How to use the “describe-subnets” Command in AWS CLI?
AWS CLI is a command-based powerful tool for easy access and management of AWS services. With this utility, the users can directly communicate, configure, automate, download, or manipulate the resources. As the name suggests, it operates on commands that accept various flags. One such command is the “describe-subnets” command in AWS CLI.
Quick Outline
This article covers the following aspects:
- What is the describe-subnet command in AWS CLI?
- How to use the describe-subnet command in AWS CLI?
- Conclusion
Before understanding the “describe-subnets” command, let’s first understand the concept of VPCs. In AWS, the Virtual Private Cloud (VPC) is a network of global resources that provides the full control and management of the networks, resources, and connectivity to its users. Within the VPC, there are different subnets. A subnet is a wide range of IP addresses. After setting up a VPC, the user can add resources, e.g., EC2 instances, Relational Databases, etc. These resources will be globally accessible with the IP addresses assigned from the subnets within the VPC.
Read more: How to use VPC | Getting Started with AWS
What is the “describe-subnets” Command in AWS CLI?
The “describe-subnets” command lists all the subnets for a given account. It supports pagination by default which can be disabled by using the “–no-paginate” flag. The “describe-subnets” command in the AWS CLI issues multiple API calls to the service for retrieving the data when pagination is enabled.
Read more: How to Disable the Page in AWS CLI?
How to use the “describe-subnets” Command in AWS CLI?
There are multiple options available for filtering, querying, specifying subnets, or displaying data in different output formats. This command is commonly used with the EC2 instance.
Syntax
The syntax of the command is as follows:
Options
Below is a brief description of the options for the “describe-subnets” command:
| Options | Description |
| –filters | The –filters option is used to extract the specific details of the data. The following are the different types of filters supported by the “describe-subnets” command:
– availability-zone: This option is for filtering using the Availability zone of the subnet. – Availability-zone-id: It refers to the ID of the availability zone. – Availability-ip-address-count: The number of IPv4 addresses available. – CIDR-block: This option refers to the IPV4 CIDR block. The CIDR block provided by the user should be the exact match to the one within a subnet. – Owner-id: The Account ID of the owner of the subnet – tag: The key-value pairs that form a tag can also be used as a filter type for extracting specific results.
Multiple filter types are also available. To read more about them, refer to the AWS documentation. |
| –subnet-ids | This parameter inputs the ID of a specific subnet for listing. |
| –dry-run | This parameter checks whether the user has permission for the actions or not. The output is in the error format. If the user is equipped with the required permission, the output will contain the “DryRunOperation”. On the other hand, if the user does not contain any permissions for the action, the output will contain the “Unauthorized Operation”. To disable this functionality, use the “–no-dry-run” option. |
| –cli-input-json | The –cli-input-json is used to provide multiple JSON instructions at once to the AWS service. The instructions are provided in the JSON format which is generated by the “–generate-cli-skeleton” parameter. |
| –starting-token | The parameter accepts the value of the NextToken parameter. It is of string type and the NextToken is generated when there is more data to list. The value of the NextToken provided to this field will specify where to start paginating. |
| –page-size | This parameter specifies the page size that is to be used in each AWS service call. Smaller page size results in more API calls to the service. This prevents the timing-out by retrieving less data in each service call. |
| –max-items | The –max-items parameter displays limited data per response. If there is more data to list, the output of the command will contain the “NextToken” value which will resume the listing of the data when the command is executed again. |
| –generate-cli-skeleton | This parameter is used to create the skeleton or JSON template for the multiple instructions to be given at once. This template is used by the –cli-input-json parameter. |
There are also global options available that can be used with “describe-subnets” command. Global options are those options that can be used with multiple commands of AWS CLI. To read about these options, refer to the AWS documentation.
Examples
This section of the article demonstrates the use of these flags with the “describe-subnets” command:
- Example 1: How to Describe all the Subnets using the “describe-subnets” Command?
- Example 2: How to Describe a Specific Subnet via the “describe-subnets” Command?
- Example 3: How to Filter Details of a Subnet via the “describe-subnets” Command?
- Example 4: How to Determine Permissions via the “describe-subnets” Command?
- Example 5: How to Display Output in Multiple Formats using the “describe-subnets” Command?
- Example 6: How to List a Limited Number of Subnets via the “describe-subnets” Command?
- Example 7: How to Query Specific Details of a Subnet via the “describe-subnets” Commands?
- Example 8: How to List Subnet Tags by using the “describe-subnet” Command?
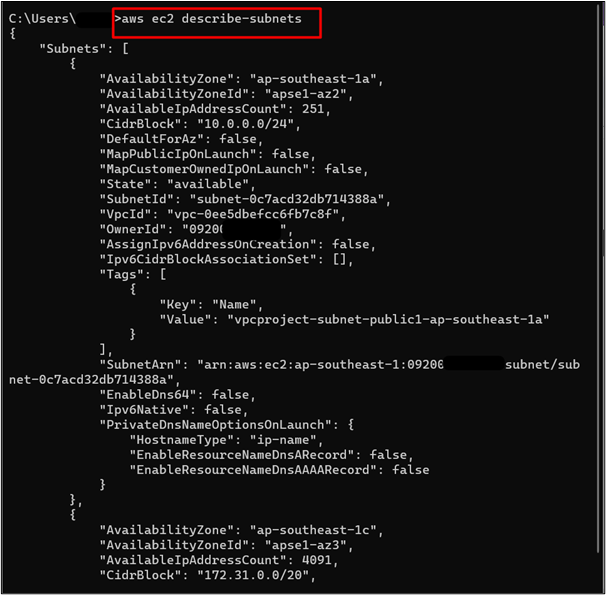
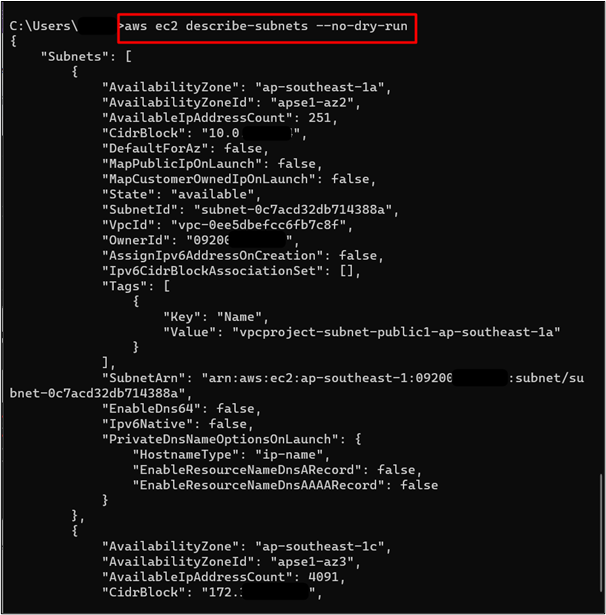
Example 1: How to Describe all the Subnets using the “describe-subnets” Command?
To list all the subnets for a given account, use the following command:
Output
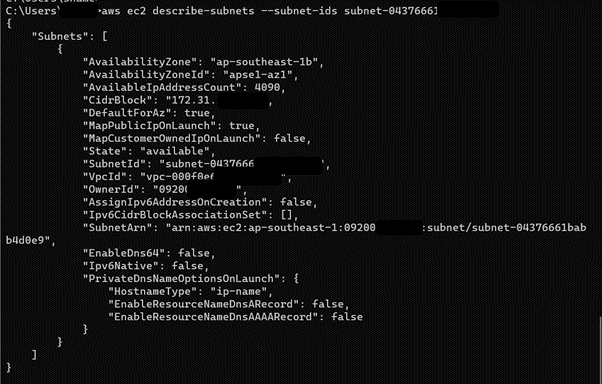
Example 2: How to Describe a Specific Subnet via the “describe-subnets” Command?
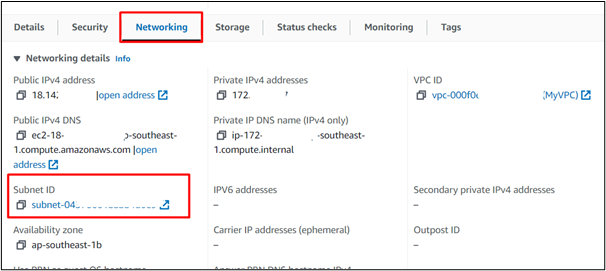
To acquire the Subnet ID of your EC2 instance, click on the EC2 instance from your dashboard. This will display the configuration of the EC2 instance. Click on the “Networking” tab from the displayed interface. Within the “Networking details” section, copy the subnet ID from the “Subnet ID” field:
To list a particular subnet, the command is given as follows:
Note: Replace the <subnet> with your EC2 instance Subnet ID.
Output
Example 3: How to Filter Details of a Subnet via the “describe-subnets” Command?
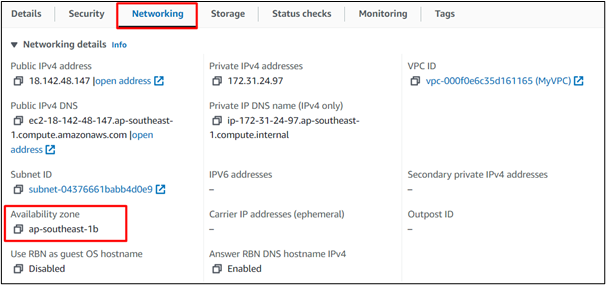
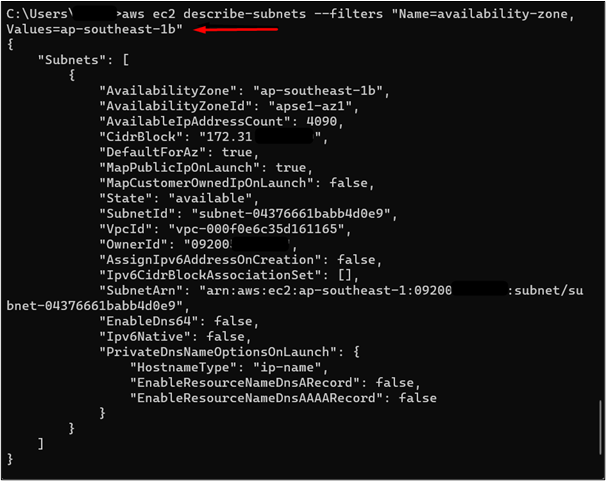
Different filters are available for filtering the subnets i.e., availability zones, owner ID, CIDR block, etc. To determine the availability zone for your EC2 instance, click the instance name from the EC2 dashboard. This will display the configurations of the EC2 instance within the “Networking” tab. From this tab, locate the “Availability zone” and copy the ID from it:
To filter the subnets based on the availability zone, the command is given below:
Note: Replace the value “ap-southeast-1b” with the copied availability zone name.
Output
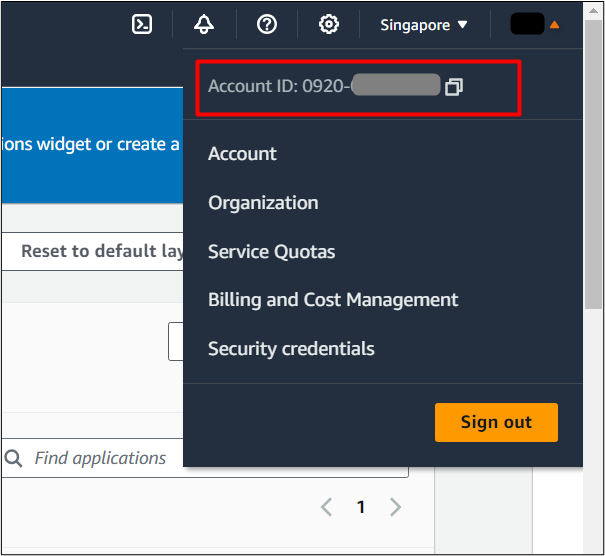
The AWS Account ID can be determined by clicking on the username in the top-right corner. Copy the Account ID by clicking the “copy” icon from the drop-down list to copy the Account ID:
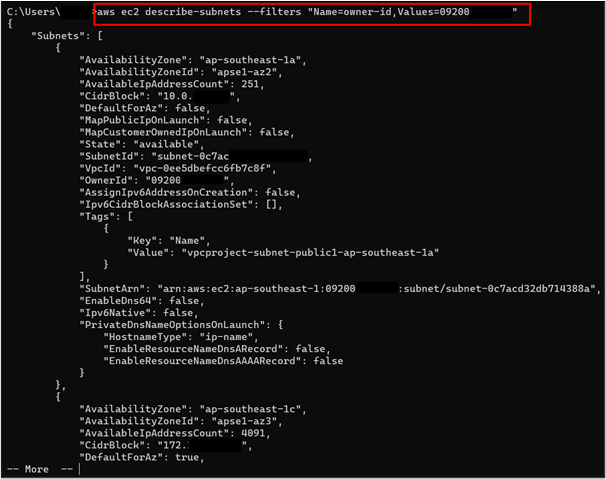
Similarly, to filter the subnets based on the Account ID of the user, the following command is used:
Note: Replace the “<AccountId>” with your AWS account ID.
Output
The output of the command is as follows:
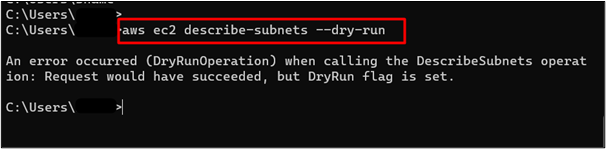
Example 4: How to Determine Permissions via the “describe-subnets” Command?
To determine the permissions for a specific subnet, the –dry run option is used. This field follows the error format and is used in the following way:
Output
The output of the command is as follows:
On the other hand, if the user wants to disable this option and list all the load balancers, use the following command:
Output
The output of the command is as follows:
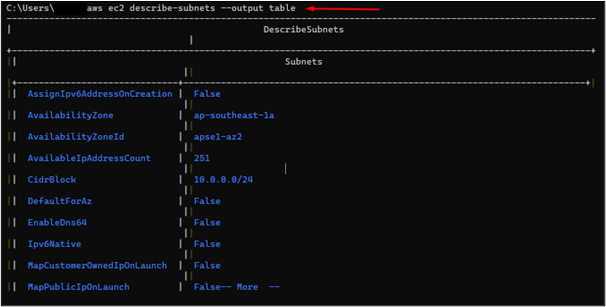
Example 5: How to Display Output in Multiple Formats using the “describe-subnets” Command?
Multiple output formats are supported by the describe-subnets command of AWS. These include JSON, YAML, or text. The user can simply replace the value of the –output field:
Note: Replace the table value in the –output field with different output formats i.e., JSON, YAML, or text.
Output
The output of the command is as follows:
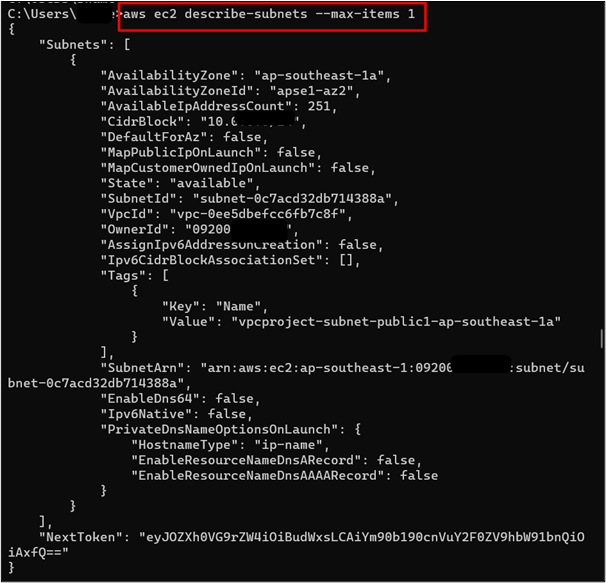
Example 6: How to List a Limited Number of Subnets via the “describe-subnets” command?
The –max-items is used to limit the number of subnets within a single response:
Note: Replace the value “1” with any numeric value of your choice between 1 to 1000.
Output
The output of the command is as follows:
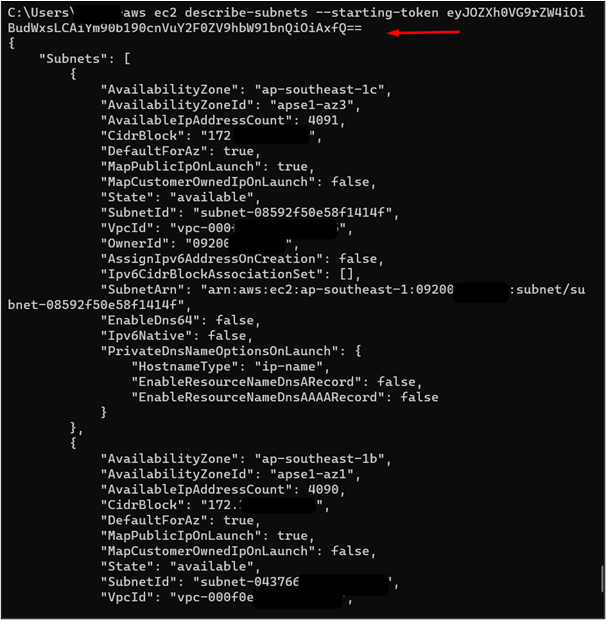
Provide the value of the NextToken from the output to the –starting-token. This token will resume listing the data from the next load balancer onward:
Note: Replace the <NextToken> with your NextToken value from the output.
Output
The output of the code is as follows:
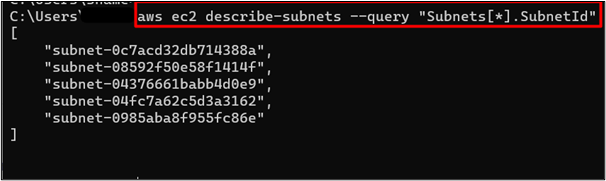
Example 7: How to Query Specific Details of a Subnet via the “describe-subnet” Command?
The output of the “describe-subnets” command consists of a Subnet array. To extract the specific information of the Subnet array, the following command is used:
Output
The output of the command is as follows:
Example 8: How to List Subnet Tags by using the “describe-subnets” Command?
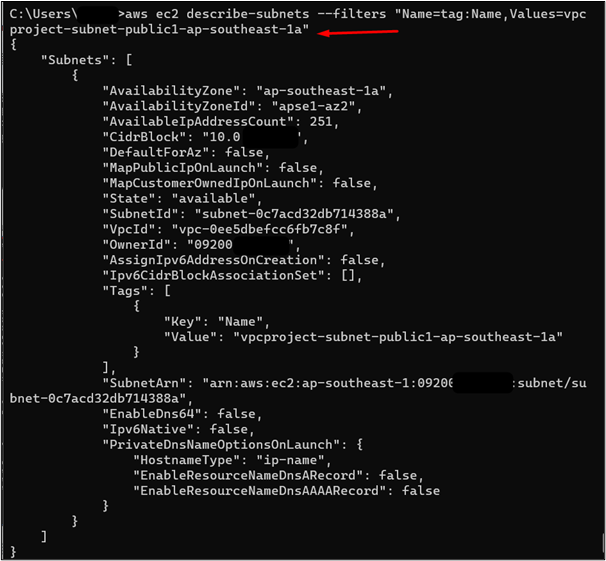
Another method of filtering the subnets is by using the tags. A tag is a key-value key pair. 59 tags can be associated with a single AWS resource. To determine a subnet’s key, visit the “VPC” service by searching it in the search bar of the AWS Management Console. Click the “Subnet” option from the VPC service dashboard:
From the Subnets dashboard, select a subnet. This will display its configurations. Click the “Tags” tab and copy the Name and Value under the “Key” and “Value” fields:

The following command is used to filter the subnets by tags:
Note: Replace the value “<Name>” and “<subnettagkey>” with the copied value of your tags. Provide the copied key to <Name> and “Value” to the <subnettagkey> field.
Output
The output of the command is as follows:
That is all from this guide.
Conclusion
To list subnets in AWS CLI, use the “describe-subnets” command. It describes all or specific subnets in a VPC and accepts multiple options for distinct actions. For AWS users, the “describe-subnets” command can help in configuring and troubleshooting the network. To use this command, configure the AWS CLI and provide the above commands to the terminal. This article is a step-by-step demonstration of using the describe-subnets command in AWS CLI.
Source: linuxhint.com