How to Assume an IAM Role Using AWS CLI?
As AWS provides several services and enormous benefits, it is only natural that the security concerns were raised by the IT experts. To address these security concerns, the IAM service was introduced by AWS. AWS IAM is one of the core web services that allow users to secure AWS resources. IAM provides the functionality of central access management of the AWS services by defining the permissions for different users.
Quick Outline
In this article, you will learn about:
What is the AWS IAM Role?
What is the Assume Role in AWS?
How to Assume an IAM Role Using AWS CLI?
With IAM roles and permissions, we can determine the authenticated and authorized access to the AWS services. These roles and permissions can only be assigned by the root user (owner) of the AWS account.
What is the AWS IAM Role?
The IAM role is an identity created by the root user within the AWS account. This identity is assigned specific permissions that define the scope of access of the IAM role to AWS resources. These permissions can be either AWS-managed or custom-defined by the root user.
An IAM role is very similar to the IAM user except that the IAM role is an identity with certain permissions while the user can assume these roles to perform certain functionalities. The permissions that are granted to the role define what actions can be taken with this identity (IAM role).
What is the Assume Role in AWS?
Assume Role is one of the functionalities of AWS IAM service that allows the user to act with AWS services although the permissions for accessing or manipulating the resource within the service are not assigned to the user. These permissions are indirectly assigned to the user when a role is assumed. A set of temporary credentials along with a session-based login is used for accessing the AWS resources.
These temporary credentials include a Secret Access Key, Access Key ID, and Security Token. IAM Roles created by the AWS root user can be assumed by the other users within the AWS account or those users whose ARN is mentioned in the policy of the role. The policy that contains the ARN of the users or resources is known as the Trust policy.
What is the Difference Between the Permission Policy and Trust Policy?
Before implementing the assume-role functionality via different methods, there are two core concepts that must be understood by the user. There are two kinds of policies in the IAM service:
-
- Trust Policy: A trust policy determines who can assume a specific IAM role. For a role to be assumed by a user, the ARN of the user is mentioned in the trust policy of the IAM role. This trust policy determines whether the user or the resources is a trusted entity for assuming this role.
- Permission Policy: This policy determines what a user can do or what actions can be performed with the role.
How to Assume an IAM Role Using AWS CLI?
To assume a role is similar to disguising yourself as another user who is authenticated and authorized to perform certain actions. While assuming an identity, AWS has ensured that security remains intact.
Let’s understand the working of the Assume-role functionality by considering the following example.
For example, a user exists within the AWS account that has not been assigned any permissions for the S3 bucket. The “Read-OnlyAccess” is called the permission policy which is attached to an IAM role. For the user to assume this role, the ARN of the user is mentioned in the IAM role’s policy. This policy is now called as “trust policy” and it is different from the permission policy. The Trust policy is crucial as it helps AWS to determine whether the user is an authorized entity or not.
Note that the ARN is mentioned in the Trust policy and not in the Permission policy of the IAM role. By assuming a role, the user can perform a few administrative actions defined by the permission policy of the role. These actions include adding, deleting, modifying, or restoring a resource, etc.
Following are the three Methods for assuming a role with AWS CLI:
Method 1: Using the STS (Security Token Service)
The users can assume a role by executing the commands in the STS section (Secure Token Service) which returns a set of temporary credentials. The temporary credentials are used to establish a session-based login to make API calls to the resources. However, there are two exceptions while using the STS i.e., GetFederationToken and GetSessionToken.
The user is restricted from accessing these tokens in order to secure the confidential information of Session and Federation Tokens. So that the security is not compromised under any circumstances. By assuming a role, a user can elevate their assigned privileges.
In this section of the article, we will request a set of temporary credentials using the STS commands. Below are the steps:
-
- Step 1: Create a User and User Policy
- Step 2: Attach Policy With the User
- Step 3: Create a Trust Policy and an IAM Role
- Step 4: Create the Access Keys
- Step 5: Configure the Access Key and Verify the IAM user
- Step 6: Assume the IAM Role
- Step 7: Configure Environment Variables
- Bonus Tip: Unset the Environment Variables
Step 1: Create a User and User Policy
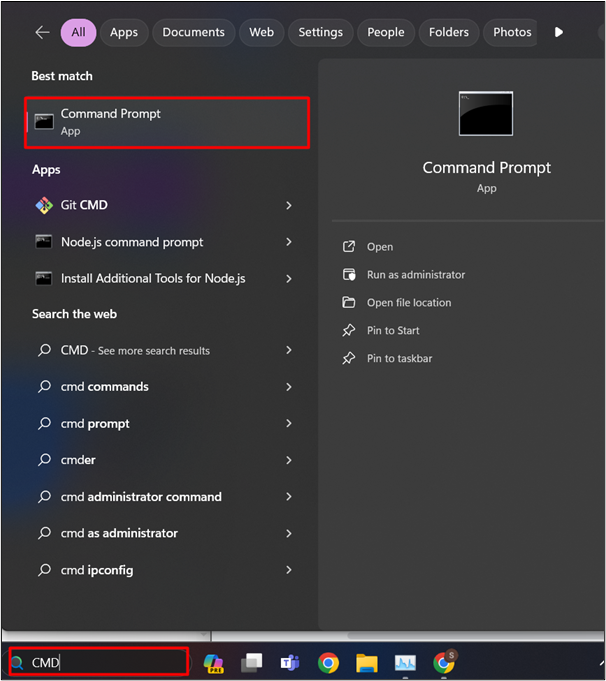
First, we will create an IAM user with no permissions. For this purpose, open the CMD from the Start menu of Windows:
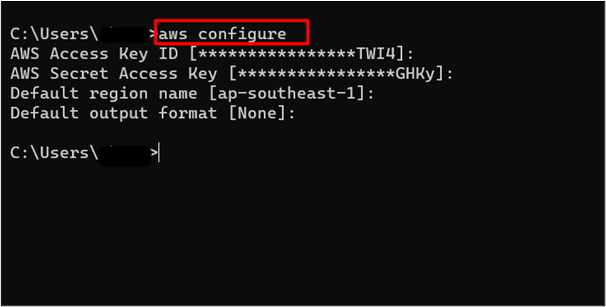
Only the root user can create an IAM user within the AWS account. Therefore, sign in to the AWS root account by using the following command:
The credentials are already configured within the CLI for this demo as shown in the output of the command:
Learn more: How to Install AWS CLI Using Chocolatey?
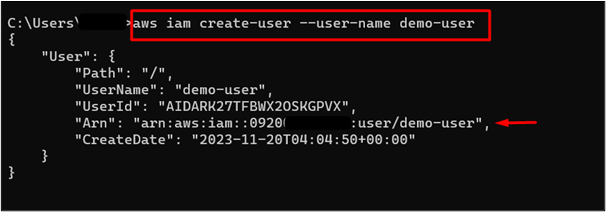
To create an IAM user, provide the following command to CLI:
Note: Replace the demo-user with your IAM user name.
Save the “Arn” given in the output of the command as it will be required when creating the Trust Policy:
Read more: How to Create an IAM User in AWS
The next step is to permit the user (demo-user) to assume a role. For this purpose, create a JSON file using any text editor you prefer. For this demo, we have used Notepad as specified in the below-mentioned command:
For Windows
Note:Replace the user-policy with your IAM policy name.
For Linux OS
At the moment, we are using the Windows Operating system for this demo:
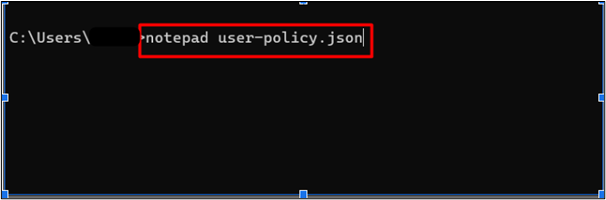
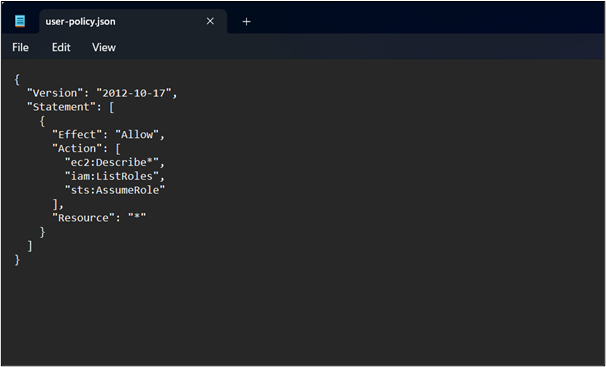
This will open the notepad. Paste the following policy in the notepad and press “CTRL + S” from the keyboard to save changes:
"Version": "2012-10-17",
"Statement": [
{
"Effect": "Allow",
"Action": [
"ec2:Describe*",
"iam:ListRoles",
"sts:AssumeRole"
],
"Resource": "*"
}
]
}
Below given is a brief description of the policy specified:
-
- ec2:Describe: This permission specifies that the user can view or list all AMIs, snapshots, or EC2 instances
- iam:ListRoles: This permission specifies that the user can list all the roles within the IAM service.
- sts:AssumeRole: This permission represents that the user can assume a role defined within the IAM service.
Here, the policy has been edited within the notepad and is saved:
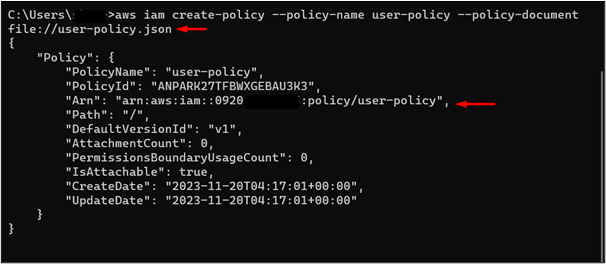
Each AWS resource is assigned an Access-Resource Name (ARN) which uniquely identifies the resource. To determine the ARN of the policy, use the below-mentioned command.
In the above-mentioned command:
-
- –policy-name: Replace the value “user-policy” with any policy name of your preference.
- –policy-document: In this field, replace the “user-policy.json” with the json file’s name that contains the policy for the user.
The output of the above-mentioned command is as follows. Save the “Arn” mentioned in the output of the policy as it will be required when attaching this policy with the user:
Step 2: Attach Policy with the User
This policy will allow the user to list the EC2 instances, AMIs, etc. When the user assumes a role with a different permission, the user will be able to perform only that specific action as allowed by the permission policy.
To attach the policy with the user created earlier in this section, use the following command:
In the above-mentioned command:
-
- –user-name: Replace the “demo-user” in the –user-name field with your IAM user name.
- –policy-arn: Similarly, in the –policy-arn, specify the “Arn” from the output of the previous command i.e., –create-policy.
By executing the command after making the required changes, the policy has been successfully attached to the user:

To verify if the policy has been attached to the user, provide the following command to the CLI:
Note: Replace the demo-user with your IAM user name specified while creating the user.
The output of the following command verifies that the policy has been attached to the user successfully:

Step 3: Create a Trust Policy and IAM Role
A trust relationship is established when a resource or a user’s ARN is specified in a policy. This functionality then enables the users or entity to perform certain actions as they are considered trusted by the policy.
In this step, we will create a policy that establishes the trust relationship between the IAM role and the user. This trust policy will be attached to the IAM role. The IAM role will be then assumed by the user which will indirectly permit the user to perform the actions specified in the policy.
To create a trust policy, the commands are given as follows:
For Windows
Note: Replace the trust-role-policy.json with the name of your preference for the policy.
For Linux OS
Note: Replace the trust-role-policy.json with the name of your preference for the policy.
The trust policy follows the JSON format as specified by the .json extension in the following command:

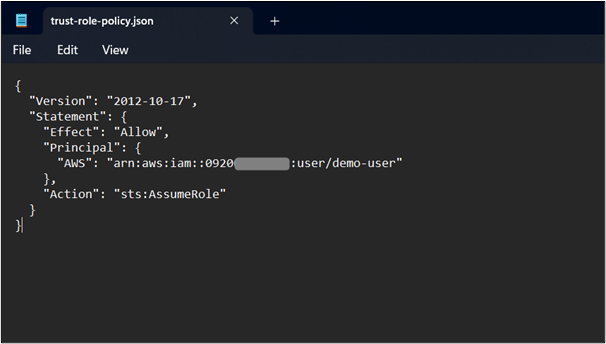
This will open the notepad. Paste the following policy within the notepad and hit the “CTRL + S” button from the keyboard to save changes. The ARN of the user can also be copied from the User’s dashboard of the IAM console. For this purpose, visit the IAM dashboard and click the name of the user. From the displayed configuration, copy the ARN of the user that is displayed within the Summary section.:
"Version": "2012-10-17",
"Statement": {
"Effect": "Allow",
"Principal": {
"AWS": "arn:aws:iam::123456789012:user/example-user"
},
"Action": "sts:AssumeRole"
}
}
In the above-mentioned policy:
-
- AWS: Replace the AWS field value “arn:aws:iam::123456789012:user/example-user ”with the ARN of the user which was displayed in the output of the –create-user command.
The user can restrict other users from assuming the IAM role by specifying the ARN of the user in the “AWS” field:
Read more: How to Create Policies and Permission in AWS IAM
Now, create an IAM role and attach the trust policy with it. To create an IAM role, use the below-mentioned command:
Following is the description of the above-mentioned fields:
-
- –role-name: This field is used to input the name that will be assigned to this IAM role. Replace the “user-role” value with the IAM role name of your choice.
- –assume-role-policy-document: In this field specify the path as given in the command. Replace the trust-role-policy.json with the policy name as specified by you in the prior section.
By executing this command, it will return several pieces of information in the output e.g., ARN, Path, ID, etc:

Read more: How to Create IAM Roles in AWS
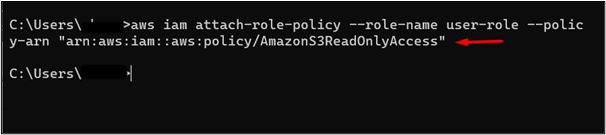
Upon assuming this role, the user will be able to perform the “ReadOnlyAccess” action with the S3 bucket. The command is given as follows:
In the above command:
-
- –role-name: Replace “user-role” in the –role-name field with the IAM role’s name that you specified earlier in this tutorial.
- –policy-arn: The arn specified in the –policy-arn refers to the ReadOnlyAccess permission for the S3 bucket.
In this image, the role has been assigned the ReadOnlyAccess permission for the S3 bucket:
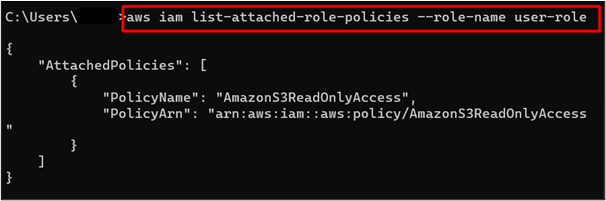
To verify if the permission has been assigned to the role or not use the following command:
Note:Replace the “user-role” with your IAM role name.
The “AmazonS3ReadOnlyAccess” permission has been attached to the IAM role. The output of the command is given as follows:
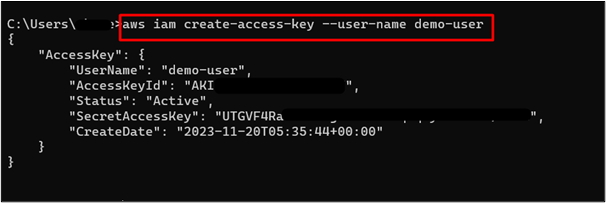
Step 4: Create the Access Keys
In this section, we will create the access keys for the user. The access keys will be used to log into the AWS Account:
Note: Replace the demo-user with your IAM user name given at the time of creating a user.
Here, the command has returned a set of Access key pairs (AccessKeyId and Secret Access Key) with additional details such as created date, status, etc. Save the AccessKeyId and SecretAccessKey as they are required later in the tutorial:
Read more: How to Get AWS Access Key
Step 5: Configure Access Key and Verify the IAM User
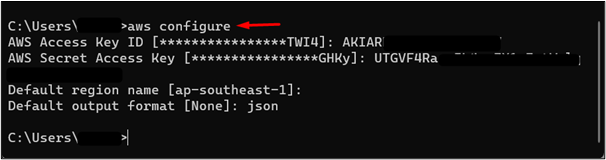
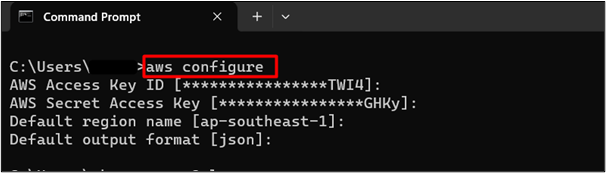
To configure the access key, provide the following command to the CMD and then enter the Access Key ID and Secret Access Key:
Provide the Access Key ID and Secret Access Key to the CLI that were created in Step 4 of this section. For the region, we have kept the default settings. Users can configure any output format for the default output format. For this demo, we have specified the JSON format:
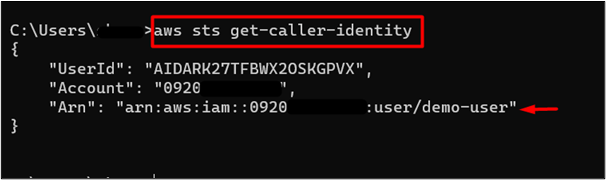
In order to verify if the IAM user has been configured, provide the following command to the CLI:
The output of the command indicates that the “demo-user” has been configured successfully, and is currently logged into the AWS account:
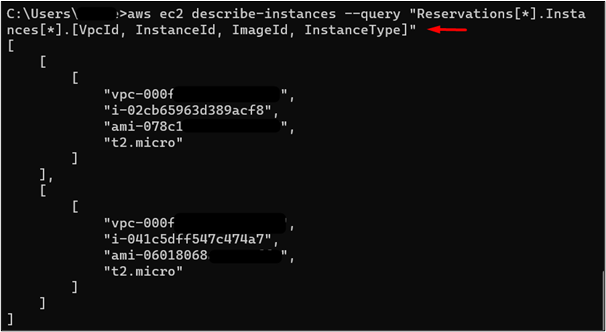
To determine that the IAM user can list the EC2 instances and has no access to the S3 bucket currently, use the following command:
The output of the command is given as follows:
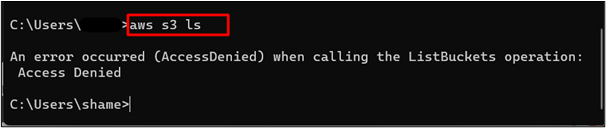
Now, provide the following command to verify if the user can access the S3 bucket:
This will display the “Access denied” error which indicates that the user is not allowed to access the S3 bucket:
Step 6: Assume the IAM Role
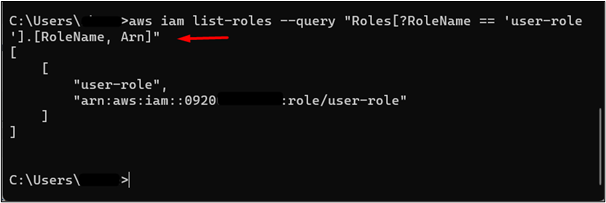
The user has permission to list the IAM roles within the AWS account. Therefore, to assume the Role, we will first acquire the necessary information such as ARN by executing the following command:
Note:Replace the “user-role” with the IAM role name in the “RoleName” field.
The ARN has been given in the output of the above-mentioned command:
Now that we have the ARN of the IAM role, we can assume the role by using the following command:
In the above command:
-
- –role-arn: Replace the mentioned value for the –role-arn with the IAM role’s ARN.
- –role-session-name: The user can provide any name of preference for this field.
By executing the above-mentioned command, a set of temporary credentials has been returned. These temporary credentials will be used to assume the IAM role with the desired permission i.e., ReadOnlyAccess. The AccessKeyId and SecretAccessKey will be used while configuring these temporary credentials:
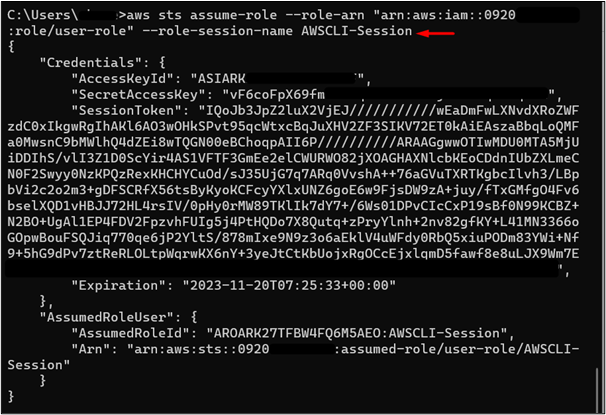
Here is a brief description of the output of the command:
-
- SessionToken: The Session token is used to create the session-based login. Save the value of this field as it will be required while configuring the credentials.
- Expiration: The session token has an expiration date and time. The Token will be of no use after the specified time and the user will not be able to assume the role.
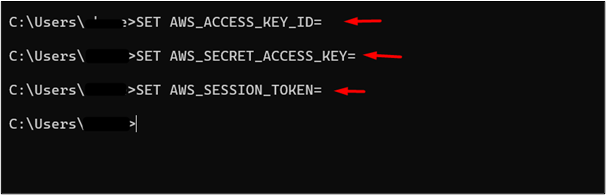
Step 7: Configure the Environment Variable
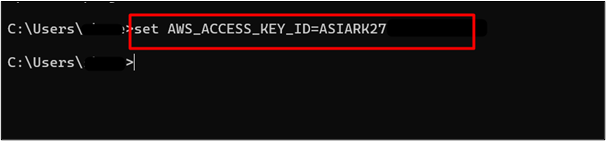
To configure the temporary credentials, we will use the “set” command for Windows and then provide the value of the Access Key ID, Secret Access Key, Session Token, etc:
For Windows
Note: Replace the RoleAccessKeyID with the Access Key ID that has been returned by the command in the Step 6.
For Linux OS
Note: Replace the RoleAccessKeyID with the Access Key ID that has been returned by the command in Step 6.
The Access Key has been configured:
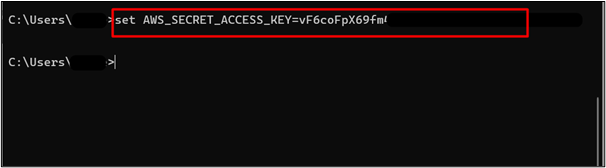
Next, we will configure the Secret Access Key by using the “set” command for Windows:
For Windows
Note: Replace the RoleSecretKey with the Secret Access Key value that has been returned by the command in Step 6.
For Linux OS
Note: Replace the AWS_SECRET_ACCESS_KEY with the Secret Access Key that has been returned by the command in Step 6.
The Secret Access Key has been configured successfully:
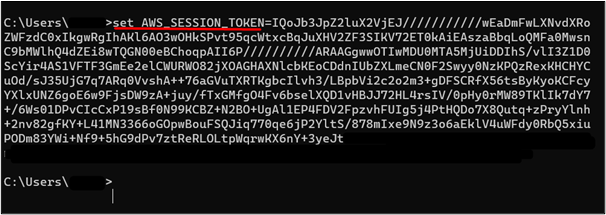
Lastly, we will configure the session token to establish the session-based login. For this purpose, use the below-mentioned command:
For Windows
Note:Replace the RoleSessionToken with the Session Token value that has been returned by the command in Step 6.
For Linux OS
Note:Replace the RoleSessionToken with the Session Token value that has been returned by the command in Step 6.
The value of the Session Token has been configured successfully:
Bonus Tip:To copy the value of the Session Token from CMD, press “CTRL + SHIFT+ C”.
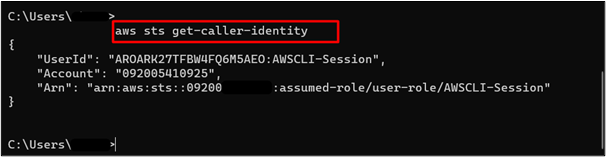
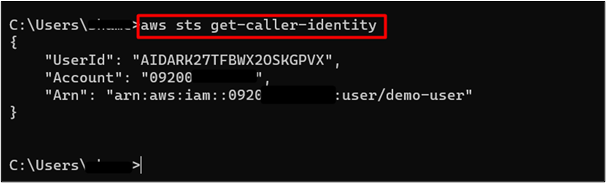
After configuring the environment variables, verify by using the following command if the role has been assumed by the user:
The output of the command verifies that the IAM role has been successfully assumed by the user as the ARN return is “arn:aws:sts::123456789012:assumed-role/user-role/AWSCLI-Session” instead of “arn:aws:iam::123456789012:user/demo-user”:
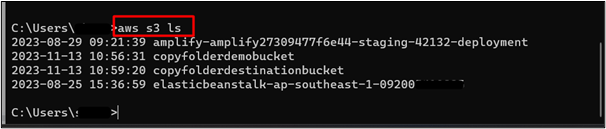
As the role contains the ReadOnlyAccess permission, the user should be able to enlist the buckets now. For this purpose, provide the following command to CLI:
The output of the command successfully enlist all the S3 bucket currently configured within the AWS account:
However, the user will not be able to access the EC2 service as the assumed role has no permission for the EC2 service. To verify this, use the following command:
Previously, the user was able to access the EC2 service information. However, upon executing the above-mentioned command, an “Access Denied” error has occurred. The user has successfully assumed the IAM role:

This is all from this section.
Bonus Tip: Unset the Environment Variables
To return to the IAM user i.e., demo-user, the user can remove the environment variables by setting the Environment variables to empty strings. The following are the commands given:
For Windows
SET AWS_SECRET_ACCESS_KEY=
SET AWS_SESSION_TOKEN=
For Linux
Use the below-mentioned command:
The above-mentioned commands will unset the environment variables:
After executing the above commands, the console should now return the “demo-user” as the currently logged-in user instead of the assumed role i.e., user-role. For this purpose, we will use the following command:
The output of the command indicates that the currently logged-in user is demo-user:
Similarly, to login as the root user, follow the “C:\Users%USERPROFILE%.aws” path and click the credentials file:
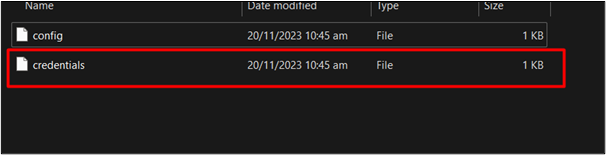
Within the credentials file, replace the values of the Access Key and Secret Access Key with the root user’s Access and Secret Access Key:
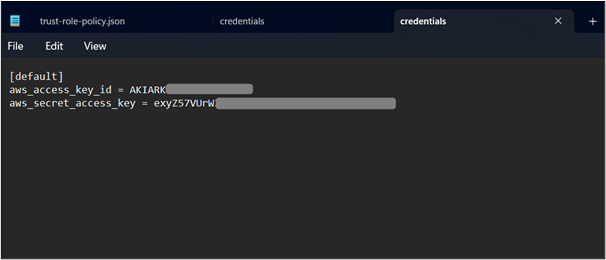
Provide the following command to the CLI to verify if the credentials are configured properly:
Here, in the below image, we can see that the Access key and Secret Access key of the root user has been configured successfully:
That is all from this section of the tutorial.
Method 2: Using –profile Parameter
Another method of assuming the role is by using the “–profile” field in the CLI. This section of the article presents the practical implementation of assuming a role in AWS via –profile. Below are the steps for it:
Step 1: Create an IAM User
To create an IAM user, log in to the root user account via CLI by using the following command:
The credentials are already configured within the CLI for this demo as shown in the output of the command:

Learn more: How to Install AWS CLI Using Chocolatey?
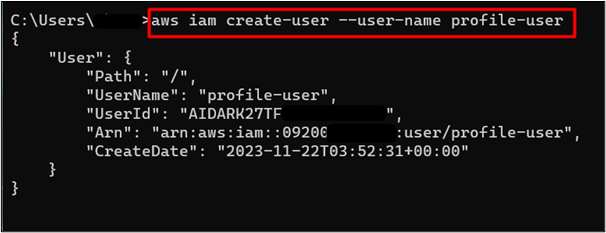
To create an IAM user, provide the following command to the CLI:
The user has been created successfully. Save the ARN of the user as displayed in the below image. The ARN of this IAM user will be used later in this tutorial. Currently, there are no permissions associated with this IAM user:
Read more: How to Create an IAM User in AWS
Step 2: Create Access Key
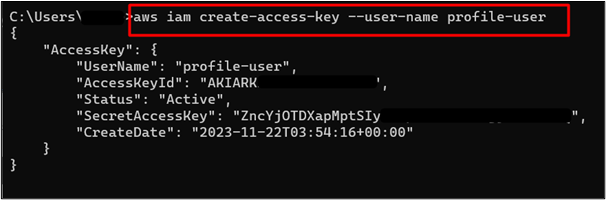
In AWS, each user is assigned a pair of Access keys for login. To create the Access Keys for this user, provide the following command to it:
This command returns a set of Access Keys. Save the AccessKeyId and SecretAccessKey as it will be required while logging into the AWS account:
Now if we log into the AWS CLI using these AccessKeyId, and SecretAccessKey, and access any resource e.g. S3 bucket, the “Access Denied” error will occur. This is because currently there are no permissions associated with the IAM user. To log into the AWS CLI, use the following command and provide the Access Key ID and Secret access key as created earlier:
Note:Replace the “profile-user” with the IAM user name that you have provided while creating the user.
Here, we have successfully logged into the AWS CLI as the IAM user:

To verify if this user has any read-only permissions for the S3 bucket, provide the following command to the CLI:
Note:Replace the profile-user with the IAM user name that you have provided while creating the user.
As this user has not been assigned any permission by the root user, it will result in the “Access Denied” error:

Step 3: Create a Trust Policy and IAM Role
A trust policy determines whether a user or an AWS resource is a trusted entity for assuming the role and acquiring the permissions. This trust relationship is created by specifying the ARN of the IAM user or AWS resource within the Permission Policy.
To create a trust policy within the IAM, provide the following command to the CLI:
For Windows
Note: Replace the trust-policy.json with the name of your preference for the policy.
For Linux OS
Note: Replace the trust-policy.json with the name of your preference for the policy.
Users can use any text editor of their preference. For this demo, we are using the notepad:
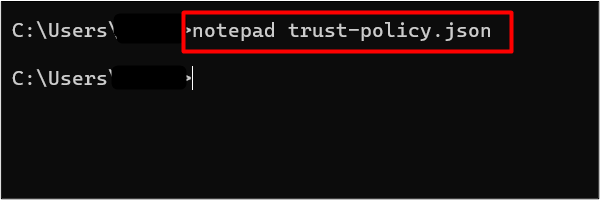
This will open the notepad for creating the trust policy. Paste the following policy within the notepad and press “CTRL + S” from the keyboard to apply and save changes:
"Version": "2012-10-17",
"Statement": {
"Effect": "Allow",
"Principal": {
"AWS": "arn:aws:iam::012345678910:user/profile-user"
},
"Action": "sts:AssumeRole"
}
}
In the above policy: AWS: Replace the value “arn:aws:iam::012345678910:user/policy-user” with the ARN of the IAM user created earlier in this section.
The policy has been edited within the notepad:
Next, we will create an IAM role and attach the above trust policy to it. Use the following command to create an IAM role:
In the above-mentioned command:
-
- –role-name: Replace the “myrole” with the IAM role name of your choice.
- –assume-role-policy-document: In this field, replace the term “trust-policy.json” with your IAM trust policy’s name
The IAM role has been created successfully. Save the IAM role. Save the ARN of the IAM role as highlighted in the following image. This ARN will be used while configuring the profile of the user:
The trust policy attached to the IAM identifies if the user is trusted or not for assuming the role. The Permission Policy determines if the IAM role has the required permission to perform a certain action with AWS services or not.
As the trust policy has been attached to the IAM role, the next step is to attach the permission policy to the IAM role. Below mentioned command will be used to attach permission policy to the IAM role:
Here, the permission policy has been attached to the IAM role via CLI:

Step 4: Configure Profile
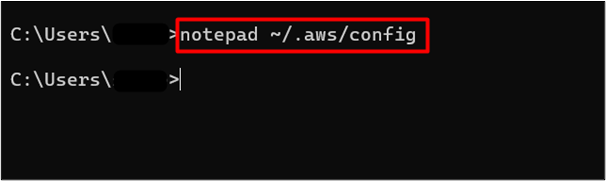
For the user to assume this role, we will first configure this profile within the credentials of AWS. To attach these temporary credentials, provide the following command:
Bonus Tip: Resolve “Path not specified” in Notepad
The config file will contain the [default] setting of the AWS CLI. However, if the notepad displays the “The system cannot find the path specified”, enter the below-mentioned command:
Linux users can use the “vim” editor for configuring the profile. Users can use any editor of their preference to open the config file of AWS in the local machine:
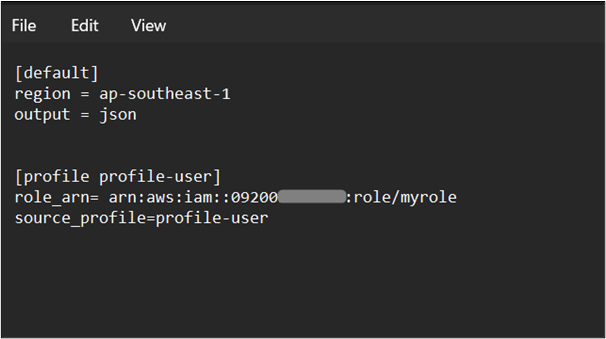
Within the config file opened in the Notepad, edit the following changes:
role_arn= arn:aws:iam::012345678910:role/myrole
source_profile=profile-user
In the above snippet:
-
- role_arn: Replace the value “arn:aws:iam::012345678910:role/myrole” with the ARN of the IAM role.
- source_profile: In this field, provide the name of the IAM user that was created in Step 1 of this method.
After making the required changes, press “CTRL + S” from the keyboard to apply and save changes:
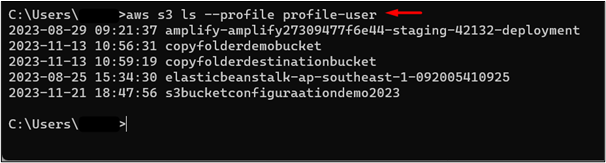
Now, to verify if the user can now list the S3 buckets or not, provide the following command to the CLI:
In the above command: –profile-user: In this field, replace the value “profile-use” with the name that you specify in the config file.
As we have specified “profile-user” within the config file, hence, we will use the same name with the command in CLI. Previously the user was not able to access the S3 service of AWS as no permissions were assigned to it. The IAM role has the permission of “ReadOnlyAccess” of the S3 bucket and therefore, by assuming this role, the user can list the buckets from the S3 Dashboard:
That is all from this method of the tutorial.
Method 3: Using MFA (Multi-Factor Authentication)
By enabling the Multi-Factor Authentication, the user can configure an additional layer of security to the user’s account. With MFA enabled, unauthorized users cannot access a user’s account even if they provide a password and username. The MFA is a six-digit code required for logging into the account. To learn more about Multi-factor authentication, refer to this article:“What is Multi-Factor Authentication”
Following are the steps to assume a role with MFA via CLI:
Step 1: Create an IAM User and Enable MFA
For this step, the user can either use the CLI for creating the user or access the AWS Management Console. Log into the root user account by using the following command:
The output of the command is given as follows:
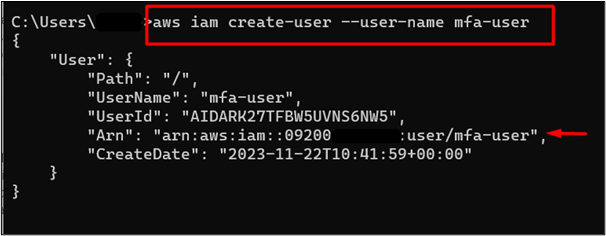
To create a user, provide the following command to the CLI:
In the above command: –user-name: Replace the “mfa-user” with the IAM user name of your choice.
The user has been created successfully. Save the ARN of the user as it will be required later in this section. Currently, this user has not been assigned any permissions:
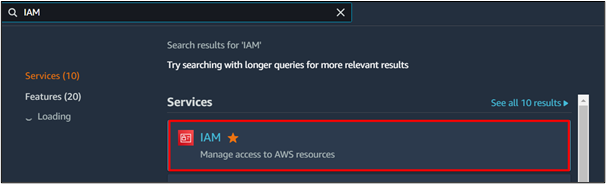
To enable the MFA, visit the AWS Management Console and search for the IAM service. Click on it from the displayed results:
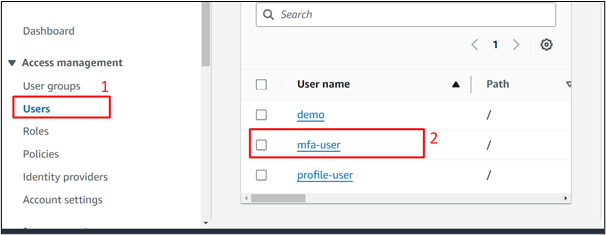
Click on the Users option from the left navigation pane of the IAM service. From the Users dashboard, click the user name to configure the MFA:
On the next interface, tap the “Security credentials” option:

Scroll down to the Multi-Factor Authentication section and click the “Assign MFA device” button:

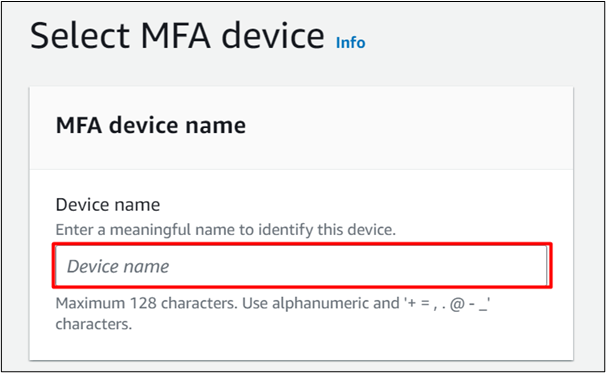
Provide a meaningful name in the Device name text field on the displayed interface:
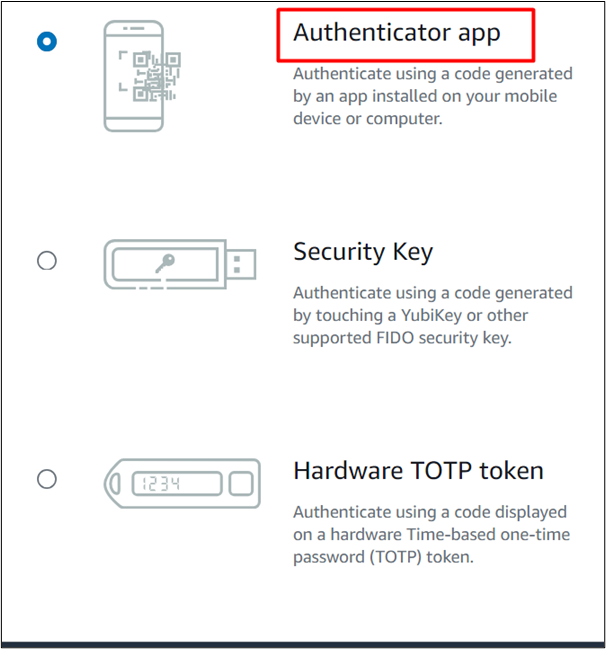
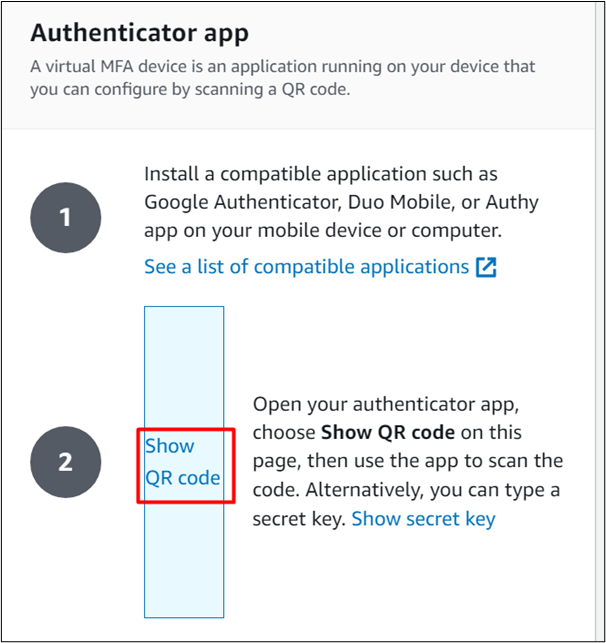
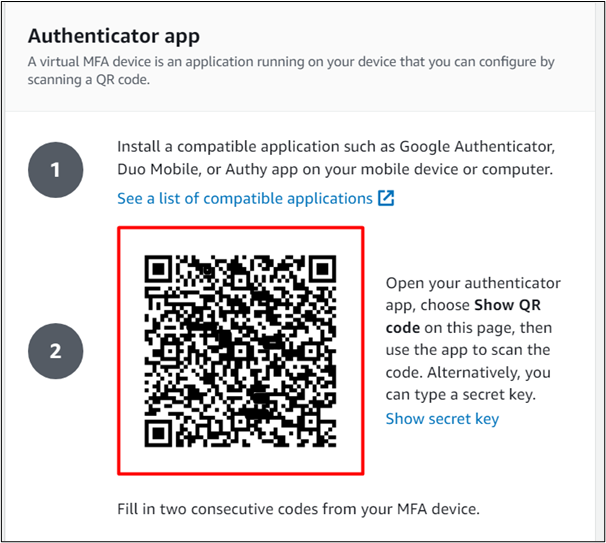
Scroll down to the MFA device section. The user is presented with various options for enabling the MFA such as by scanning the QR code, via the Security Key or Hardware TOTP token. For this demo, select the “Authenticator app” option:
Tap the “Next” button at the bottom of the interface to proceed further:
Click the “Show QR code” as shown in the below image:
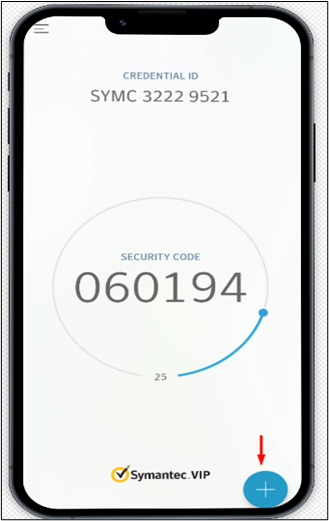
Launch the Symantec VIP application on your mobile or laptop to scan the QR code. Tap the “+” option from the Symantec VIP interface:
Note: On the Play store, Symantec VIP is named as VIP Access.
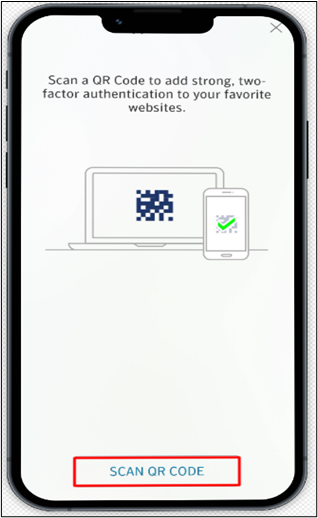
On the next interface of the Symantec VIP, click the Scan QR code button at the bottom of the interface:
Scan the QR code from the AWS MFA Authenticator’s app interface displayed. This code will generate a series of codes that will be required for logging into the IAM user’s console:
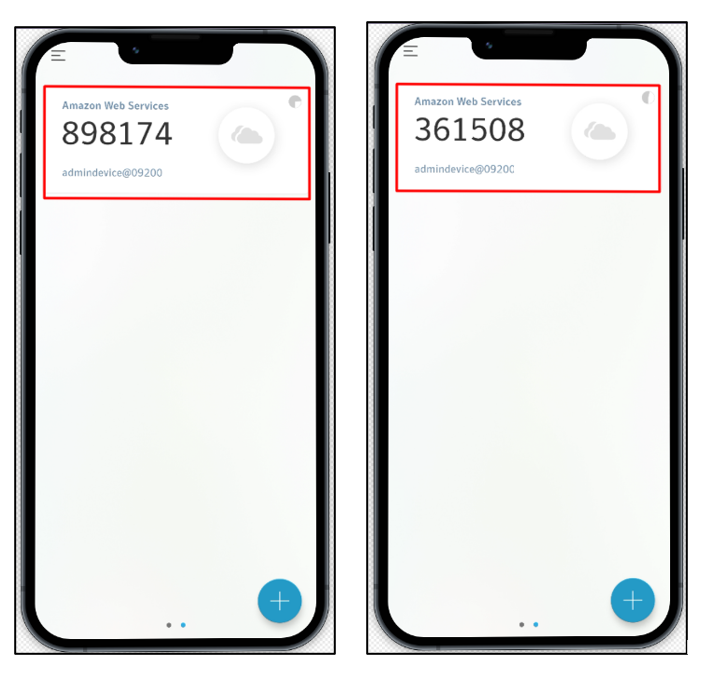
The Symantec VIP app will generate six-digit OTP after scanning the QR code. These codes will keep on coming after every 30 seconds. The below screenshot demonstrates the two codes that are generated:
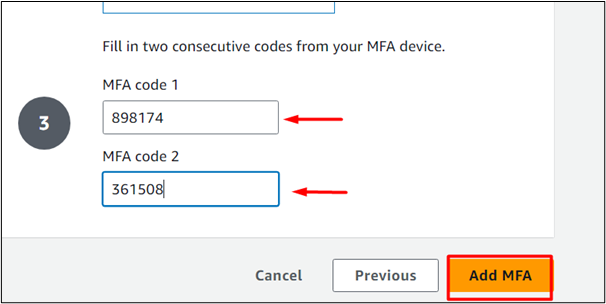
Provide the codes to the MFA code 1 and MFA code 2 text-fields on the Authenticator App interface of MFA. Click the “Add MFA” button afterward to enable the functionality:
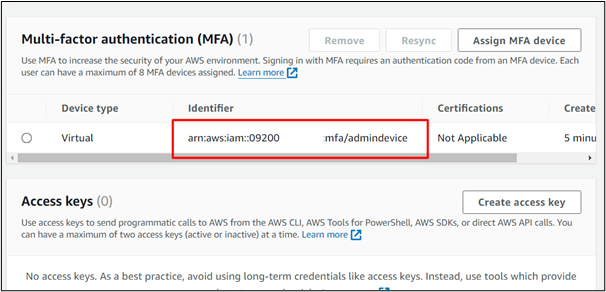
The MFA has been enabled for the IAM user successfully. This can be verified by the “Multi-factor authentication (MFA)” section of the “Security credentials” tab of the IAM user. From this section, save the value of Identifier as it will be required while assuming the role:
Step 2: Attach Policy With User
For a user to assume a role, the user must be able to list the IAM role to determine which role to assume and the permission for assuming the role. To equip the user with the required permission, follow Step 2 of Method 1 in this tutorial
Step 3: Create Trust Policy and IAM role
The next step is to create a Trust policy to determine whether the user is a trusted entity or not. This Trust Policy will be then attached to the IAM role. To create the Trust policy and IAM role, navigate to the Command Prompt and follow Step 3of Method 1 in this article.
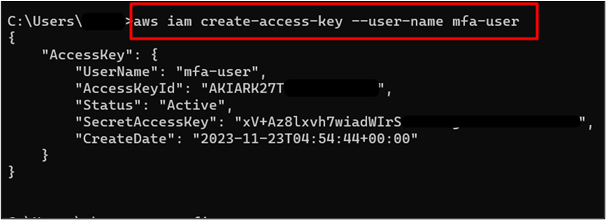
Step 4: Create an Access Key
For the user to be authorized and authenticated, a pair of Access Keys that are globally unique across the AWS platform is generated. This Key pairs are used at the time of login to the AWS account. To create the Access Keys for the IAM user, follow the Step 4 of the Method 1 in this article.
Step 5: Configure Credentials
The AWS user can only access the AWS resources and services if the credentials are configured correctly. In this section of the Method, we will configure the credentials of the IAM user by providing the Access Key and Secret Access Key to the Command Line Interface. For this purpose, follow the Step 5 of Method 1 of this tutorial.
Step 6: Assume the IAM role
After successfully attaching the IAM role and implementing the Trust policy, the user can now assume the IAM role. For this purpose, provide the following command to the CLI:
Here the key has been successfully created for the IAM user. Save the AccessKeyId and SecretAccessKey as they will be required for logging into the AWS account:
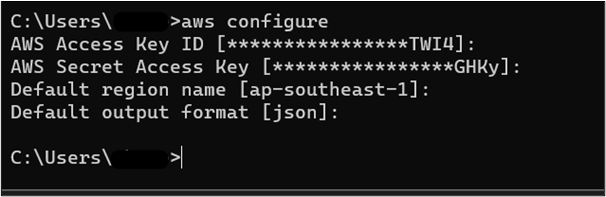
The next step is to configure the Access Keys within the AWS CLI. Use the below-mentioned command for configuring the CLI:
Provide the Access Key and Secret Access Key to the CLI for configurations:

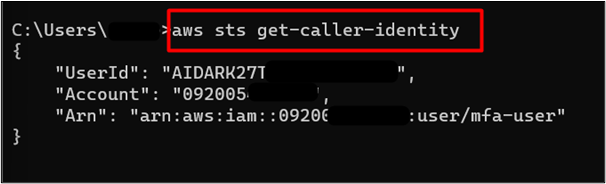
To verify if the IAM user has logged into the AWS CLI, use the following command:
The output of the command is given as follows which indicates that the user has successfully logged into the AWS console:
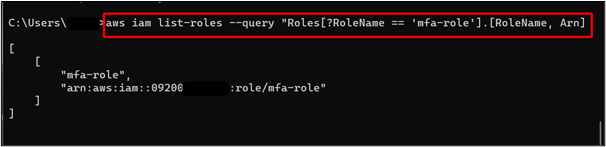
The user has the permission to list the IAM roles within the AWS account. Command given below is used to list the IAM roles:
In the above command: RoleName: Within this field, replace the value “mfa-role” with your IAM role’s name.
The output of the command is given as follows:
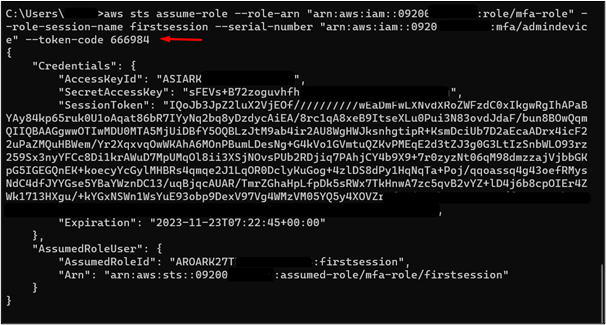
To assume the IAM role with MFA, use the assume role command with additional parameters such as serial number and token code. Provide the following command to the CLI:
In the above command:
-
- –role-arn: Replace the value of this field with the ARN of your IAM role.
- –role-session-name: In this field, the user can provide any session name of choice.
- –serial-number: Replace the value of this field with the Identifier value from the MFA interface that was saved earlier.
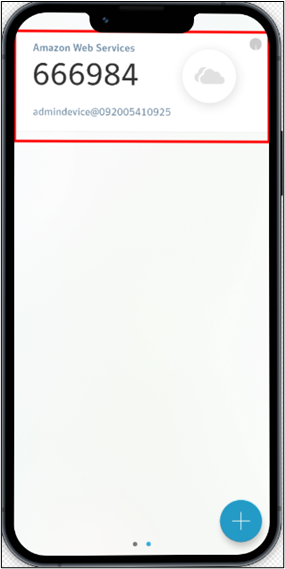
- –token-code: This value is to be replaced by the current code displayed in the Symantec VIP interface.
The current code shown in the Symantec VIP is given as follows. The same code will be used in the –token-code value of the command:
The output of the command will contain the temporary credentials such as a Session Token, Access Key, Secret Access key, etc:
Step 7: Configure Environment Variables
The access keys and the session token returned will be now used to establish the session-based login and to assume the role. The detailed implementation for configuring the environment is discussed in Step 7of Method 1.
Final Thoughts
To assume a role using CLI, there are three methods i.e., via the STS (security token service), –profile parameter, or the MFA (Multi-Factor Authentication). For a user to assume a role, a Trust policy must be established first. This trust policy determines whether the user is a trusted entity or not. This functionality is necessary as it addresses the security concerns of IT experts and individuals. Furthermore, the user can only assume the role if equipped with the required permissions.
When a user assumes a role in the AWS, a session-based login is created to provide limited-time access to the user with the desired permissions. A token is generated that expires after a specific time and thus, the user can no longer perform the administrative task with AWS resources. This article provides a practical implementation of the three methods for assuming a role in AWS CLI.
Source: linuxhint.com