How to Install AWS CLI on Ubuntu 24.04
AWS offers numerous services for anyone to use. However, when you want an easy and controlled way of controlling all your AWS services, you must install an AWS CLI (command-line interface). The AWS CLI gives you access to the AWS API, allowing you to manage all the services depending on the task you are handling or want to automate.
You can install the AWS CLI on Ubuntu 24.04, and there are two approaches you can use depending on your preference. You can install it as a snap package or a Python module inside a Python virtual environment. Let’s discuss each option.
Method 1: Install AWS CLI Via Snap
Ubuntu supports AWS CLI, and you can access it as a snap package from App Center via GUI or using the snap command. Installing AWS CLI as a snap will install all the dependency packages it requires without installing them separately.
If you find this approach convenient, execute the below command to install AWS CLI.

AWS CLI will be downloaded and installed on your system. With this option, the AWS CLI is accessible system-wide and not just in a virtual environment, as in the second method.
Once you install AWS CLI, check the installed version to ascertain the package has been installed successfully.

We’ve installed AWS CLI version 2.15.38.
The next step is to set up the AWS CLI by connecting it with your AWS account to allow you to take control of your AWS services. Run the configure command below.

Provide your credentials to complete the setup.
Method 2: Install AWS CLI as a Python Module
You can also install AWS CLI on Ubuntu 24.04 as a Python module. This method requires creating a virtual environment and using pip to install AWS CLI. A virtual environment is a secluded way of using packages. Instead of making AWS CLI accessible system-wide, you can limit it to only being accessible inside the created virtual environment.
Besides, if you don’t have sudo privileges on the system, provided you have a virtual environment, you will manage to install AWS CLI. Follow the steps below.
Step 1: Install Python3 PIP and Venv
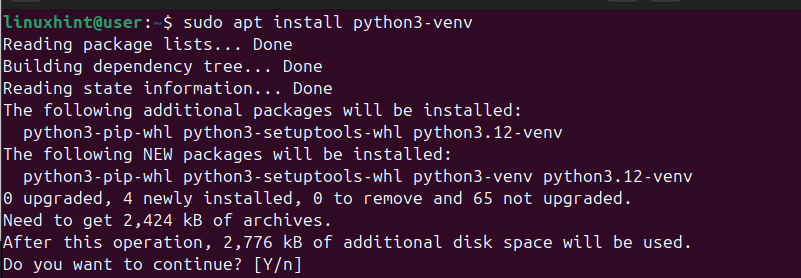
To create a virtual environment, we must have Venv installed. Execute the below command to install it.

You also need PIP to help with installing Python modules. Therefore, install PIP using the following command.

Step 2: Create a Virtual Environment
With Venv, we can create a secluded environment in which to install AWS CLI without requiring sudo privileges. A virtual environment is recommended when working with Python modules, as it doesn’t interfere with APT-installed packages. Besides, if things go sideways, it doesn’t affect your system. We are using Python 3 for this case.
Here’s how you create a virtual environment and activate it.
$ source .venv/bin/activate

We’ve named the virtual environment “venv,” but you can use any preferred name. Again, we’ve created the directory in our current location, but you can specify a different path.
Step 3: Install AWS CLI
Inside the virtual environment, running the following command will download and install AWS CLI.

Ensure the download completes successfully. You will get an output similar to the one below.

You can check the installed version.

With AWS CLI installed, configure it to start managing your AWS services. Once you are done using it or want to exit the virtual environment, deactivate it.

Conclusion
AWS CLI is a preferred way of managing your AWS services. On Ubuntu 24.04, you can install it as a snap package or in a Python virtual environment using PIP. This post discussed each method, giving examples to create a detailed and straightforward guide for anyone to follow along.
Source: linuxhint.com
