How to use the “describe-images” Command in AWS CLI?
Amazon Machine Image is a template that is used for launching the EC2 instances. An AMI is similar to a blueprint that contains an operating system and all the necessary software, or application configurations for the instances. The AMIs can be pre-built or custom-managed. AWS CLI is a powerful utility for accessing and managing images via simple commands such as the “describe-images” command. The “describe-images” command is used to list all the configured AMIs for a given account.
Quick Outline
In this article, we will learn about:
- What is the “describe-images” Command in AWS CLI?
- How to use the “describe-images” Command in AWS CLI?
- Conclusion
What is the “describe-images” Command in AWS CLI?
The “describe-images” command in AWS CLI is a paginated operation that is used to list all or specific AMIs within an account. The output of the “describe-images” command is in the list form that contains information about various images. These images can be public, private, user-defined, or AWS-managed. The data of the AMI is accessed in multiple API calls to the service when the pagination is enabled.
Read more: How to Disable the Page in AWS CLI?
How to use the “describe-images” Command in AWS CLI?
Deregistered images are those that are removed from the AWS and are no longer supported by the EC2 service and the platform. However, these images are also included in the output of the “describe-images” command. The user can control the output of the command by filtering, querying, or specifying a particular AMI, etc through multiple different parameters.
Syntax
The syntax of the “describe-images” command is given as follows:
Options
Here is a brief description of the options in the above-mentioned command:
| Option | Descriptions |
| –executable-users | This parameter is used to extract and list the AMIs based on the user’s permissions. The user can either specify “self”, “all” or the AWS account id. |
| –filters | The –filters parameter is used to list specific details or AMIs in the output. There are different filter types supported by this command:
– name: The user can filter the AMIs by specifying the name. – owner-id: The AWS account ID can also filter the AMIs by only describing those images that are configured within a specific account. – tag: Tags are the combination of the key-value pairs. By specifying the tags, a user can easily filter the AMIs for a given account. – image-id: Another method of filtering the AMIs is by specifying the image ID. This will only list a specific AMI. |
| –image-ids | This parameter inputs the ID of the AMI. |
| –owners | The –owner parameter accepts the account ID, self, amazon, or aws-marketplace options. These options will only list those AMIs that are an exact match to the specified option. |
| –include-deprecated | This parameter is used to specify whether to list the deprecated AMIs or not. The deprecated AMIs are those images that are no longer recommended to use. |
| –include-disabled | This field specifies whether to list the disabled AMIs in the output or not. |
| –dry-run | The –dry-run parameter is used to determine whether the user has permission for the desired action or not. It returns the output in the Error format. Furthermore, if the user has the permissions, the output will contain the “DryRunOperation”. If the user is not equipped with this permission, it will return “UnauthorizedOperation” in the output. |
| –cli-input-json | This parameter is used to provide multiple JSON instructions at once in the form of a template for AWS services. The template followed is generated by the “–generate-cli-skeleton” parameter. |
| –starting-token | This parameter inputs the value of the “NextToken” field from the output. The NextToken symbolizes that there is more data to list. When the value of the NextToken is provided to the –starting-token, it will start listing the data from the previous response. |
| –page-size | This parameter defines the page size in each service AWS service call. Smaller page size results in more API calls that prevent the timeout error. However, it retrieves less data in each call. |
| –max-items | The –max-items parameter is used to limit the number of entries to be displayed in the output. |
| –generate-cli-skeleton | It generates a skeleton or template which is to be followed when providing multiple instructions to AWS service at once. |
Other than these options, there are also global options provided by AWS. The global options are common to AWS CLI command and can be used with different commands. The AWS documentation discusses various global options.
Examples
This section of the article discusses various examples of “describe-images” command in AWS CLI:
- Example 1: How to Describe Images in AWS CLI?
- Example 2: How to Describe all the Images in AWS CLI?
- Example 3: How to Describe AMI by Owner ID in AWS CLI?
- Example 4: How to Filter Images in AWS CLI?
- Example 5: How to query the AMI in AWS CLI?
- Example 6: How to Describe Deprecated Images in AWS CLI?
- Example 7: How to Describe Enabled or Disabled Images in AWS CLI?
- Example 8: How to Describe Images in Multiple Output Formats?
Example 1: How to Describe Images in AWS CLI?
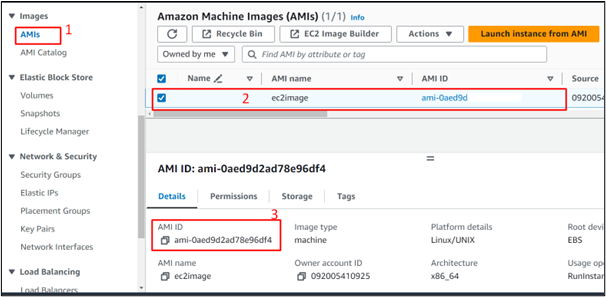
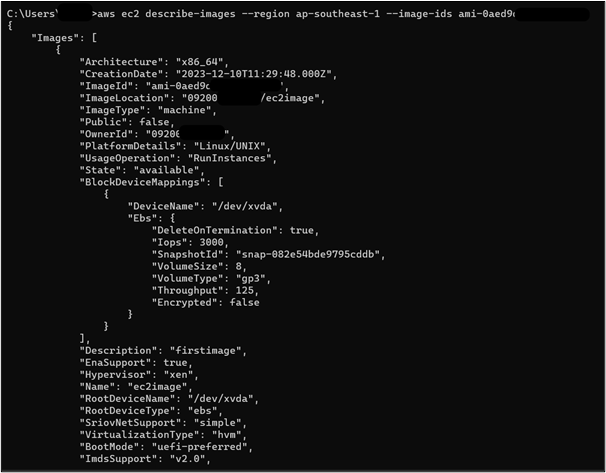
The “describe-images” command in AWS CLI is used to list the details of a specific AMI for a given account. This command requires the image ID of the AMI. Visit the EC2 service and click the “AMI” option from the left navigation pane. Select the create image and it will display the configurations of the image. Within the Details section, copy and save the AMI ID:
The command to list a specific AMI is given as follows:
Note: Replace the <AMIImageID> with the copied AMI ID of your EC2 instance. Similarly, replace the “ap-southeast-1” with the region name of your choice.
Output
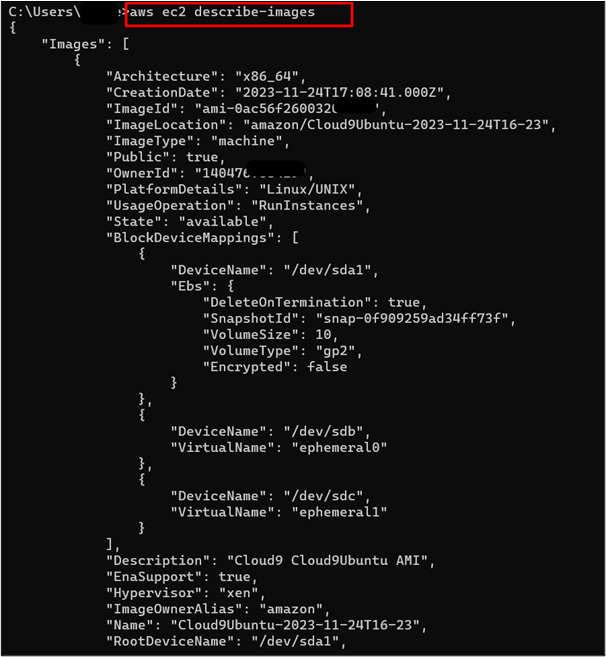
Example 2: How to Describe all the Images in AWS CLI?
The command to list all the images available in AWS CLI is as follows:
Output
This will take some time to display a list of all the images. Keep on pressing the “Enter” key from the keyboard to view the details of all the images:
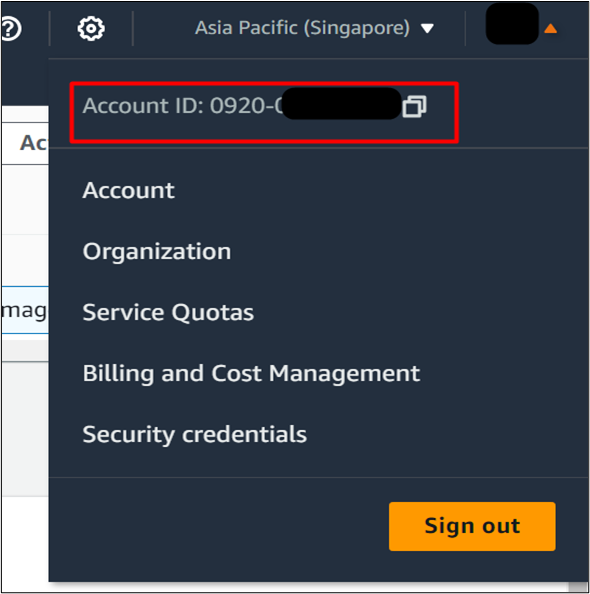
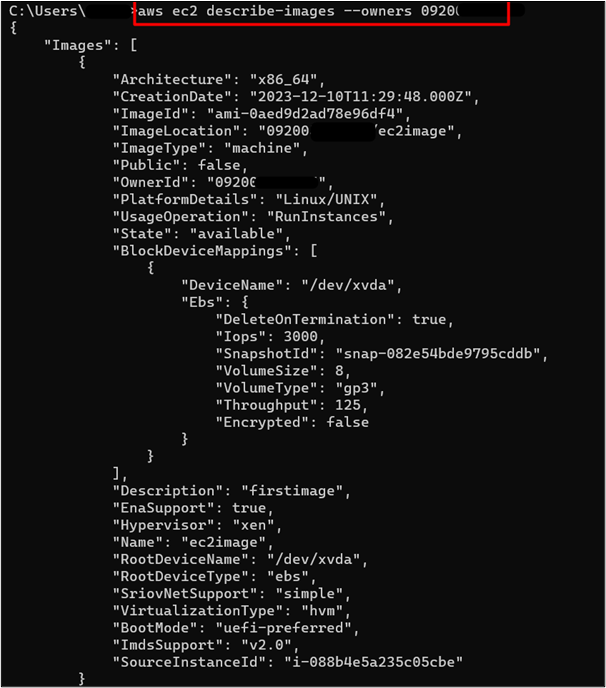
Example 3: How to Describe AMI by Owner ID in AWS CLI?
AMIs configured within an AWS account can also be determined by the owner or account ID. The Account ID can be determined by clicking the username in the top-right corner of the AWS Management Console. Click the “copy” icon to copy the Account ID:
The command is customized with an additional parameter in the following way:
Note: Replace the <AccountID> with your AWS Account ID.
Output
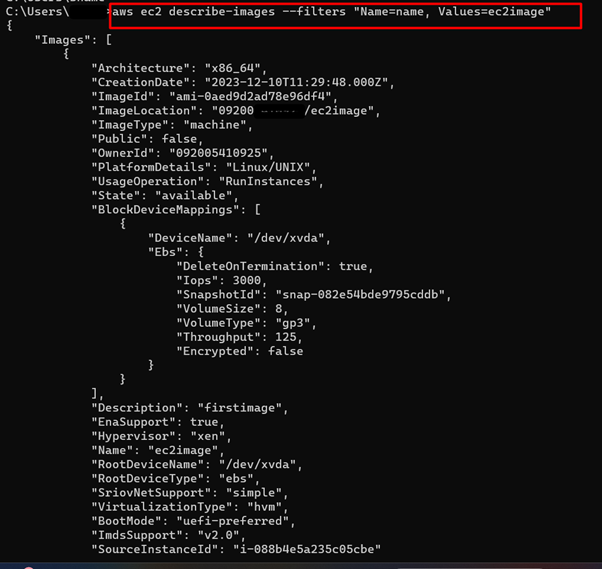
Example 4: How to Filter Images in AWS CLI?
There are different filters available for extracting specific image details. The user can filter the images by owner ID, image ID, tags, name or status, etc. To list an image by its name, the following command is used:
Note: Replace the “ec2image” in Values with the name of your AMI.
Output
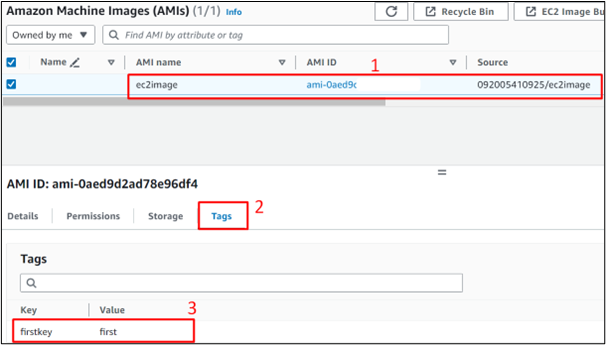
The value of key-value pairs of an AMI’s tag can be determined by selecting the AMI from the AMI dashboard. This will display the configurations of the image. Tap the “Tags” tab and copy the value of key-value fields:
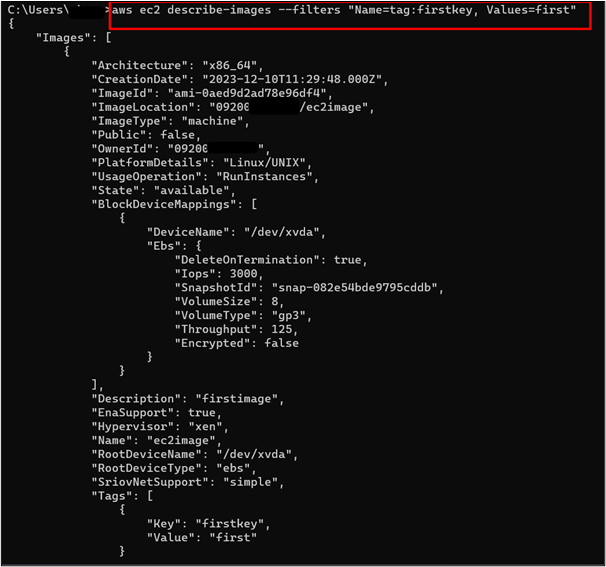
To filter an image by its tags, the command is given below:
Note: Replace the “firstkey” in the Name field with the key. Similarly, replace the “first” in Values with the tag’s value.
Output
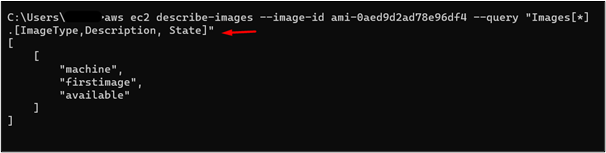
Example 5: How to query the AMI in AWS CLI?
The user can extract specific details of an image from the displayed list by using the “–query” parameter. The command is given as follows:
Output

Similarly, the user can also query particular details of an image by specifying the image id with query parameter:
Output
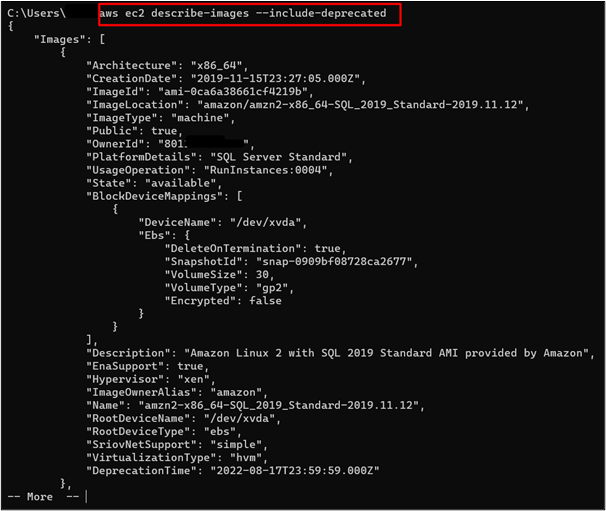
Example 6: How to Describe Deprecated Images in AWS CLI?
Deprecated AMIs are those images that are no longer recommended for use by AWS. To determine which images are deprecated, use the command given as follows:
Output
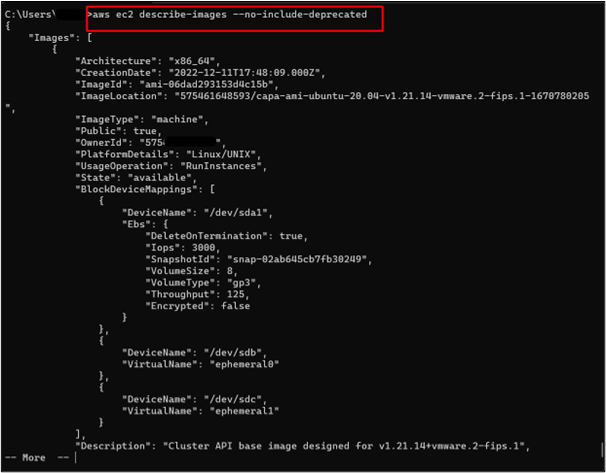
Similarly, the user can also specify the “–no-include-deprecated” parameter to list all the images including the deprecated ones:
Output
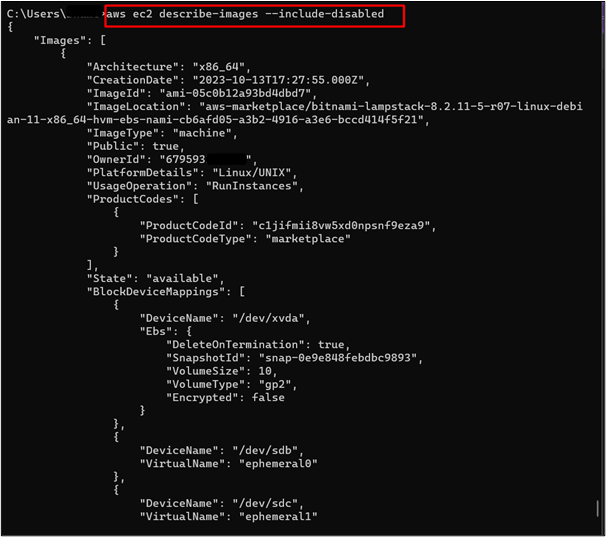
Example 7: How to Describe Enabled or Disabled Images in AWS CLI?
The “describe-images” command can also be used to list those images that are disabled or not disabled for the account. This will help the users in determining which AMIs to use. The command given below is used to list the AMIs that are disabled for the account:
Output
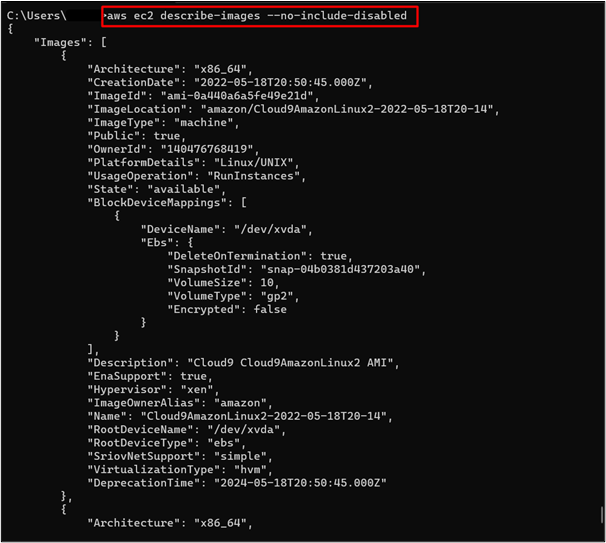
Similarly, the “describe-images” command returns only those AMIs that are not disabled for a given account. For this purpose, use the command below:
Output
Example 8: How to Describe Images in Multiple Output Formats?
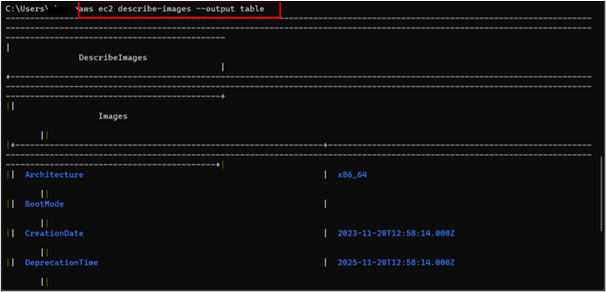
There are multiple output formats supported by the “describe-images” command. The formats include YAML, JSON, text, or table. Given below is the command for describing the images in the tabular format:
Note: Replace the “table” value in the output field with a different output format of your choice such as JSON, YAML, or text.
Output
Press “Enter” from the keyboard to keep on listing the data:
Conclusion
The “describe-images” command in AWS returns a list of all or specific AMIs for a given account. It accepts optional parameters e.g., –query, –output, etc. The “describe-images” command is helpful for AWS developers as it helps them understand and decide between various AMIs for their applications. Before using the “describe-images” command, ensure that the AWS CLI is configured on your local machines, and then provide the mentioned commands to the terminal. This article provides an in-depth understanding of the “describe-images” command with multiple examples to discuss its various parameters.
Source: linuxhint.com