event loop in node js
Although Javascript is a single-threaded language, Node.js can assign tasks to the operating system, allowing it to process multiple tasks at the same time. Several tasks have to be completed at the same time because operations in the operating system are multi-threaded. The callback associated with each operation is added to the event queue and is scheduled by Node.js to run when the specified task is completed.
To write efficient and reliable Node.js code, the user must have a solid understanding of event loops. It can also help in troubleshooting performance issues effectively. The event loop in Node.js saves memory and allows you to do multiple things at once without having to wait for each one to finish. The term “asynchronous” refers to any Javascript function that runs in the background without blocking incoming requests.
Before jumping directly to event loops let us have a look at different aspects of the Javascript programming language.
Javascript as an asynchronous programming language
Let us have a look at the concepts of asynchronous programming. Javascript is used in web, mobile, and desktop applications, but it should be noted that Javascript is a single-threaded, synchronous computer programming language.
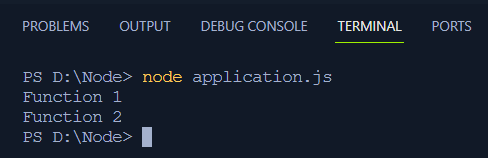
A simple code example is given to understand the concept.
console.log("Function 1")
}
function method2(){
console.log("Function 2")
}
method1()
method2()
In this code, two simple functions are created and method1 is called first so it would log method1 first and then move to the next.
Output
Javascript as a synchronous programming language
Javascript is a synchronous programming language and executes each line step by step moving from top to bottom with only one line executed at a time. In the example code given above method1 is logged first in the terminal and then the method2.
Javascript as a Blocking Language
Being a synchronous language javascript has a blocking functionality. It does not matter how long it takes to complete an ongoing process but a new process won’t be started until the previous one has been completed. In the above code example suppose there is a lot of code script in method1 no matter how much time it takes either 10 seconds or a minute method2 won’t be executed until all the code in method1 has been executed.
Users might have experienced this while browsing. When a web application executes in a browser in the back-end a huge chunk of code is being executed so the browser appears to be frozen for some time before returning the control access to the user. This behavior is known as blocking. The browser cannot entertain any further incoming requests until the current request has been processed.
Javascript is a single-threaded Language
To run a program in javascript the thread functionality is used. Threads are only capable of performing one task at a time. Other programming languages support multi-threading and can run multiple tasks in parallel, javascript contains only one thread for executing any code script.
Waiting in Javascript
As evident from the name in this section, we have to wait for our request to be processed to proceed further. The waiting can take several minutes during which no further request is entertained. If the code script proceeds without waiting then the code will encounter an error. Some functionality is to be implemented in Javascript or more specifically Node.js to make the code asynchronous.
Now that we have understood the different aspects of Javascript, let us understand synchronous and asynchronous by some simple examples.
Synchronous execution of code in Javascript
Synchronous means that the code is executed sequentially or more simply step-by-step starting from the top and moving down line by line.
Below an example is given which can help understand:
console.log('One')
console.log('Two')
console.log('Three')
In this code, there are three console.log statements each printing something. Firstly the first statement which is going to print “One” in the console is sent into the call stack for 1 ms (estimated) then it is logged to the terminal. After that, the second statement is pushed into the call stack and now the time is 2 ms with one added from the previous and then it logs “Two” to the console. Finally, the last statement is pushed into the call stack for now the time is 3ms and it logs “Three” in the console.
The above code can be executed by invoking the following command:
Output
The functioning is explained above in detail and by keeping it into consideration the output is logged into the console in the blink of an eye:

Asynchronous execution of code in Javascript
Now let us refactor the same code by introducing callbacks and making the code asynchronous. The above code can be refactored as:
function printOne(callback) {
setTimeout(function () {
console.log("One");
callback();
}, 1000);
}
function printTwo(callback) {
setTimeout(function () {
console.log("Two");
callback();
}, 2000);
}
function printThree() {
setTimeout(function () {
console.log("Three");
}, 3000);
}
console.log("Start of the program");
printOne(function () {
printTwo(function () {
printThree();
});
});
console.log("End of the program");
In this code above:
- Three functions are declared to print “One”, “Two” and “Three”, each function has a callback parameter that allows sequential execution of code.
- A timeout is set using the setTimeout function and there is a console.log statement for printing after a specific delay.
- Two messages are printed “Start of the Program” and “End of the Program” which indicate the beginning and end of the program.
- The program starts by printing “Start of the Program” after which the printOne function is executed with a 1-second delay, then the printTwo function is executed with a 2-second delay, and finally the printThree function is executed with a 3-second delay.
- The program does not wait for the asynchronous code executions inside the setTimeouts functions which logs the “End of the Program” statement before printing One, Two, and Three.
Output
Run the above code by executing this command in the terminal:
Now the output in the terminal would show up asynchronously as:
Now that we have a complete understanding of the synchronous and asynchronous execution let’s jump to solidify our concept of event loop in Node.js.
Node.js: Event Loop Mechanism
The execution of both synchronous and asynchronous tasks is managed by the event loop in Node.js.The execution is invoked as soon as the Node.js project is launched and smoothly transfers the complex tasks to the system. This ensures that other tasks can run smoothly on the main thread.
Visual Explanation of Event Loop in Node.js
The event loop is continuous and semi-infinite in Node.js. The event loop is invoked by the start of Node.js code script, and it is responsible for making async API calls and calling processes.Tick(), and scheduling timers then resume the execution of the event loop.
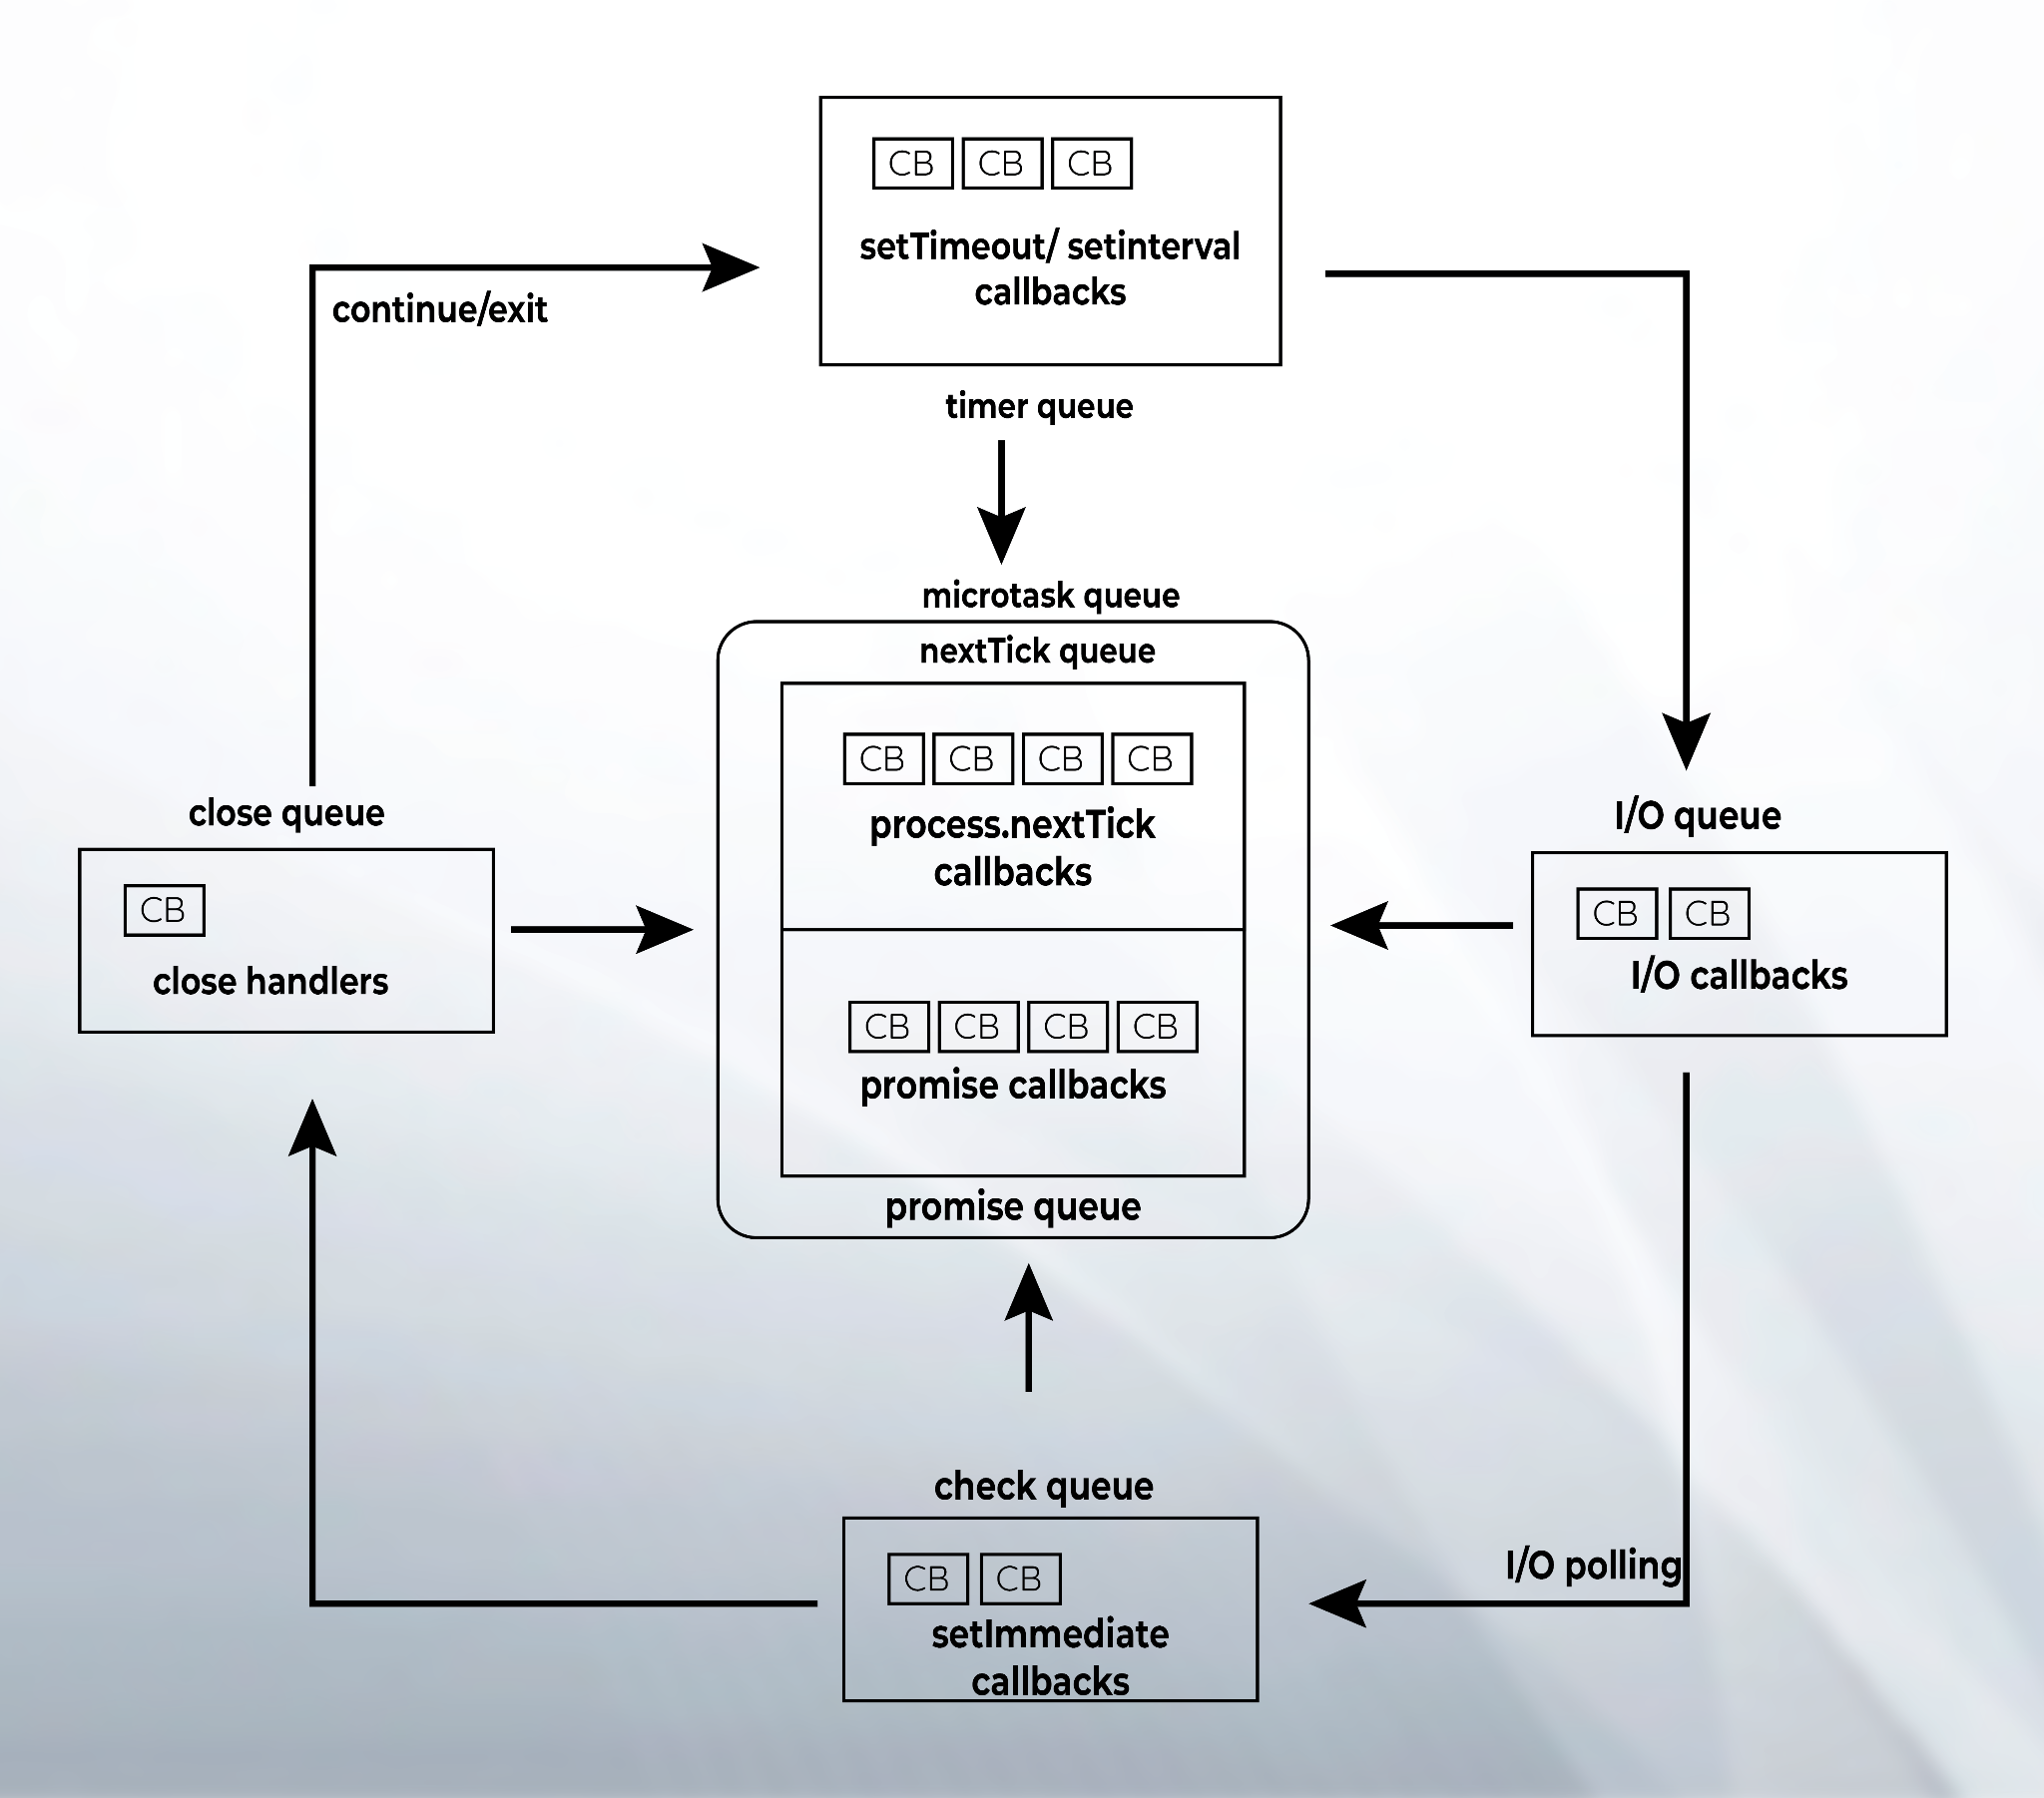
In Node.js, five main types of queues handle callbacks:
- The “Timer Queue” commonly known as a min-heap is responsible for handling callbacks associated with “setTimeout” and “setInterval”.
- The callbacks for asynchronous operations like in “fs” and “http” modules are handled by “I/O Queue”.
- The “Check Queue” contains callbacks for the “setImmediate” function which is unique to Node.
- The “Close Queue” manages callbacks associated with any asynchronous task’s closing event.
- Lastly, there are two different queues in the “Micro Task” queue:
- The “nextTick” queue contains callbacks associated with the “process.nextTick” function.
- The “Promise” queue controls callbacks related to native Promise.
Event Loop functionality in Node.js
The event loop functions under specific requirements that control the callback execution order. The user’s synchronous Javascript code is given priority at the start of the process, so the event loop only starts when the call stack is cleared. The following execution sequence follows a structured pattern:
The highest priority is given to the callbacks in the microtask queue then moving to execute the tasks in the nextTick queue followed by the tasks in the Promise queue. The processes in the timer’s queue callbacks are then handled after which the microtask queue is re-visited after each timer callback. The callbacks in the I/O, check and close queues are then executed in a similar pattern with the microtask queue visited after each phase.
The loop continues to execute if there are more callbacks to process. When the code script has ended or no callbacks are left to process, the event loop ends efficiently.
Now that we deeply understand the Event loop, let’s look at its features.
Features of event loop in Node.js
The main features are:
- The event loop is an infinite loop and continues to execute the tasks as soon as it receives them and goes into sleep mode in case there are no tasks but starts to function as soon as the task is received.
- The tasks in the event queue are executed only when the stack is empty means there is no active operation.
- Callbacks and promises can be used in the event loop.
- As the event loop follows the principle of Abstract data type queue it fulfills the first task then proceeds to the next.
After a thorough understanding of the event loop, and the logic of asynchronous and synchronous executions, getting an understanding of the different phases may solidify the concepts of the event loop.
Node.js Event loop Phases
As mentioned above, the event loop is semi-infinite. It has many phases but some phases are used for internal handling. These phases do not have any effect on the code script.
The event loop follows the functionality of Queue and executes the task on the principle of first-in and first-out. The scheduled timers will be handled by the operating system until they expire. The expired timers are then added to the callback queue for timers.
The event loop executes the tasks in the timer’s queue one by one by one until there are no more tasks left or it reaches the maximum allowed number of tasks. In the sections below the core phases of event loops are explained.
Timers Phase
In Node.js there is a timer API that can schedule the functions that are to be executed in the future. After the allocated time has passed the timer callback will execute as soon as they can be scheduled; however, a delay may be faced either from the operating system end or due to execution of other callbacks.
The timers API has three main functions:
- setTimeout
- setImmediate
- setInterval
The above-mentioned functions are synchronous. The timer phase in the event loop has its scope limited to the setTimeout and setInterval functions. While the check function handles the setImmediate function.
Let’s consider a simple example to solidify the theoretical portion:
function delayedFunction() {
console.log("the delayed function is executed after timeout");
}
console.log("Start of the program");
setTimeout(delayedFunction, 2000);
console.log("End of the program");
In this code:
- The program starts by logging the statement “Start of the Program” to the terminal.
- Then the delayedFunction is called with a timer of 2ms, the code script does not halt and proceeds further handling the delay in the background.
- The statement “End of the Program is logged after the first statement.
- After a delay of 2ms, the statement in the delayedFunction is logged to the terminal.
Output
The output will show up as:

It can be seen that the code is not stopped for the delayedFunction to process; it moves forward and after the delay, the function callback is processed.
Pending Callbacks
The event loop checks for the events happening, like reading files, network activities, or input/output tasks, in the polling phase. It’s important to know that, in Node.js, only some of the events are handled in this polling phase. However, in the subsequent iteration of the event loop, certain events may be deferred to the pending phase. This is a key concept to keep in mind when optimizing and troubleshooting Node.js code that involves complex event-driven operations.
It’s important to understand that during the waiting callbacks phase, the event loop adds postponed events to the queue of pending callbacks and performs them. This phase also handles some TCP socket errors that the system has generated, such as ECONNREFUSED error events on certain operating systems.
Below an example is mentioned to solidify the concept:
const fs = require('fs');
function readFileAsync(filePath, callback) {
fs.readFile('./PromiseText.txt', 'utf8', function (err, data) {
if (err) {
console.error(`Error reading file: ${err.message}`);
} else {
console.log(`File content: ${data}`);
}
callback();
});
}
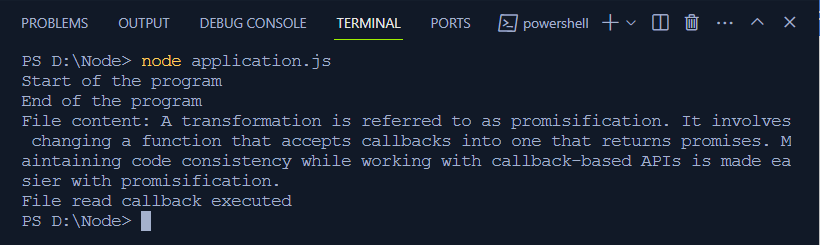
console.log("Start of the program");
readFileAsync('./PromiseText.txt', function () {
console.log("File read callback executed");
});
console.log("End of the program");
In this code:
- The program is initiated by logging the statement “Start of the Program” in the terminal.
- The readFileAsync is defined asynchronously to read the content of the file “PromiseText.txt”. It is a parametrized function that executes a callback function after the file has been read.
- The readFileAsync function is called to begin the process of file reading.
- In the process of file reading, the program does not halt; instead, it proceeds to the next statement and logs it into the terminal “End of the Program”.
- The asynchronous event of file reading is processed in the background by the event loop.
- After the file has been read asynchronously and the content has been logged to the terminal the program logs the file content to the terminal. After that, it logs the following message “File read callback executed”.
- The event loop handles the pending callback operations in the next phase.
Output
The result of the above execution is:
Idle, Prepare Phase in Node.js
The idle phase is used to deal with internal functions in Node.js so it is not a standard phase. It does not influence the code script. The idle phase is like a break period for the event loop during which manages the low-priority tasks in the background. A simple example to understand this phase is:
idle.ignore();
In this code, the “idle-gc” module is used that allows to ignore the idle phase. This serves to handle situations when the event loop is busy and background tasks are not performed. The use of idle.ignore is not considered optimal as it can cause performance issues.
Polling phase in Node.js
The poll phase in Node.js serves as:
- It handles the events in the poll queue and performs their corresponding tasks.
- It decides how much time to spend waiting and checking for the I/O operations in the process.
As the event loop enters the poll phase due to the absence of a timer one of the below tasks will be performed:
- In the poll phase of the event loop in Node.js, the pending I/O events are queued and then executed in a sequential procedure following the principle of First In and First Out until the queue becomes empty. During the callbacks executions the nextTick and microtasks queues are also in action. This ensures smoothness and allows to handle I/O operations more efficiently and reliably.
- If the queue is empty and the script has not been scheduled by the setImmediate() function then the event loop will end and it will proceed to the next phase(check). On the other hand, if the script scheduling has been done by the setImmediate() function the event loop allows the callbacks to be added to the queue which will be executed by it.
This is best illustrated with a simple code example:
console.log('Async operation completed');
}, 2000);
console.log('Start');
setImmediate(() => {
console.log('setImmediate callback executed');
});
console.log('End');
In this code:
- Two messages “Start” and “End” indicate the initiation and termination of the program.
- The setTimeout() function sets a callback function with a delay of 2 ms and logs “Async operation completed” to the terminal.
- The setImmediate() function logs the “setImmediate callback executed” message to the terminal after the Start message has been logged to the terminal.
Output
The output would show the messages with just a minute observation that the “Async operation completed” takes time and is printed after the “End” message:

Node.js Check Phase
After the poll phase has been executed the callbacks in the check phase are then executed. If a code script is scheduled using the setImmediate() function and the poll function is free, the event loop works by moving directly to the check phase instead of staying idle. The setImmediate() function is a unique timer that operates during the different phases of the event loop.
The libuv API is used to plan the callback executions after the poll phase execution has been completed. During the code execution, the event loop enters the poll phase in which it waits for the incoming connection requests. In another case if the callback is scheduled using the setImmediate() function and the poll phase is terminated without any activity it will move to the check phase instead of waiting. Consider the below example for understanding:
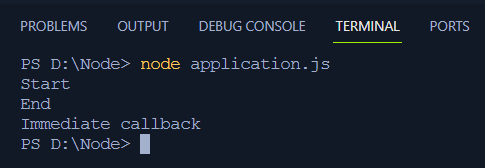
console.log('Start');
setImmediate(() => {
console.log('Immediate callback');
});
console.log('End');
In this code three messages are logged on to the terminal. The setImmediate() function then finally sends a callback to log the message “Immediate callback” to the terminal.
Output
The output of the above code will show up in the following sequence:
Node.js close callbacks
Node.js uses this close phase to run callbacks to close events and end an event loop iteration. After the connection is closed, the event loop handles the closing events in this phase. In this phase of the event loop, “nextTick()” and microtasks are generated and processed similarly to other phases.
The process.exit function is used to end the event loop at any instant. The event loop will disregard any pending asynchronous operations and the Node.js process will terminate.
A simple example to consider is:
const net = require('net');
const server = net.createServer((socket) => {
socket.on('close', () => {
console.log('Socket closed');
});
socket.on('data', (data) => {
console.log('Received data:', data.toString());
});
});
server.on('close', () => {
console.log('Server closed');
});
const port = 3000;
server.listen(port, () => {
console.log(`Server listening on port ${port}`);
});
setTimeout(() => {
console.log('Closing server after 10 seconds');
server.close();
process.exit();
}, 10000);
In this code:
- “const net = require(‘net’)” imports the net module required to handle a TCP server and “const server = net.createServer((socket) => {” creates a new TCP server instance.
- “socket.on(‘close’, () => {… }” listens to the “close” on all the sockets. When the socket connection is closed the message “Socket Closed” is logged to the terminal.
- “socket.on(‘data’, (data) => {}” checks for incoming data from all the individual sockets and prints it using the “.toString()” function.
- “server.on(‘close’, () => {…}” checks for the “close” event on the server itself, and when the server connection is closed it logs the “Server Closed” message to the terminal.
- “server.listen(port, () => {…}” listens to incoming connections on the port.
- “setTimeout(() => {…}” sets a timer of 10 ms to close the server.
That concludes the discussion on the various phases of the event loop in Node.js. Before jumping to a conclusion let’s discuss one last thing which is how to exit the event loop in Node.js.
Exiting the Event Loop in Node.js
The event loop is in the execution phase as long as there are some tasks in all queues of event loop phases. The event loop ends after the exit phase is emitted and the exit listener callback returns if no more tasks are in the queues.
The explicit way to end an event loop is to use the “.exit” method. The active processes of the Node.js will terminate instantly as soon as the process.exit function is called. All the scheduled and pending events will be dropped:
console.log(`Exiting with exit code: ${code}`);
});
process.exit(1);
Users can listen to the .exit function. It is to be noted that the “.exit” function must be synchronous as the Node.js program will exit as soon as it listens to this event.
This concludes the discussion on the event loop. An in-depth article that has covered all the concepts, phases, and examples related to the event loop.
Conclusion
Before understanding the event loop, an overview of the synchronous and asynchronous concepts can help to understand the code flow in the event loop. Synchronous execution means step-by-step execution while asynchronous execution means halting some steps without waiting for their completion. The working of the event loop along with all the phases along with suitable examples are discussed in the article.
Source: linuxhint.com