30 JavaScript Examples Guide
This guide will describe the 30 examples of JavaScript including:
- Print Message on Console in JavaScript
- Clear Console in JavaScript
- Use “alert()” in JavaScript
- Take Input From the User in JavaScript
- Variable Declaration in JavaScript
- Array Declaration in JavaScript
- Access Array Elements in JavaScript
- Add or Remove Elements From an Array in JavaScript
- Object Definition in JavaScript
- Access Property of an Object in JavaScript
- Function Definition in JavaScript
- Arrow Function in JavaScript
- Difference Between Function and Method in JavaScript
- Get Date and Time on Console in JavaScript
- Use of Regular Expression in JavaScript
- Concatenate Strings in JavaScript
- Conditional Statements in JavaScript
- Loops in JavaScript
- Operators in JavaScript
- Ternary Operator in JavaScript
- Add JavaScript Code in HTML File
- Link JavaScript File With HTML File
- Add CSS With JavaScript
- Get HTML Elements in JavaScript
- Add Text on Web Page Using JavaScript
- Create Element Using JavaScript
- Get Value of the Marked Radio Buttons Using JavaScript
- Get Value of Checkbox Using JavaScript
- Navigate to Another Page by Clicking on the Button
- Validate a Form in JavaScript
Example 1: How to Print Message on Console in JavaScript?
To print the message on the console, use the JavaScript predefined “log()” method. The “console.log()” method is utilized for printing the messages and output information. It is a built-in debugging tool that is available in most web browsers and used for debugging purposes by printing the values of variables or the results of function calls to the console.
Syntax
If you want to print the message directly, pass it to the “log()” method as an argument:
If you want to print the value of any variable, use the given syntax:
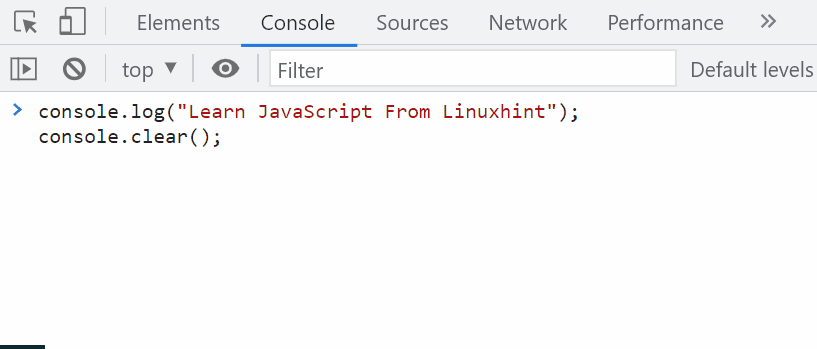
Here, we will print the message “Learn JavaScript From Linuxhint” on the console:
It can be seen that the given message has been successfully printed on the console:

In this example, we will create a variable “msg” that stores a message string:
Print the message stored in the variable on the console using the “console.log()” method:
Output

For more information to print the message on the console, kindly follow this article.
Example 2: How to Clear the Console in JavaScript?
For clearing the console, use the “CTRL+L” keyboard shortcut or the JavaScript prebuilt “clear()” method. The “console.clear()” method removes all existing messages from the console and provides a clean slate for new messages to be logged.
Syntax
To clear the console, use the following syntax:
It can be observed that after calling the “console.clear()” method, the console will be cleared:
Example 3: How to Use “alert()” in JavaScript?
In some situations, there is a need to show an alert dialog box to the user. For this, use the JavaScript “alert()” method. It displays a message to the user with an “OK” button, and the user must press the OK button for closing the dialog box.
Syntax
For showing the message in the dialog box, pass the message to the “alert()” method using the given syntax:
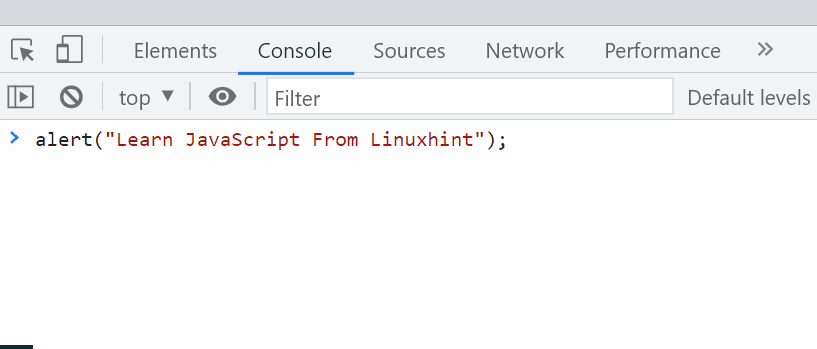
Here, we will pass the message “Learn JavaScript From Linuxhint” to the “alert()” method for showing the message on the alert dialog box:
Output
For creating a custom alert dialog box, follow this post.
Example 4: How to Take Input From User in JavaScript?
For taking user input, utilize the “prompt()” method. It shows a dialogue window to the user with a message and an input field to enter some text as an input.
Syntax
Following syntax is utilized for taking input from the user using the prompt() method:
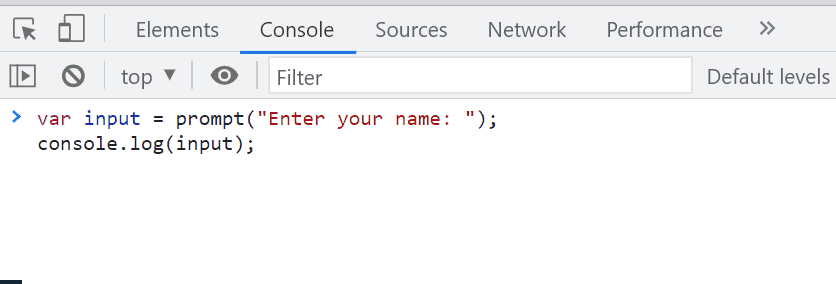
Call the prompt() method with a message “Enter your name: ” and store the user input in a variable “input”:
Pass the variable “input” to the console.log() method for showing the user’s input on the console:
The given output shows a dialog box to take an input and after pressing “OK” button, it prints the value on the console:
Example 5: How to Declare/Initialize Variables in JavaScript?
We may need to declare variables for storing data. Variables can store data of any type, such as number, boolean, array, and so on. In JavaScript, “var”, “let” and “const” are the variables.
In this example, only the “var” type variable declaration is discussed.
Syntax
For declaring variables, use the given syntax:
For assigning a value or initializing a variable, utilize the below-given syntax:
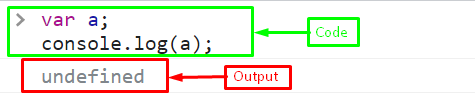
Here, we will declare variable, “a”, and then print on the console:
console.log(a);
It gives “undefined” as the variable “a” is just declared, not initialized. So, it is empty and returns undefined:
When we will initialize a variable by assigning any value, it will return or print the assigned value on the console using the “console.log()” method:
console.log(a);
Output

Example 6: How to Declare an Array in JavaScript?
Use “[ ]” square bracket notation for declaring an array with multiple data type elements, such as “number”, “string”, “boolean” and so on.
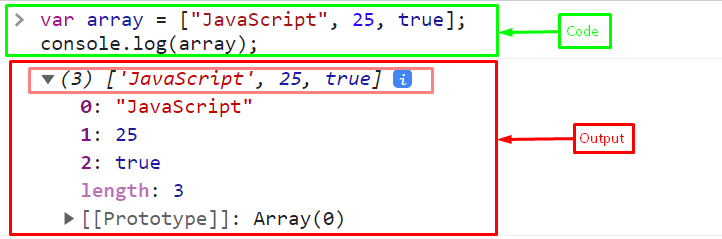
Create an array that contains a string, number, and boolean value:
Print the array on the console:
The given output shows a declared array:
Example 7: How to Access Array Elements in JavaScript?
For accessing array elements, utilize the “[ ]” square bracket notation by passing index numbers in the brackets.
Syntax
The following syntax is utilized for accessing the array elements:
Here, we will access the element of an array at the index 1:
console.log("Value at index 1 is " + array[1]);
Output

Example 8: How to Add Or Remove Elements in an Array in JavaScript?
In JavaScript, you can add or remove elements from an array using different JavaScript pre-built methods. For adding elements to an array, use the following methods:
- concat() method
- push() method
- splice() method
- unshift() method
For removing elements from an array utilize the given JavaScript methods:
- pop() method
- filter() method
- shift() method
- splice() method
The “splice()” method is the common method that is used for adding and removing elements from an array. The general syntax for the splice() method is as follows:
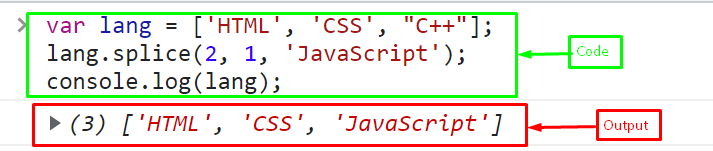
Create an array of languages called “lang”:
Here, we will delete an element from an array at the index “2” and add a new element at that position using the splice() method:
Print the updated array after removing and adding element:
The output indicates that the “C++” is removed from an array and the “JavaScript” is added as a replacement:
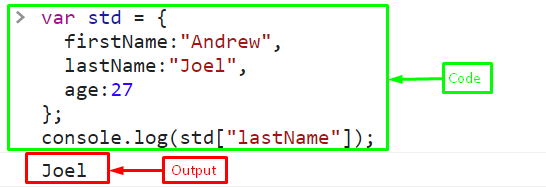
Example 9: How to Define an Object in JavaScript?
For defining Object, use the “object literals { }”. It is the most simplest approach for creating/defining an object in JavaScript with key-value pairs.
Syntax
The given mentioned syntax is utilized for the defining Object:
propertyName: propertyValue
}
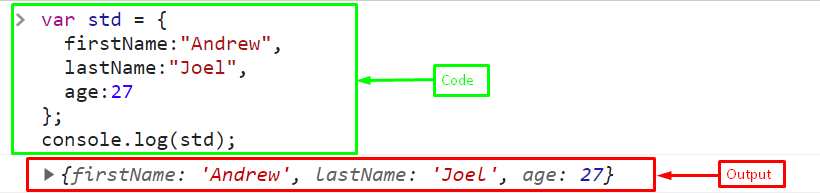
Define an object named “std” with properties “firstName”, “lastName”, and “age”:
firstName:"Andrew",
lastName:"Joel",
age:27
};
Lastly, print the defined object on the console:
Output:
Example 10: How to Access/Get Properties of some Object in JavaScript?
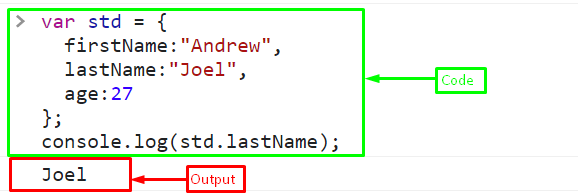
For accessing property of an object, the “dot (.)” notation or the “bracket [ ]” is used. Here, we will access the “lastName” of the object “std” using the dot notation:
The output has been successfully retrieved the value of the property “lastName” of the object “std”:
Also, utilize the square bracket notation for accessing the value of the property of an object:
Output
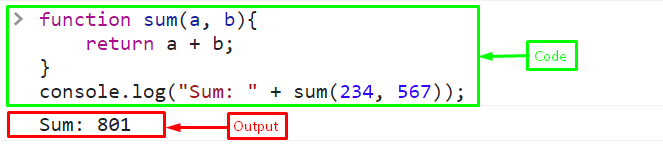
Example 11: How to Define a Function in JavaScript?
A function in JavaScript is a chunk of code that is designed to execute a certain task. It is a key component of JavaScript programming that allows the user to put a collection of instructions together to perform a specific action.
Syntax
For defining a function, utilize the given syntax:
// function body
}
Here, we will create a function for adding two numbers. Define a function named “sum” with two parameters “a” and “b” and returns the sum:
return a + b;
}
Call the function in the “console.log()” method by passing two numbers “234 and 567” as arguments:
While calling the function sum with numbers “234 and 567”, it gives “801”:
To learn more about calling functions in JavaScript, please visit this link.
Example 12: How to Declare and Use an Arrow Function in JavaScript?
A shortcut syntax for writing function expressions in JavaScript is called an “arrow function”. In comparison to conventional function expressions, the arrow function uses “=>” and has a shorter syntax.
Syntax
Utilize the given syntax for arrow functions:
// function body
}
Or you can also use the arrow function as:
// function body
};
Here, we will create the sum function using the arrow function:
Call the function by passing numbers “74 and 23” to get their sum on the console:
Output

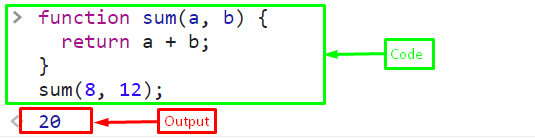
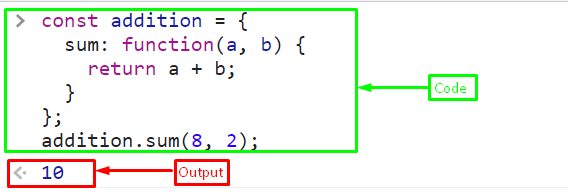
Example 13: Difference Between Function and Method?
A “function” is an independent code block that may be called with arguments, but a “method” is a function that is linked to an object and has access to its properties.
First, define a function “sum” for adding two numbers:
return a + b;
}
Call the function by passing two numbers “8” and “12”:
The sum of 8 and 12 is “20”:
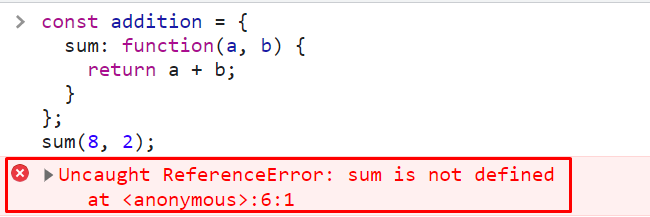
Method is the function of any class or an object. Create an object “addition” and create a method “sum” by passing two arguments “a” and “b”:
sum: function(a, b) {
return a + b;
}
};
Method is called with the class/object’s name with the dot (.) notation:
Output
If you try to call the method without its class or object’s name, it will throw a reference error:
Example 14: How to Get Date and Time on Console?
For getting the date and time in JavaScript, utilize the “Date” constructor with the “new” keyword. It gives the current date and time according to the Locale.
Here, we will call the Date constructor for the current date and time and store it in a variable “date”:
Finally, print the current date and time on the console by passing “date” as an argument in “console.log()” method:
Output

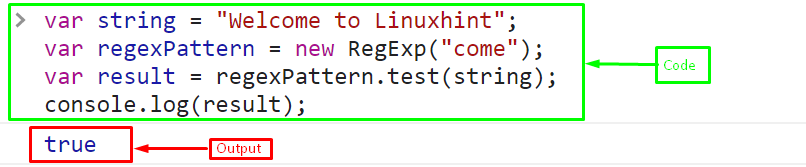
Example 15: How and Why Do We Need to Use Regular Expression/Regex in JavaScript?
When it comes to matching character combinations in strings, the regular expression, regex or regexPatterns comes in handy. Regular expressions are also objects in JavaScript. For matching patterns, utilize the “test()” method, or the “match()” method.
Here, in the given example, we will use the “test()” method for determining whether the specified pattern exists in the string. It returns “true” if the string matches the pattern.
First, create a string:
Create a regular expression or regex using “RegExp()” constructor:
Or specify pattern as follows:
Call the “test()” method with the pattern and pass the string as an argument to check whether the pattern string exists in the string or not:
Print the result on the console that indicates whether the given pattern exists in the string or not:
The output indicates that the pattern string “come” is found in the “string”:
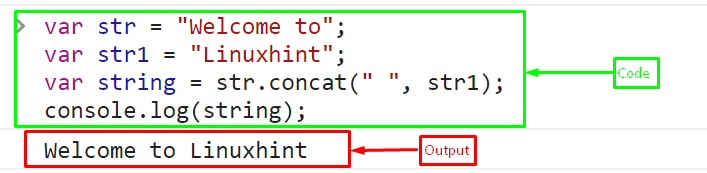
Example 16: How to Concatenate Strings in JavaScript?
Concatenating a String is a frequently used task in JavaScript. It can be done using the following approaches:
- join() method
- concat() method
- Template literals
- + operator
The “join()” method is utilized for joining the strings in an array. The other approaches are used for concatenating different strings.
To use it, first, create an array of languages:
Call the join() method for combining all the array elements:
Print the resultant concatenated string on the console using “console.log()” method:
It can be seen that all the array elements are returned as a comma-separated string:

Next, we will discuss the “concat()” method for concatenating strings in JavaScript. For knowing the working of the other approaches, please follow this article.
First, create two variables “str” and “str1” that stores strings:
var str1 = "Linuxhint";
Invoke the concat() method with first string “str” and pass the space and the second string “str1” as an argument:
Print the resultant concatenated string on the console:
Output
Example 17: How to Use Conditional Statements in JavaScript?
When it comes to executing different code chunks based on a given condition, Conditional statements get into help.
Syntax
The following syntax is utilized for the conditional statements in JavaScript:
{
// the code executes only if the condition is true.
}
else {
//when the condition is false, this block will execute
}
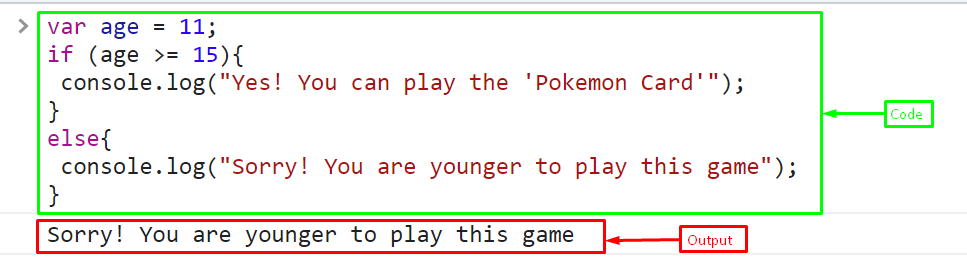
In the given example, first, create a variable “age” that stores “11”:
Use the conditional “if-else” statement and check whether the age is greater than or equal to 15. If yes, then, it prints “Yes! You can play the ‘Pokemon Card’”. Otherwise, it prints the message “Sorry! You are younger to play this game”:
console.log("Yes! You can play the 'Pokemon Card'");
}
else{
console.log("Sorry! You are younger to play this game");
}
The output displays that the “else” condition is executed because the age is 11 that is less than 15:
For more understanding of conditional statements in JavaScript, please visit this article.
Example 18: How to Use Loops in JavaScript?
Loops are a fundamental element in all programming languages, including JavaScript. They permit you to execute a code block repeatedly, which can help you avoid creating unnecessary lines of code. The most common loops are for loop, while loop, and do-while loop.
In JavaScript, there is a forEach loop used to iterate through array elements.
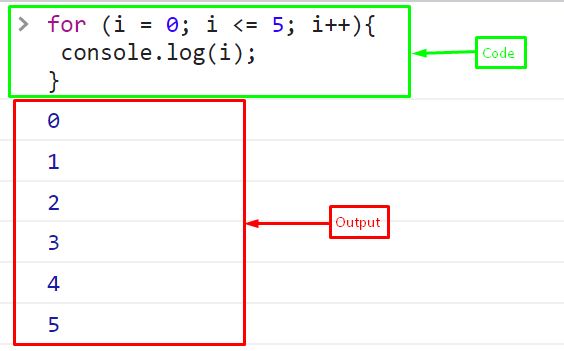
Let’s have a look at the most basic and commonly used loop called the “for” loop. In the given example, we will print numbers using for loop:
console.log(i);
}
Output
Example 19: How to Use Operators in JavaScript?
In JavaScript, operators are symbols that execute certain operations on operands. There are five main operators in JavaScript:
- Arithmetic Operators
- Comparison Operators
- Logical Operators
- Assignment Operators
- String Operators
For a better understanding of these operators, follow the JavaScript operators article.
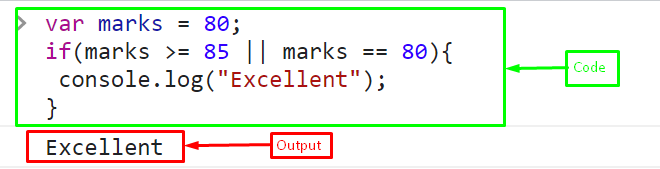
In the provided example, the assignment operator “=”, comparison operator “>=” and “==”, and the logical operator “||” are used.
First, assign a value “80” to the variable “marks”:
Use the conditional statement with comparison and logical operator “OR” which indicates if any of the condition is “true”, then if block will be executed:
console.log("Excellent");
}
The if block is executed and displays “Excellent”:
Example 20: How to Use Ternary Operator in JavaScript?
The “ternary operator”, also referred to as the “conditional operator”, is a shortcut for creating an “if-else” statement in JavaScript. It is also called an “inline if statement”.
Syntax
For using ternary operator, use the following syntax:
Here, we will specify the condition of the “Example 17” in inline statement using the ternary operator:
var game = age >= 15 ? "Yes! You can play the 'Pokemon Card'" : "Sorry! You are younger to play this game";
Finally, log the “game” variable on the console:
Output

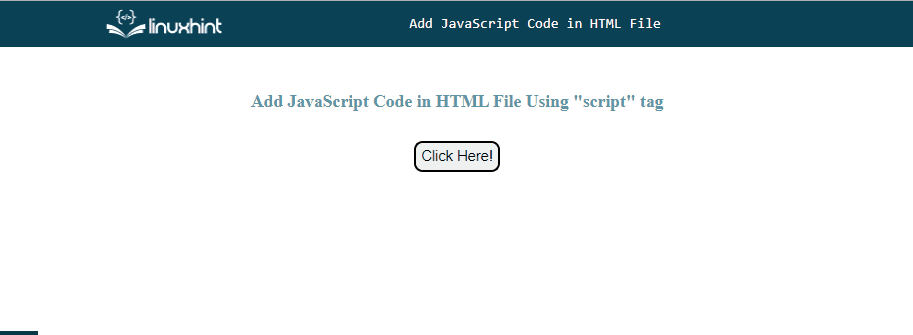
Example 21: How to Add JavaScript Code in HTML File?
Use the <script> tag for adding JavaScript code in HTML. It can be added whether in the “<head>” or at the end of the “<body>” section of an HTML document.
In the given example, first, we will create a button element in an HTML file by attaching an “onclick” event that calls the defined function:
In the <script> tag, define a function “displayDailogbox()” to show an alert message on the button click:
function displayDailogbox(){
alert("Welcome to Linuxhint");
}
</script>
The JavaScript code has been successfully added in HTML file:
For learning more about adding JavaScript code in HTML files, kindly follow this article.
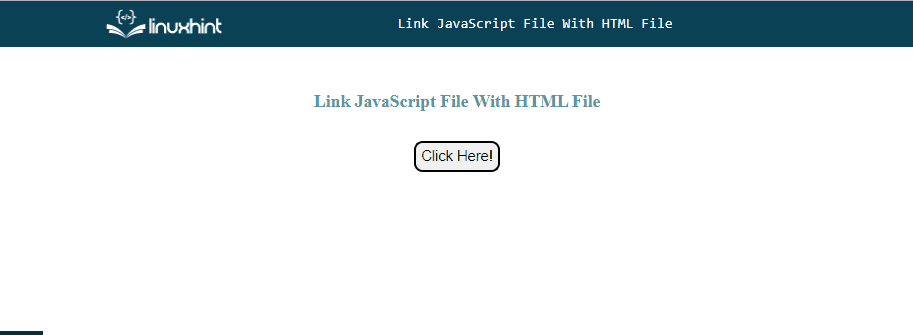
Example 22: How to Link JavaScript File With HTML File?
For linking the external JavaScript file in an HTML, use the “src” attribute of the “<script>” tag:
Now, Add the JavaScript code for showing an alert message on the button click.
Here, you can see the external file has been successfully added to the HTML file:
For knowing more about linking external JavaScript files into an HTML file, kindly visit this post.
Example 23: How Do You Add CSS With JavaScript?
There are three main approaches to add CSS on the web page using the JavaScript:
- style Property
- setAttribute() Method
- createElement() Method
Here, we will use the “style” Property for adding styling on an element in JavaScript. To check out other approaches, follow this blog.
First, create a <p> element for text with an id “text”:
The page will look like as follows:
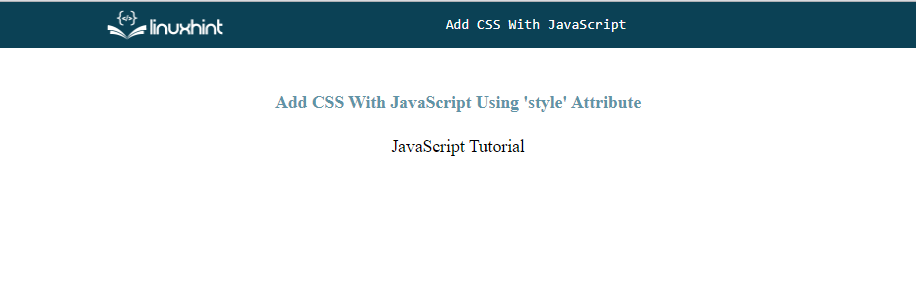
Now, change the color of the text to “blue” using the “style” attribute in JavaScript:
Output

Example 24: How to Get HTML Elements in JavaScript?
For getting an element in JavaScript, use the following methods:
- getElementById() method
- getElementsByClassName() method
- getElementsByTagName() method
- querySelector() method
- querySelectorAll() method
Here, we will use the “getElementById()” method for selecting/getting the HTML element in JavaScript. For other approaches, visit this post.
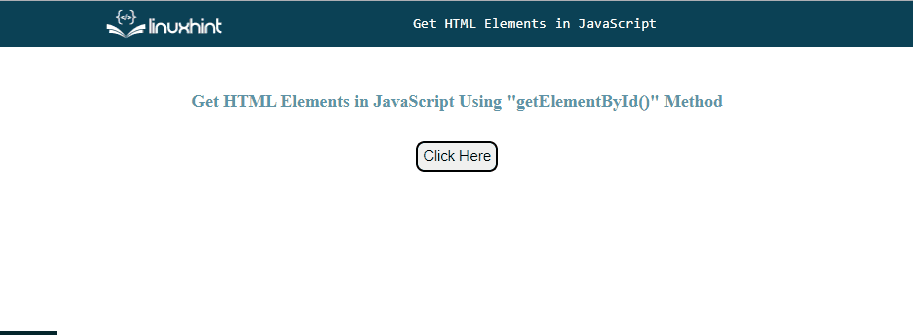
In this example, we will create a button and a <span> element to show a text on the web page on the button’s click:
<span id="text"></span>
Define a function named “func()” where we will get the <span> element and the button using their ids with the help of the “getElementById()” method. Now, use the “innerHTML” property to add text on the <span> element, and change the background color of the button using the “style” attribute:
document.getElementById("text").innerHTML= "Welcome to Linuxhint";
document.getElementById("btn").style.backgroundColor = "green";
}
The button will change the color and print the text on the button’s click:
Example 25: How to Add Text on Web Page Using JavaScript?
For adding any text on the web page, utilize the “innerHTML” property. First, create a <p> tag with an id “text”:
In <script> tag, get the <p> element using the “getelementById()” method and use the “innerHTML” property to set the text on the specified element:
document.getElementById("text").innerHTML = "Welcome To Linuxhint";
</script>
Output

Example 26: How to Create Elements Using JavaScript?
For creating an HTML element in JavaScript such as “<p>”, “<h2>”, “<style>” and so on, use the “createElement()” method by passing element names as arguments.
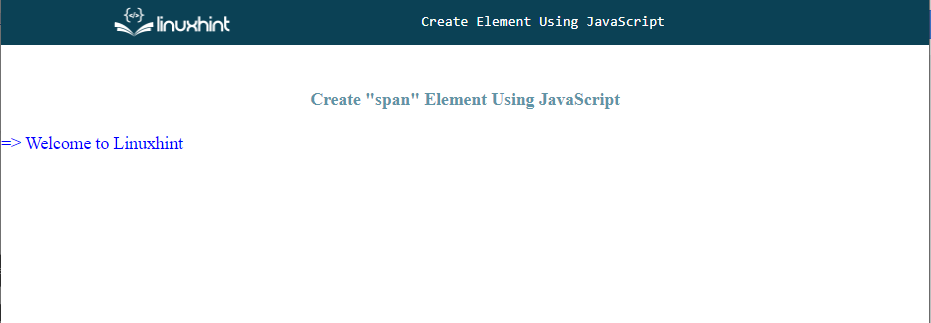
Here, we will create a “<span>” element to add text to the web page using the JavaScript “createElement()” method.
Access the “innerHTML” attribute to set the text:
Apply “style” property to set the color of the text to “blue”:
Now, append the element to the body tag using the “appendChild()” method:
The text has been successfully appeared on the page using JavaScript:
To learn more about creating elements using JavaScript, please follow this blog.
Example 27: How to Get the Value of the Marked Radio Buttons Using JavaScript?
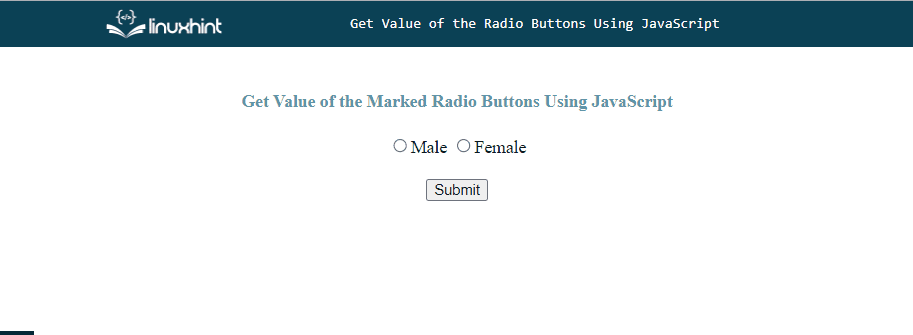
In JavaScript, getting/retrieving the radio button’s value, utilize the “value” property with the “checked” attribute. Let’s take an example, where we will first create two radio buttons: “Male” and “Female”:
<input type="radio" name="radio" value="female">Female
Create a “submit” button with an “onclick” event that will call the “checkValue()” function to retrieve the value of the checked radio button:
Define a function “checkValue()” that will trigger on the click event of the button. First, get the reference of the radio button and then verify using the “checked” property, whether it is marked or not. Then, access its value using the “value” attribute:
var radio= document.getElementsByName('radio');
for (var val of radio){
if (val.checked) {
alert(val.value);
}
}
}
The output shows the value of the checked radio button on the click event of the “submit” button:
For more information, kindly visit this article.
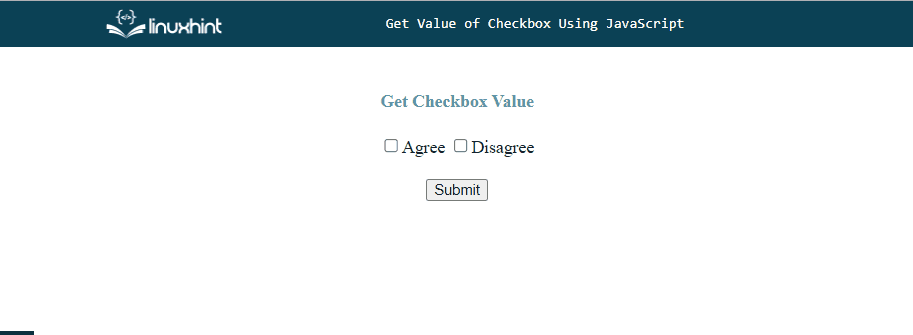
Example 28: How to Get Value of Checkbox in JavaScript?
Similarly, for retrieving the value of the checkbox, use the “checked” property with the “value” attribute. In the given example, first, we will create two checkboxes, “Agree” and “Disagree” and a “submit” button in an HTML file:
<input type="checkbox" name="checkbox" value="Disagree">Disagree<br><br>
<button id="submit" onclick="checkValue()">Submit</button>
Define a function that will display the value of the checked checkbox on the click event of the “submit” button:
var checkbox= document.getElementsByName('checkbox');
for (var val of checkbox){
if (val.checked) {
alert(val.value);
}
}
}
Output
To get more information related to retrieving the marked/checked value of the checkbox, follow this article.
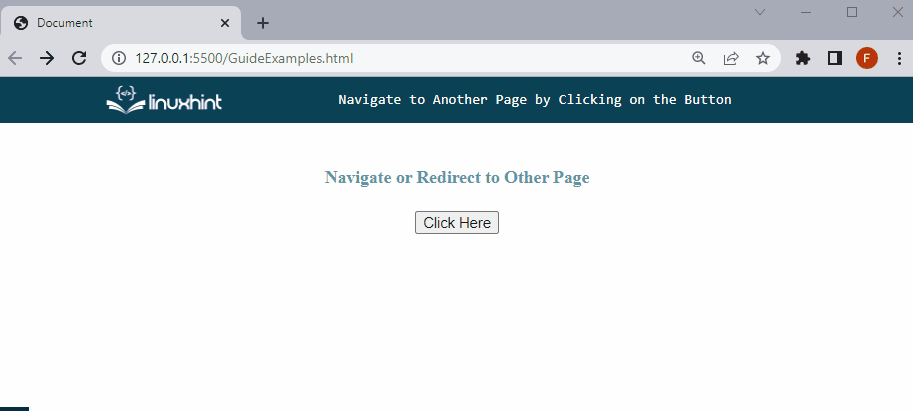
Example 29: How to Navigate to Another Page in JavaScript using buttons?
To navigate the page on the button click, use the following JavaScript approaches:
- assign() method
- replace() method
- href attribute
Here, we will discuss the “href” attribute for navigating pages in JavaScript. For understanding the working of other approaches, follow this post.
Syntax
The given syntax is utilized for the “href” attribute to navigate to the page in JavaScript:
Create a button and attach an “onclick” event that will call the function “navigate()”:
Define a function named “navigate()” and set the URL for navigating using the “href” attribute:
location.href = "https://linuxhint.com";
}
It can be seen that the page has been successfully navigated to the Linuxhint official web page:
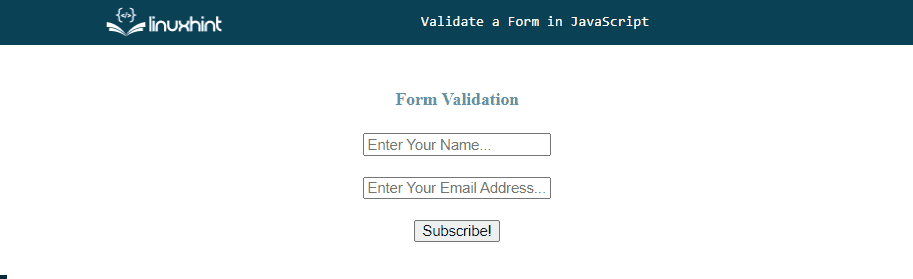
Example 30: How to Validate a Form in JavaScript?
In the given example, we will create and validate the form for subscribing to our YouTube channel. Here, in an HTML file, first, we will create a form with two input fields “for name” and “for email address” and a submit button that will call the function “submitForm()” for the validation:
<input type="text" name="name" id="nameField" autocomplete="off" placeholder="Enter Your Name..."/><br><br>
<input type="text" name="email" id="emailField" autocomplete="off" placeholder="Enter Your Email Address..."/><br><br>
<button type="submit" onclick="submitForm()">Subscribe!</button>
</form>
In the JavaScript file, define the “submitForm()” function for the form validation that will be called on click of the “Submit” button. For field values validation, we will use the “regular expression”:
var name = document.forms.formValidation.name.value;
var mail = document.forms.formValidation.email.value;
var mailPattern = /^\w+([\.-]?\w+)*@\w+([\.-]?\w+)*(\.\w{2,3})+$/g;
var namePattern = /\d+$/g;
if (name == "" && mail == "") {
alert("Fill the fields");
return false;
}
if (name == "" || namePattern.test(name)) {
alert("Enter your name");
return false;
}
if (mail == "" || !mailPattern.test(mail)) {
alert("Enter a valid email address");
return false;
}
alert("Thanks For Subscribing Linuxhint Youtube Channel");
return true;
}
Output
Conclusion
In this guide, we have presented 30 JavaScript examples that are helpful for beginners as well as professionals. We started with examples from the basic, intermediate, and then shifted to the advanced level. For instance, printing a message on the console, clear the console, use an “alert()” in JavaScript, concatenate strings, conditional statements, loops, and operators in JavaScript. Also, you can understand how to navigate to another page by clicking on the button and the form validation in JavaScript through this guide.
Source: linuxhint.com