How to Give an Element a Linear Gradient Background in Tailwind?
This guide explains the procedure of assigning a linear gradient background in Tailwind CSS by covering the following sections:
- How to Give an Element a Linear Gradient Background in Tailwind?
- Example 1: Implementing All Background Image Utility Classes to Create Linear Gradient
- Example 2: Give an Element a Linear Gradient Background Via Hover, Focus and Other States
- Bonus Tip: Assigning LinearGradient to Text
- Conclusion
How to Give an Element a Linear Gradient Background in Tailwind?
The “Background Image” utility offers various classes to design the background of an element to implement specific images or gradients according to the requirements. To be specific for linear gradients, the “Background Image” utility offers “8” classes, each of these classes creates a unique pattern of gradient. The starting and ending direction of gradient color can also be provided to create custom design patterns as well.
The classes offered by the “Background Image” utility for the creation of line gradients are stated below:
Where “*” identifies the direction of the gradient that needs to be inserted. For instance, “br” means bottom right, “t” means top, “tr” means top right.
The above syntax only inserts the gradient in a specified direction in order to add colors that specify the colors of the gradient. Then, the below syntax should be followed and inserted next to the upper discussed syntax:
Let’s look over the table to understand these classes and the CSS properties that can also be used to perform or create the same effect:
| Classes | Description | CSS |
| bg-gradient-to-tl | Insert gradient from the Top Left direction. | background-image: linear-gradient(to top left, startColor, endColor); |
| bg-gradient-to-br | Insert gradient from the Bottom Right direction. | background-image: linear-gradient(to bottom right, startColor, endColor); |
| bg-gradient-to-l | Insert gradient from the Left direction. | background-image: linear-gradient(to left, startColor, endColor); |
| bg-gradient-to-t | Insert gradient from the Top direction. | background-image: linear-gradient(to top, startColor, endColor); |
| bg-gradient-to-b | Insert gradient from the Bottom direction. | background-image: linear-gradient(to bottom, startColor, endColor); |
| bg-gradient-to-tr | Insert gradient from the Top Right direction. | background-image: linear-gradient(to top right, startColor, endColor); |
| bg-gradient-to-bl | Insert gradient from the Bottom Left direction. | background-image: linear-gradient(to bottom left, startColor, endColor); |
| bg-gradient-to-r | Insert gradient from the Right direction. | background-image: linear-gradient(to right, startColor, endColor); |
| bg-none | Removes all assigned background styling like gradients. | background-image: none; |
Now, let’s have a practical implementation for some of the above-discussed classes.
Example 1: Implementing All Background Image Utility Classes to Create Linear Gradient
In this example, the “Background Image” utility classes that are discussed in the above table to create a linear gradient are implemented below:
<html lang="en">
<head>
<script src="https://cdn.tailwindcss.com"></script>
</head>
<body class="p-3">
<p>
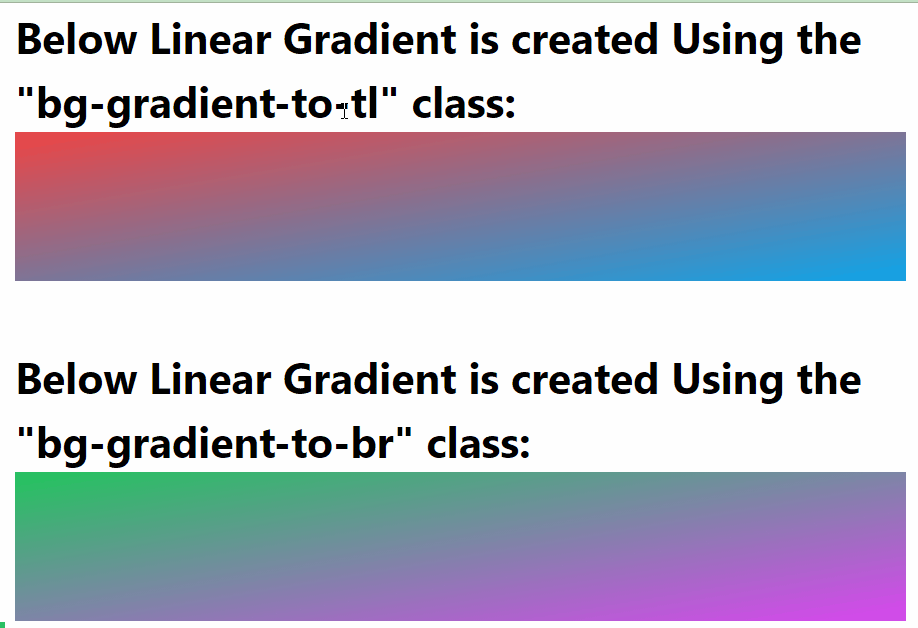
<b> Below Linear Gradient is created Using the "bg-gradient-to-tl" class:</b>
</p>
<div class="h-14 bg-gradient-to-tl from-sky-500 to-indigo-500"></div>
<br>
<p>
<b> Below Linear Gradient is created Using the "bg-gradient-to-br" class:</b>
</p>
<div class="h-14 bg-gradient-to-br from-green-500 to-fuchsia-500"></div>
<br>
<p>
<b> Below Linear Gradient is created Using the "bg-gradient-to-l" class:</b>
</p>
<div class="h-14 bg-gradient-to-l from-teal-500 to-pink-500"></div>
<br>
<p>
<b> Below Linear Gradient is created Using the "bg-gradient-to-t" class:</b>
</p>
<div class="h-14 bg-gradient-to-t from-orange-500 to-blue-500"></div>
<br>
<p>
<b> Below Linear Gradient is created Using the "bg-gradient-to-b" class:</b>
</p>
<div class="h-14 bg-gradient-to-b from-cyan-500 to-indigo-500"></div>
<br>
<p>
<b> Below Linear Gradient is created Using the "bg-gradient-to-tr" class:</b>
</p>
<div class="h-14 bg-gradient-to-tr from-green-500 to-yellow-500"></div>
<br>
<p>
<b> Below Linear Gradient is created Using the "bg-gradient-to-bl" class:</b>
</p>
<div class="h-14 bg-gradient-to-bl from-cyan-500 to-red-500"></div>
<br>
<p>
<b> Below Linear Gradient is created Using the "bg-gradient-to-r" class:</b>
</p>
<div class="h-14 bg-gradient-to-r from-gray-500 to-pink-500"></div>
</body>
</html>
Explanation of the above code is stated below:
- First, the CDN(Content Delivery Network) for the Tailwind framework is added inside the file using the “<script>” inside the “<head>” tag.
- Next, multiple “<div>” tags are used having the same height of “3.5 rem” or “56px”.
- Then, all discussed classes in the above-mentioned table are assigned to each “div” element. Different starting and ending colors are also assigned using the “from” and “to” keywords to each “div” for better visual separation.
The generated output shows the assignment of different types of gradients to the targeted “div” element:
Example 2: Give an Element a Linear Gradient Background Via Hover, Focus and Other States
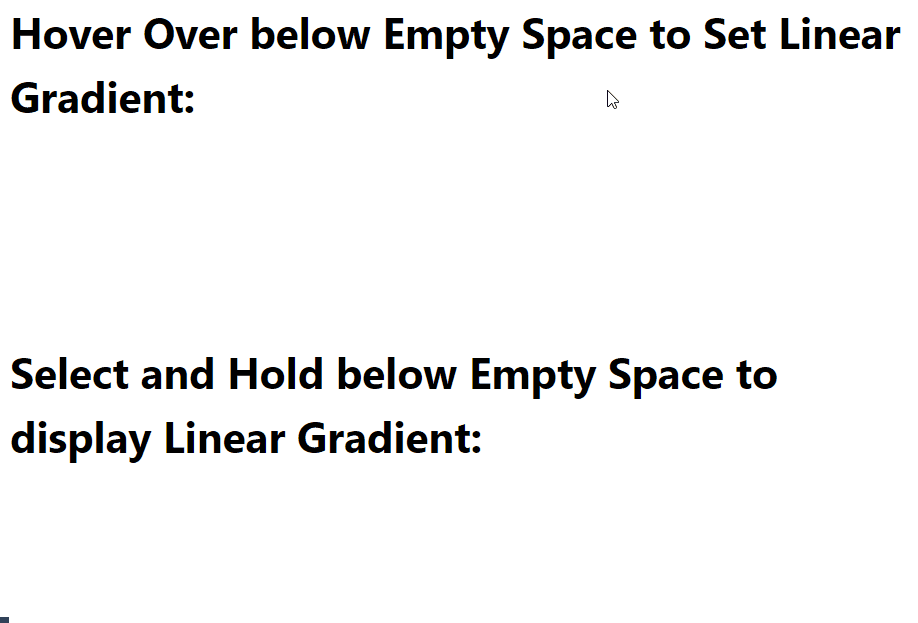
The “Background Image” utility classes can be performed according to user actions like hovering or selecting an element. To get a practical demonstration of this scenario, visit the below code which inserts the gradient over an element when a user hovers or press and hold the specified element or select:
<b> Hover Over below Empty Space to Set Linear Gradient: </b>
</p>
<div class="h-14 hover:bg-gradient-to-bl from-cyan-500 to-red-500"></div>
<br>
<p>
<b> Select and Hold below Empty Space to display Linear Gradient: </b>
</p>
<div class="h-14 active:bg-gradient-to-r from-gray-500 to-pink-500"></div>
In the above code, the “hover” and “active” states are being used to give a linear gradient to the specified “div” element. The “hover” state applies gradient when the mouse moves over the targeted element and “active” when the targeted element becomes active like being held or clicked by the end user.
The output generated for the above-discussed code shows that the linear gradient appears on allotted states as desired:
Bonus Tip: Assigning LinearGradient to Text
The linear Gradient can be applied to texts as well, that text can be utilized in the hero section or to display the most important stuff like new arrivals of stuff and so on. For visual demonstration check out below code block:
<html lang="en">
<head>
<script src="https://cdn.tailwindcss.com"></script>
</head>
<body class="p-3">
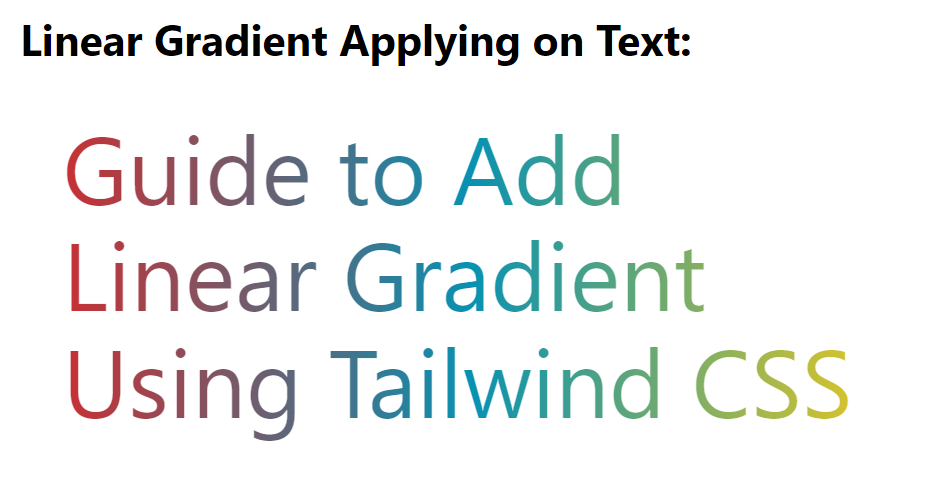
<p>
<b> Linear Gradient Applying on Text: </b>
</p>
<h1 class="text-4xl p-4 bg-gradient-to-r from-red-600 via-cyan-600
to-yellow-400 bg-clip-text text-transparent">
Guide to Add Linear Gradient Using Tailwind CSS
</h1>
</body>
</html>
The description of the above code block is shown below:
- First, the CDN for the Tailwind framework is added inside the “<script>” tag to use the utilities and classes provided by Tailwind.
- Next, the “<h1>” tag is used to display random targeted text.
- The “class” attribute is utilized with the “<h1>” element and the tailwind styling classes are placed as the value for the “class” attribute.
- The applied classes include “text-4xl” to set the “font-size” to “36px’ and the “bg-gradient-to-r” to insert the linear gradient from the “right” direction. To assign the colors of gradients, the “from”, “via” and “to” classes are utilized that represent the starting color, middle color, and ending color.
- To make each character of text editable the “bd-clip-text” class is used along with the “text-transparent” class.
The output after executing the above code shows that a Linear Gradient Background is now assigned to the targeted text element:
That’s all about giving an element a linear gradient background in tailwind CSS.
Conclusion
To give an element a linear gradient background in a tailwind, the classes provided by the “Background Image” utility are mainly used. These classes are “bg-gradient-to-tl”, “bg-gradient-to-br”, “bg-gradient-to-l”, “bg-gradient-to-t”, “bg-gradient-to-b”, “bg-gradient-to-tr”, “bg-gradient-to-bl”, and “bg-gradient-to-r”. In case the user wants to delete all applied gradients over the selected element then the “bg-none” class is utilized.
Source: linuxhint.com