How to Troubleshoot Windows 10 Camera Not Working
Windows 10 introduces a built-in Camera feature in the operating system that plays a vital role when you have an online face-to-face meeting with another person or having an online class. Systems like laptops come with integrated Cameras located at the top-middle of the screen. For some reason, if you are facing issues while working with your Camera on Windows 10, you should follow this guide to find out different fixes to solve Camera-related issues.
Why Camera Issue Occurs in Windows 10
There are number of reasons for Camera not working on your Windows 10 system, these include:
- Outdated Software
- Hardware Problem
- Incompatibility Issue
- Privacy Settings
- System Updates
How to Troubleshoot Windows 10 Camera Not Working
If you are facing the Camera related issue on Window 10, then follow the below-given fixes to troubleshoot the problem:
- Check the Physical Camera Button
- Restart the System
- Update the Window
- Allow Access to the Camera on this Device
- Update the Camera Driver
- Reinstall the Camera Driver
- Reset the Camera App Settings
- Reinstall the Camera App
Fix 1: Check the Physical Camera Button
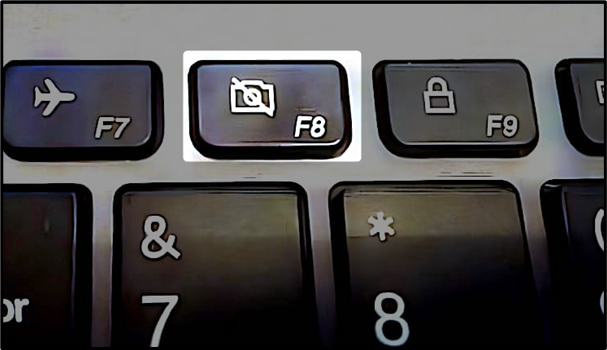
Some devices have a physical key that allows you to turn off/on the Camera on your Windows system. If your laptop has one, check to ensure it is turned on. This key is usually located on the function keys; however, the specific key may vary depending on the manufacturer of your system, but usually the key is either F6, F7 or F8. You should check them according to your manufacturer from their official site.
Fix 2: Restart the System
Windows update and backhand changes may sometimes cause components to stop working. The most straight possible way to solve this issue is to restart the system; it is seen that in most cases, restarting the system will solve the bugs and errors that occurs in your system.

Fix 3: Update the Window
If your camera is still not working, check for a Windows update; sometimes, Windows files can become corrupted or missing, and updating the system can resolve such an issue. To update Windows, follow the below steps:
Step 1: Open the Start menu, type “check for update” in a search bar, open it using the Open button.
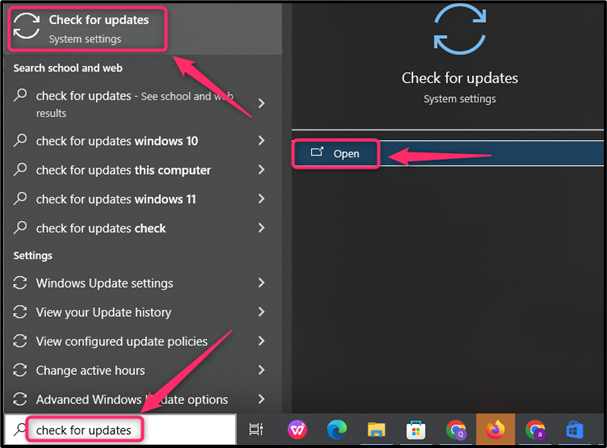
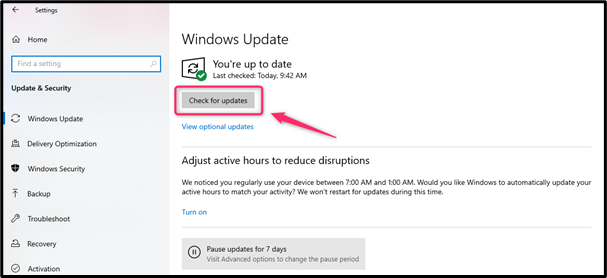
Step 2: In the Windows Update settings, choose the “Check for updates” option, and if the any update is available download it.
Note: Restart the system once the update is completed to apply the new changes to the system.
Fix 4: Allow Access to the Camera on this Device
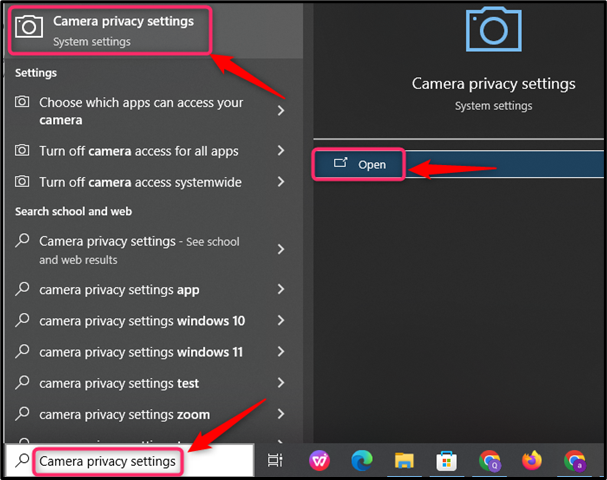
If you are still having trouble connecting your Camera on Windows 10 system, you should check the Camera settings to ensure that it is not restricted by the Camera’s privacy settings. To verify the Camera’s privacy settings, follow these steps:
Step 1: Open the Start Menu, type Camera privacy settings, and click on the Open option to open the privacy settings.
Step 2: Inside the Camera settings, click the Change button and toggle the switch to on state to allow the Camera access to the device.

Fix 5: Update the Camera Driver
Drivers are a major part of any operating system and they are responsible for the communication between the component and the operating system. If a driver is not working properly then this might cause an issue with that specific system. If your Camera is still not working after performing the above steps, then you should go with updating the Camera driver on your system; this can be done through the following steps:
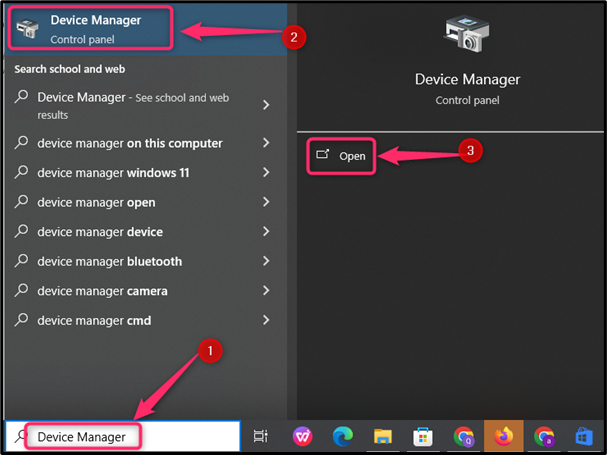
Step 1: Open the Device Manager from the Start menu by typing the Device Manager and choosing the Open button to open it.
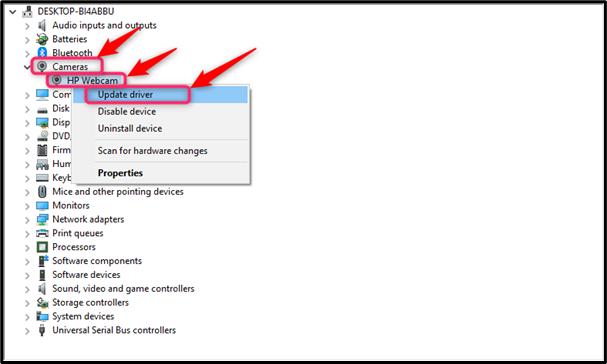
Step 2: To update your Camera driver, expand the Camera devices category, and select the Camera driver. Right-click on the available driver option and choose the Update driver option; this will automatically update camera driver if the update is available.
Fix 6: Reinstall the Camera Driver
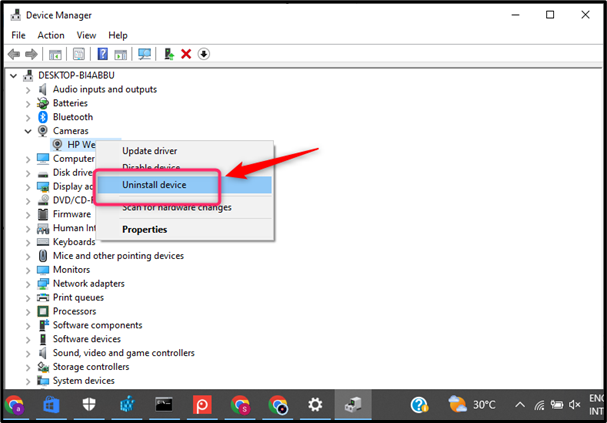
If your Camera is still not working after updating the Camera driver, then reinstalling the Camera driver is the option you should consider after performing the above methods. To do this, navigate to the Device Manager from the Start menu, right-click on the Camera driver, then choose the Uninstall the device option to uninstall the driver from the system.
Note: Once you have completed the uninstall process, restart the system and Windows will automatically reinstall the driver for you.
Fix 7: Reset the Camera App Settings
Sometimes unusual changes might stop the application from working on your Windows system, and it is better to reset the application settings to fix the problem. Resetting the system is the another fix to resolve camera related issue using the following steps to fix the problem.
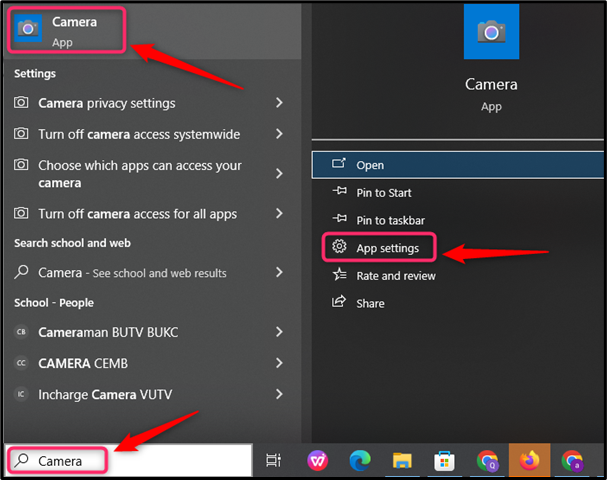
Step 1: Open the Start Menu, type Camera, and click the App settings.
Step 2: After that, scroll down the screen to find the Reset option. Once found, hit the Reset button to reset the Camera settings on the Windows system.

Fix 8: Reinstall the Camera App
Third-party applications or malware can sometimes corrupt the application files for the Camera app. If your Camera is still not working after trying all the above troubleshooting methods, you can try reinstalling the Camera app, which can be done through the following steps:
Step 1: Open the Start Menu, type PowerShell in the search bar, and click to Run as an administrator.
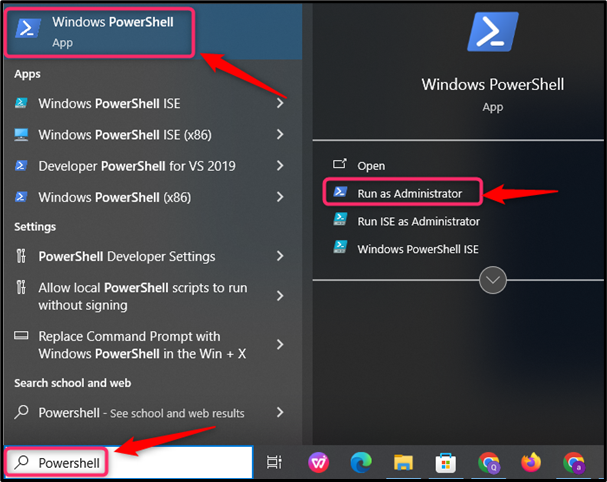
Step 2: Once you have opened the PowerShell as an administrator, paste the command mentioned below and press Enter to execute it.

This will uninstall the Camera app on your Windows system.
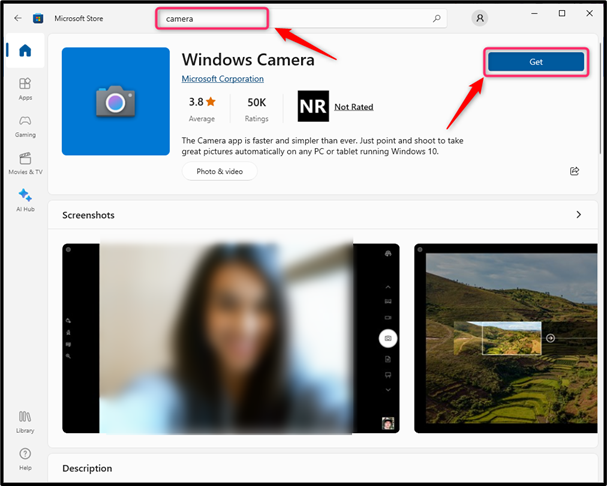
Step 3: You can then open the Microsoft Store from the taskbar, write camera in the search bar, and click on the first result called Windows Camera. To install the Camera application, choose the Get button and wait for the completion of the installation
Conclusion
To troubleshoot the Windows 10 Camera, check the physical Camera button to ensure it is turned on. If the Camera is still not working, you can also try other methods, such as restarting the system, updating the Windows, allowing access to camera, updating or reinstalling the driver, resetting the application settings, and reinstalling the Camera application. All these methods should be carefully done to fix the Camera related issues on Windows systems.
Source: linuxhint.com