How to Install AWS SDK in Node.js
Contents Overview
- What is AWS SDK and How Does it Work?
- What Runtimes Does the “AWS SDK for JavaScript” Support?
- Prerequisites for Installing AWS SDK in Node.js
- How to Install AWS SDK in Node.js?
- How to Upload Data to a Bucket Using AWS SDK?
- Conclusion
What is AWS SDK and How Does it Work?
“AWS SDK” for JavaScript provides a set of libraries that simplify the usage of AWS services that are familiar to JS programmers. Also, it supports API lifecycle such as credential management, serialization, deserialization, etc. In addition to that, it is compatible with the high-level abstractions for streamlining development.
What Runtimes Does the “AWS SDK for JavaScript” Support?
The “AWS SDK for JavaScript” is compatible with the following runtimes:
- Node.js for server.
- JavaScript for browser.
- React Native for mobile development.
- Cross Runtime.
Prerequisites for Installing AWS SDK in Node.js
Below are the prerequisites that need to be considered before installing AWS SDK in Node.js:
- Installed Node.js on the system.
- Access to AWS credentials.
How to Install AWS SDK in Node.js?
To install “AWS SDK” in Node.js, apply the following steps:
Step 1: Setup the Project
Before proceeding to install AWS SDK in Node.js, execute the following cmdlet to set up/initialize the project:
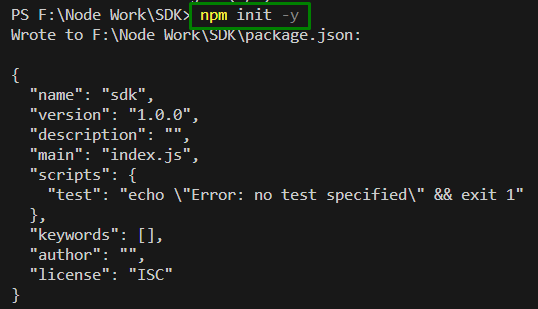
In the above command, the “-y” i.e., “yes” flag opts for all the options with the default npm values.
Step 2: Install “AWS SDK”
Now, install “AWS SDK” for JavaScript in the project via the following command:
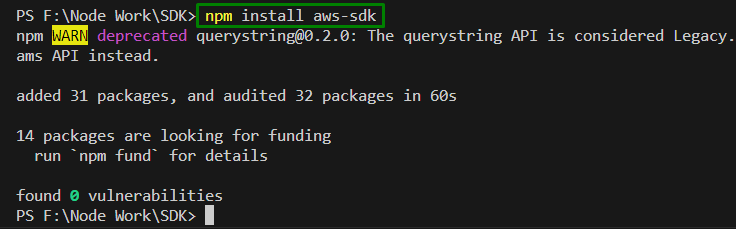
This cmdlet installs SDK for JavaScript and updates the “package.json” file to list the SDK as a project dependency.
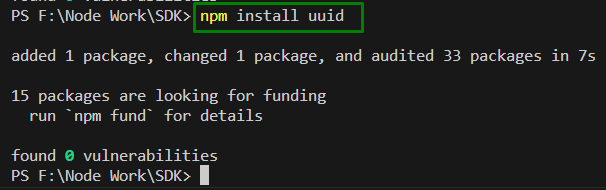
Step 3: Install the “uuid” Package
Now, install this package that updates the “package.json” file as well:
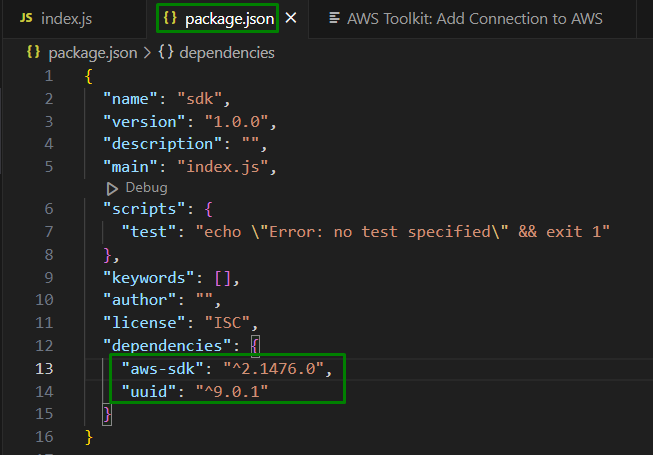
After installing/downloading the discussed packages, the “package.json” file will look like this:
Step 4: Configure the Credentials
Now, the credentials need to be provided to AWS to make only your account and its resources accessed via SDK. For more information for fetching the account credentials, redirect to this link.
Note: The credentials file looks as follows:
aws_access_key_id = YOUR_ACCESS_KEY_ID
aws_secret_access_key = YOUR_SECRET_ACCESS_KEY
Step 5: Install AWS in the System
Also, download AWS in the system and set it up via this link.
Step 6: Confirm the Installation
After the setup is completed, check if AWS is installed properly by checking the AWS version in the command prompt, as follows:

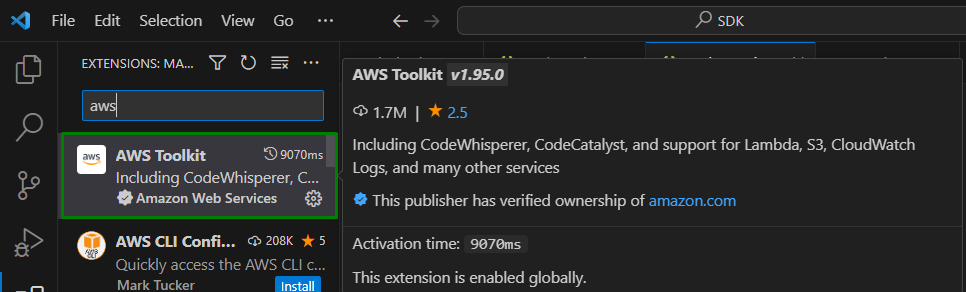
Step 7: Install the “AWS toolkit” Extension
Also, install the following “AWS Toolkit” extension to streamline the procedure:
How to Upload Data to a Bucket Using AWS SDK?
To upload data to a bucket in the text file, consider the below-given steps:
Step 1: Write the Code
First, add the following code lines in the “index.js” file to check that the configured credentials are set accurately:
get.config.getCredentials(function(error) {
if (error)
console.log(error.stack);
else {
console.log("Access Key -> ", get.config.credentials.accessKeyId);
}
});
In this code:
- Firstly, import the “aws-sdk” package and fetch the credentials via the “getCredentials()” method.
- Also, apply the “if/else” statement to log an error if there is an issue with the set credentials.
- Otherwise, the credentials i.e., Access Key is displayed via the “else” statement.
Output
Execute the below-stated command to run the code and log the requested access key:

Step 2: Create Another package.json File
After that, create a separate “package.json” file comprising the following JSON content in it:
"dependencies": {},
"name": "aws-nodejs-test",
"description": "AWS SDK for JavaScript.",
"version": "1.0.1",
"main": "test.js",
"devDependencies": {},
"scripts": {
"test": "echo "Error: no test specified" && exit 1"
},
"author": "NAME",
"license": "ISC"
}
Here, after installing the modules, the “dependencies” section of the file will be completed. Also, the description and the associated “js” file, etc are specified.
Step 3: Write the Node.js Code
Now, create a new “test.js” file containing the following code lines:
var get2 = require('uuid');
var bucket = 'node-sdk-test-' + get2.v4();
var key = 'hello_world.txt';
var out = new get1.S3({apiVersion: '2006-03-01'}).createBucket({Bucket: bucket}).promise();
out.then(
function(data) {
var x = {Bucket: bucket, Key: key, Body: 'Hello World!'};
var y = new get1.S3({apiVersion: '2006-03-01'}).putObject(x).promise();
y.then(
function(data) {
console.log("Data Successfully Uploaded to -> " + bucket + "/" + key);
});
}).catch(
function(error) {
console.error(error, error.stack);
});
The code explanation is as follows:
- First of all, import the “aws-sdk” and “uuid” packages.
- After that, create a unique bucket name and specify the name for the uploaded object key named “hello_world.txt”.
- Now, create a promise on the S3 service object and store it in the “out” variable.
- Also, cope with the promise fulfilled rejected states in the “then()” method.
- In the function definition, specify the parameters for the “putObject” call in the “x” variable along with the file content and create the “objectUpload” promise stored in the “y” variable.
- Lastly, specify another function that displays the upload message on the console.
- In the “catch” block, cope with the faced errors, if any.
Output
Execute the code utilizing the below command:

This success message indicates that the data has been uploaded to the bucket successfully.
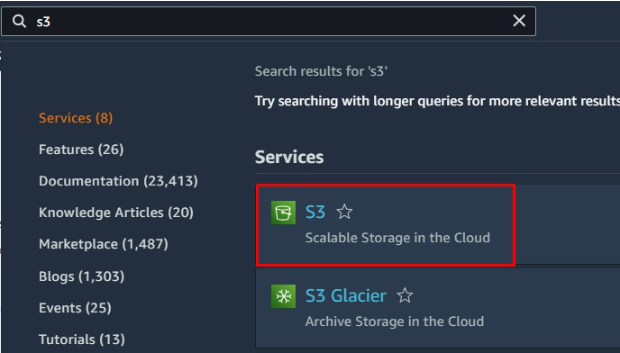
Step 4: Analyze the AWS Bucket
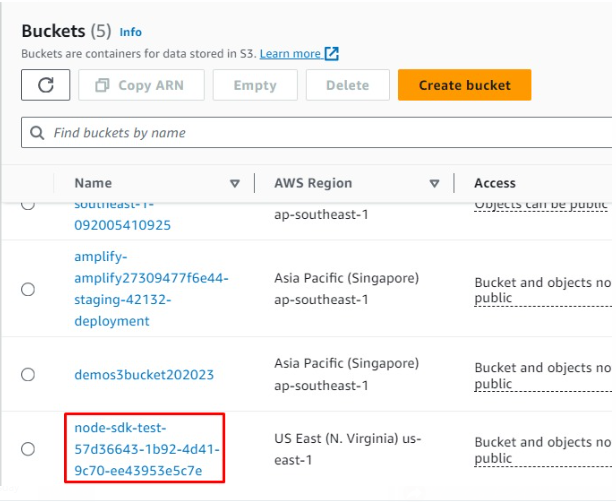
Below is the bucket i.e., “S3(Simple Storage Service)” in which the target text file is saved:
In the below image, it can be seen that the “node-sdk-test” bucket is contained. Click on this bucket to view the object and the file content:
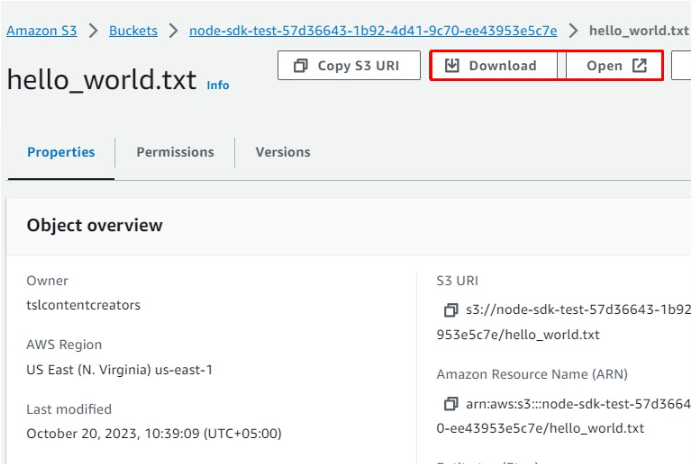
Here, it can be seen that the stated text file is there. Click on this file to access its content:
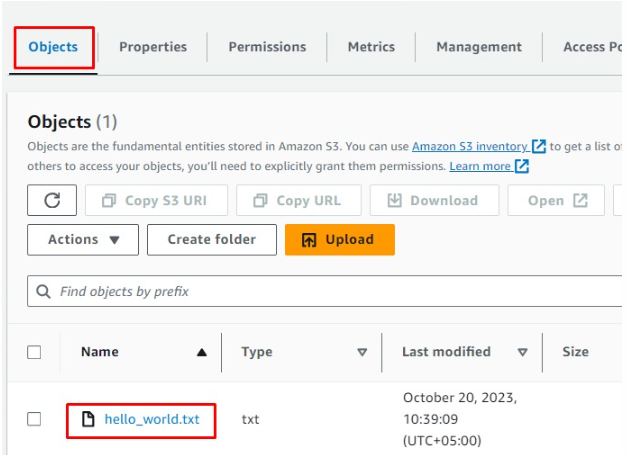
Step 5: Access the File Content
Now, trigger “Download” or “Open” to access/open the file content:
Upon doing so, the written file’s content will be displayed, as follows:

Concluasion
To install AWS SDK in Node.js, set up the project, install the “aws-sdk” and “uuid” packages, configure the credentials, install AWS in the system, create a package.json file, and write the code that uploads the data to the bucket in a text file.
Source: linuxhint.com