How to Implement Effective Health Checks in HAProxy
Only the servers that pass the health checks are added to the rotation. That way, a server won’t be selected for use if it doesn’t pass the health check, minimizing the chances of downtime. Throughout this post, we will dig deeper into understanding how the health checks in HAProxy work and what it takes to implement an effective health check. Let’s begin!
What Are Health Checks in HAProxy
When configuring HAProxy, one task is to specify what backend servers to use for your application. That way, the traffic will be distributed to the servers to avoid overloading any server. However, health checks help to ascertain that a server is only selected to handle the traffic if it is okay.
Health checks are done on each server, and only those that pass are added to the rotation for use in the load balancing. The health checks are performed by sending requests, such as TCP or HTTP, to a predefined endpoint on your backend server. The health results that are sent back by the backend server determine its status. For instance, the server’s status could show UP or DOWN or send an okay 200 status which confirms that the server is healthy.
In configuring the health checks, ensure that you have a predefined endpoint to use for the health checks. There are different options that you can use to set up your endpoint. For instance, you can return a status code or message depending on the server’s status. All the health checks are defined in the backend section of your HAProxy config file. Open the config file and create your frontend section.
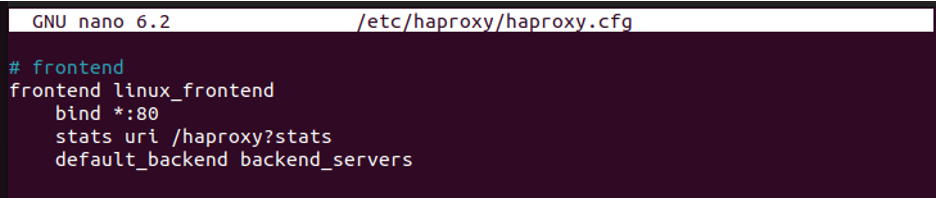
Here’s a basic example of a frontend section that binds port 80, sets a stats page, and specifies the default backend.
The next step is to create the backend section. The following are different examples on how to implement an effective health check in HAProxy.
Example 1: Implementing Effective Active Health Checks
A simple way of implementing the health checks in HAProxy is by setting the active health checks. With this option, HAProxy will try connecting with the server. If no response is sent, it deems the server unhealthy and removes it from the rotation. The default way of implementing the active health checks is by adding the “check” keyword on every server line for HAProxy to check them all.

Although this first example works, it’s not the best way to implement the health checks. Besides, it uses the default settings. For instance, the interval between the checks, marked as inter, is set to two seconds. The fall, the number of failed checks allowed, is set to three. To adjust these settings, specify the preferred inter time and number of checks as shown in the following example:

Example 2: Implementing an HTTP Health Check
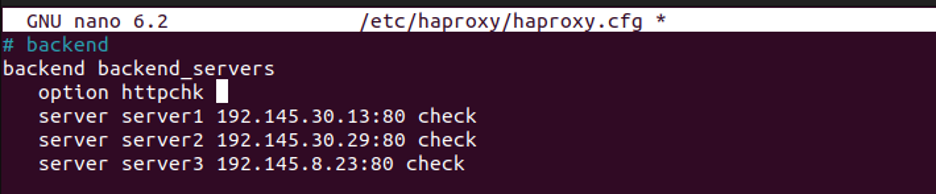
With an HTTP health check, HAProxy will send an HTTP request to all servers with the “check” keyword. Based on the response, it concludes the server’s status. Examples of successful server responses fall in the range of 2xx or 3xx. A response such as 200 OK means that the server is in a good state.
For this example, add the “option httpchk” line in your backend.
Example 3: Working with a GET Request
HAProxy sends a GET request to the path “/” when making an HTTP request. However, if you have your endpoint configured in another path, you can specify the URL path such as “/health”, and HAProxy will send the GET request to it.
Based on your endpoint, the server will use the response to determine the server’s status. Here’s how to implement it:

Example 4: Specifying a GET Request Path and Response Status
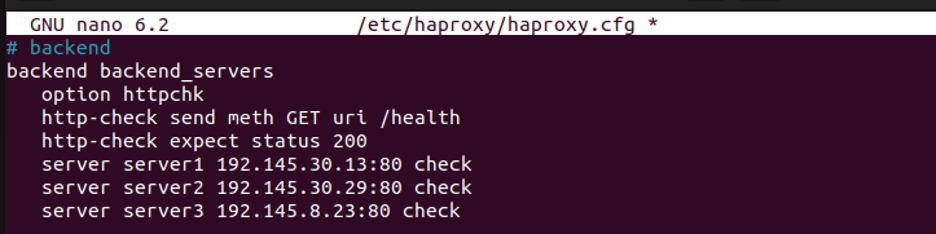
With an endpoint, you can specify what successful response to expect from the endpoint GET request to determine the server’s status. For this example, our GET request path is “/health”, and we expect a 200 response status to confirm that the server is in good health to handle the load balancing and other tasks.
Once you modified your HAProxy configuration file, restart HAProxy for the changes to take effect.

That’s it! You implemented the effective health checks on your HAProxy. You can access the stats page or check the log file with the following command to confirm that the health checks are working as expected:
Conclusion
You can implement an effective health check in HAProxy in different ways. The health checks are implemented in the backend section of the HAProxy configuration file, and this post has given different examples on how to go about it. Check your ideal method and comfortably implement an effective health check in HAProxy.
Source: linuxhint.com