How To Enable DNS Over TLS on Debian 12 Bookworm
This tutorial will help you setup DoT (short for DNS over TLS) security into your Debian 12 Bookworm. With this, we hope you will have a very secure internet access so nobody can forcefully block or redirect your browsing activities in the middle especially for your dns line. This article complements our both Debian 12 Install Guide and After Install Recommendation. We choose here a secure public dns service that serves DoT —Quad9 from Swiss– to replace our internet service provider’s one which does not support it. We hope this will be helpful for you.

Subscribe to UbuntuBuzz Telegram Channel to get article updates.
Requirements
9.9.9.9
149.112.112.112
1. Install bind9
On our Debian Bookworm, the required tools like ‘dig’ are not yet installed built-in so we need to install them manually:
$ sudo apt install bind9-dnsutils
2. Install systemd-resolved
On Debian Bookworm we installed (live gnome edition), the required software package ‘systemd-resolved’ is not installed so we should do it:
$ sudo apt-get install systemd-resolved
$ sudo systemctl enable --now systemd-resolved
3. Configure System DNS Settings
3.1. Via Terminal
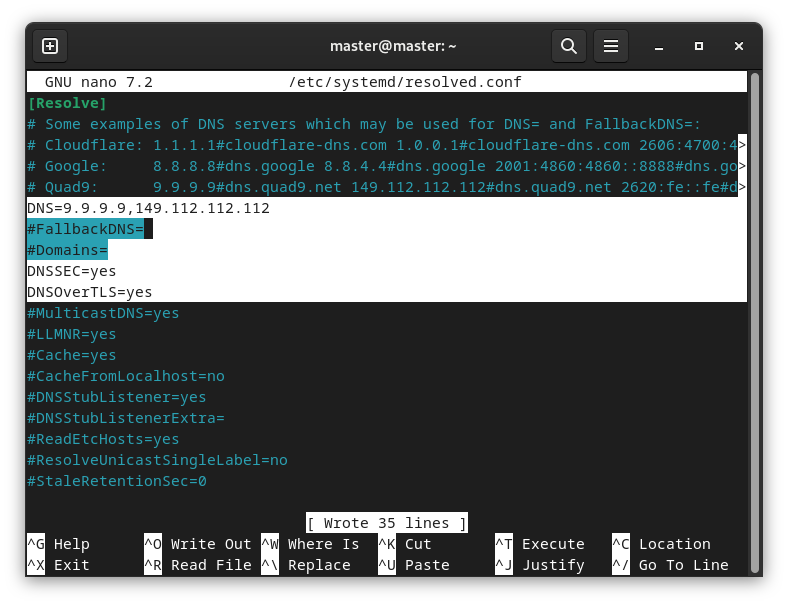
Now we need to edit resolved.conf text file of systemd-resolved:
$ sudo nano /etc/systemd/resolved.conf
For example if we use Quad9 DNS, then the resolved.conf content will look like below:
[Resolve]DNS=9.9.9.9,149.112.112.112
DNSOverTLS=yes
DNSSEC=yes
Viewed from Terminal, it will look like below. Read the white lines without beginning hashtags. Please ignore any unrelated lines.
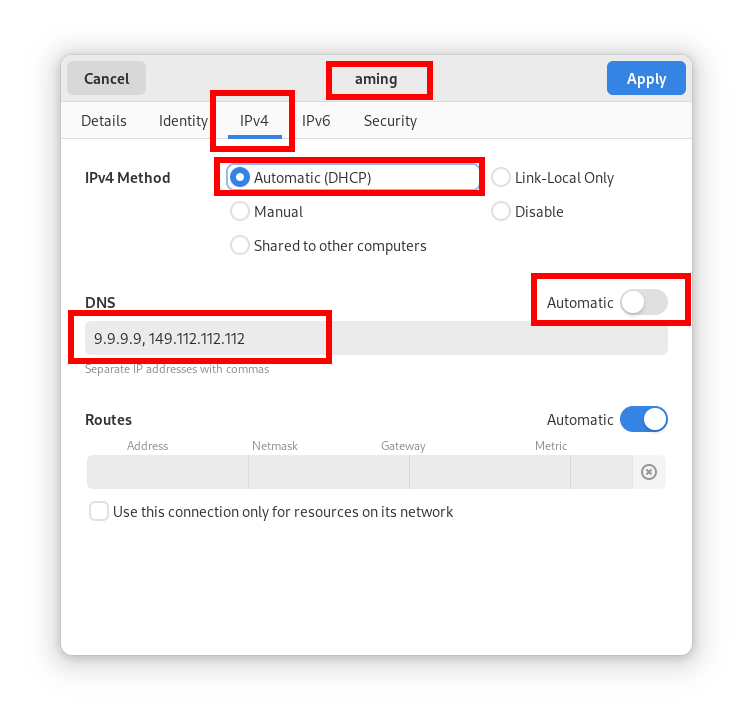
3.2. Via Graphical User Interface (GUI)
We also need to edit DNS addresses in the graphical network manager if we use Debian 12 GNOME Desktop.
- Click network icon to the top panel.
- Click All Network.
- System Settings will show ‘Wifi’ or ‘Network’ configuration.
- Click gear icon to the currently connected network. For example, ours is “aming”.
- A configuration dialog will show.
- Open IPv4 tab.
- Disable “Automatic” option on DNS section.
- Fill in DNS addresses into DNS input box. See picture below.
- Click Apply.
- Do this for every network you are usually connected to such as wifi, cable network, usb tethering etc.
4. Enable DNS
$ sudo systemctl restart systemd-resolved
5. Confirm if DoT is working
5.1. Using Firefox
Visit on.quad9.net and you should see the page says “Yes, you ARE using quad9” meaning your DNS is secure i.e. encrypted over TLS.

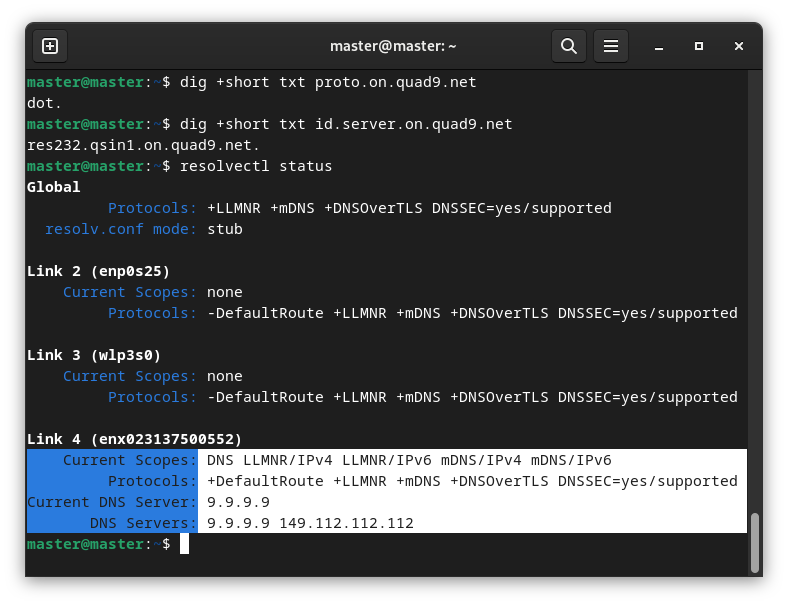
5.2. Using Terminal
If we use Quad9 addresses, run command lines below and they should show replies from Quad9 servers like shown below. Otherwise, your DNS over TLS is failed and you should reconfigure it.
First command and expected result if it works:
$ dig +short txt proto.on.quad9.net
dot.
Second command and expected result if it works:
$ dig +short txt id.server.on.quad9.net
res231.qsin1.on.quad9.net.
Third command and expected result if it works:
$ resolvectl status
Link 4 (enx023137500552)
    Current Scopes: DNS LLMNR/IPv4 LLMNR/IPv6 mDNS/IPv4 mDNS/IPv6
         Protocols: +DefaultRoute +LLMNR +mDNS +DNSOverTLS DNSSEC=yes/supported
Current DNS Server: 9.9.9.9
       DNS Servers: 9.9.9.9 149.112.112.112
Picture below shows how these three commands confirm DNS over TLS is working as expected.
6. Enable or Disable DoT
To enable DoT, finish step number 3 to 5.
To disable DoT, basically you need to reverse what you did in step number 3 to 5 back to its default configuration. Simply write a hashtag in beginning of every edited line like below.
[Resolve]#DNS=9.9.9.9,149.112.112.112
#DNSOverTLS=yes
#DNSSEC=yes
References
This article is licensed under CC BY-SA 3.0.
Source: Ubuntu Buzz !