How to Configure Proxmox VE 8 for PCI/PCIE and NVIDIA GPU Passthrough
Proxmox VE 8 is one of the best open-source and free Type-I hypervisors out there for running QEMU/KVM virtual machines (VMs) and LXC containers. It has a nice web management interface and a lot of features.
One of the most amazing features of Proxmox VE is that it can passthrough PCI/PCIE devices (i.e. an NVIDIA GPU) from your computer to Proxmox VE virtual machines (VMs). The PCI/PCIE passthrough is getting better and better with newer Proxmox VE releases. At the time of this writing, the latest version of Proxmox VE is Proxmox VE v8.1 and it has great PCI/PCIE passthrough support.
In this article, I am going to show you how to configure your Proxmox VE 8 host/server for PCI/PCIE passthrough and configure your NVIDIA GPU for PCIE passthrough on Proxmox VE 8 virtual machines (VMs).
Table of Contents
- Enabling Virtualization from the BIOS/UEFI Firmware of Your Motherboard
- Installing Proxmox VE 8
- Enabling Proxmox VE 8 Community Repositories
- Installing Updates on Proxmox VE 8
- Enabling IOMMU from the BIOS/UEFI Firmware of Your Motherboard
- Enabling IOMMU on Proxmox VE 8
- Verifying if IOMMU is Enabled on Proxmox VE 8
- Loading VFIO Kernel Modules on Proxmox VE 8
- Listing IOMMU Groups on Proxmox VE 8
- Checking if Your NVIDIA GPU Can Be Passthrough to a Proxmox VE 8 Virtual Machine (VM)
- Checking for the Kernel Modules to Blacklist for PCI/PCIE Passthrough on Proxmox VE 8
- Blacklisting Required Kernel Modules for PCI/PCIE Passthrough on Proxmox VE 8
- Configuring Your NVIDIA GPU to Use the VFIO Kernel Module on Proxmox VE 8
- Passthrough the NVIDIA GPU to a Proxmox VE 8 Virtual Machine (VM)
- Still Having Problems with PCI/PCIE Passthrough on Proxmox VE 8 Virtual Machines (VMs)?
- Conclusion
- References
Enabling Virtualization from the BIOS/UEFI Firmware of Your Motherboard
Before you can install Proxmox VE 8 on your computer/server, you must enable the hardware virtualization feature of your processor from the BIOS/UEFI firmware of your motherboard. The process is different for different motherboards. So, if you need any assistance in enabling hardware virtualization on your motherboard, read this article.
Installing Proxmox VE 8
Proxmox VE 8 is free to download, install, and use. Before you get started, make sure to install Proxmox VE 8 on your computer. If you need any assistance on that, read this article.
Enabling Proxmox VE 8 Community Repositories
Once you have Proxmox VE 8 installed on your computer/server, make sure to enable the Proxmox VE 8 community package repositories.
By default, Proxmox VE 8 enterprise package repositories are enabled and you won’t be able to get/install updates and bug fixes from the enterprise repositories unless you have bought Proxmox VE 8 enterprise licenses. So, if you want to use Proxmox VE 8 for free, make sure to enable the Proxmox VE 8 community package repositories to get the latest updates and bug fixes from Proxmox for free.
Installing Updates on Proxmox VE 8
Once you’ve enabled the Proxmox VE 8 community package repositories, make sure to install all the available updates on your Proxmox VE 8 server.
Enabling IOMMU from the BIOS/UEFI Firmware of Your Motherboard
The IOMMU configuration is found in different locations in different motherboards. To enable IOMMU on your motherboard, read this article.
Enabling IOMMU on Proxmox VE 8
Once the IOMMU is enabled on the hardware side, you also need to enable IOMMU from the software side (from Proxmox VE 8).
To enable IOMMU from Proxmox VE 8, you have the add the following kernel boot parameters:
| Processor Vendor | Kernel boot parameters to add |
| Intel | intel_iommu=on, iommu=pt |
| AMD | iommu=pt |
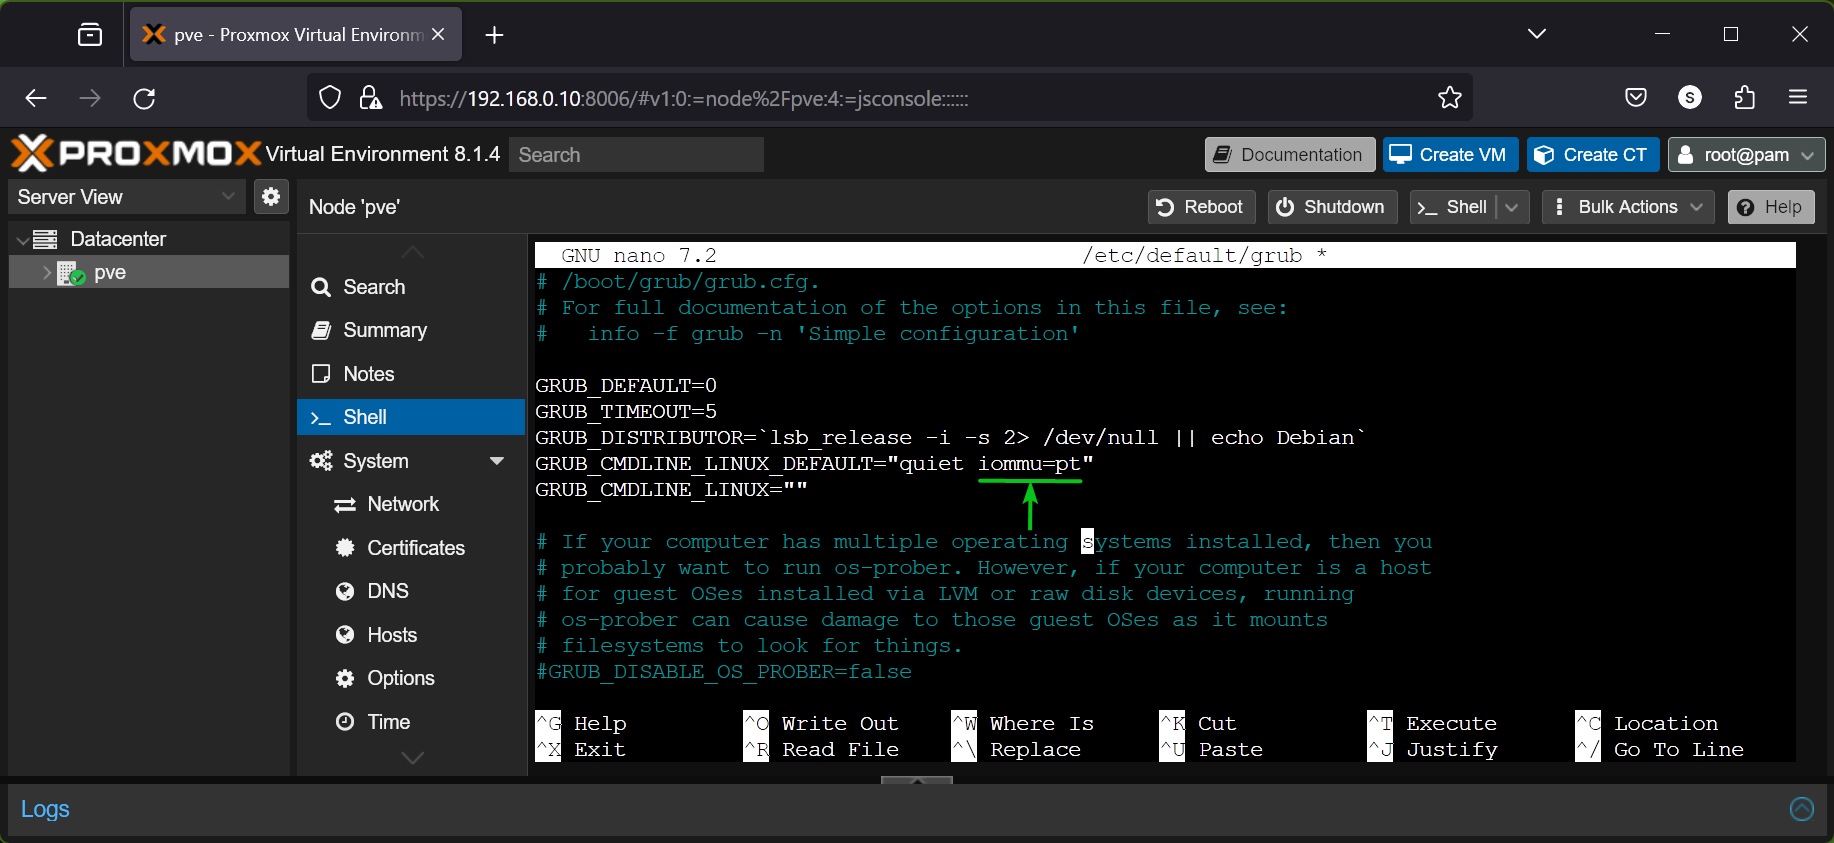
To modify the kernel boot parameters of Proxmox VE 8, open the /etc/default/grub file with the nano text editor as follows:
At the end of the GRUB_CMDLINE_LINUX_DEFAULT, add the required kernel boot parameters for enabling IOMMU depending on the processor you’re using.
As I am using an AMD processor, I have added only the kernel boot parameter iommu=pt at the end of the GRUB_CMDLINE_LINUX_DEFAULT line in the /etc/default/grub file.
Once you’re done, press <Ctrl> + X followed by Y and <Enter> to save the /etc/default/grub file.
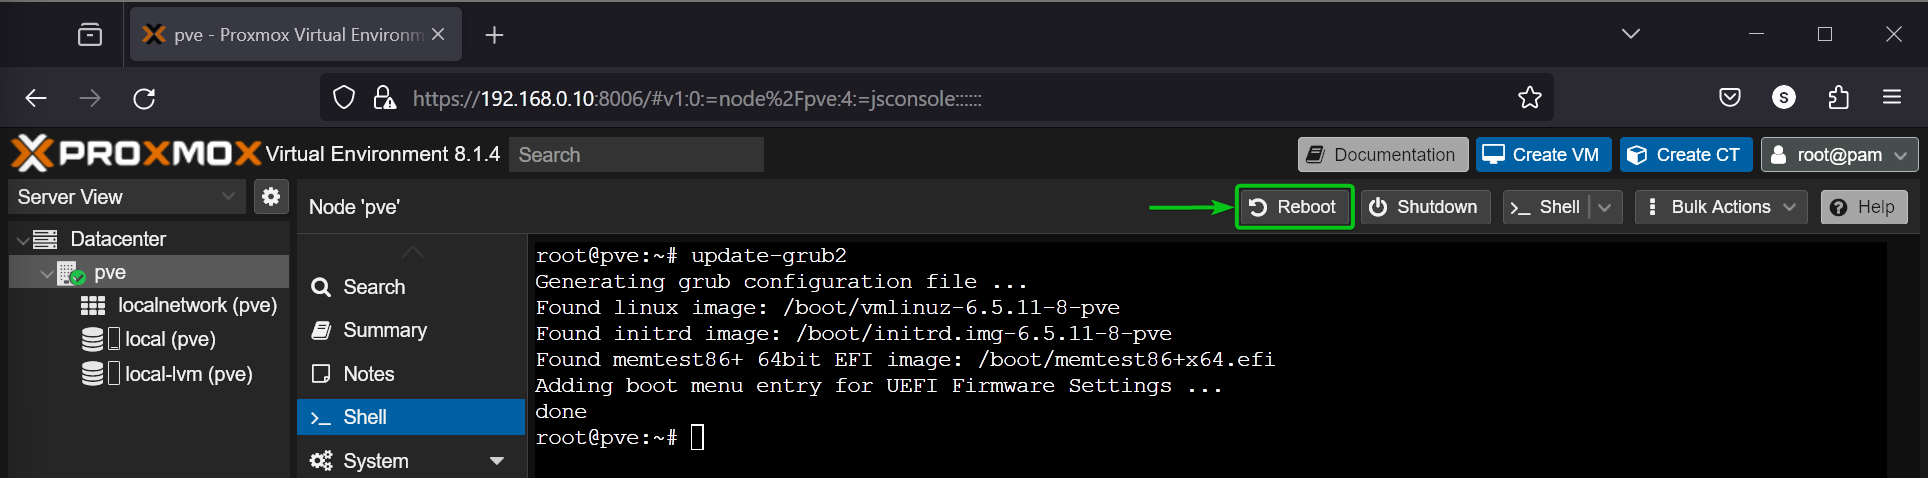
Now, update the GRUB boot configurations with the following command:
Once the GRUB boot configurations are updated, click on Reboot to restart your Proxmox VE 8 server for the changes to take effect.
Verifying if IOMMU is Enabled on Proxmox VE 8
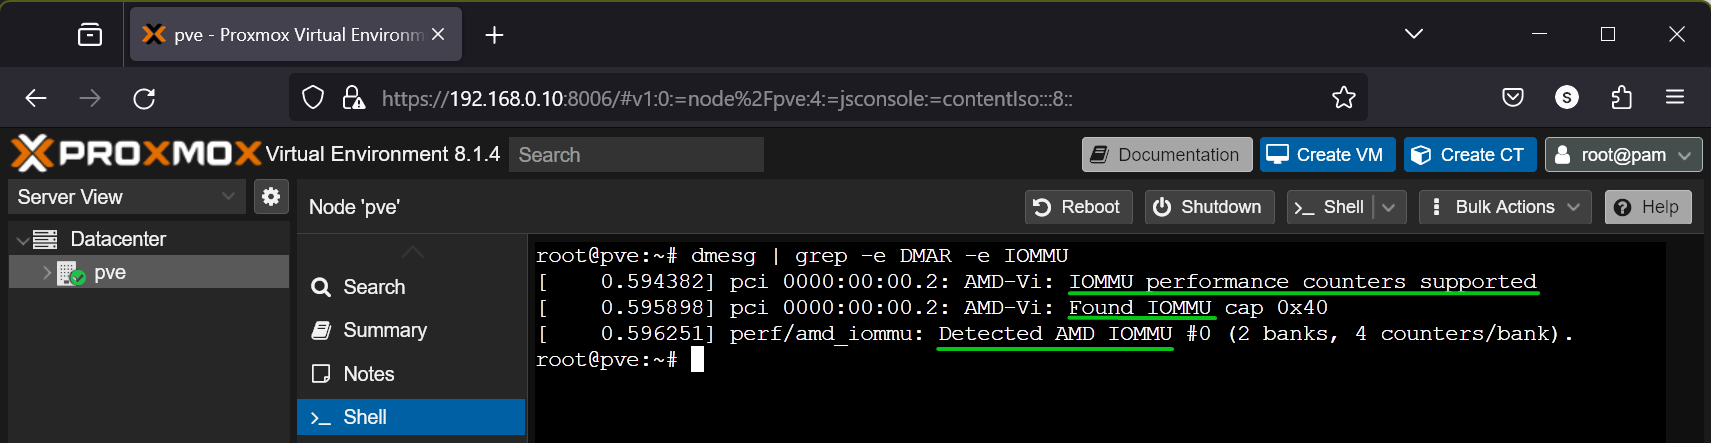
To verify whether IOMMU is enabled on Proxmox VE 8, run the following command:
If IOMMU is enabled, you will see some outputs confirming that IOMMU is enabled.
If IOMMU is not enabled, you may not see any outputs.
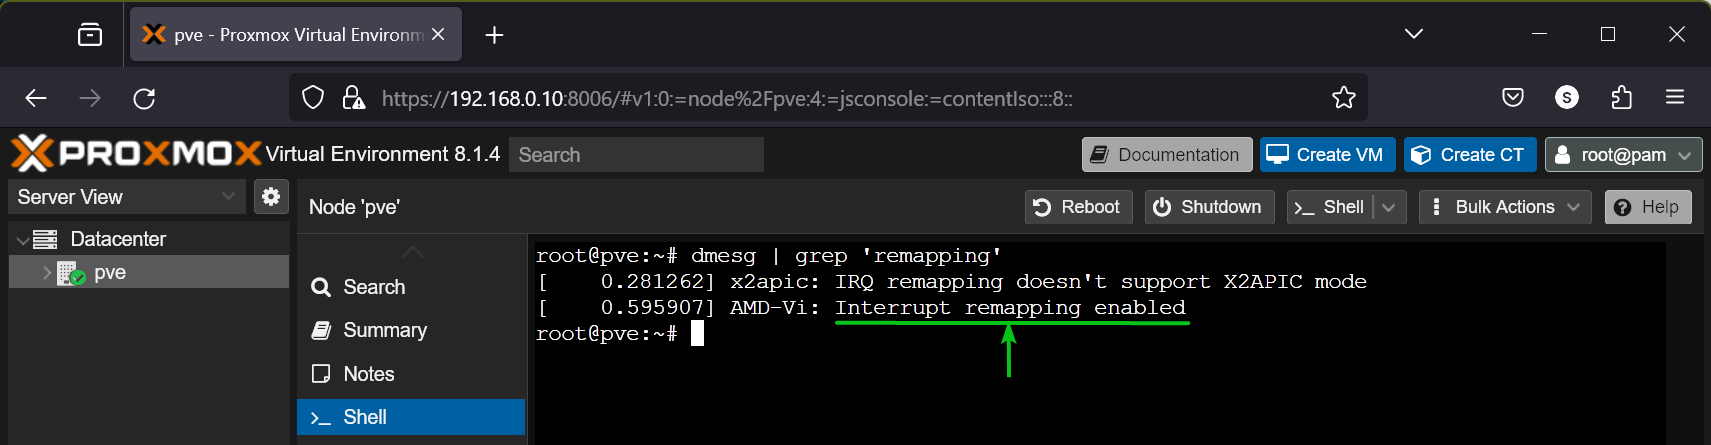
You also need to have the IOMMU Interrupt Remapping enabled for PCI/PCIE passthrough to work.
To check if IOMMU Interrupt Remapping is enabled on your Proxmox VE 8 server, run the following command:
As you can see, IOMMU Interrupt Remapping is enabled on my Proxmox VE 8 server.
NOTE: Most modern AMD and Intel processors will have IOMMU Interrupt Remapping enabled. If for any reason, you don’t have IOMMU Interrupt Remapping enabled, there’s a workaround. You have to enable Unsafe Interrupts for VFIO. Read this article for more information on enabling Unsafe Interrupts on your Proxmox VE 8 server.
Loading VFIO Kernel Modules on Proxmox VE 8
The PCI/PCIE passthrough is done mainly by the VFIO (Virtual Function I/O) kernel modules on Proxmox VE 8. The VFIO kernel modules are not loaded at boot time by default on Proxmox VE 8. But, it’s easy to load the VFIO kernel modules at boot time on Proxmox VE 8.
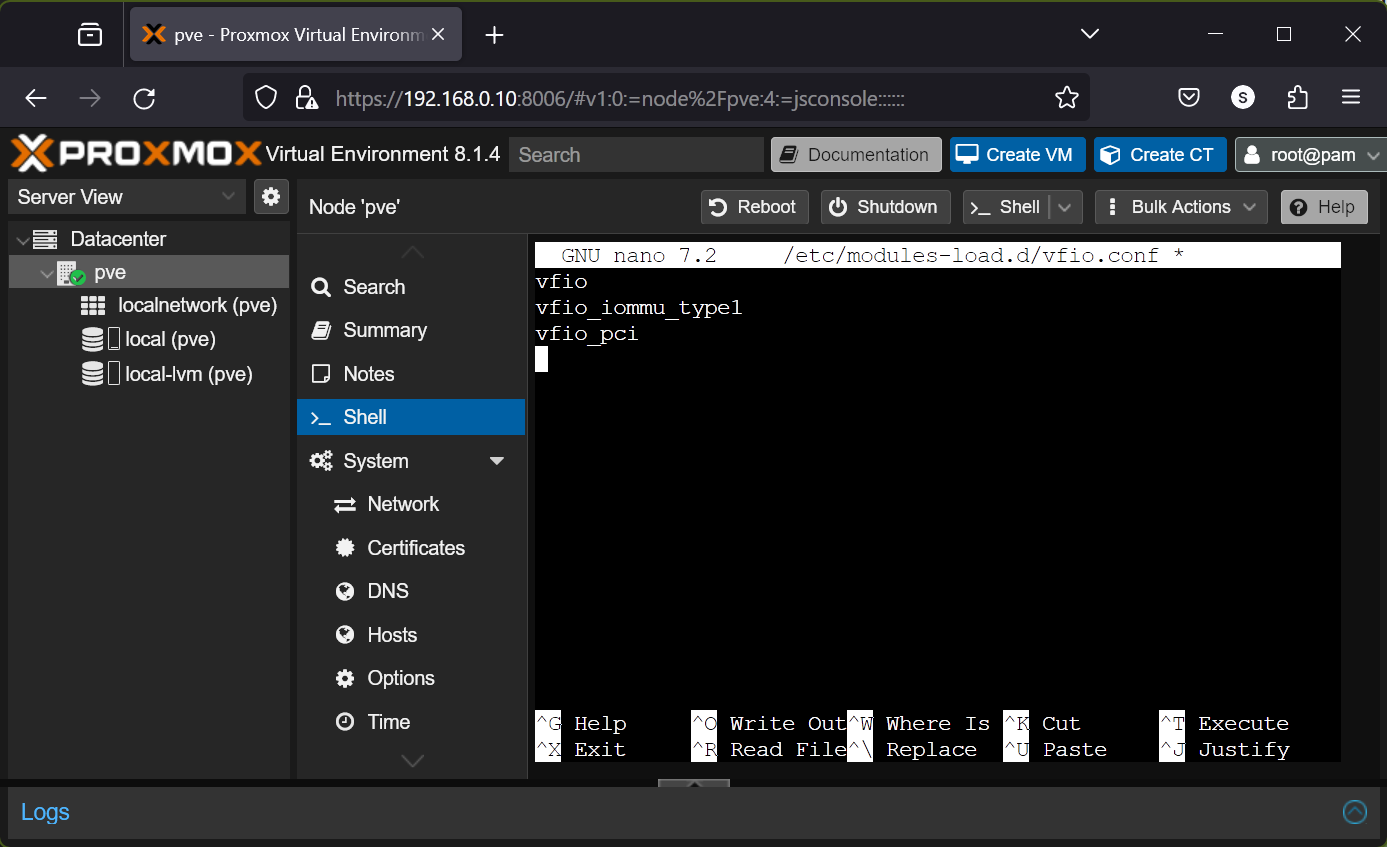
First, open the /etc/modules-load.d/vfio.conf file with the nano text editor as follows:
Type in the following lines in the /etc/modules-load.d/vfio.conf file.
vfio_iommu_type1
vfio_pci
Once you’re done, press <Ctrl> + X followed by Y and <Enter> to save the changes.
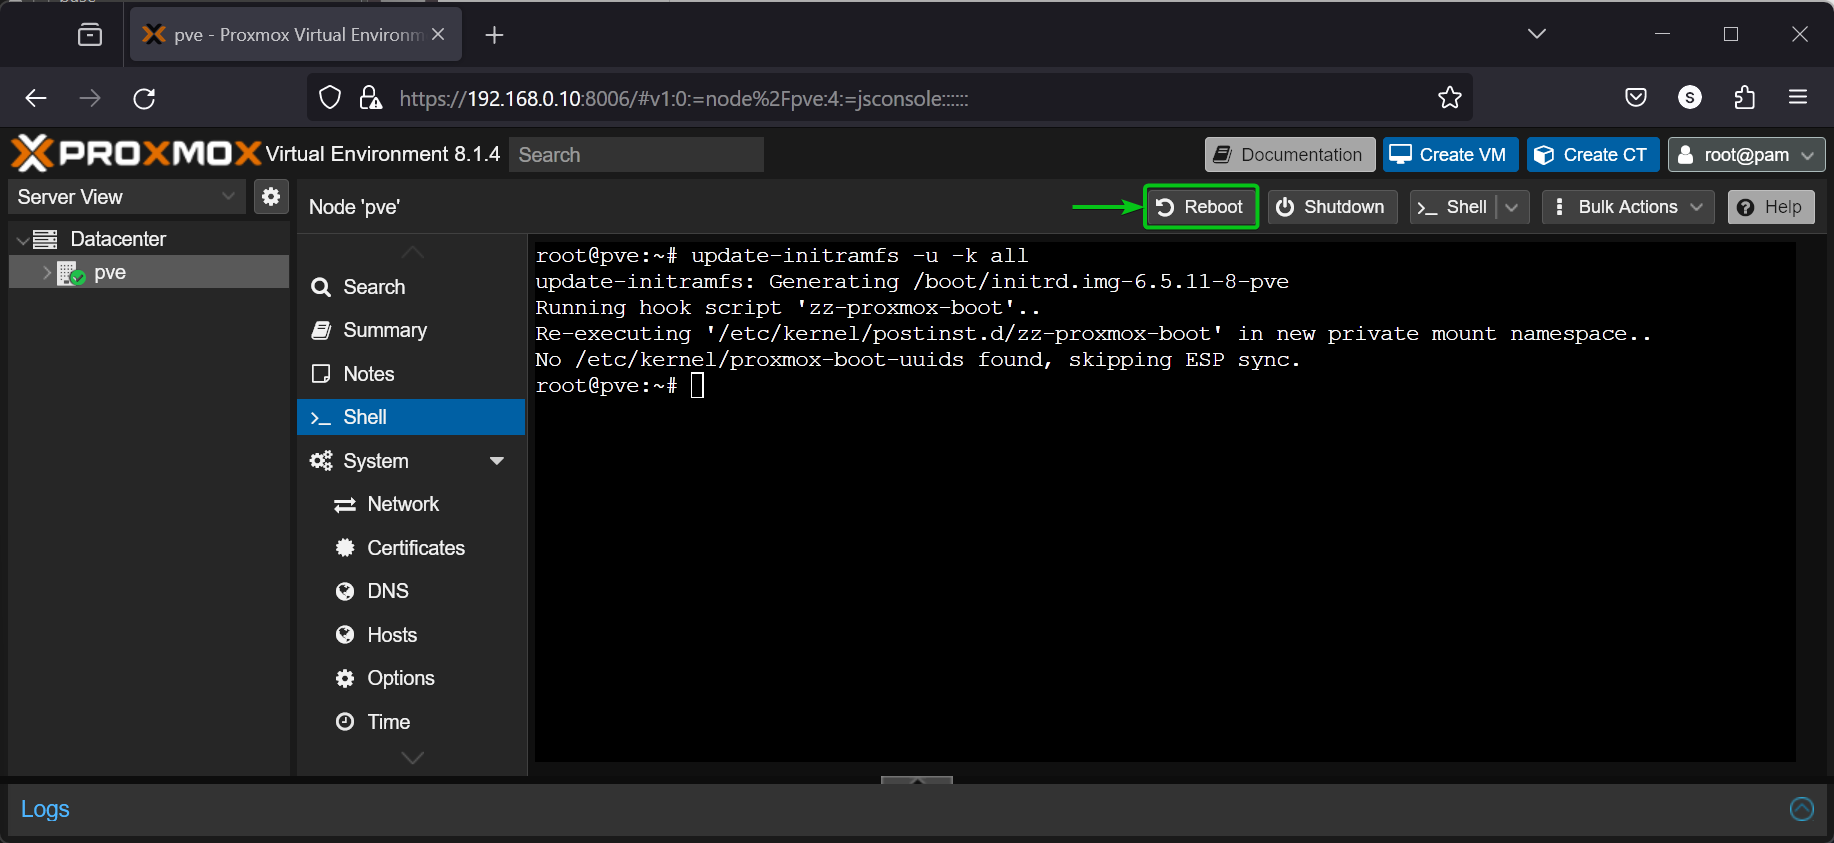
Now, update the initramfs of your Proxmox VE 8 installation with the following command:
Once the initramfs is updated, click on Reboot to restart your Proxmox VE 8 server for the changes to take effect.
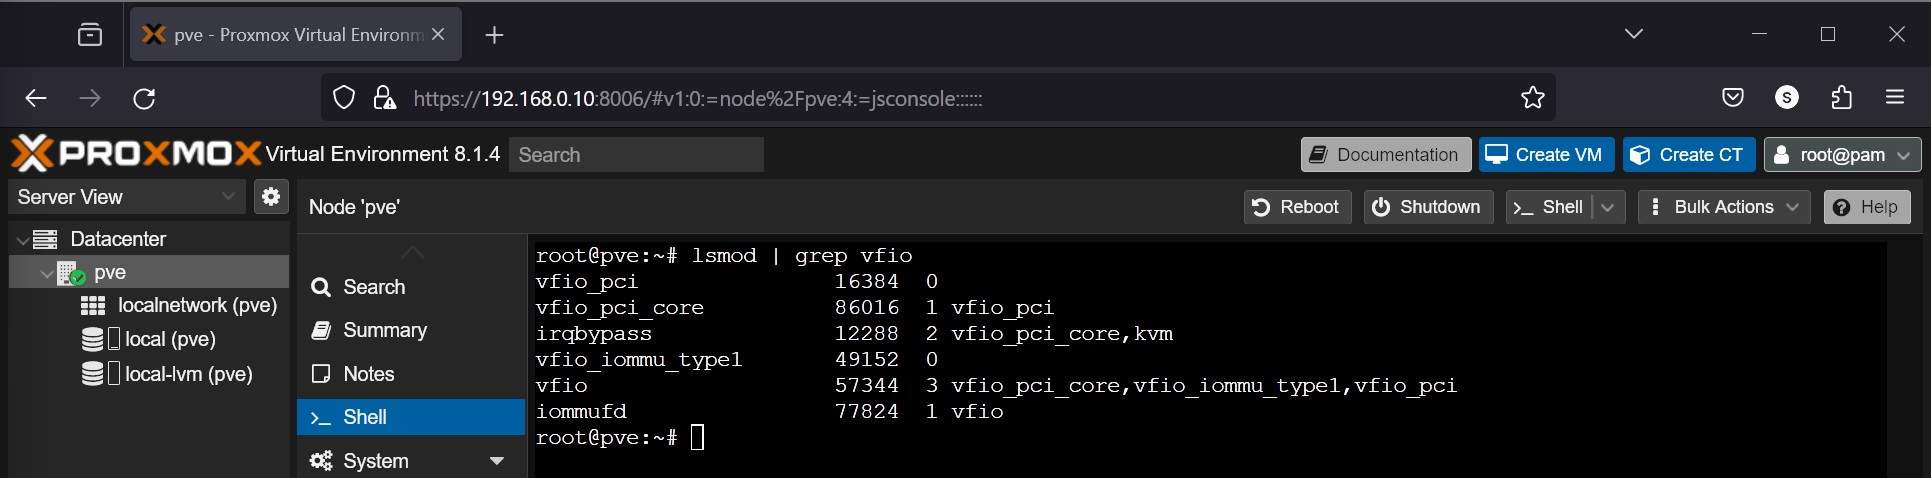
Once your Proxmox VE 8 server boots, you should see that all the required VFIO kernel modules are loaded.
Listing IOMMU Groups on Proxmox VE 8
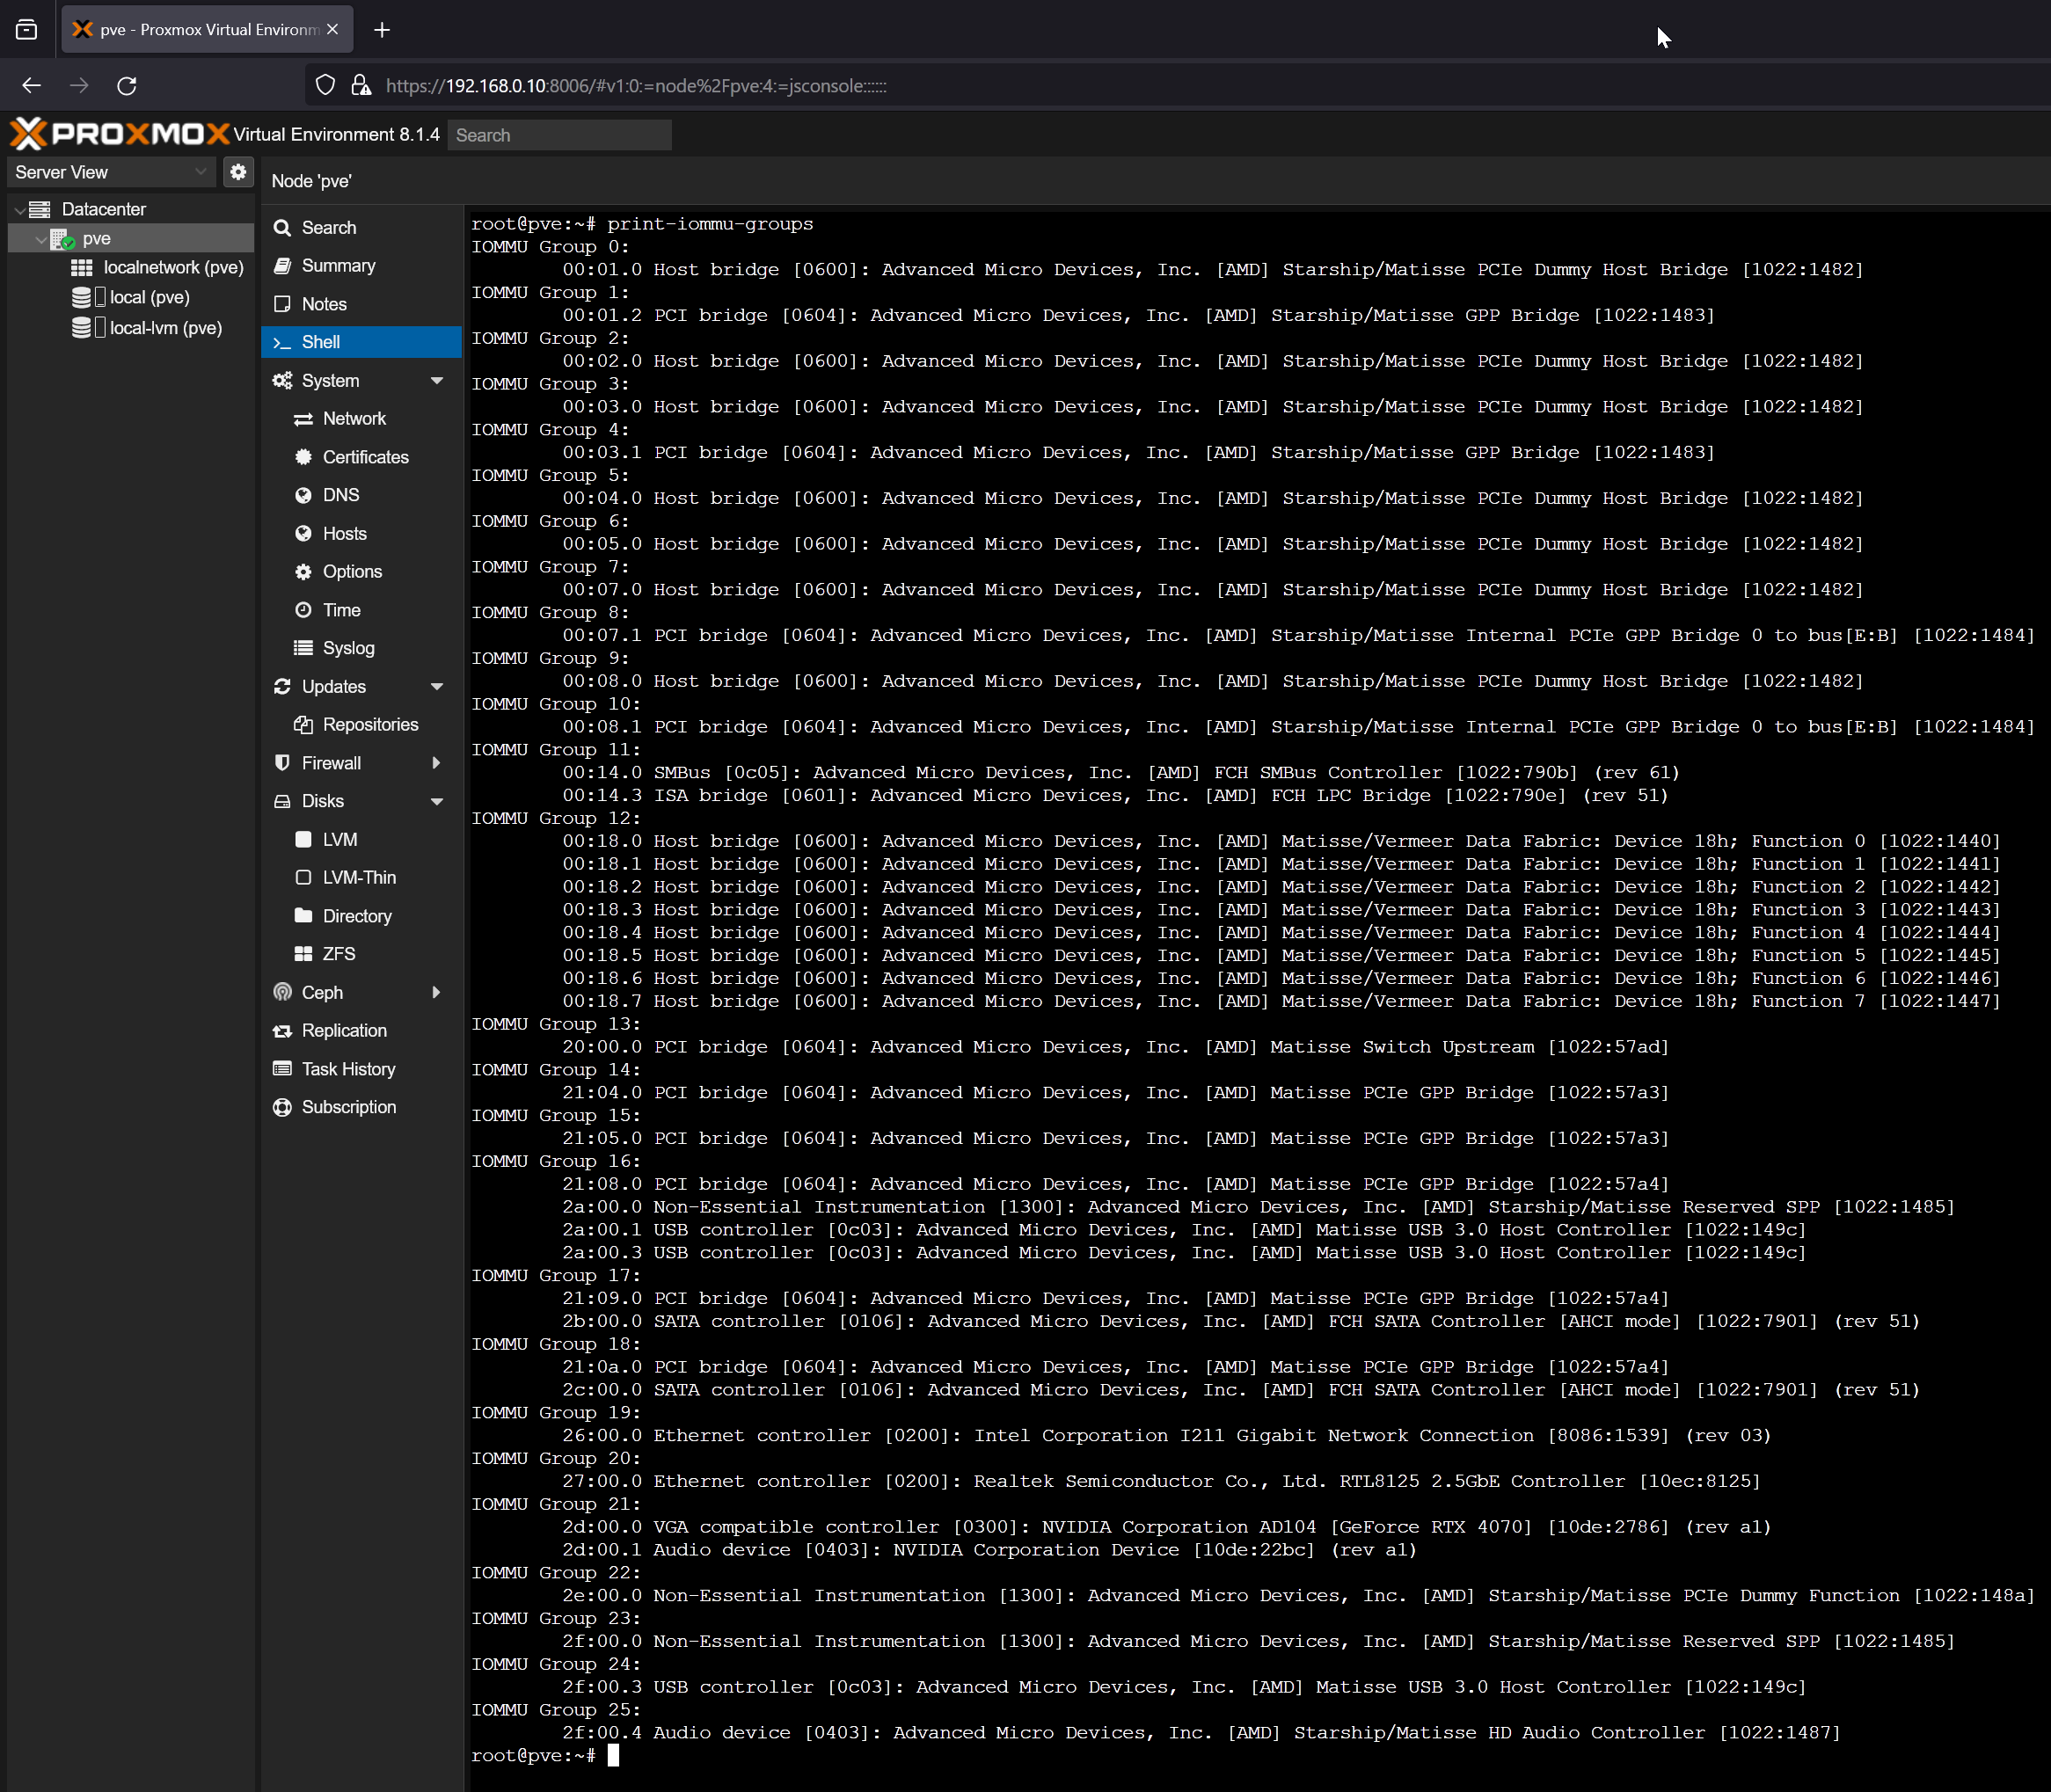
To passthrough PCI/PCIE devices on Proxmox VE 8 virtual machines (VMs), you will need to check the IOMMU groups of your PCI/PCIE devices quite frequently. To make checking for IOMMU groups easier, I decided to write a shell script (I got it from GitHub, but I can’t remember the name of the original poster) in the path /usr/local/bin/print-iommu-groups so that I can just run print-iommu-groups command and it will print the IOMMU groups on the Proxmox VE 8 shell.
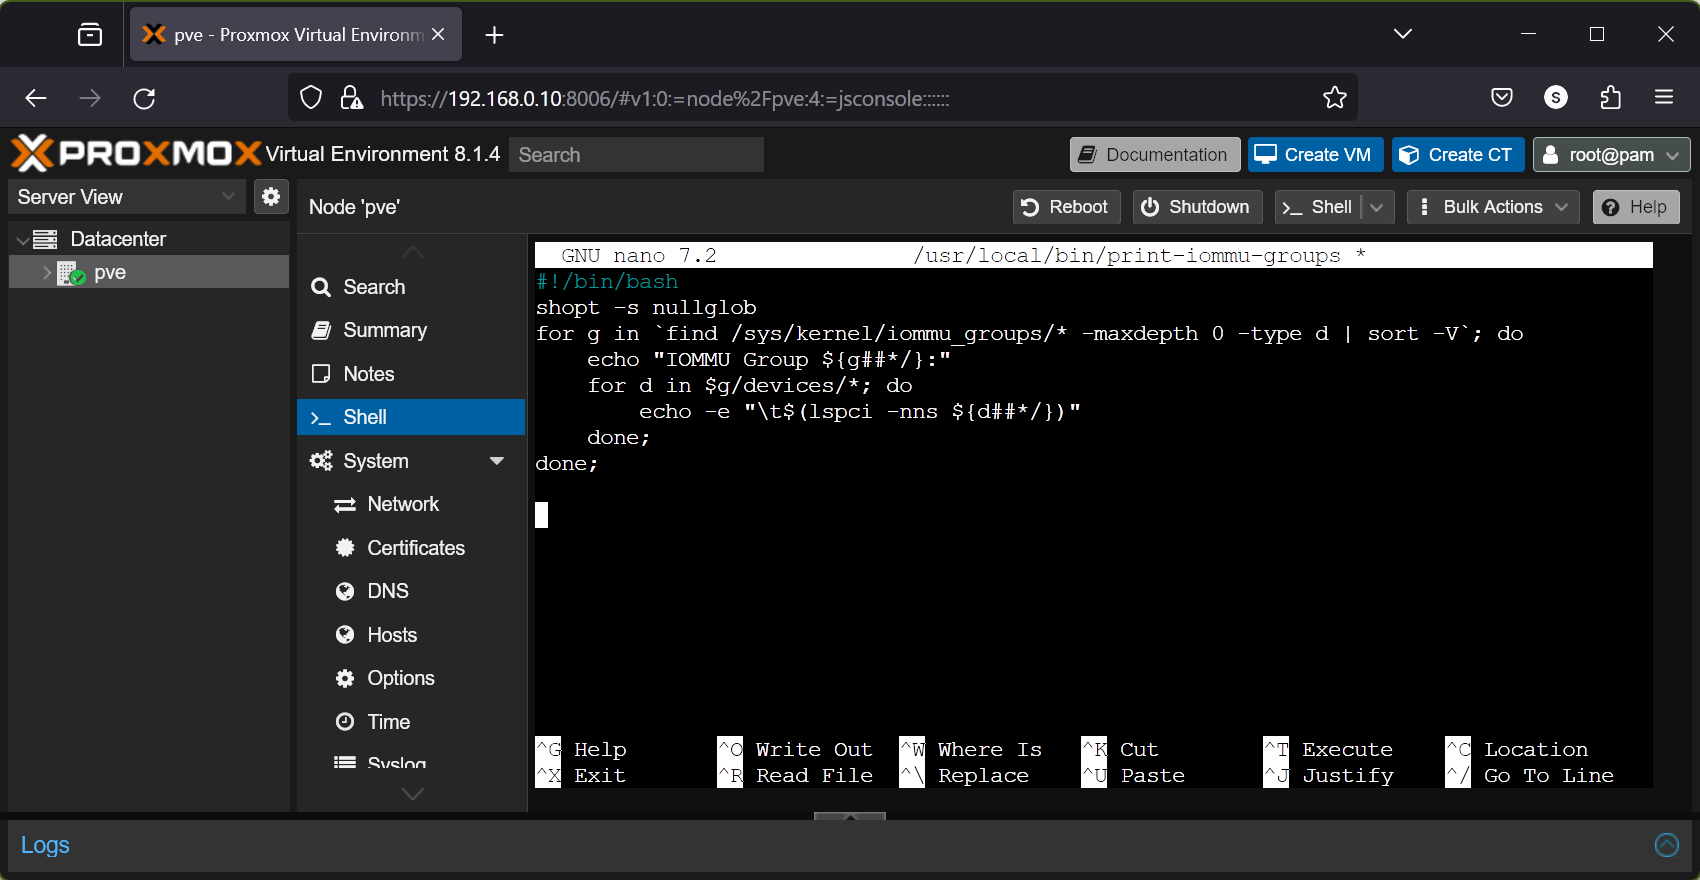
First, create a new file print-iommu-groups in the path /usr/local/bin and open it with the nano text editor as follows:
Type in the following lines in the print-iommu-groups file:
shopt -s nullglob
for g in `find /sys/kernel/iommu_groups/* -maxdepth 0 -type d | sort -V`; do
echo "IOMMU Group ${g##*/}:"
for d in $g/devices/*; do
echo -e "\t$(lspci -nns ${d##*/})"
done;
done;
Once you’re done, press <Ctrl> + X followed by Y and <Enter> to save the changes to the print-iommu-groups file.
Make the print-iommu-groups script file executable with the following command:
Now, you can run the print-iommu-groups command as follows to print the IOMMU groups of the PCI/PCIE devices installed on your Proxmox VE 8 server:
As you can see, the IOMMU groups of the PCI/PCIE devices installed on my Proxmox VE 8 server are printed.
Checking if Your NVIDIA GPU Can Be Passthrough to a Proxmox VE 8 Virtual Machine (VM)
To passthrough a PCI/PCIE device to a Proxmox VE 8 virtual machine (VM), it must be in its own IOMMU group. If 2 or more PCI/PCIE devices share an IOMMU group, you can’t passthrough any of the PCI/PCIE devices of that IOMMU group to any Proxmox VE 8 virtual machines (VMs).
So, if your NVIDIA GPU and its audio device are on its own IOMMU group, you can passthrough the NVIDIA GPU to any Proxmox VE 8 virtual machines (VMs).
On my Proxmox VE 8 server, I am using an MSI X570 ACE motherboard paired with a Ryzen 3900X processor and Gigabyte RTX 4070 NVIDIA GPU. According to the IOMMU groups of my system, I can passthrough the NVIDIA RTX 4070 GPU (IOMMU Group 21), RTL8125 2.5Gbe Ethernet Controller (IOMMU Group 20), Intel I211 Gigabit Ethernet Controller (IOMMU Group 19), a USB 3.0 controller (IOMMU Group 24), and the Onboard HD Audio Controller (IOMMU Group 25).
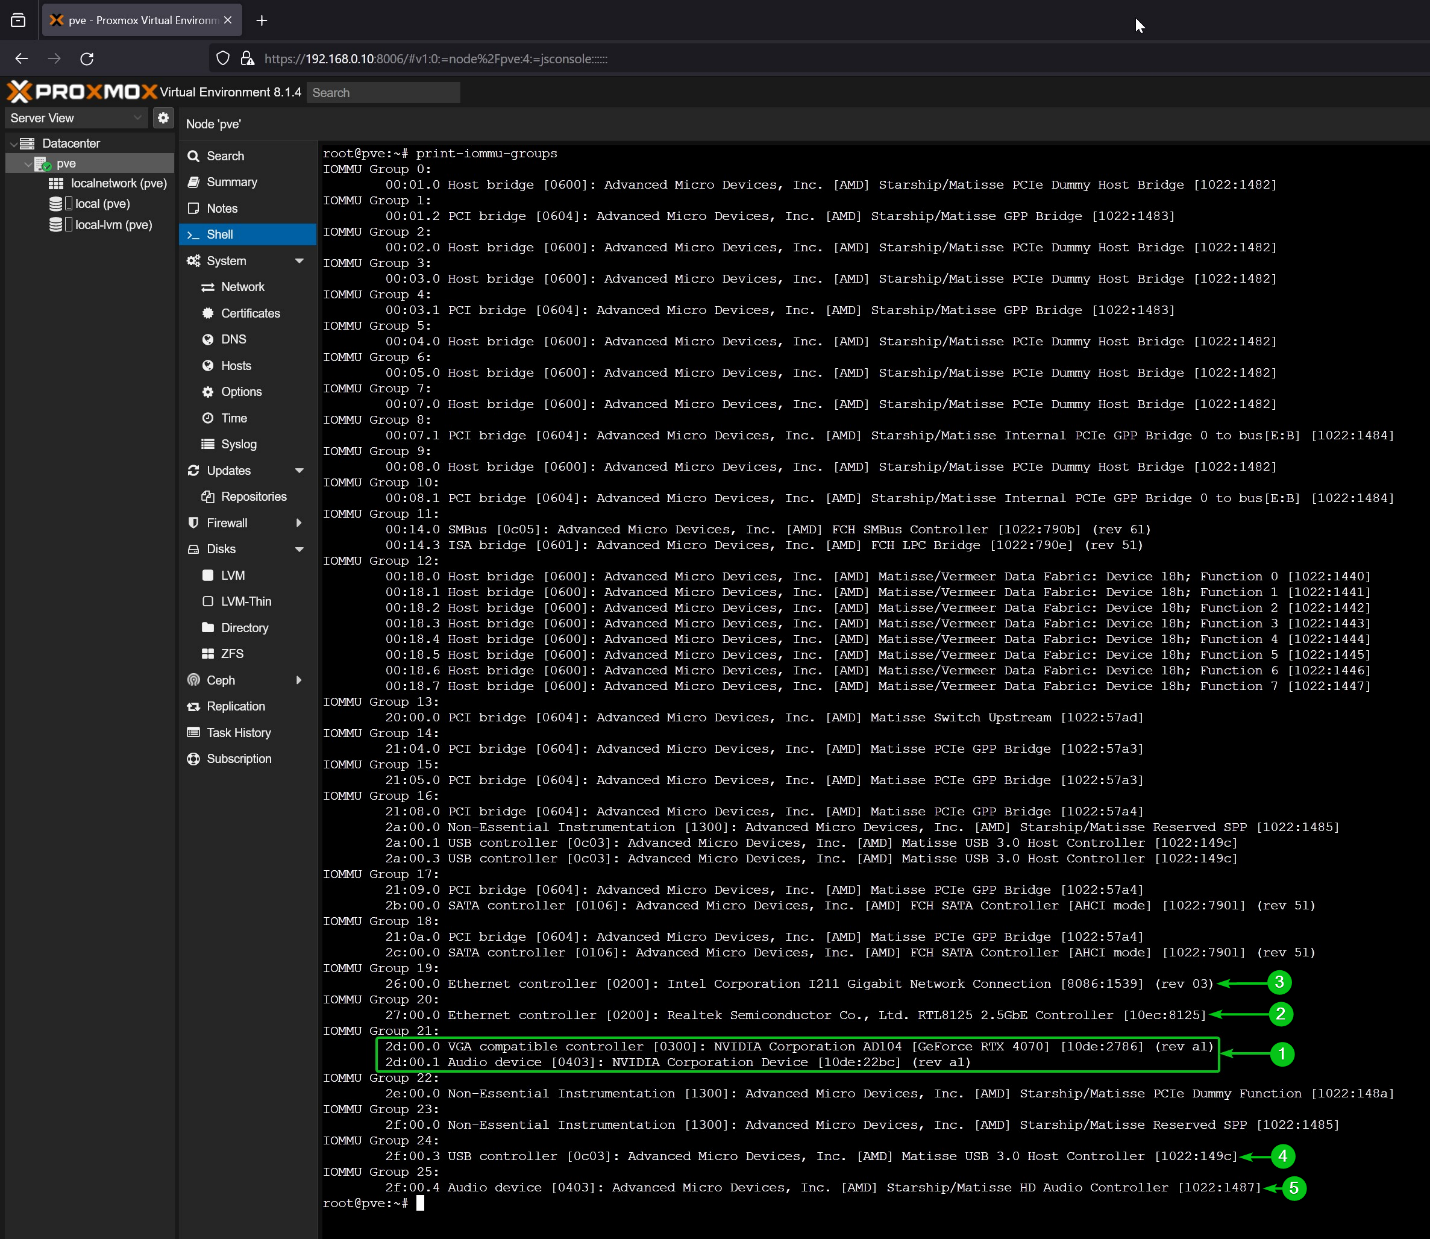
As the main focus of this article is configuring Proxmox VE 8 for passing through the NVIDIA GPU to Proxmox VE 8 virtual machines, the NVIDIA GPU and its Audio device must be in its own IOMMU group.

Checking for the Kernel Modules to Blacklist for PCI/PCIE Passthrough on Proxmox VE 8
To passthrough a PCI/PCIE device on a Proxmox VE 8 virtual machine (VM), you must make sure that Proxmox VE forces it to use the VFIO kernel module instead of its original kernel module.
To find out the kernel module your PCI/PCIE devices are using, you will need to know the vendor ID and device ID of these PCI/PCIE devices. You can find the vendor ID and device ID of the PCI/PCIE devices using the print-iommu-groups command.
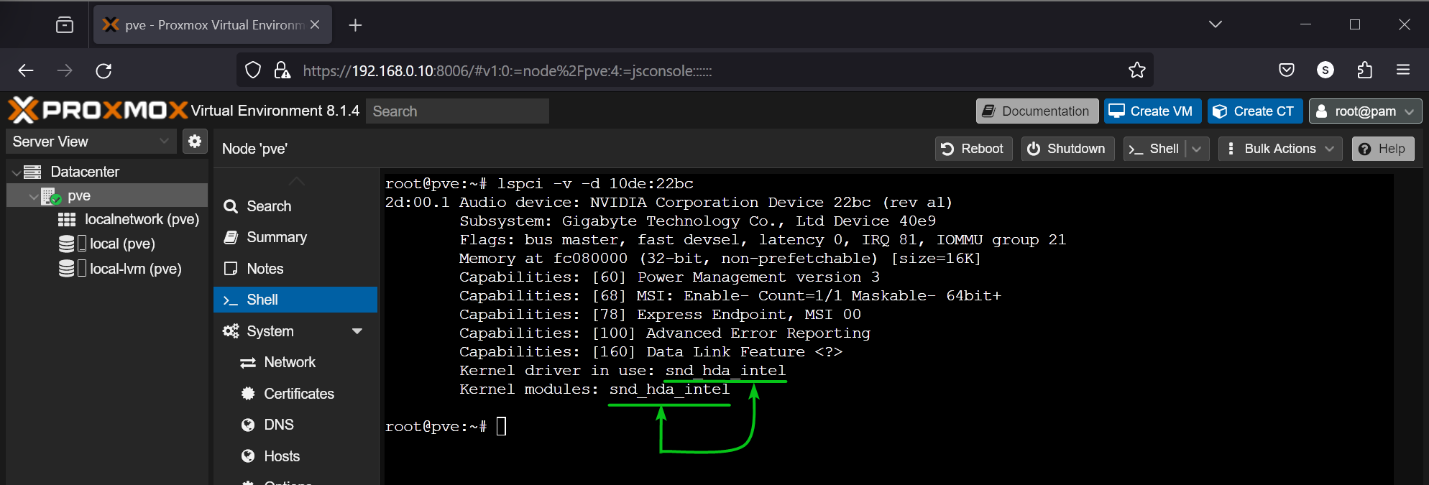
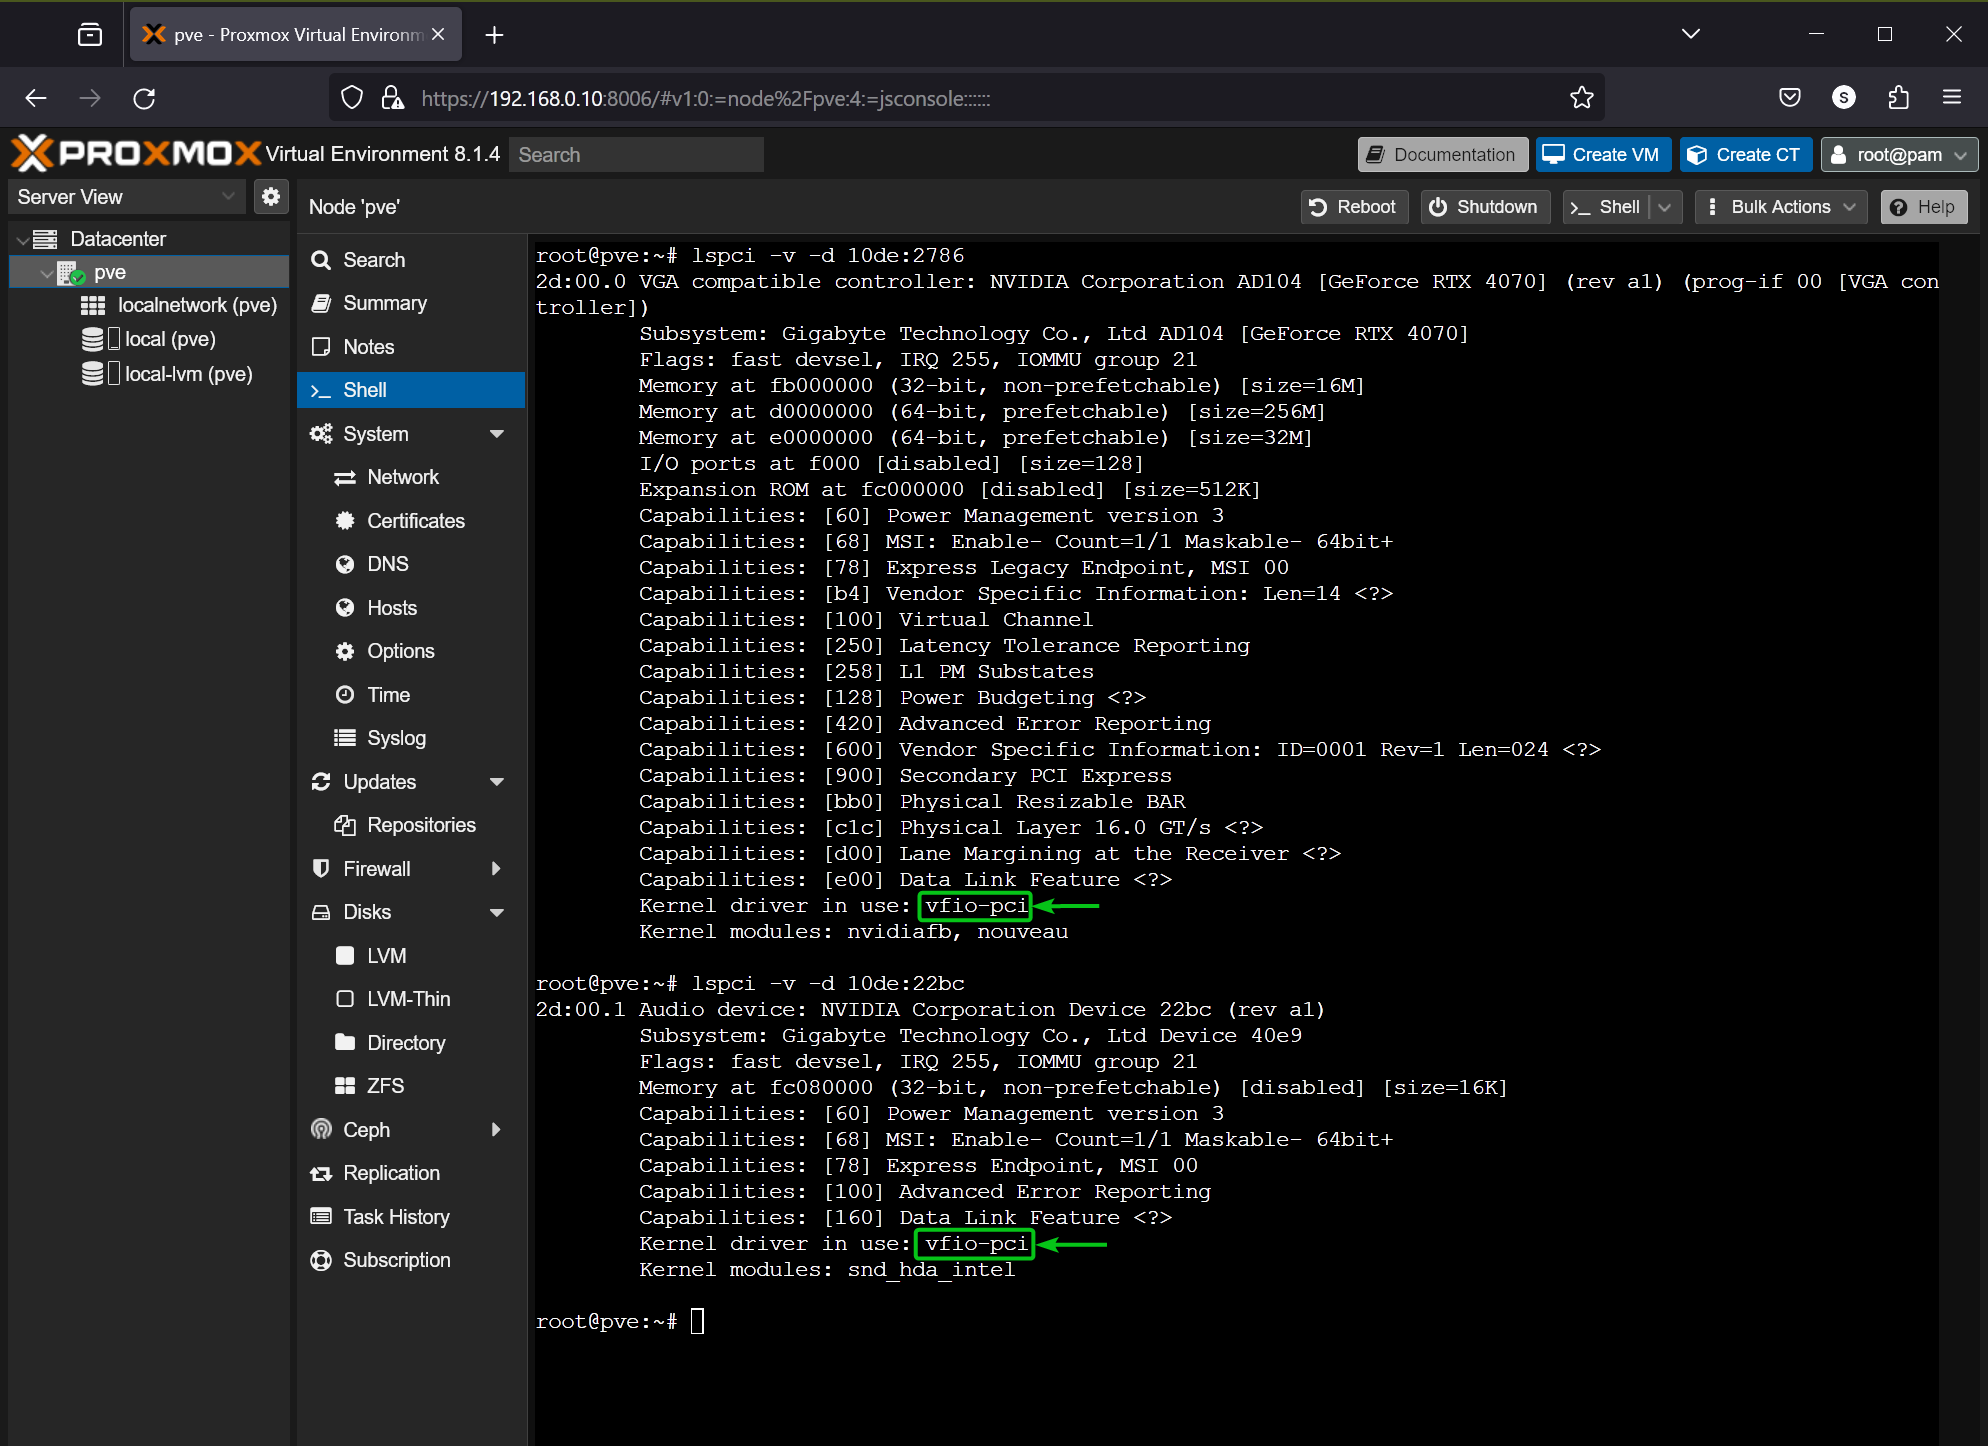
For example, the vendor ID and device ID of my NVIDIA RTX 4070 GPU is 10de:2786 and it’s audio device is 10de:22bc.

To find the kernel module a PCI/PCIE device 10de:2786 (my NVIDIA RTX 4070 GPU) is using, run the lspci command as follows:
As you can see, my NVIDIA RTX 4070 GPU is using the nvidiafb and nouveau kernel modules by default. So, they can’t be passed to a Proxmox VE 8 virtual machine (VM) at this point.
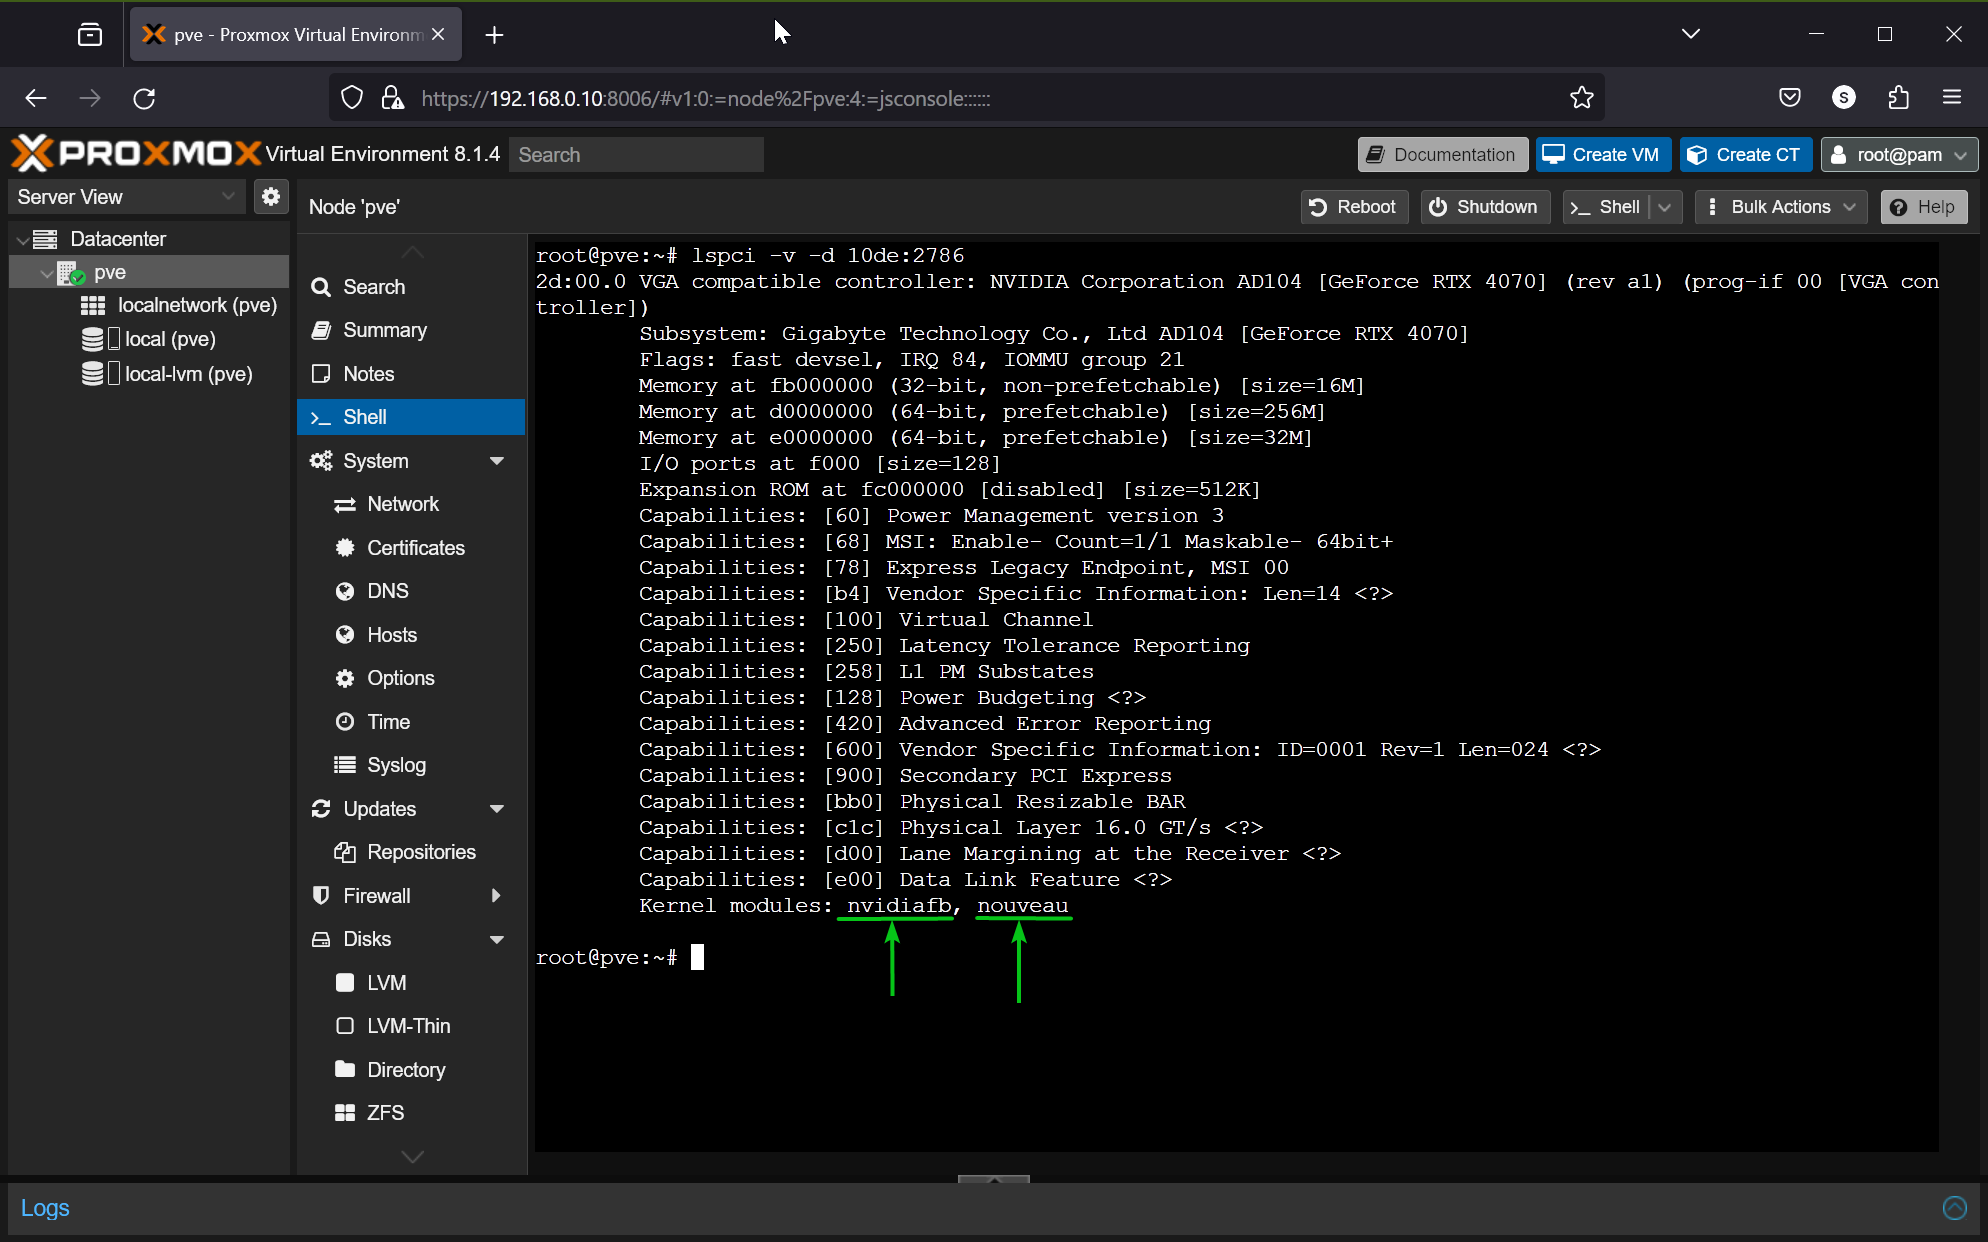
The Audio device of my NVIDIA RTX 4070 GPU is using the snd_hda_intel kernel module. So, it can’t be passed on a Proxmox VE 8 virtual machine at this point either.
So, to passthrough my NVIDIA RTX 4070 GPU and its audio device on a Proxmox VE 8 virtual machine (VM), I must blacklist the nvidiafb, nouveau, and snd_hda_intel kernel modules and configure my NVIDIA RTX 4070 GPU and its audio device to use the vfio-pci kernel module.
Blacklisting Required Kernel Modules for PCI/PCIE Passthrough on Proxmox VE 8
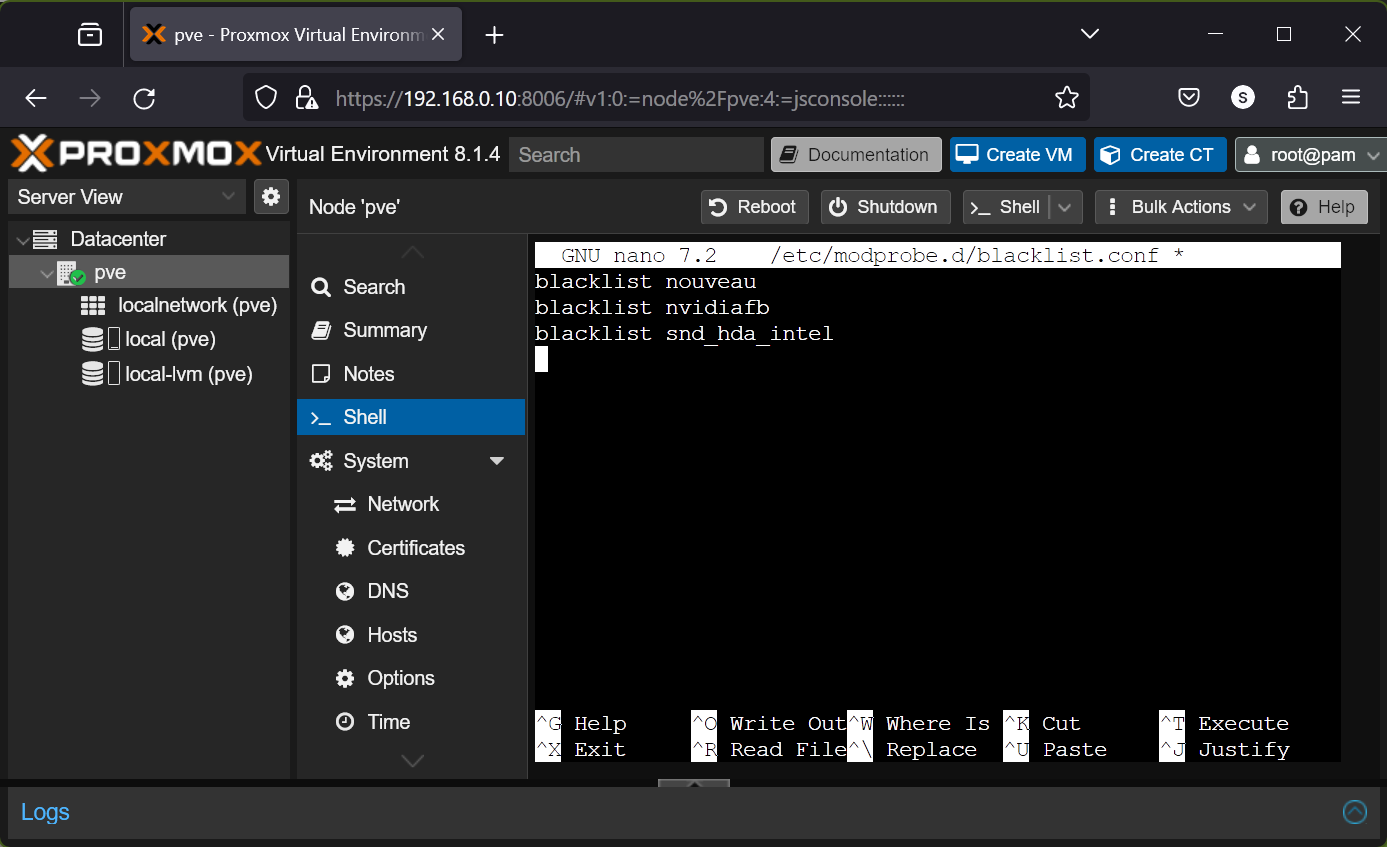
To blacklist kernel modules on Proxmox VE 8, open the /etc/modprobe.d/blacklist.conf file with the nano text editor as follows:
To blacklist the kernel modules nouveau, nvidiafb, and snd_hda_intel kernel modules (to passthrough NVIDIA GPU), add the following lines in the /etc/modprobe.d/blacklist.conf file:
blacklist nvidiafb
blacklist snd_hda_intel
Once you’re done, press <Ctrl> + X followed by Y and <Enter> to save the /etc/modprobe.d/blacklist.conf file.
Configuring Your NVIDIA GPU to Use the VFIO Kernel Module on Proxmox VE 8
To configure the PCI/PCIE device (i.e. your NVIDIA GPU) to use the VFIO kernel module, you need to know their vendor ID and device ID.
In this case, the vendor ID and device ID of my NVIDIA RTX 4070 GPU and its audio device are 10de:2786 and 10de:22bc.
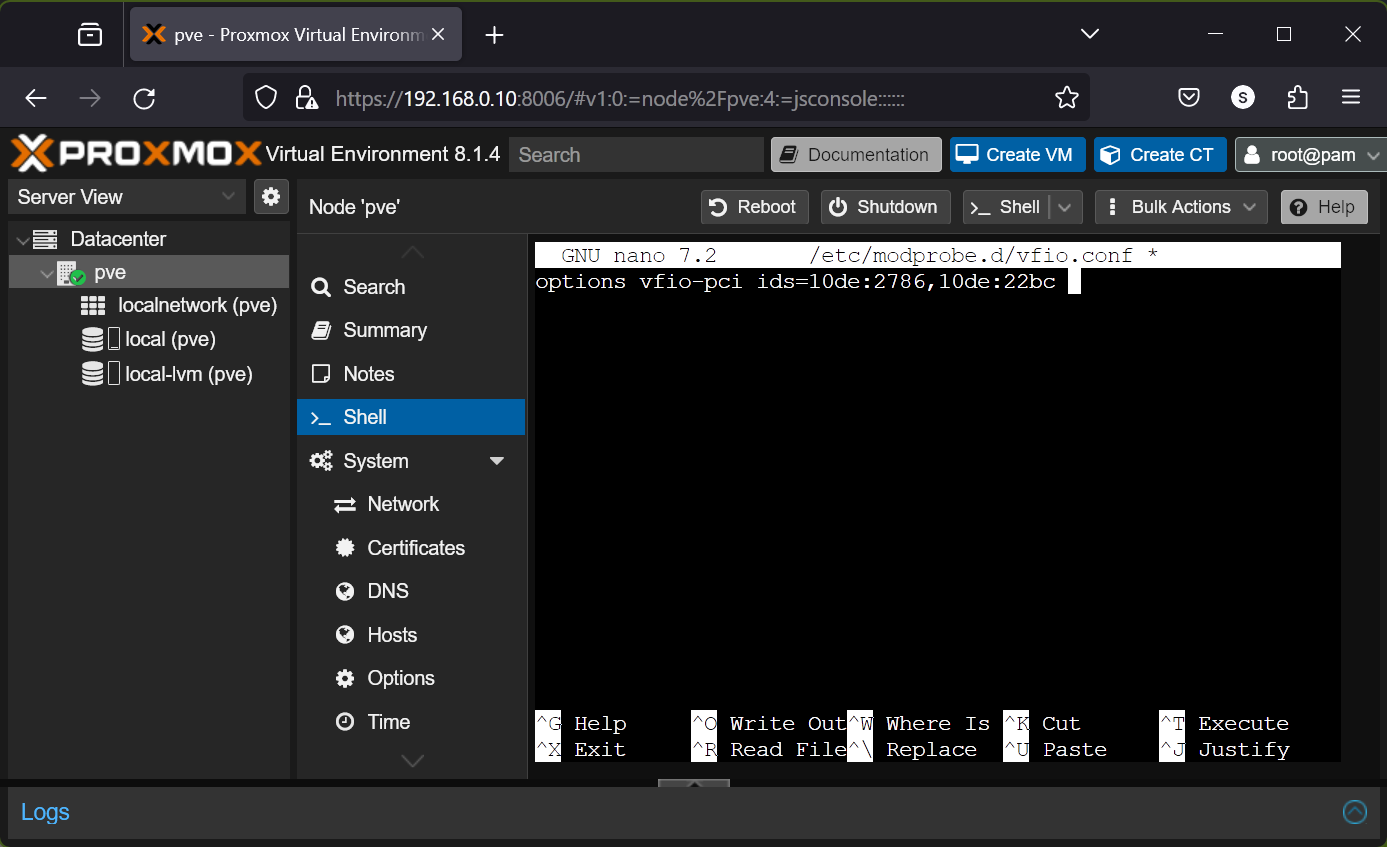
To configure your NVIDIA GPU to use the VFIO kernel module, open the /etc/modprobe.d/vfio.conf file with the nano text editor as follows:
To configure your NVIDIA GPU and its audio device with the <vendor-id>:<device-id> 10de:2786 and 10de:22bc (let’s say) respectively to use the VFIO kernel module, add the following line to the /etc/modprobe.d/vfio.conf file.
Once you’re done, press <Ctrl> + X followed by Y and <Enter> to save the /etc/modprobe.d/vfio.conf file.
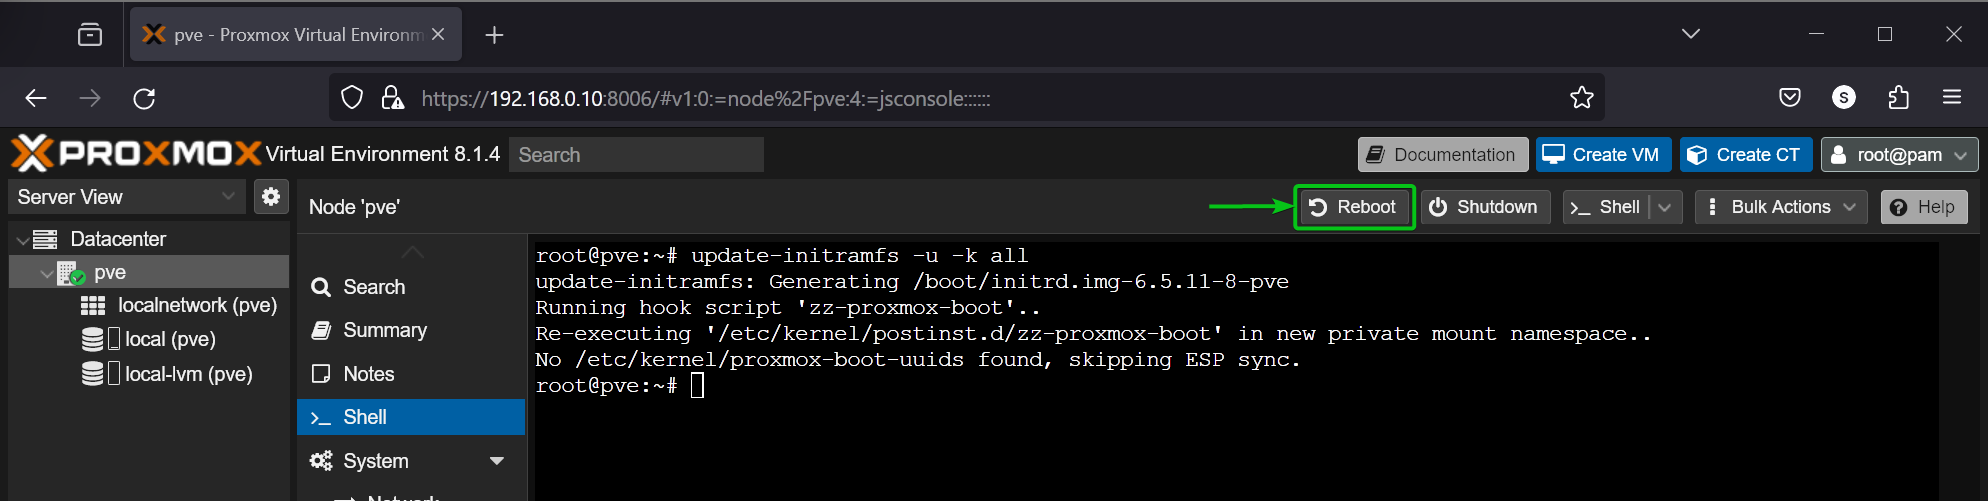
Now, update the initramfs of Proxmove VE 8 with the following command:
Once initramfs is updated, click on Reboot to restart your Proxmox VE 8 server for the changes to take effect.
Once your Proxmox VE 8 server boots, you should see that your NVIDIA GPU and its audio device (10de:2786 and 10de:22bc in my case) are using the vfio-pci kernel module. Now, your NVIDIA GPU is ready to be passed to a Proxmox VE 8 virtual machine.
$ lspci -v -d 10de:22bc
Passthrough the NVIDIA GPU to a Proxmox VE 8 Virtual Machine (VM)
Now that your NVIDIA GPU is ready for passthrough on Proxmox VE 8 virtual machines (VMs), you can passthrough your NVIDIA GPU on your desired Proxmox VE 8 virtual machine and install the NVIDIA GPU drivers depending on the operating system that you’re using on that virtual machine as usual.
For detailed information on how to passthrough your NVIDIA GPU on a Proxmox VE 8 virtual machine (VM) with different operating systems installed, read one of the following articles:
- How to Passthrough an NVIDIA GPU to a Windows 11 Proxmox VE 8 Virtual Machine (VM)
- How to Passthrough an NVIDIA GPU to a Ubuntu 24.04 LTS Proxmox VE 8 Virtual Machine (VM)
- How to Passthrough an NVIDIA GPU to a LinuxMint 21 Proxmox VE 8 Virtual Machine (VM)
- How to Passthrough an NVIDIA GPU to a Debian 12 Proxmox VE 8 Virtual Machine (VM)
- How to Passthrough an NVIDIA GPU to an Elementary OS 8 Proxmox VE 8 Virtual Machine (VM)
- How to Passthrough an NVIDIA GPU to a Fedora 39+ Proxmox VE 8 Virtual Machine (VM)
- How to Passthrough an NVIDIA GPU on an Arch Linux Proxmox VE 8 Virtual Machine (VM)
- How to Passthrough an NVIDIA GPU on a Red Hat Enterprise Linux 9 (RHEL 9) Proxmox VE 8 Virtual Machine (VM)
Still Having Problems with PCI/PCIE Passthrough on Proxmox VE 8 Virtual Machines (VMs)?
Even after trying everything listed in this article correctly, if PCI/PCIE passthrough still does not work for you, be sure to try out some of the Proxmox VE PCI/PCIE passthrough tricks and/or workarounds that you can use to get PCI/PCIE passthrough work on your hardware.
Conclusion
In this article, I have shown you how to configure your Proxmox VE 8 server for PCI/PCIE passthrough so that you can passthrough PCI/PCIE devices (i.e. your NVIDIA GPU) to your Proxmox VE 8 virtual machines (VMs). I have also shown you how to find out the kernel modules that you need to blacklist and how to blacklist them for a successful passthrough of your desired PCI/PCIE devices (i.e. your NVIDIA GPU) to a Proxmox VE 8 virtual machine. Finally, I have shown you how to configure your desired PCI/PCIE devices (i.e. your NVIDIA GPU) to use the VFIO kernel modules, which is also an essential step for a successful passthrough of your desired PCI/PCIE devices (i.e. your NVIDIA GPU) to a Proxmox VE 8 virtual machine (VM).
References
Source: linuxhint.com