Important Proxmox VE 8 PCI/PCIE Passthrough Tweaks, Fixes, and Workarounds
In recent years, support for PCI/PCIE (i.e. GPU passthrough) has improved a lot in newer hardware. So, the regular Proxmox VE PCI/PCIE and GPU passthrough guide should work in most new hardware. Still, you may face many problems passing through GPUs and other PCI/PCIE devices on a Proxmox VE virtual machine. There are many tweaks/fixes/workarounds for some of the common Proxmox VE GPU and PCI/PCIE passthrough problems.
In this article, I am going to discuss some of the most common Proxmox VE PCI/PCIE passthrough and GPU passthrough problems and the steps you can take to solve those problems.
Table of Contents
- What to do if IOMMU Interrupt Remapping is not Supported?
- What to do if My GPU (or PCI/PCIE Device) is not in its own IOMMU Group?
- How do I Blacklist AMD GPU Drivers on Proxmox VE?
- How do I Blacklist NVIDIA GPU Drivers on Proxmox VE?
- How do I Blacklist Intel GPU Drivers on Proxmox VE?
- How to Check if my GPU (or PCI/PCIE Device) is Using the VFIO Driver on Proxmox VE?
- I Have Blacklisted the AMU GPU Drivers, Still, the GPU is not Using the VFIO Driver, What to Do?
- I Have Blacklisted the NVIDIA GPU Drivers, Still, the GPU is not Using the VFIO Driver, What to Do?
- I Have Blacklisted the Intel GPU Drivers, Still, the GPU is not Using the VFIO Driver, What to Do?
- Single GPU Used VFIO Driver, But When Configured a Second GPU, it Didn’t Work, Why?
- Why Disable VGA Arbitration for the GPUs and How to Do It?
- What if my GPU is Still not Using the VFIO Driver Even After Configuring VFIO?
- GPU Passthrough Showed No Errors, But I’m Getting a Black Screen on the Monitor Connected to the GPU Passed to the Proxmox VE VM, Why?
- What is AMD Vendor Reset Bug and How to Solve it?
- How to Provide a vBIOS for the Passed GPU on a Proxmox VE Virtual Machine?
- What to do If Some Apps Crash the Proxmox VE Windows Virtual Machine?
- How to Solve HDMI Audio Crackling/Broken Problems on Proxmox VE Linux Virtual Machines?.
- How to Update Proxmox VE initramfs?
- How to Update Proxmox VE GRUB Bootloader?
- Conclusion
- References
What to do If IOMMU Interrupt Remapping is not Supported?
For PCI/PCIE passthrough, IOMMU interrupt remapping is essential.
To check whether your processor supports IOMMU interrupt remapping, run the command below:
If your processor supports IOMMU interrupt remapping, you will see some sort of output confirming that interrupt remapping is enabled. Otherwise, you will see no outputs.

If IOMMU interrupt remapping is not supported on your processor, you will have to configure unsafe interrupts on your Proxmox VE server to passthrough PCI/PCIE devices on Proxmox VE virtual machines.
To configure unsafe interrupts on Proxmox VE, create a new file iommu_unsafe_interrupts.conf in the /etc/modprobe.d directory and open it with the nano text editor as follows:
Add the following line in the iommu_unsafe_interrupts.conf file and press <Ctrl> + X followed by Y and <Enter> to save the file.
Once you’re done, you must update the initramfs of your Proxmox VE server.
What to do if my GPU (or PCI/PCIE Device) is not in its own IOMMU Group?
If your server has multiple PCI/PCIE slots, you can move the GPU to a different PCI/PCIE slot and see if the GPU is in its own IOMMU group.
If that does not work, you can try enabling the ACS override kernel patch on Proxmox VE.
To try enabling the ACS override kernel patch on Proxmox VE, open the /etc/default/grub file with the nano text editor as follows:
Add the kernel boot option pcie_acs_override=downstream at the end of the GRUB_CMDLINE_LINUX_DEFAULT.
Once you’re done, press <Ctrl> + X followed by Y and <Enter> to save the file and make sure to update the Proxmox VE GRUB bootloader for the changes to take effect.
You should have better IOMMU grouping once your Proxmox VE server boots.
If your GPU still does not have its own IOMMU group, you can go one step further by using the pcie_acs_override=downstream,multifunction instead. You should have an even better IOMMU grouping.
If pcie_acs_override=downstream,multifunction results in better IOMMU grouping that pcie_acs_override=downstream, then why use pcie_acs_override=downstream at all?
Well, the purpose of PCIE ACS override is to fool the kernel into thinking that the PCIE devices are isolated when they are not in reality. So, PCIE ACS override comes with security and stability issues. That’s why you should try using a less aggressive PCIE ACS override option pcie_acs_override=downstream first and see if your problem is solved. If pcie_acs_override=downstream does not work, only then you should use the more aggressive option pcie_acs_override=downstream,multifunction.
How do I Blacklist AMD GPU Drivers on Proxmox VE?
If you want to passthrough an AMD GPU on Proxmox VE virtual machines, you must blacklist the AMD GPU drivers and make sure that it uses the VFIO driver instead.
First, open the /etc/modprobe.d/blacklist.conf file with the nano text editor as follows:
To blacklist the AMD GPU drivers, add the following lines to the /etc/modprobe.d/blacklist.conf file and press <Ctrl> + X followed by Y and <Enter> to save the file.
blacklist amdgpu
Once you’re done, you must update the initramfs of your Proxmox VE server for the changes to take effect.
How do I Blacklist NVIDIA GPU Drivers on Proxmox VE?
If you want to passthrough an NVIDIA GPU on Proxmox VE virtual machines, you must blacklist the NVIDIA GPU drivers and make sure that it uses the VFIO driver instead.
First, open the /etc/modprobe.d/blacklist.conf file with the nano text editor as follows:
To blacklist the NVIDIA GPU drivers, add the following lines to the /etc/modprobe.d/blacklist.conf file and press <Ctrl> + X followed by Y and <Enter> to save the file.
blacklist nvidia
blacklist nvidiafb
blacklist nvidia_drm
Once you’re done, you must update the initramfs of your Proxmox VE server for the changes to take effect.
How do I Blacklist Intel GPU Drivers on Proxmox VE?
If you want to passthrough an Intel GPU on Proxmox VE virtual machines, you must blacklist the Intel GPU drivers and make sure that it uses the VFIO driver instead.
First, open the /etc/modprobe.d/blacklist.conf file with the nano text editor as follows:
To blacklist the Intel GPU drivers, add the following lines to the /etc/modprobe.d/blacklist.conf file and press <Ctrl> + X followed by Y and <Enter> to save the file.
blacklist snd_hda_codec_hdmi
blacklist i915
Once you’re done, you must update the initramfs of your Proxmox VE server for the changes to take effect.
How to Check if my GPU (or PCI/PCIE Device) is Using the VFIO Driver on Proxmox VE?
To check if your GPU or desired PCI/PCIE devices are using the VFIO driver, run the following command:
If your GPU or PCI/PCIE device is using the VFIO driver, you should see the line Kernel driver in use: vfio-pci as marked in the screenshot below.

I Have Blacklisted the AMU GPU Drivers, Still, the GPU is not Using the VFIO Driver, What to Do?
At times, blacklisting the AMD GPU drivers is not enough, you also have to configure the AMD GPU drivers to load after the VFIO driver.
To do that, open the /etc/modprobe.d/vfio.conf file with the nano text editor as follows:
To configure the AMD GPU drivers to load after the VFIO driver, add the following lines to the /etc/modprobe.d/vfio.conf file and press <Ctrl> + X followed by Y and <Enter> to save the file.
softdep amdgpu pre: vfio-pci
Once you’re done, you must update the initramfs of your Proxmox VE server for the changes to take effect.
I Have Blacklisted the NVIDIA GPU Drivers, Still, the GPU is not Using the VFIO Driver, What to Do?
At times, blacklisting the NVIDIA GPU drivers is not enough, you also have to configure the NVIDIA GPU drivers to load after the VFIO driver.
To do that, open the /etc/modprobe.d/vfio.conf file with the nano text editor as follows:
To configure the NVIDIA GPU drivers to load after the VFIO driver, add the following lines to the /etc/modprobe.d/vfio.conf file and press <Ctrl> + X followed by Y and <Enter> to save the file.
softdep nvidia pre: vfio-pci
softdep nvidiafb pre: vfio-pci
softdep nvidia_drm pre: vfio-pci
softdep drm pre: vfio-pci
Once you’re done, you must update the initramfs of your Proxmox VE server for the changes to take effect.
I Have Blacklisted the Intel GPU Drivers, Still, the GPU is not Using the VFIO Driver, What to Do?
At times, blacklisting the Intel GPU drivers is not enough, you also have to configure the Intel GPU drivers to load after the VFIO driver.
To do that, open the /etc/modprobe.d/vfio.conf file with the nano text editor as follows:
To configure the Intel GPU drivers to load after the VFIO driver, add the following lines to the /etc/modprobe.d/vfio.conf file and press <Ctrl> + X followed by Y and <Enter> to save the file.
softdep snd_hda_codec_hdmi pre: vfio-pci
softdep i915 pre: vfio-pci
Once you’re done, you must update the initramfs of your Proxmox VE server for the changes to take effect.
Single GPU Used VFIO Driver, But When Configured a Second GPU, it Didn’t Work, Why?
In the /etc/modprobe.d/vfio.conf file, you must add the IDs of all the PCI/PCIE devices that you want to use the VFIO driver in a single line. One device per line won’t work.
For example, if you have 2 GPUs that you want to configure to use the VFIO driver, you must add their IDs in a single line in the /etc/modprobe.d/vfio.conf file as follows:
If you want to add another GPU to the list, just append it at the end of the existing vfio-pci line in the /etc/modprobe.d/vfio.conf file as follows:
Never do this. Although it looks much cleaner, it won’t work. I do wish we could specify PCI/PCIE IDs this way.
options vfio-pci ids=<GPU-2>,<GPU-2-Audio>
options vfio-pci ids=<GPU-3>,<GPU-3-Audio>
Why Disable VGA Arbitration for the GPUs and How to Do It?
If you’re using UEFI/OVMF BIOS on the Proxmox VE virtual machine where you want to passthrough the GPU, you can disable VGA arbitration which will reduce the legacy codes required during boot.
To disable VGA arbitration for the GPUs, add disable_vga=1 at the end of the vfio-pci option in the /etc/modprobe.d/vfio.conf file as shown below:
What if my GPU is Still not Using the VFIO Driver Even After Configuring VFIO?
Even after doing everything correctly, if your GPU still does not use the VFIO driver, you will need to try booting Proxmox VE with kernel options that disable the video framebuffer.
On Proxmox VE 7.1 and older, the nofb nomodeset video=vesafb:off video=efifb:off video=simplefb:off kernel options disable the GPU framebuffer for your Proxmox VE server.
On Proxmox VE 7.2 and newer, the initcall_blacklist=sysfb_init kernel option does a better job at disabling the GPU framebuffer for your Proxmox VE server.
Open the GRUB bootloader configuration file /etc/default/grub file with the nano text editor with the following command:
Add the kernel option initcall_blacklist=sysfb_init at the end of the GRUB_CMDLINE_LINUX_DEFAULT.
Once you’re done, press <Ctrl> + X followed by Y and <Enter> to save the file and make sure to update the Proxmox VE GRUB bootloader for the changes to take effect.
GPU Passthrough Showed No Errors, But I’m Getting a Black Screen on the Monitor Connected to the GPU Passed to the Proxmox VE VM, Why?
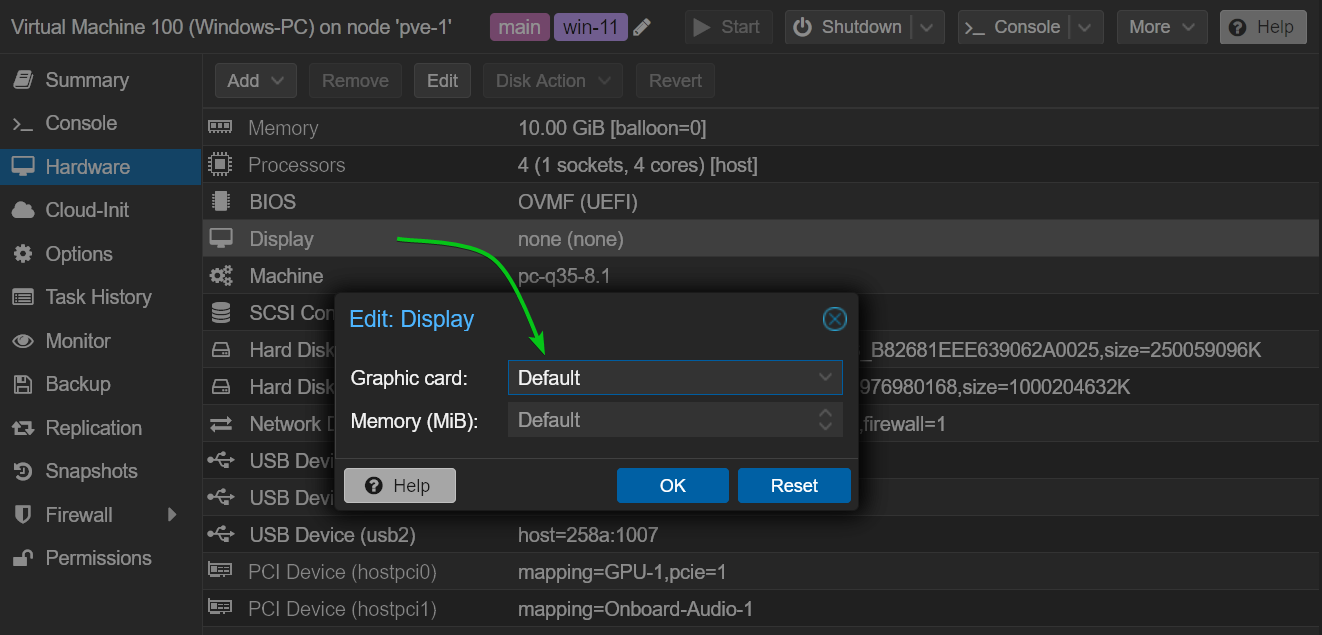
Once you’ve passed a GPU to a Proxmox VE virtual machine, make sure to use the Default Graphics card before you start the virtual machine. This way, you will be able to access the display of the virtual machine from the Proxmox VE web management UI, download the GPU driver installer on the virtual machine, and install it on the virtual machine.
Once the GPU driver is installed on the virtual machine, the screen of the virtual machine will be displayed on the monitor connected to the GPU that you’ve passed to the virtual machine as well.
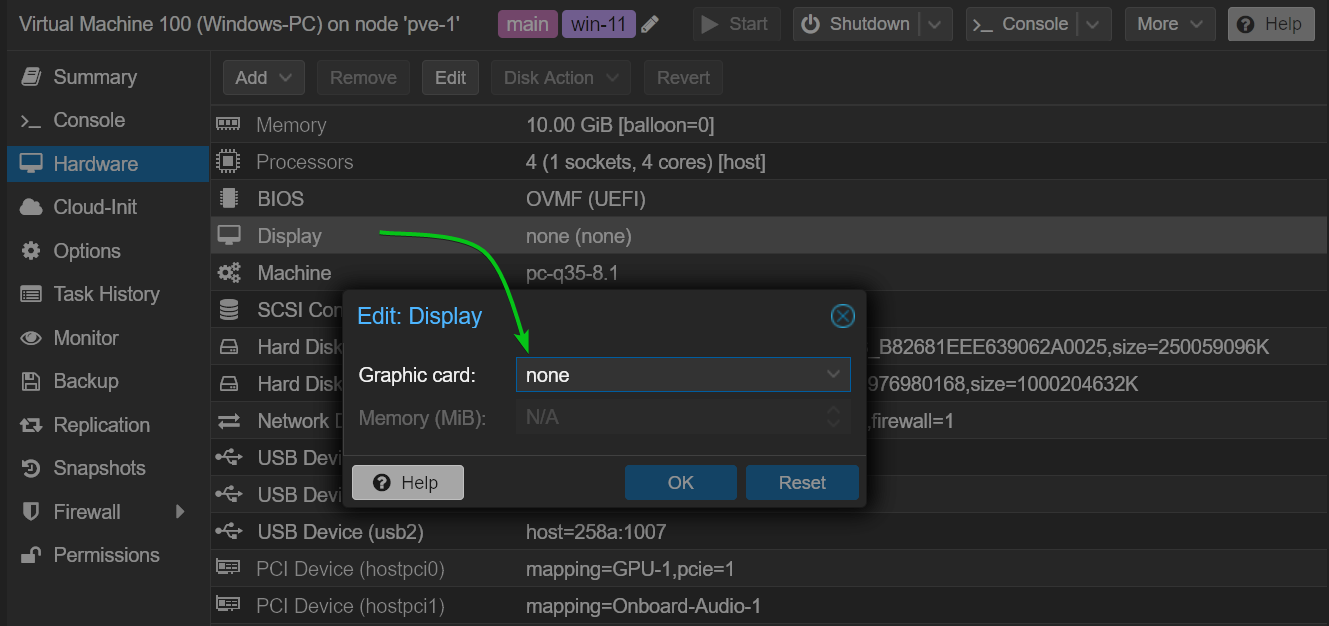
Once the GPU driver is installed on the virtual machine and the screen of the virtual machine is displayed on the monitor connected to the GPU (passed to the virtual machine), power off the virtual machine and set the Display Graphic card of the virtual machine to none.
Once you’re set, the next time you power on the virtual machine, the screen of the virtual machine will be displayed on the monitor connected to the GPU (passed to the virtual machine) only, nothing will be displayed on the Proxmox VE web management UI. This way, you will have the same experience as using a real computer even though you’re using a virtual machine.
Remember, never use SPICE, VirtIO GPU, and VirGL GPU Display Graphic card on the Proxmox VE virtual machine that you’re configuring for GPU passthrough as it has a high chance of failure.
What is AMD Vendor Reset Bug and How to Solve it?
AMD GPUs have a well-known bug called “vendor reset bug”. Once an AMD GPU is passed to a Proxmox VE virtual machine, and you power off this virtual machine, you won’t be able to use the AMD GPU in another Proxmox VE virtual machine. At times, your Proxmox VE server will become unresponsive as a result. This is called the “vendor reset bug” of AMD GPUs.
The reason this happens is that AMD GPUs can’t reset themselves correctly after being passed to a virtual machine. To fix this problem, you will have to reset your AMD GPU properly. For more information on installing the AMD vendor reset on Proxmox VE, read this article and read this thread on Proxmox VE forum. Also, check the vendor reset GitHub page.
How to Provide a vBIOS for the Passed GPU on a Proxmox VE Virtual Machine?
If you’ve installed the GPU on the first slot of your motherboard, you might not be able to passthrough the GPU in a Proxmox VE virtual machine by default. Some motherboards shadow the vBIOS of the GPU installed on the first slot by default which is the reason the GPU installed on the first slot of those motherboards can’t be passed to virtual machines.
The solution to this problem is to install the GPU on the second slot of the motherboard, extract the vBIOS of the GPU, install the GPU on the first slot of the motherboard, and passthrough the GPU to a Proxmox VE virtual machine along with the extracted vBIOS of the GPU.
NOTE: To learn how to extract the vBIOS of your GPU, read this article.
Once you’ve obtained the vBIOS for your GPU, you must store the vBIOS file in the /usr/share/kvm/ directory of your Proxmox VE server to access it.
Once the vBIOS file for your GPU is stored in the /usr/share/kvm/ directory, you need to configure your virtual machine to use it. Currently, there is no way to specify the vBIOS file for PCI/PCIE devices of Proxmox VE virtual machines from the Proxmox VE web management UI. So, you will have to do everything from the Proxmox VE shell/command-line.
You can find the Proxmox VE virtual machine configuration files in the /etc/pve/qemu-server/ directory of your Proxmox VE server. Each Proxmox VE virtual machine has one configuration file in this directory in the format <VM-ID>.conf.
For example, to open the Proxmox VE virtual machine configuration file (for editing) for the virtual machine ID 100, you will need to run the following command:
In the virtual machine configuration file, you will need to append romfile=<vBIOS-filename> in the hostpciX line which is responsible for passing the GPU on the virtual machine.
For example, if the vBIOS filename for my GPU is gigabyte-nvidia-1050ti.bin, and I have passed the GPU on the first slot (slot 0) of the virtual machine (hostpci0), then in the 100.conf file, the line should be as follows:
Once you’re done, save the virtual machine configuration file by pressing <Ctrl> + X followed by Y and <Enter>, start the virtual machine, and check if the GPU passthrough is working.
What to do if Some Apps Crash the Proxmox VE Windows Virtual Machine?
Some apps such as GeForce Experience, Passmark, etc. might crash Proxmox VE Windows virtual machines. You might also experience a sudden blue screen of death (BSOD) on your Proxmox VE Windows virtual machines. The reason it happens is that the Windows virtual machine might try to access the model-specific registers (MSRs) that are not actually available and depending on how your hardware handles MSRs requests, your system might crash.
The solution to this problem is ignoring MSRs messages on your Proxmox VE server.
To configure MSRs on your Proxmox VE server, open the /etc/modprobe.d/kvm.conf file with the nano text editor as follows:
To ignore MSRs on your Proxmox VE server, add the following line to the /etc/modprobe.d/kvm.conf file.
Once MSRs are ignored, you might see a lot of MSRs warning messages in your dmesg system log. To avoid that, you can ignore MSRs as well as disable logging MSRs warning messages by adding the following line instead:
Once you’re done, press <Ctrl> + X followed by Y and <Enter> to save the /etc/modprobe.d/kvm.conf file and update the initramfs of your Proxmox VE server for the changes to take effect.
How to Solve HDMI Audio Crackling/Broken Problems on Proxmox VE Linux Virtual Machines?
If you’ve passed the GPU to a Linux Proxmox VE virtual machine and you’re getting bad audio quality on the virtual machine, you will need to enable MSI (Message Signal Interrupt) for the audio device on the Proxmox VE virtual machine.
To enable MSI on the Linux Proxmox VE virtual machine, open the /etc/modprobe.d/snd-hda-intel.conf file with the nano text editor on the virtual machine with the following command:
Add the following line and save the file by pressing <Ctrl> + X followed by Y and <Enter>.
For the changes to take effect, reboot the Linux virtual machine with the following command:
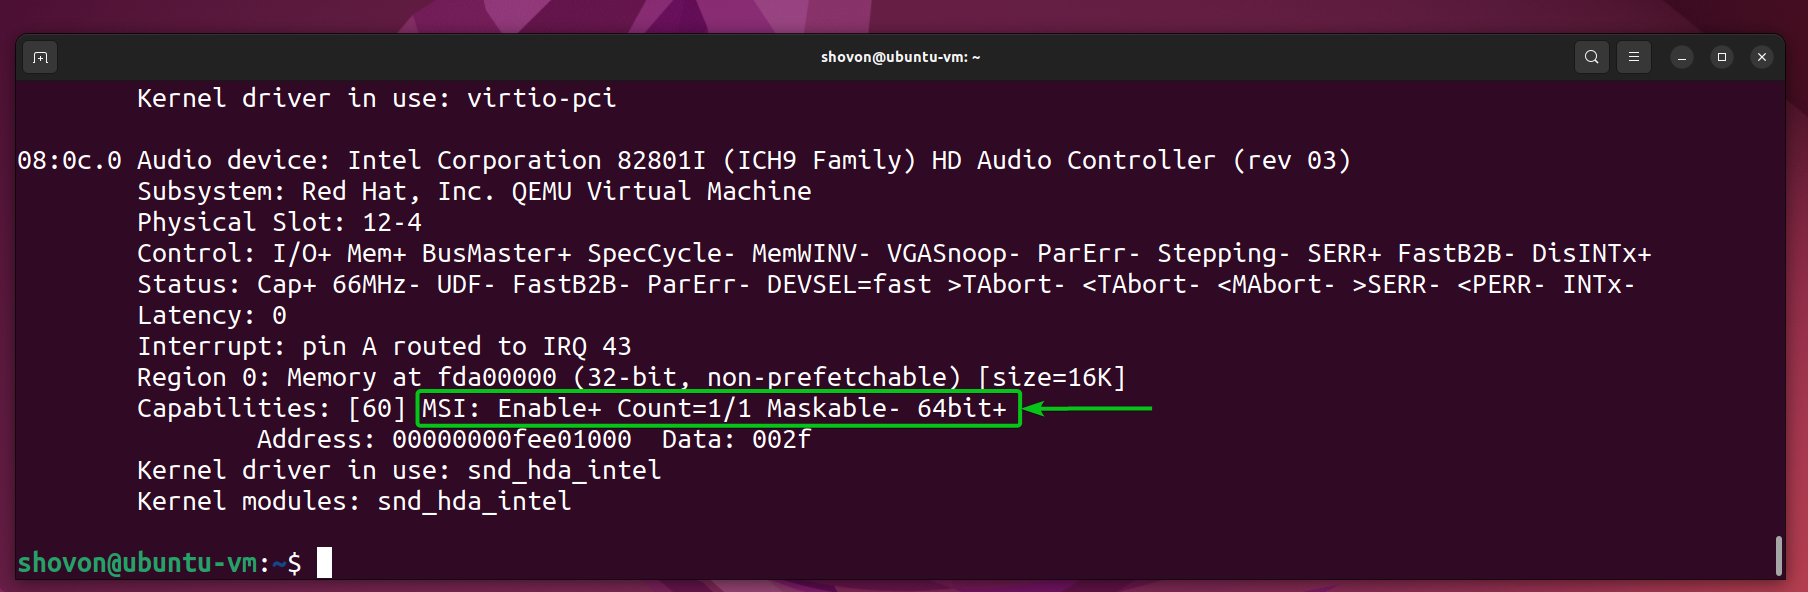
Once the virtual machine boots, check if MSI is enabled for the audio device with the following command:
If MSI is enabled for the audio device on the virtual machine, you should see the marked line in the audio device information.
How to Update Proxmox VE initramfs?
Every time you make any changes to files in the /etc/modules-load.d/ and /etc/modprobe.d/ directories, you must update the initramfs of your Proxmox VE 8 installation with the following command:
Once Proxmox VE initramfs is updated, reboot your Proxmox VE server for the changes to take effect.
How to Update Proxmox VE GRUB Bootloader?
Every time you update the Proxmox VE GRUB boot configuration file /etc/default/grub, you must update the GRUB bootloader for the changes to take effect.
To update the Proxmox VE GRUB bootloader with the new configurations, run the following command:
Once the GRUB bootloader is updated with the new configuration, reboot your Proxmox VE server for the changes to take effect.
Conclusion
In this article, have discussed some of the most common Proxmox VE PCI/PCIE passthrough and GPU passthrough problems and the steps you can take to solve those problems.
References
- [TUTORIAL] – PCI/GPU Passthrough on Proxmox VE 8 : Installation and configuration | Proxmox Support Forum
- Ultimate Beginner’s Guide to Proxmox GPU Passthrough
- Reading and Writing Model Specific Registers in Linux
- The MSI Driver Guide HOWTO — The Linux Kernel documentation
Source: linuxhint.com