Using tail Command in Linux

There are several commands to view the contents of a file in Linux. Tail command is one of them.
And as the name suggests, the tail command is used to print the end part of a file. This can be useful when dealing with config files where the new changes are made to the end of the file.
The tail command also allows you to view the changes made to a file live. This is extensively used for monitoring log files in real-time while troubleshooting issues.
In this tutorial, I will show how you can use the tail command by sharing some practical examples of it.
 Abhishek Prakash
How to use the tail command in Linux
To use any command in the terminal, execution of the command in the right syntax is compulsory, so let's start with its syntax first.
tail [option] [file]Here,
[option]allows you to tweak the default behavior of the command.[file]is where you'd enter the file name that you want to pair with the tail command.
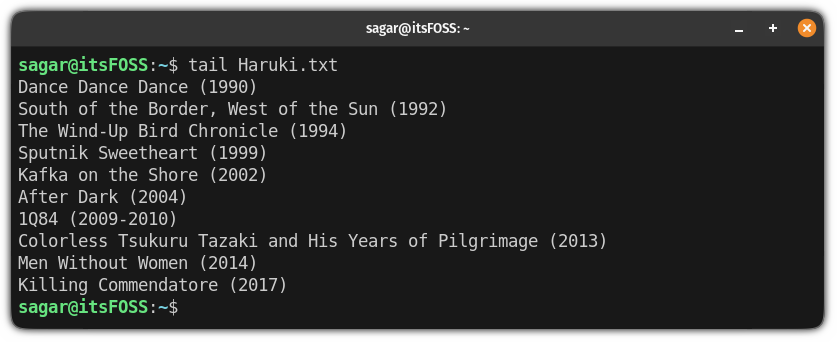
To make things easy to understand, I will be using the Haruki.txt text file containing the following line:
Hear the Wind Sing (1979)
Pinball, 1973 (1980)
A Wild Sheep Chase (1982)
Hard-Boiled Wonderland and the End of the World (1985)
Norwegian Wood (1987)
Dance Dance Dance (1990)
South of the Border, West of the Sun (1992)
The Wind-Up Bird Chronicle (1994)
Sputnik Sweetheart (1999)
Kafka on the Shore (2002)
After Dark (2004)
1Q84 (2009-2010)
Colorless Tsukuru Tazaki and His Years of Pilgrimage (2013)
Men Without Women (2014)
Killing Commendatore (2017)
And when the tail command is executed without any options, it prints the last 10 lines of the file:
But you can do more than just this! Let me tell you how.
Tail command examples
In this section, I will share different examples of the tail command, using its different options.
1. Print the last N lines
As I mentioned earlier, the tail command prints the last ten lines by default but you may not always want the same behavior.
To print the desired number of last N lines, all you have to do is use the -n flag and append the number of the last N lines you want to be printed:
tail -n <Number-of-last-N-Lines> <File>For example, here, I printed the last three lines of my text file named Haruki.txt:
tail -n 3 Haruki.txt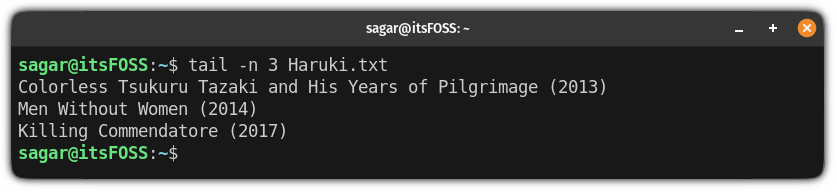
You can also use a number higher than 10 here.
2. Print everything from the N line
So if you want the output from a specific point, this can be very handy.
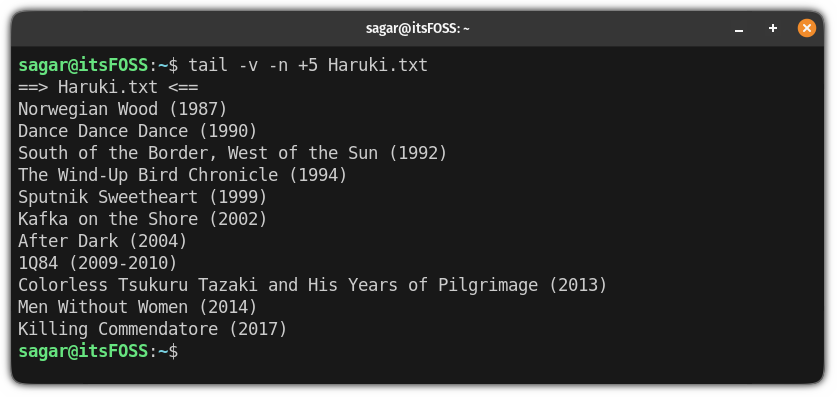
To do so, you'd have to use the -n flag and append the line number from where you want to print the file with the + sign:
tail -n +<Line-number> <File>So let's say I want to print everything from the 5th line in the text file Haruki.txt then, I will use the following command:
tail -n +5 Haruki.txt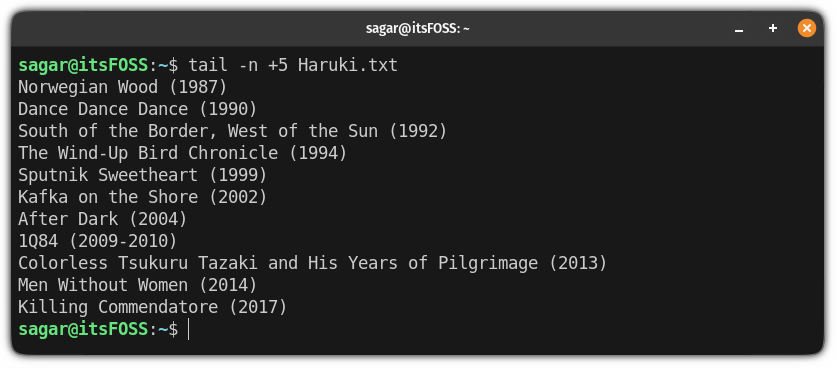
3. Print the filename with the output
You may find yourself in a situation where you want to print the filename with the output given by the tail command.
A good example will be while redirecting the output of multiple files with tail commands to a single file and you want to separate the output.
To do so, you'd have to use the -v flag, which will get you a verbose output:
tail -v [File]Here, I used the previous example, but this time, I added the option for the verbose output:
4. Use multiple files with the tail command
Sometimes, you may want to use multiple files with the tail command, and it's pretty simple! All you have to do is use the multiple filenames and the tail command will take care of the rest:
tail <options> <File-1> <File-2> <File-n> For example, here, printed the last three lines of the two different text files: Haruki.txt and Premchand.txt:
tail -n 3 Haruki.txt Premchand.txt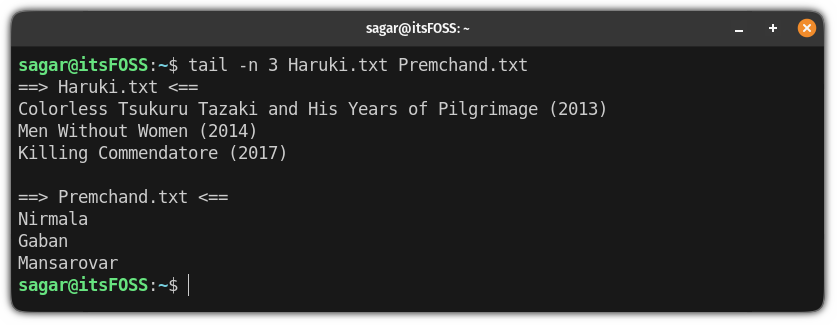
And if you notice carefully, it prints the filename by default, which is nice.
If you want to skip the filename from the output, use the -q flag (quiet mode):
tail -q <File-1> <File-2> <File-n> 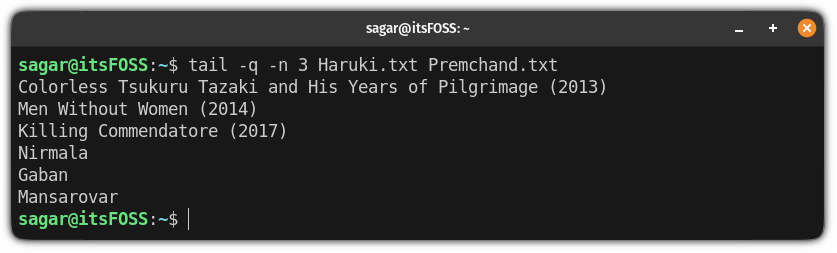
5. Monitor changes made to file live
This is an excellent feature of the tail command. Not only you can see the last few lines, but it can also display any new lines added to it. How cool is that!
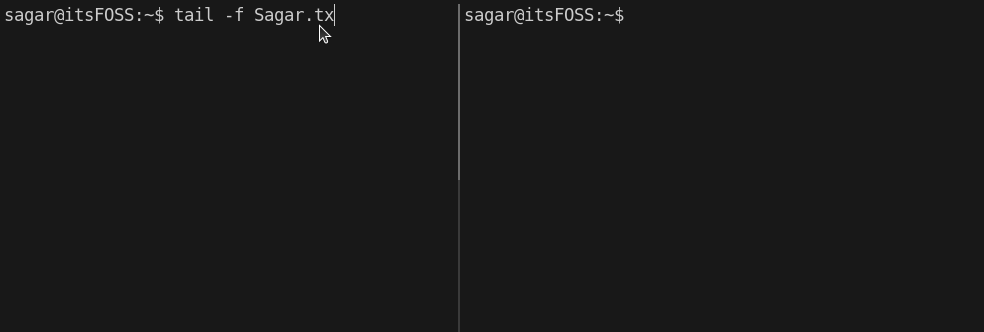
To do so, use the -f (follow) flag with the tail command:
tail -f <File>Here's an example where I used multiple windows in a single terminal. I executed the tail command in one and in the other one, I used the echo command to append the text in the file:
Sysadmins and developers use it to watch log files in real-time. It helps in troubleshooting.
tail -F is lesser known but slightly better option. In some server configurations, the log files are rotated and created (with the same name again). The tail -f command will not track changes if the file was recreated. However, tail -F will wait for the file to be created and continue monitoring it. Pretty cool! Isn't it?
Quick summary of tail command options
Here's a brief summary covering everything I've mentioned so far in this tutorial:
| Option | Description |
|---|---|
-n <number> |
Display N lines from the end of the file |
-n +<number> |
Print everything from the Nth line |
-v |
Include filename in the output header |
-q |
Removes the filenames from the output |
-f |
Monitor the changes made to the file in real-time |
-F |
Monitor changes in real-time, wait for file to be (re)created |
🖥️ Practice what you learn
If you want to test your recently learned knowledge of the tail command, here's some exercise for you.
Download the agatha.txt file from our GitHub repository.
Now do the following.
- Print the last 12 lines of the file
- Print only the last line of the file
- Add the filename to output while displaying the lines starting from line 15
- Print only the 11th line (combine it with the head command)
You can discuss the practice questions in the community:


If you are absolutely new to the command line, we have a good starting point for you.

🗨 We'll be sharing more Linux command examples every week. Stay tuned for more. And if you have questions or suggestions, the comment section is all yours.
Source: It's FOSS