Setup Docker Private Registry on Ubuntu
A “Docker private registry” is a centralized repository for storing and distributing Docker images within a private network or organization. It is useful to manage their own images, which can be easily shared and deployed within their own infrastructure.
By using a private registry, organizations can maintain security and control over their images, ensuring that only approved images are used within their infrastructure. Additionally, a private registry can improve the deployment speed and reliability of Docker images.
This article will explain the step-by-step instructions to set up the Docker private registry on Ubuntu.
How to Setup Docker Private Registry on Ubuntu?
Setting up a Docker private registry on Ubuntu is a useful tool for organizations looking to improve their deployment processes, security, and control over their Docker images. For setting up the private Docker registry, follow these steps:
Prerequisite: Install Docker on Ubuntu
To set up Docker private registry on Ubuntu, users must ensure that Docker is installed on the operating system. If not, follow the procedure which is provided on the official Website.
Step 1: Start the Docker daemon
After completing the installation, start the Docker daemon using the “systemctl” command as seen in the following script:

The output shows that docker has been successfully started.
Step 2: Pull the Docker Registry Image
To pull the Docker registry image from the Docker Hub, specify the “registry” with the “sudo” privileges as below:
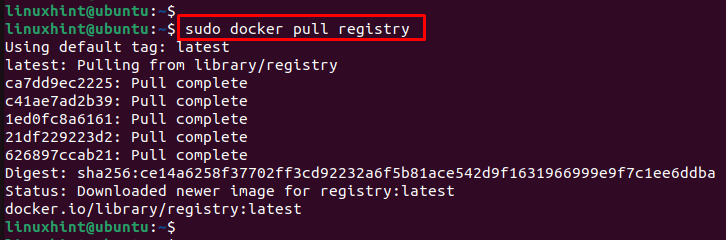
The execution of the above command shows that the newer image “registry” has been downloaded.
Step 3: Setup Docker Private Registry Container
To start the Docker registry container, execute the “docker run” command by specifying the port number:
The description of the below command is provided here:
- registry:2: It is the official Docker image for running a Docker registry, which is used to store and distribute Docker images.
- –restart=always: This option ensures that the container will automatically restart if it stops for any reason.
- -p 5000:5000: It maps port 5000 on the host to port 5000 in the container, allowing external access to the registry.
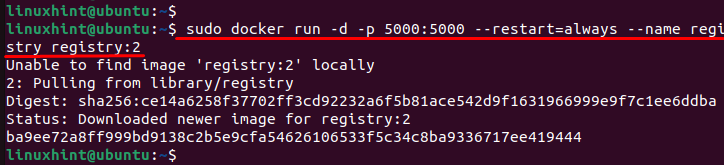
The output shows that the Docker container named “registry” has been downloaded from the image “registry:2”.
Step 4: Pull the “alpine” Docker Image
Alpine is a popular and lightweight Linux distribution that is commonly used as a base image for other Docker images. To pull the “alpine” Docker image from a Docker registry to the local host, execute the below script:
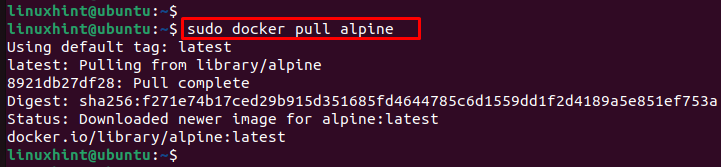
The output displays that the docker image “alpine” has been downloaded.
Step 5: Tag and Push a Target Image to the Registry
To tag an image and push it to the registry, users need to specify the “image name”. For instance, the “alpine” image is mentioned by specifying the port “5000” to the localhost:

For pushing the docker image to the registry, the “docker push” command is utilized with the “alpine” image name:
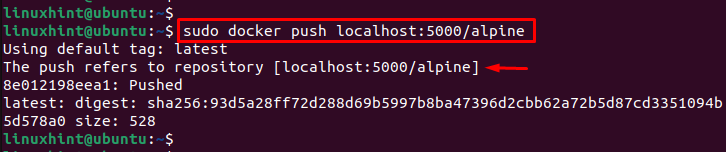
The output shows that the “alpine” image has been successfully pushed to the particular repository.
Step 6: Pull an Updated Image from the Registry
To pull the updated image from the registry, run the “docker pull” command by specifying the port number “5000” and image name “alpine” as below:
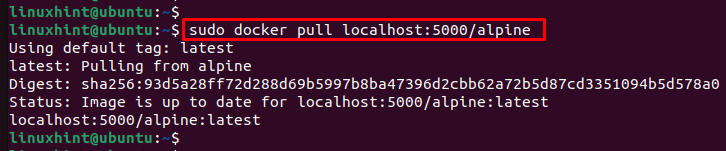
The output shows that the “alpine” image has been pulled with the updated settings.
Step 7: Verify the Registry is Running
To verify the registry is up and running, users can utilize the “curl” command with the particular URL:

The above display shows that the current private registry is running on Ubuntu.
Conclusion
To set up a private Docker registry on Ubuntu, users first need to pull the “registry” image using the “docker pull registry” script. Furthermore, start the docker private registry via the “docker run -d -p <port no.> –restart always –name registry registry:tag” script. After that, pull the specified image and tag it. Finally, push the tagged image to your Docker private registry. This guide has demonstrated step-by-step procedures to set up the docker private registry on Ubuntu.
Source: linuxhint.com