Select the Top 10 Rows in SQL
Luckily, in SQL, we have access to the LIMIT clause which allows us to control the number of rows that are returned within a given result set. This feature is very useful when we are dealing with a large data set and do not actually need the entire row but instead a subset of it. This can be either to get the layout of the data or presentation.
In this tutorial, we will learn how we can use and work with the LIMIT clause in SQL databases to specify the number of rows that we wish to retrieve from the database.
Requirements:
Before we dive into the workings and usage of the LIMIT clause in SQL, let us discuss some basic requirements for this tutorial.
To follow along with this post, you will require the following:
- MySQL 8.0 and above works with MySQL 5
- Access to the Sakila sample database
- Permissions to query the rows from the target database (read access)
With the given requirements met, we can proceed with this tutorial.
SQL LIMIT
In SQL, the LIMIT clause allows us to restrict the number of rows that are returned from a given SQL query. For example, in a select statement, instead of returning all the rows from the table which may contain over 1000 records, we can choose to view only the first 10 rows.
The following shows the basic syntax of the LIMIT clause in SQL:
FROM tbl_name
LIMIT num_rows;
In this example, we are using the LIMIT clause in conjunction with the SELECT statement.
From the given syntax, the “tbl_name” represents the name of the table from which we wish to retrieve the data.
The “num_rows” allows us to specify the maximum number of rows that are returned in the result set.
Example 1: Limit the Number of Rows
The most common and fundamental role of the LIMIT clause is to set the maximum number of rows that are included in the result set.
Suppose we want to use the “film” table from the Sakila sample database. However, since we do not want to fetch all the associated rows, we can select the first 10 rows as shown in the following example clause:
LIMIT 10;
Once we run the given query, we should get an output as follows:

In this example, we use the LIMIT clause to restrict the result set to 10 rows. This fetches the first 10 rows from the result.
Example 2: Using the OFFSET Value
In some cases, we may wish to skip or omit a specific number of rows. For example, suppose we wish to retrieve only five elements, but we want to start at position 20. We can use the OFFSET parameter which allows us to tell the LIMIT clause at which position we wish to start.
This is particularly useful when you need to implement the pagination in a large dataset as shown in the following example:
LIMIT 10 OFFSET 20;;
This should return 10 rows starting from position 20 as follows:
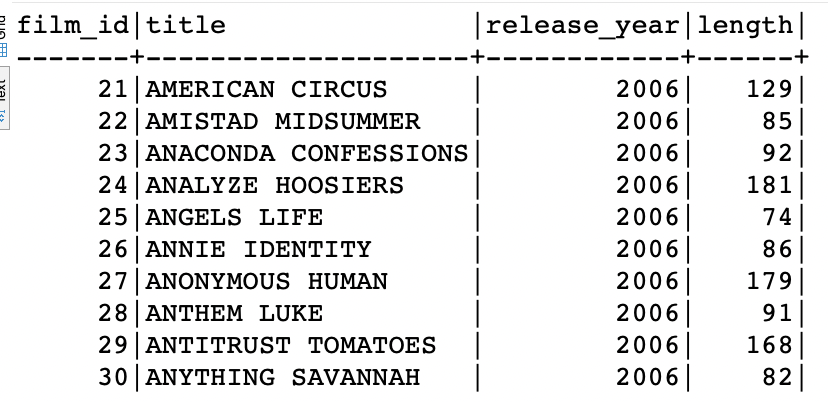
As you can see from the given result, the start “film_id” starts at position 21 and proceeds to position 30.
Example 3: Using the Order BY Clause
Another common use of the LIMIT clause is in combination with the ORDER BY clause. This allows us to retrieve specific number of rows that are based on a particular order. This can include the basic sorting (ascending or descending), etc.
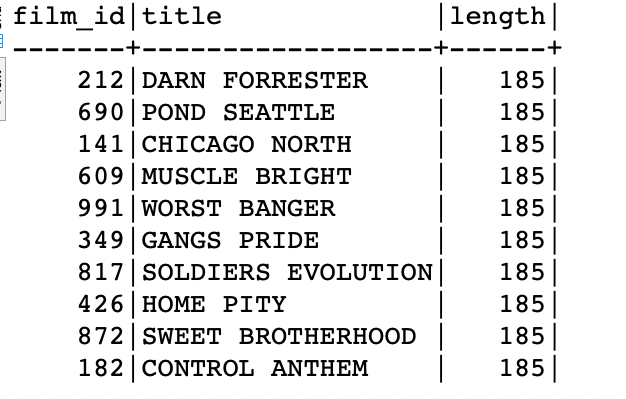
For example, suppose we want to retrieve the top 10 longest films from the “film” table. We can use the ORDER BY clause to sort the values based on the length and then limit the first 10 rows.
An example is as follows:
FROM film f
ORDER BY length DESC
LIMIT 10;
In this case, we use the ORDER BY clause to order the rows in descending order (highest to lowest) and then fetch the first 10 rows using the LIMIT clause.
The result set is as follows:
There you have it!
Conclusion
In this post, we learned the fundamentals and advanced features of working with the LIMIT clause in SQL databases.
Source: linuxhint.com