Recovering a missing kernel in Centos 6

Introduction
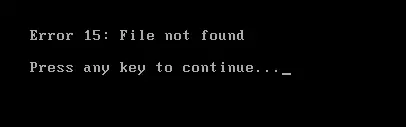
Recently when I restarted a centos 6.8 system, I was greeted with the message “Error 15: File not found”. In this article, I will systematically describe the steps I used to recover my system. I was using a VMware virtual machine.
Step 1: Identify the error
My system did not boot beyond the grub prompt and gave me “Error 15: File not found”. I still tried to boot the system in single user mode several times without any success.
Step 2: Boot system into BIOS
I attached the Centos installation iso to my virtual machine but in order to boot from the iso, I needed to change the boot order in the virtual machine BIOS. The problem was that I was unable to interrupt the boot sequence quickly enough to open the BIOS menu. I finally shut down the machine and appended the following line in the virtual machine’s VMX file.
bios.forceSetupOnce = "TRUE"
After this, I restarted my virtual machine and it presented the BIOS setup as soon as it powered up.
Step 3: Change boot order in BIOS
At the BIOS setup, use the arrow keys to move the cursor to the Boot tab.
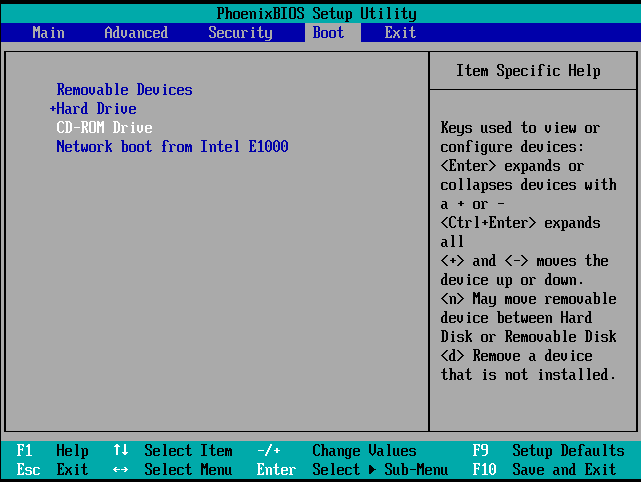
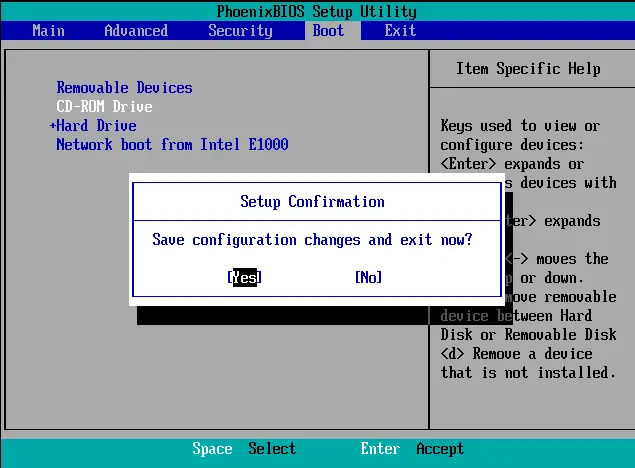
Use the arrow keys to bring the cursor to the CD-ROM drive option and press the + key. This will ensure that the system boots from the iso inserted into the CR ROM drive. Now press F10 to save and exit. Select yes when prompted for confirmation.
Step 4: Boot system into rescue mode
Now the boot process continues and we are presented with the below menu provided by the installation iso.
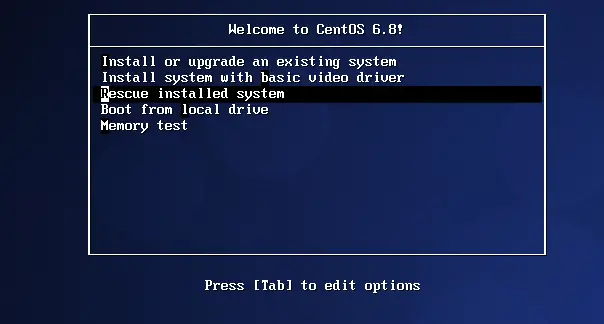
From here select the option “Rescue installed system”. If the option “Rescue installed system is not available, you will have to choose Rescue Mode by typing the following at the grub prompt and pressing the enter key
boot: linux rescue
After this, you will be asked to select the language and keyboard settings followed by a prompt asking you if wish to start up the network interfaces in the system. Once you’ve gone through this and made the appropriate selections, you will be presented with the below screen:
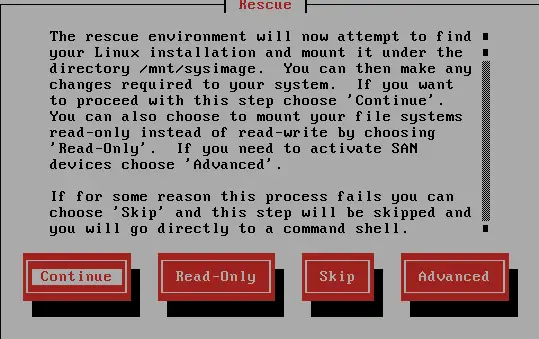
From here select continue and hit enter.
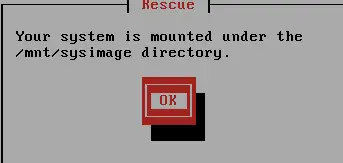
Your system will now notify you that you have successfully entered the rescue mode and that the system is mounted under /mnt/sysimage directory.
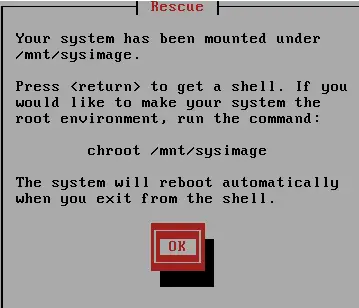
Step 5: Obtain a shell prompt
Once you selected ok in the last prompt, you will now be presented with the below menu.
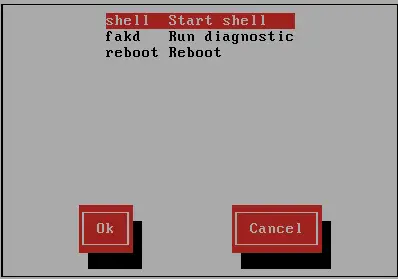
From here select “shell Start shell” and move your cursor to the ok button with the help of arrow keys and press enter. This will now bring you to a shell prompt.
Even if your file system is mounted, the default root partition while in rescue mode is a temporary root partition, not the root partition of the file system used during normal user mode. You can change the root partition of the rescue mode environment to the root partition of your file system by executing the following command:
# chroot /mnt/sysimage
Step 6: Reinstall grub
Once I obtained write access to the file systems, I reinstalled the grub bootloader with the following command:
/sbin/grub-install --recheck /dev/sda1
In the above command /dev/sda1 was the partition on which the /boot file system was mounted. This might be different for your system. Check the df command output to validate the underlying partition name for the /boot mount point.
Step 7: Mount the installation iso
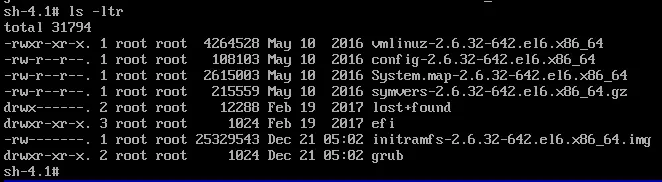
When I took a look at the file system hierarchy and ran the df =h command, I observed that the /boot filesystem only contained the grub and efi folders and the kernel related files and the kernel itself i.e. the vmlinuz file were missing explaining the “file not found” error I received on the grub prompt during system boot.
I then proceeded to mount the installation iso using the mount command.

Step 8: Forcefully install kernel packages
Once I mounted iso on the /mnt directory, I did a cd to /mnt and from there I moved to the Packages sub-directory which contained the .rpm files. From within that directory, I executed the following command to install the kernel and related packages:

Once this command completed successfully resulting in the installation of kernel packages I moved to /boot directory and was relieved to see that vmlinuz, initrd, and other kernel related files were now present.
Step 9: Remove entry from .vmx file and boot system
I shut down the system and booted it to the BIOS setup again. From here I now changed the boot order and moved the hard drive option above the CD-ROM Drive option and saved the settings. This ensured that the system now booted from the OS hard disk and I was able to successfully boot the system. I later removed the entry I had placed in the virtual machines’ .vmx file to ensure that the VM did not boot to the BIOS every time it was restarted.
Conclusion
In this article, we demonstrated how you could boot a virtual machine to it’s BIOS setup, change the boot order and then boot the system in rescue mode from the installation media followed by a practical demonstration of how we reinstalled the kernel on the system. We hope that this article as a whole or a part of it assists now while troubleshooting and recovering non-bootable systems.
The post Recovering a missing kernel in Centos 6 appeared first on The Linux Juggernaut.
Source: The Linux Juggernaut