Mount Windows NTFS Drive on Linux
In this tutorial, I will be covering how you can manually mount the Windows NTFS drive on Linux.
Note: Be advised that the instructions and commands mentioned in this tutorial are executed on Ubuntu version 22.04.
Mount Windows Drive on Linux
Mounting a Windows drive on Linux involves three steps, which are listed below.
1. Identifying the Windows Partition
Various command-line utilities can be used to identify the Windows partition on Linux. The first one is parted utility, which is used to resize the partitions on Linux.
The -l flag in the above command indicates the list.
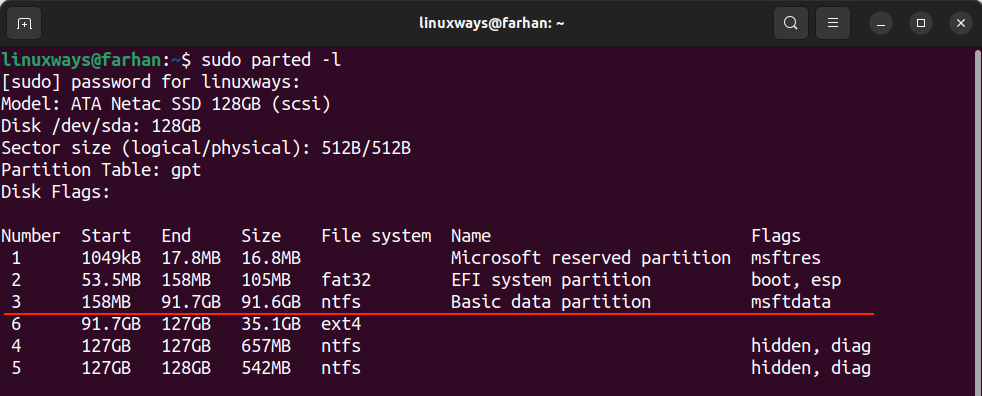
The output shows the file system type, the NTFS indicates the Windows file system while EXT4 Linux. One way to get information about the NTFS device is to determine the size of its partition. The parted command indicates that the block device is /dev/sda and /dev/sda3 is the Windows NTFS partition.
The lsblk utility is another utility used to list all the attached block devices.

Now that we have all the partition names, we can identify the Windows by its size. In my case, it is /dev/sda3.
2. Creating a Mount Point
In Linux, a mount point is essentially a directory that is used to access a file system. It will be an access point that allows you to access the file system as long as it is mounted.
You can set up a mount point anywhere on the Linux system; I will be creating it on root in the /mnt directory, which is the standard directory typically used to mount the storage devices.
A mount point, WinMount in the /mnt directory has successfully been created.
3. Mounting the Windows Drive on Linux
To mount the Windows drive, the mount command is used; the syntax is given below.
Replace the [WINDOWS_DRIVE] and [MOUNT_POINT] in the above syntax.
Now, the Windows drive is mounted on Linux and to verify use the df -h command.

The drive is successfully mounted.
To check permission of the mounted Windows drive, use the mount command with grep.

As can be seen, by default, I have the read and write (rw) permissions to the mounted Windows drive. However, permission can also be altered using the -o flag with the mount command. For instance, if you want to mount the drive in read-only (ro) mode, then use the above command in the following way.

Unmount the Windows Drive on Linux
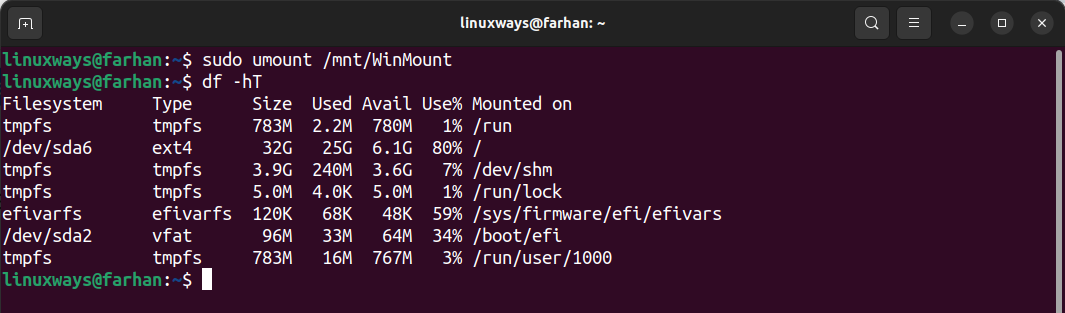
To unmount the Windows drive, the umount command is used with the mount point path.
We will utilize the subsequent command to unmount the mounted drive on the mount point /mnt/WinMount.
To verify, use the df -hT command.
Do I need to Install NTFS-3G on Linux to Mount a Windows Drive?
No, Linux’s kernel version 5.15 and above provides native read and write support for NTFS drives. Therefore, it is not necessary to install third-party drivers. However, if you are using a distribution with no native support for NTFS, then you need to install the ntfs-3g utility.
To install it on Ubuntu, its flavors, and Debian-based distribution use.
For CentOS, and Red Hat Linux distributions.
For Fedora, Arch-Linux, and distributions based on Arch-Linux, use the command mentioned below.
Conclusion
If the Windows NTFS partition is not automatically mounted on booting in a dual-boot setup, you have to do it manually.
To mount the Windows drive, first, we need to identify the Windows partition on Linux. A mount point directory needs to be created after identifying the drive name; then, using the mount command, the drive can be mounted with read and write access.
Source: linuxhint.com