How to use the Rename-Computer (Microsoft.PowerShell.Management) Cmdlet in PowerShell?
This post will provide details regarding the “Rename-Computer” cmdlet in PowerShell.
How to use the Rename-Computer Cmdlet in PowerShell?
In PowerShell, to rename a computer, first, write the “Rename-Computer” cmdlet. Then, specify the new name of the local computer as a parameter value to the “-NewName”. To know more about the stated cmdlet, let’s have a look at the below-provided examples.
Example 1: Use the “Rename-Computer” Cmdlet to Rename a Local Computer
To change the name of the local computer, first, specify the cmdlet “Rename-Computer”. Then, write the “-NewName” parameter and provide it with the new name for the local computer:
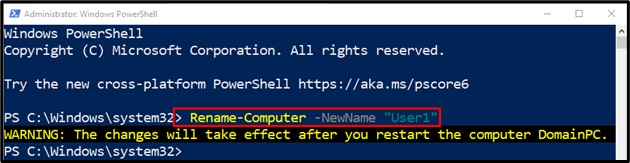
Note: When the “-Restart” parameter is not provided then the computer will not restart immediately. However, changes will take effect when the user restarts the system.
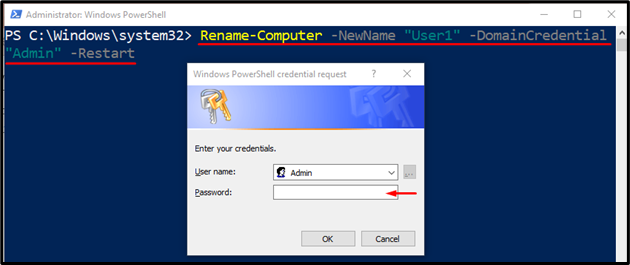
Example 2: Use the “Rename-Computer” Cmdlet to Rename the Local Computer and Prompt a User to Enter the Credential
Run the following command to rename a local computer with administrator privileges. Moreover, after executing this command, the computer will restart because the “-Restart” parameter specified at the end of this command:
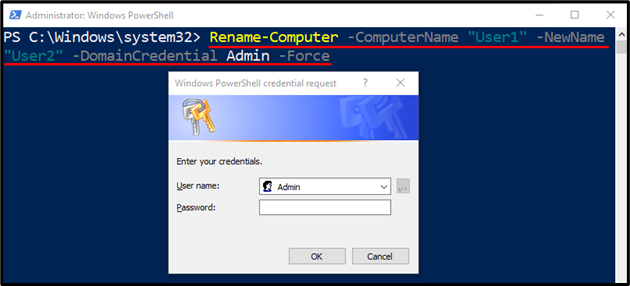
Example 3: Use the “Rename-Computer” Cmdlet to Rename a Remote Computer with Administrator Privileges
In order to rename a remote computer, use the provided command:
-
According to the above-given code:
- First, specify the “Rename-Computer” cmdlet.
- Then, add the “-ComputerName” parameter to select the old user name.
- After that, specify the new computer name to the “-NewName” parameter.
- Lastly, use the “-DomainCredential” parameter to prompt the user to enter credentials and apply the “-Force” parameter:
Parameter’s Glossary
Here is the description of all parameters that are used in this post:
| Parameter | Description |
|---|---|
| -NewName | It is used to set the new name for a local computer. |
| -ComputerName | It is used to rename the specified remote computer. |
| -DomainCredential | It is utilized to prompt the user to type credentials and rename a computer. |
| -Restart | It is used to restart the computer after the execution of the provided command. |
| -Force | It is used to run a cmdlet without the user’s confirmation. |
| -Confirm | It prompts the user to confirm the action to be performed. |
That’s all! You have successfully learned the ways to rename a computer using a “Rename-Computer” cmdlet.
Conclusion
PowerShell’s “Rename-Computer” cmdlet is particularly designed to rename a local computer and a remote computer. However, it cannot rename computers in bulk. Instead, it renames one computer at a time. This guide has presented a number of examples to demonstrate the “Rename-Computer” cmdlet.
Source: linuxhint.com