How to Map Keys in Vim
In this comprehensive guide, I will explain how to map the keys in Vim to automate the operations. From creating a basic key map to advanced key mapping, along with the processes of making them permanent and removing them.
- Syntax
- Vim Special Arguments
- Creating a Basic Keymap
- Listing the Keymaps
- Making Keymaps Permanent
- Avoiding Recursion
- Creating Mode-Specific Keymaps
- How to Map Mouse Events
- How to Map with Leader Key in Vim
- How to Map a Vimscript Function
- How to Map External Commands in Vim
- How to Remove a Keymap in Vim
- Vim Key Mapping Cheat Sheet
- Conclusion
Syntax
To map the key in Vim, the following syntax is used:
<mode>map <arguments> <lhs> <rhs>
In the above syntax:
| <mode>map | nmap, imap, vmap, xmap, cmap, or omap |
| <arguments>* | <silent>, <buffer>, <script>, <special>, <expr> and <unique> |
| <lhs> | The left-hand side contains a key or set of keys to be mapped |
| <rhs> | The right-hand side contains a set of keys or commands that will be executed by the left-hand side keys |
In essential, the <lhs> is a key or set of keys that will execute the commands or operations on the <rhs>.
*In the above syntax, the <arguments> section is optional.
Vim Special Arguments
Vim Special Arguments are tags used to give additional functionality to the keymaps. These arguments appear after the :map command, and before the {rhs} and {lhs}.
For example, to make a map buffer-specific, use the special argument in the following way:
| <silent> | To suppress echoed messages from a keymap |
| <buffer> | To make the map buffer-specific (unique to current buffer) |
| <script> | To indicate that the map is a part of a script or plugin |
| <special> | *It is used to define the special keys for mapping using <> notation (Function keys, control, shift, and other non-alphabetic keys) |
| <expr> | It indicates the mapping’s left-hand side is an expression and that is to be evaluated to obtain the right-hand side |
| <unique> | To make the map unique among the local and global maps |
| <nowait> | To skip the wait for the next command character in the map |
Vim special key notations are mentioned in the following image.
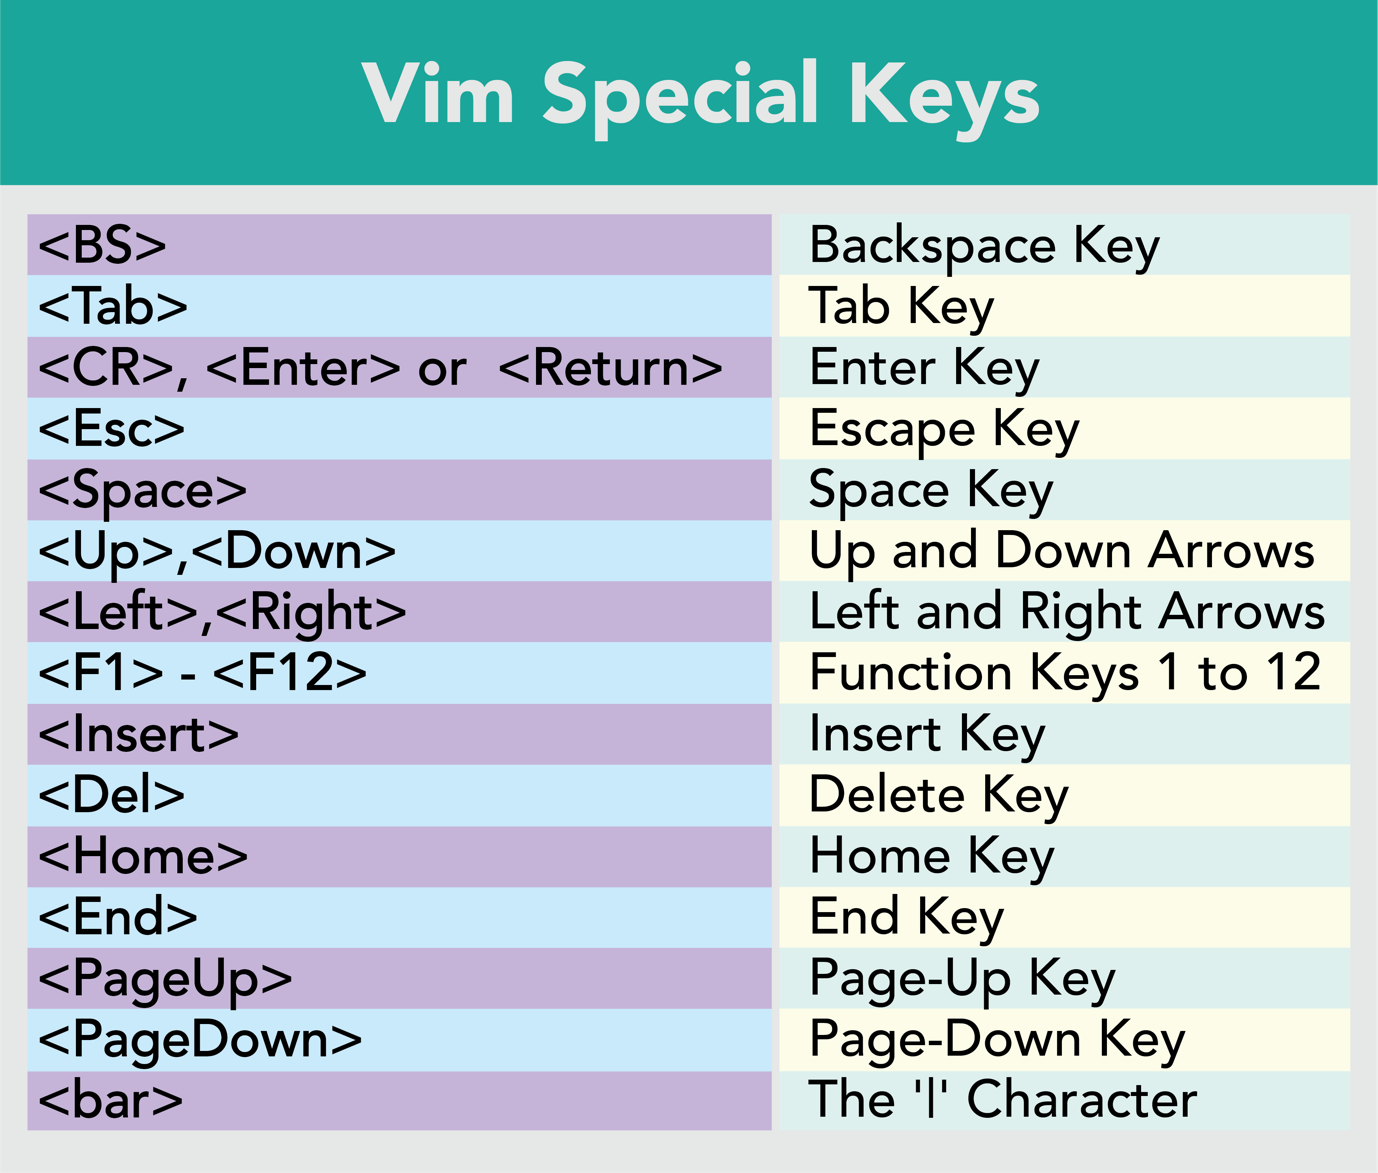
For example, if you want to use the space key in key mapping, the <Space>notation will be used.
Creating a Basic Keymap in Vim
Let’s understand Vim key mapping with a basic example. I want to map the select all lines command (ggVG) to ctrl+a keys. To map the ctrl+a keys, I will run the following command in Vim.
Here, <C-a> signifies the ctrl and a keys, while ggVG is a command to select all lines in the file. The :map keyword is for normal mode mapping by default, however, the :nmap can also be used explicitly for the normal mode.
Similarly, to map line number toggle functionality with the F1 key use:
Now, when you press the F1 key the line number will be enabled, and pressing it again disables it.
Note that this method will only map the keys in the current buffer and will be removed upon closing the buffer.
Listing the Keymaps
To list all the key mappings of normal, visual, and operator pending modes, use the :map command.
To list key mapping of insert and command-line modes, use the :map! Command.
To list the key mapping of a specific mode, just type the initial letter of mode before the map keyword.
| :nmap | To display the maps of the normal mode |
| :imap | To display the maps of the insert mode |
| :vmap | To display the maps of the visual and select mode |
| :smap | To display the maps of the select mode |
| :xmap | To display the maps of the visual mode |
| :cmap | To display the maps of the command-line mode |
| :omap | To display the maps of the operator pending mode |
Moreover, to list all the maps including the plugin maps with paths, use :verbose map command.
For a specific key, simply mention the key in the command (:verbose map <key>).
Making Keymaps Permanent
The keymaps mentioned in the above section will map the keys in the current buffer only. To make Vim key mappings permanent, the maps have to be placed in the vimrc file.

Note that while placing the keymap in the vimrc file, do not add a colon (:) before the map command.
After placing the keymap in the vimrc file, save and quit it using :wq command or using shift+zz keys. The keymaps placed in the vimrc file will be global and can be used in all the Vim sessions. However, certain keymaps can temporarily be disabled if they are affecting the work in the current session, see How to Remove a Keymap in Vim section below.
The vimrc is the setting file of Vim that contains various commands and settings. It is present in the /usr/share/vim/ directory on macOS and /etc/vim on Linux. It is important to note that the vimrc files in the mentioned directories are system-specific files. You can edit these files as well for key mapping, but I would recommend creating a user-specific vimrc file in the home directory.
Avoiding Recursion
Before moving forward, it is significant to learn about recursion in Vim key mapping. Its drawbacks and how to prevent it. It can be comprehended through the use of an example.
In the above example, I have mapped the dd keys to move down by 3 lines and delete the line under the cursor. Now, when I press the dd, it will try to execute the map 3jdd. Vim will interpret the dd command as a map and execute the map repeatedly, as shown in the following image.
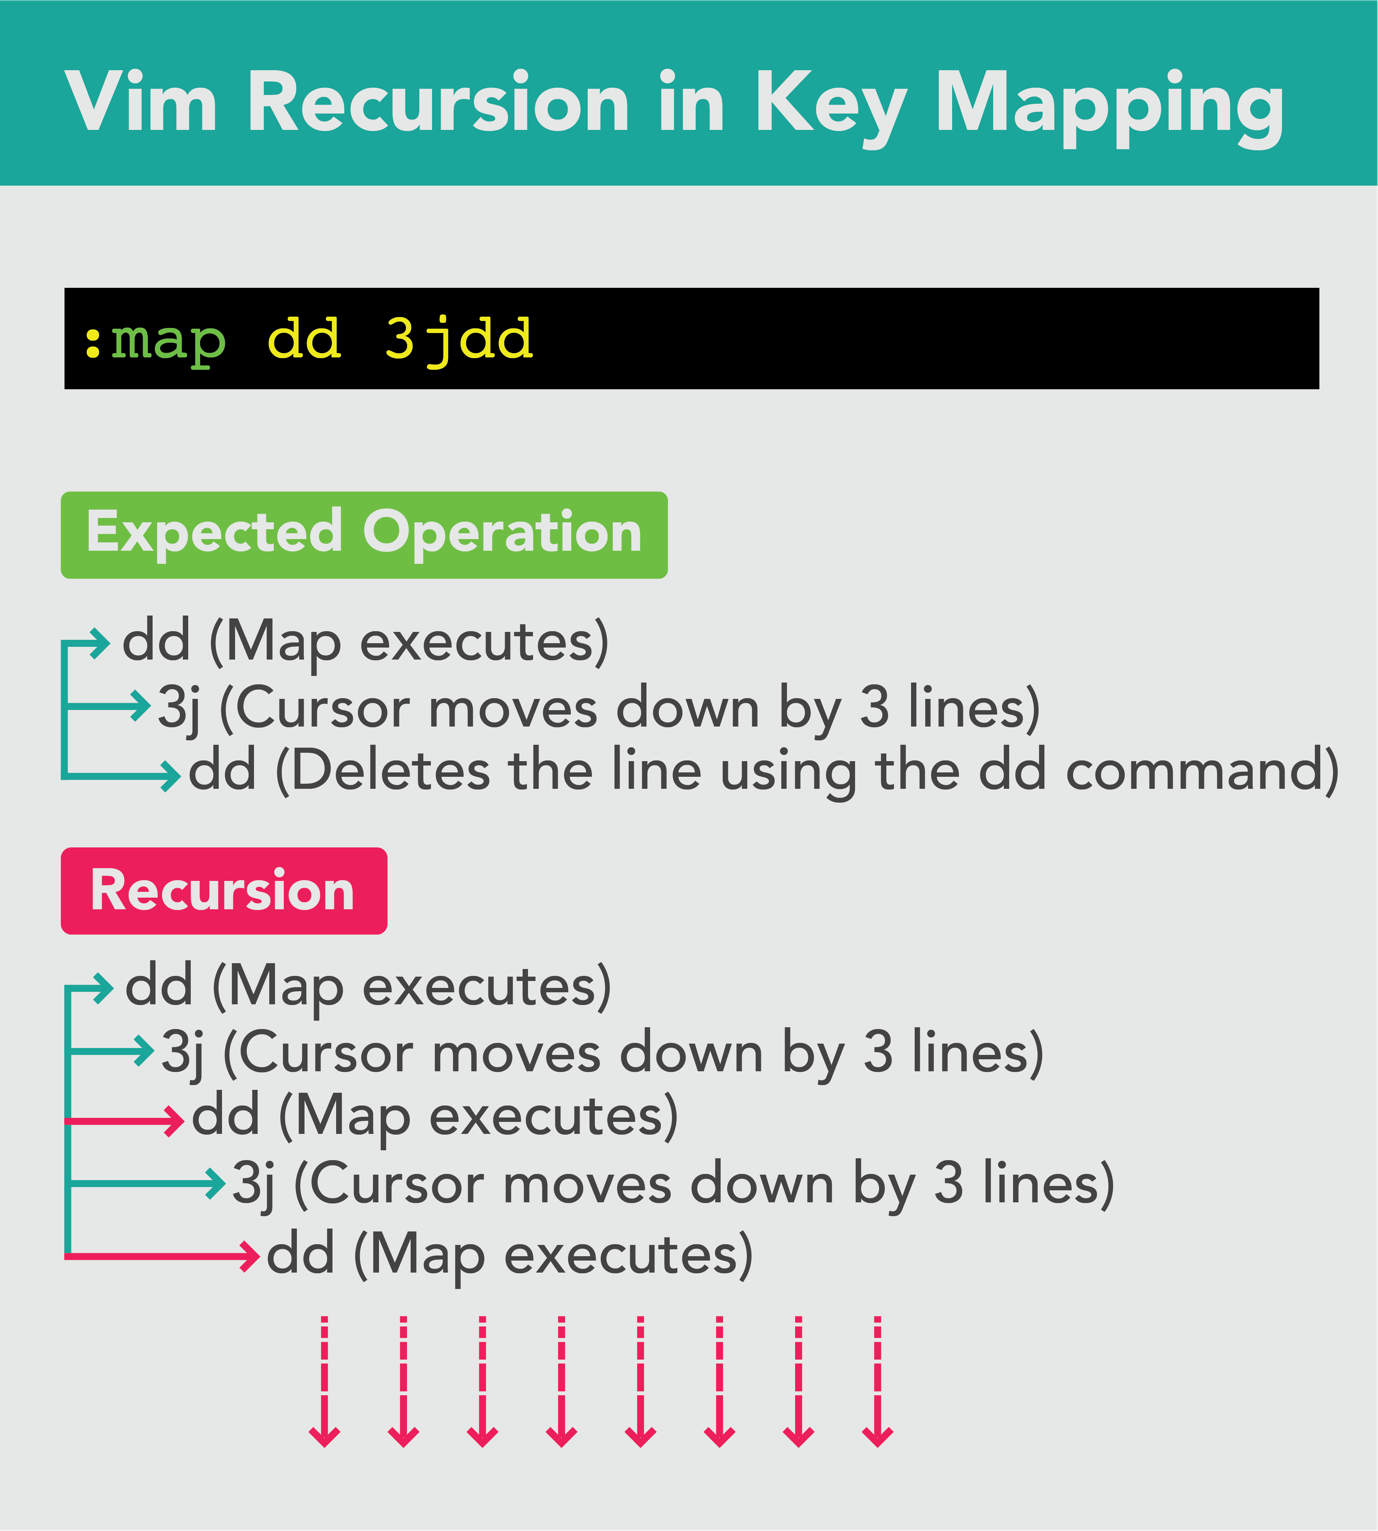
Note: Recursion can freeze the Vim editor. To unfreeze it, press ctrl+c keys.
To avoid recursion, replace the map keyword with noremap, where ‘nore’ means non-recursive. I will replace the map keyword with noremap to fix the recursion in the above keymap.
I will recommend using noremap instead of map to avoid accidentally creating recursive mapping.
Creating Mode-Specific Keymaps
Vim has made key mapping so versatile that even a keymap of a specific mode can be created quite easily. For example, if you have made a keymap for insert mode using an F1 key, then you can map the same F1 key in another mode for an entirely new operation.
In the following example, I have mapped the F1 key to delete 3 lines in the normal mode and yank 3 lines in the insert mode.
:imap <F1> <C-t>
The first map deletes three lines in normal mode when pressing the F1 key, while the second map adds one indentation in the current line when in insert mode using the same key. Now, let’s understand mapping in each mode.
Normal Mode Mapping
To apply a map in the normal mode, only use nmap keyword. For example, to copy all the lines in a file using ctrl+c keys, I will use the following command.
As discussed earlier, it is a best practice to use a non-recursive method to map a key, therefore, I will replace the nmap with nnoremap keyword.
Place it without a colon (:) in the vimrc file to make it a permanent keymap.
I will use noremap instead of the map in the following example.
Insert Mode Mapping
To map keys for the insert mode, just use i instead of n. For example, in insert mode, ctrl+p and ctrl+n keys are used to autocomplete the word based on backward and forward match respectively. To map the ctrl+p keys with the tab key, I will use the following command.
More importantly, if you want to map operator pending mode commands in the insert mode, then you need to insert the <Esc> key on the right-hand side to exit the insert mode in order to execute those commands. For example, in the following keymap, I want to delete 3 lines using the ctrl+x keys and re-enter the insert mode.
Now, when I press the ctrl+x keys, it will print the 3ddi command instead of executing it.

To fix it, I will insert the <Esc> before the 3ddi command.
Now, the command will execute the keep me in the insert mode.
Many mini laptops lack the Esc key, which is important to exit the current mode. So, to map the Esc key to exit the insert mode, key mapping can be utilized. In the following example, I am using ex keys to exit to the normal mode.
When you quickly press the ex keys the insert mode will be exited, thus entering the normal mode.
Visual Mode Mapping
The visual mode is a very significant mode for selecting text in the Vim editor. Apart from the basic selection, the visual mode has other different modes such as visual line, and visual block modes.
In the visual mode, tilde (~) is used to toggle the case. To use tilde (~), you have to press the two keys (shift+~). In the following example, I am mapping the c key in visual mode to select a word under the cursor and change its case.
Now, press v to enter the visual mode and press the c key to toggle the word under the cursor as shown in the following GIF.

Command-Line Mode Mapping
Many Vim essential commands work in the command-line mode only. Such as, to save the file :w command is used, similarly, to save and quit :wq command is used. All the tabs and split operations are also done in the command-line mode. For instance, in order to create a new tab, the :tabe command is used. Well, to quickly create a tab, ctrl+t keys are enough.
Now, press the colon (:) to enter the command-line mode and then ctrl+t to open a new tab; it is much quicker than typing the entire tabe command and Return key.

Creating Vim Custom Commands
Entering the command mode to execute a map appears less useful. But you can create your own custom commands in Vim using the :command option. This feature quite resembles the Vim key mapping. For example, to create a quick command to set line number and textwidth to 80, use the following command.
Now, enter the command mode and execute the :Mycmd command.
Operator Pending Mode Mapping
Operator pending mode is a mode in which Vim waits for the motion command after the operator key is pressed. The common operators are y, d, and c. For example, to delete the current line and the 3 following lines, you will use the d operator with 3j motion (d3j). You cannot press these keys simultaneously, to achieve the desired operation.
The mode is generally used to map the motions. Let’s map a motion that will select the current line and 3 lines followed by it.
Now, to yank the current line and 3 lines followed by it use the yF2 keys, in the same way, the d operator can also be applied.
Another important thing to keep in mind is if you add a count to the above-mentioned mapped motion, let’s say 2<F2>, the map will take it as 23j, not 6j. To fix this, the expression register “= can be used. The above map can be modified as @=’3j’<CR>.
How to Map Mouse Events
Although Vim is a fully customizable keyboard-centric text editor, the availability of mouse functionality makes it even better. Apart from normal keyboard keys, all the mouse events can also be mapped in Vim. For example, if you want to map the right double click and left double click to jump the marks forward and backward respectively, use the following mapping.
:noremap <2-LeftMouse> [`
Other mouse events that can be mapped are given in the following table.
| <LeftMouse> | <LeftRelease> | <LeftDrag> | <2-LeftMouse> | <X1Mouse> |
| <RightMouse> | <RightRelease> | <RightDrag> | <2-RightMouse> | <X2Mouse> |
| <MiddleMouse> | <MiddleRelease> | <MiddleDrag> | <3-LeftMouse> | <X1Release> |
| <3-RightMouse> | <X2Release> | |||
| <4-LeftMouse> | <X1Drag> | |||
| <4-RightMouse> | <X2Drag> |
How to Map with the Leader Key in Vim
Vim mapping is incomplete without the leader key. The leader key is the default key that can be used to map keys, even if they are mapped to do some other tasks. For example, if you have mapped the d key to delete all lines, then we can map the same key to delete only 5 lines using the leader key.
For those who have no familiarity, with the Vim leader key. It is a key that is prefixed with another key or set of keys for mapping commands or operations. Vim’s default leader key is a backslash (\), but it’s customizable.
For example, the dd command is used to delete the line under the cursor. If you want to map the dd command to delete all the lines in the files, then you can use the leader key.
Now, whenever you press the \dd key, all the lines in the file will be deleted. You can attribute the Vim leader key as the control key on Windows or the command key in macOS.
How to Map a Vimscript Function
The Vim editor is not confined to the commands or operations. There is an entire programming language around Vim to create custom functionality called Vimscript. You can easily create a script or function and map it to a key. For example, let’s create a function that will enable settings like line number, mouse functionality and textwidth.
set number
set mouse=a
set textwidth=80
endfunction
Place this function in the vimrc file.
Let’s map this function with the leader and the s keys. I will use
Now, whenever you press the \s keys, the function will be called and any functionality inside the function will execute.
Note: The first letter of the function name should always be capitalized while creating a custom function in Vim.
How to Map External Commands in Vim
The external commands can also be mapped in Vim. External commands refer to Linux or Unix commands. For example, if you want to map the external sort command to sort all the lines in the current buffer to the F1 key, use the following command.
In the same way, if you are writing a script file and making it executable without leaving the Vim session, you can use the chmod command internally. For example, to make the current file executable, you can execute the command :!chmod +x % in Vim. If you frequently perform this task, then simply map a key to it.
In Vim, any external command can be used with an exclamation (!) sign.
How to Remove a Keymap in Vim
To remove keymaps in Vim, first identify where it is defined. As discussed earlier, keymaps can be buffer-local and permanent. If the keymap is permanent and placed in the vimrc file, then simply removing them from the file will unmap the keys.
If the mapping is done in the current buffer, then they can be removed using the :unmap or :unmap! commands.
- :unmap to clear keymaps of normal, visual, select, or operator pending modes
- :unmap! to clear keymaps of insert and command-line modes
For example, to remove the <F2> key, use the :unmap <F2>. Moreover, the removal of the keys can be mode-specific. If you want to remove the normal mode map, use the :nunmap <key>. Other mode-specific commands to remove a keymap are mentioned below:
| :nunmap | To remove the maps of the normal mode |
| :iunmap | To remove the maps of the insert mode |
| :vunmap | To remove the maps of the visual and select mode |
| :sunmap | To remove the maps of the select mode |
| :xunmap | To remove the maps of the visual mode |
| :cunmap | To remove the maps of the command-line mode |
| :ounmap | To remove the maps of the operator pending mode |
To remove all the maps in the current buffer, use the :mapclear command.
The above command will clear all keymaps of normal, visual, select, or operator pending mode.
To clear all keymaps of insert and command line modes use:
Note that the default Vim commands cannot be clear, however, that can be disabled using the :unmap command with <Nop>. For example, if you want to disable the dd functionality that deletes the line under the cursor, then use :unmap dd <Nop>.
The dd will no longer be functional in the current buffer. Using this method, any keymap can be disabled for the current session.
Vim Key Mapping Cheat Sheet
The following image provides a list of all the commands and their specific modes for reference.

Conclusion
Vim key mapping is a handy way to automate your tasks, frequently used key binding, commands, and other operations. It is a diverse topic and in this guide, I covered all the major aspects that are related to key mapping in Vim. From general syntax to creating a basic keymap and all the way to mapping advanced Vimscript functions and external commands. To learn more about Vim key mapping, use the :help key-mapping command in Vim.
Source: linuxhint.com