Basic Linux Network Commands
After reading this document and reproducing all its examples, you will learn how to manage the most important networking aspects from the Linux terminal.
This content is thoroughly optimized for the users without experience or knowledge on networking, avoiding uncritical theoretical information and focusing on practice, but including all the basic theory that a user without previous knowledge on networking must learn.
This is also the first part of a comprehensive Linux networking course. The second part can be found in the Advanced Linux Network Commands Tutorial which is more practical and less theoretical. By reading both of them, you will acquire the practical knowledge of a Linux network administrator.
All the examples used in this article contain screenshots, making it easy for all Linux users to learn how they are applied and how to understand the outputs and results.
Index:
- 1) IP Addresses and “Ip” Command Basics
- 2) Protocols, OSI Model and the “Ping” Command
- 3) Dynamic IP with the “dhclient” Command
- 4) DNS and the “resolv.conf” File
- 5) The “Host” Command
- 5) The “Hostname” Command
- 6) The “/etc/hosts” and “/etc/hostname” Files
- 7) The “iwconfig”, “iwlist”, and “wpa_supplicant” Commands
- 8) The “Ip Route” Command
- 9) Ports and the “nc” or “netcat” Commands
- 10) Nmap Basics
- 11) Setting Up a Web Server and Managing Services
- 12) The ssh Protocol
- 13) Getting Started with UFW (Uncomplicated Firewall)
- 14) The “netstat” Command
The “Ip” Command in Linux
Note: This first chapter in this document contains more theoretical content. We did our best to summarize all the theoretical knowledge and focus on practical command examples. But this article is intended for inexperienced users. The most theoretical writing is included in this first section.
An IP address is a unique number which identifies each network device (connected computer, cell phone, etc.) within a network.
This number called IP address (Internet Protocol address) is associated with a network card (network interface or network device) and can’t be repeated on another device within the same network. It is a unique identifier which represents the device address within a network like the internet.
For a computer, tablet, cellphone, or other network device to be part of a network like the internet, it must have an IP address.
The Linux ip command is used to configure the network interfaces (network cards) including IP assignation, IP removal, etc. It is also used to show the network devices settings and define the routing tables and tunnels (explained in the following chapters).
For the old Linux users, this command replaces the classic and discontinued ifconfig command.
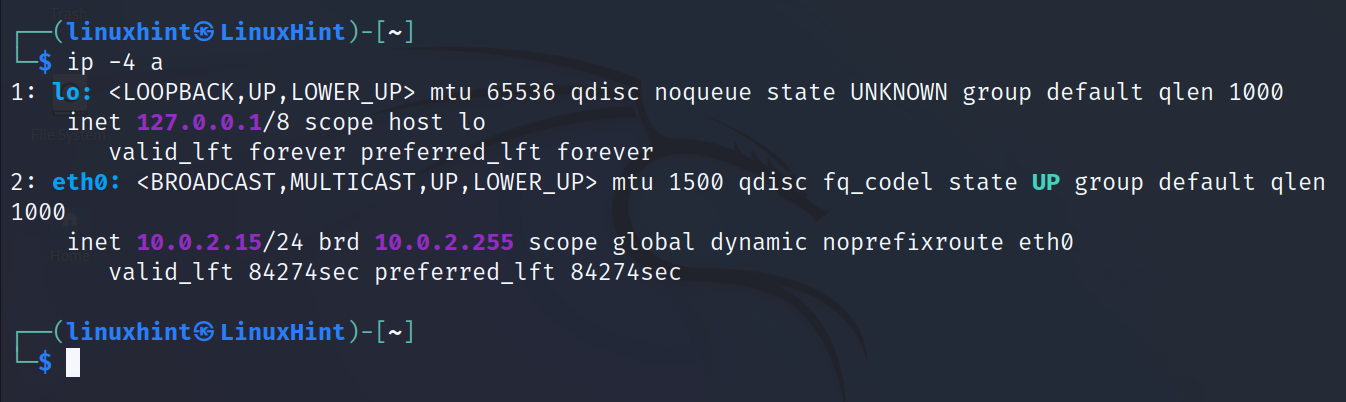
The most basic ip command is followed by the addr option. It is used to print an information on all network devices.
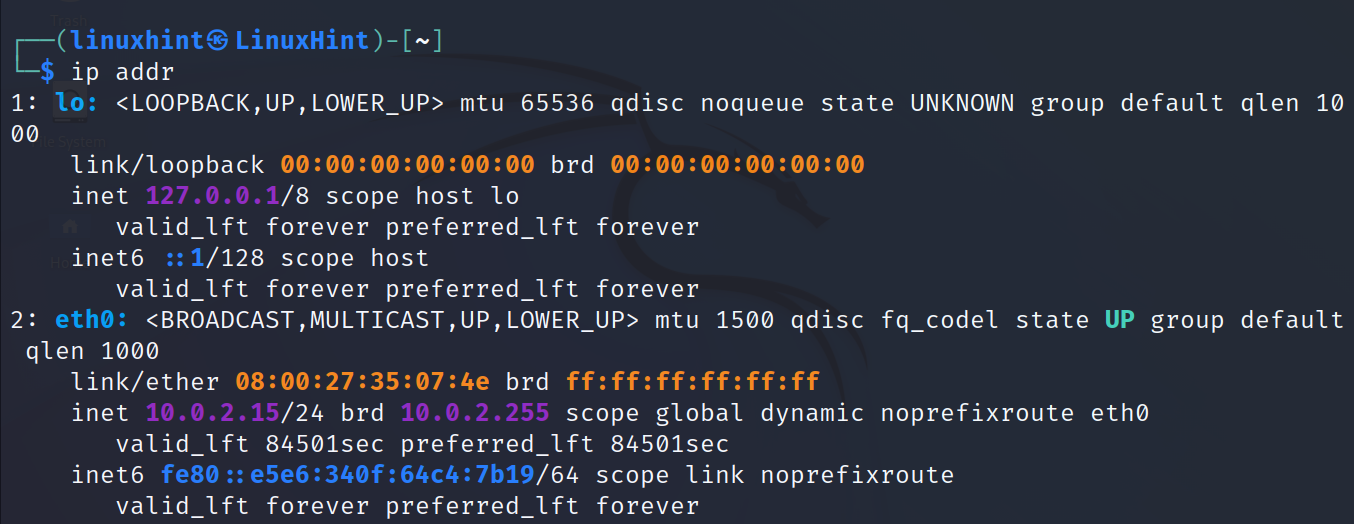
As you can see in the previous output, the command returns an information on the loopback (lo) and eth0 network devices.
The most basic networking knowledge that the reader must acquire from this output is summarized in the following list:
- loopback: The loopback (lo) is a virtual network device for the internal use of the operating system. This virtual interface does not interact with the network or other devices, and is used when the system sends traffic to itself. Normally, the loopback interface is assigned with the IP address 127.0.0.1 and the localhost.
- eth0: In this case, the network device or card is identified as eth0. Normally, the wired network interfaces are identified as ethX, athX, etc. while the wireless interfaces are shown as wlp3sX, wlanX, etc. Where “X” is replaced with a number according to the attached devices.
- link/ether: As explained before, all computers and devices are assigned with an IP address to be identified within a network. This IP address is a software address provided by a server or manually configured by a user.
Additionally, there is a hardware address associated with the network card. This address is physical (like an engine serial number), unique, and is assigned from the factory. This is known as MAC address. It is fixed (despite that there is some work around to set a fake MAC). This is the physical address of your network card.
If the user configures a router to assign a specific IP address to a specific computer or network card, he will instruct the router to assign that specific IP to the specific MAC address. Before an IP address is assigned, the router identifies the device by the MAC address.
- inet: This line shows the IPv4 (Internet Protocol v4) address.
As said previously, every device has a unique address (IP) per network card, which identifies the device within a network. Normally, when we talk about IP addresses, we talk about the version 4 of the Internet Protocol (IPv4).IPv4 addresses are represented by 4 octets divided by periods. The numbers in each octet range from 0 to 255. For example, an IPv4 address can be 192.168.1.4, or 233.64.12.423. In the previous screenshot, the IP for the eth0 device is 10.0.2.15. Additionally, there is a version 6 of the IP protocol (IPv6) which is explained in the following example.
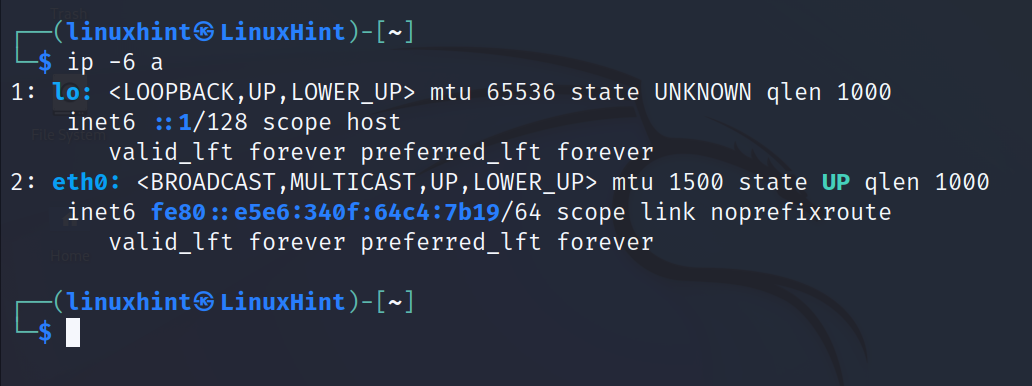
- inet6: The inet6 line shows the IPv6 (Internet Protocol v6). This is a new version of the Internet Protocol created to increase the number of available IP addresses (because the IPv4 is limited from 0 to 255 per octet).
IPv6 addresses consist of 8 groups of 4 hexadecimal digits separated by periods. In the following screenshot, the eth0 interface IPv6 address is fe80::e5e6:340f:64c4:7b19.
Despite being newer, IPv6 is still less relevant than IPv4. As you can see, the network devices work with both protocols simultaneously.
In the previous screenshot, the IPv4 address is followed by a slash and a number. It is 10.0.2.15/24. The /24 after the IP address is known as network mask.
To understand what a network mask is, you need to understand a bit more about the IP addresses.
IP addresses are 32 bits unique binary numbers divided in 4 sections of 8 bits separated by periods which is used to identify the networks and devices within a network. The result of the conversion of the binary number to decimal is what we know as IP address. An example of an IP address would be 172.45.23.76.
When shown in decimal format (since we usually see and type the IP addresses), they consist of 4 numbers ranging from 0 to 255, separated by periods. For example: 240.34.87.212.
Each of those numbers separated by periods are known as octet. In the example of the previous paragraph, 240 is an octet, 34 is another octet, 87 is the third octet, and 212 is the last octet. Each octet consists of 8 bits (32 in total, 8 per octet). Some bits or octets are used to identify a network, while the rest are used to identify the hosts within a network.
In the IP and netmask 192.168.0.0/24, the /24 after the IP address means the first 24 bits (the first 3 octets of 8 bits each) identify the network, while the last octet is only available for the hosts or devices.
This means, in this case, that all addresses in the network will be 192.168.0.X, where X is a different number for each connected device. The router may be 192.168.0.1, a computer 192.168.0.2, a cellphone 192.168.0.20, etc. But the first 3 octets remain because they represent the network. In this case, since the maximum limit per octet is 255, this /24 netmask supports up to 254 IP addresses.
This is because 8 bits represents one octet. If the IP was 192.168.0.0/16, only the first 2 octets are used to identify the network, and the other 2 can variate to assign the unique IP addresses.
The number of bits defines the network mask. Network masks are a mechanism through which a router knows what IP addresses belong to the local network or to other networks.
Therefore, for the IP 192.168.0.0/8, there is only an octet to identify the network and 3 for the hosts, and the netmask is 255.0.0.0. For the IP address 10.0.2.0/16, the netmask is 255.255.0.0 because the two first octets belong to the network and the two last octets belong to hosts. The netmask of a network 192.168.0.0/24 is 255.255.255.0.
This is useful for the router to differentiate between the local network traffic and the external traffic. That’s the meaning of the /24 after the IP address in the previous screenshot.
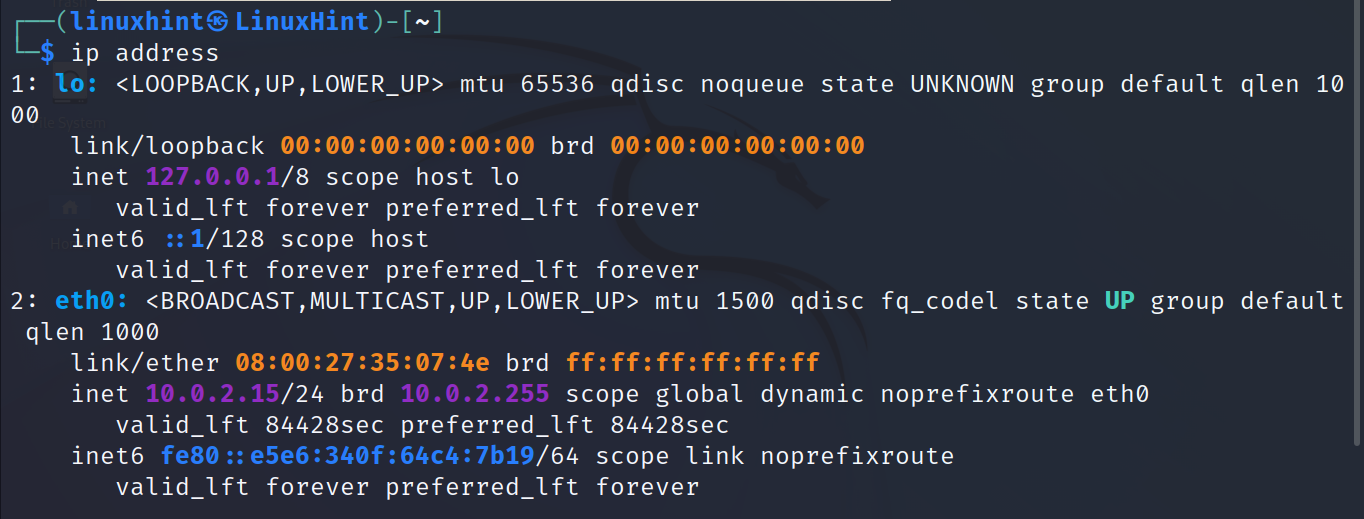
The following commands return the same output of the ip addr command. You can just remember any of them:
Or
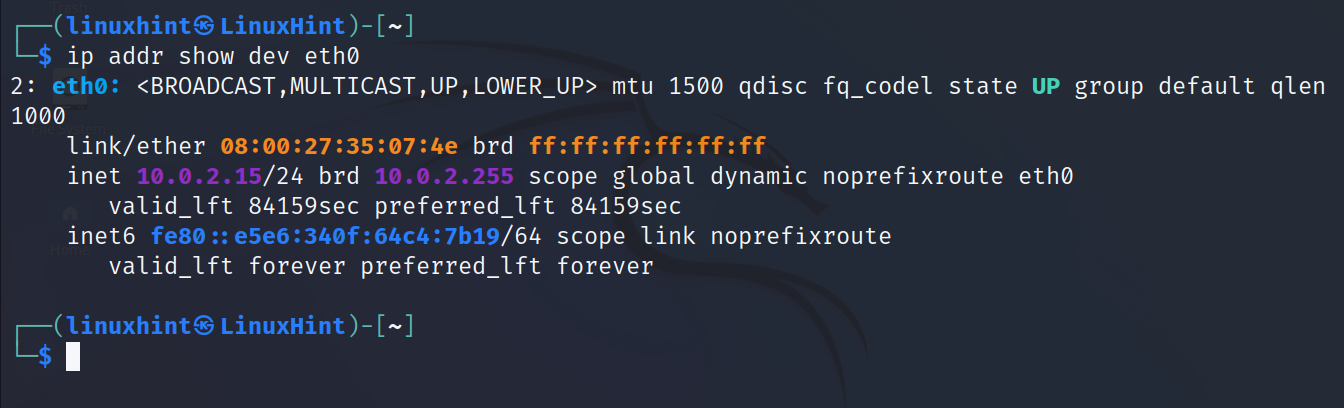
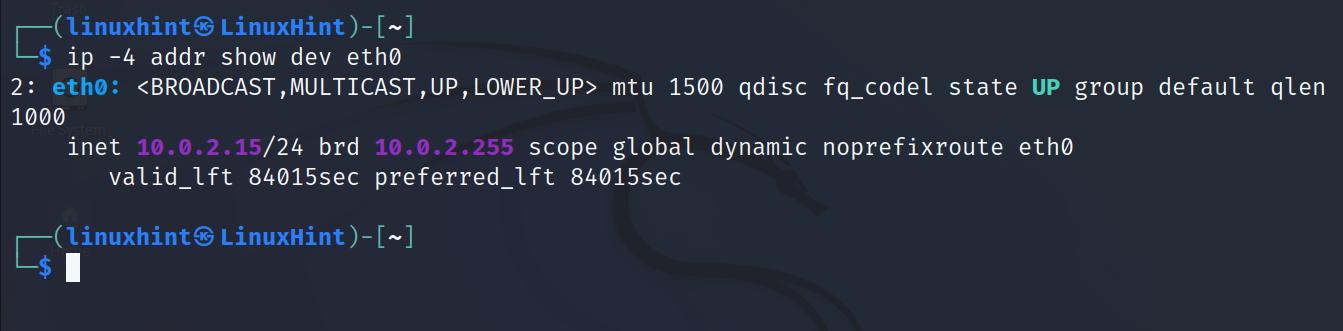
The user can also limit the output to a specific network card.
In the following example, the ip command and the flags addr show dev <Device> are executed to print an information on the eth0 device specifically. As you can see, the loopback or other network card information is omitted.
Replacing addr with address returns the same result.
To print all information related to the IPv4 protocol for all network devices, run the following command:
To show the information on the IPv6 protocol for all devices, run the command shown in the following screenshot:
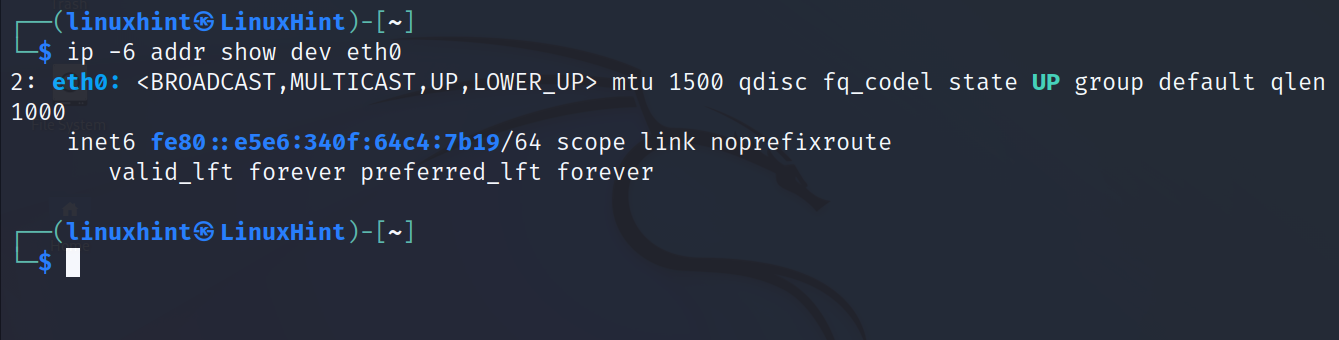
Users can combine the flags. In the following example, the ip command is used to show the IPv4 related information about the eth0 network interface:
To show the IPv6 related information for the eth0 network interface, just replace the 4 with 6 as shown in the following:
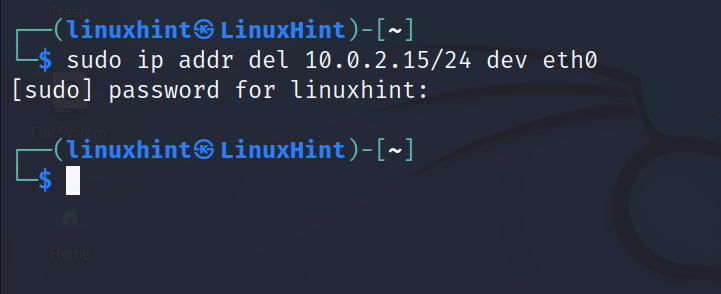
The syntax to remove an IP address is shown in the following:
To remove the IP 10.0.2.15/24 from the network interface eth0, run the following command:
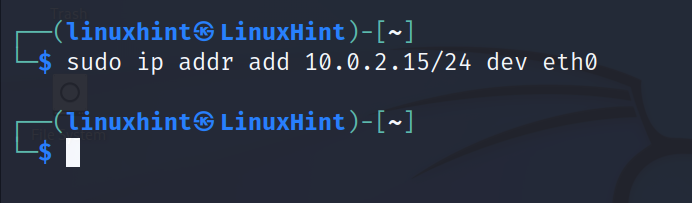
To add an IP address, the syntax is the same except for the del flag which must be replaced with add as shown in the following figure:
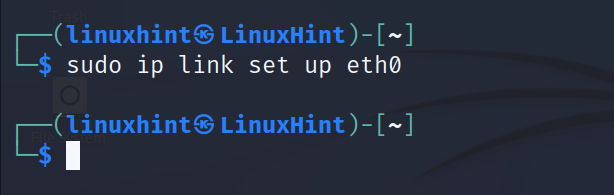
In some cases, disabling and enabling a network interface is useful to apply certain changes.
To disable a network card, use the following command where eth0 must be replaced with the correct network card name:

To enable a network card, use the following command:
These are the basic ip command functions. This tutorial covers the additional ip commands related to routing tables in Chapter 8.
Public and Private IP Addresses
There are two main types of IP addresses: public for public networks and private for private networks.
A public network example is the internet. Everyone can access it because it’s public, and everyone needs a public IP to connect to it.
Since IP addresses can range from 0.0.0.0 to 255.255.255.255, there are 3,706,452,992 public IP addresses in the world for all users, servers, etc.
So, when we buy an internet service, what our internet service provider (ISP) is selling (or renting) us is a public IP address to be able to connect to the internet.
The ISP assigns our router a unique public IP address to communicate with the internet, and all devices connected through the same router use the same public IP.
On the other hand, when the network devices interact at an internal level (two different home computers or devices, or a device and the router), they don’t need a public IP address because they don’t need to access a public network to interact between them.
So, while the router has a public IP address to communicate with the internet, it also has a private IP address to communicate with the local network devices. That’s why routers have at least two network cards – one for public use and another for private use.
You can think about a local network as a home network (home computers, cellphones, tablets, router) connected between them, or office devices connected between them through a router. All your home devices are connected to your router through wifi or wire constitute a local network. But when you access the internet, you are interacting with a public network.
All IP addresses within a network must be unique. They can’t be repeated in two devices from the same network. On the internet, every user in the world must have a unique IP address.
The same rule applies to local networks. But since they work at an internal level, two local networks which don’t interact between them can have the same IP. For example, my router’s internal IP may be 192.168.0.1 and your router’s internal IP can be the same. This is because these devices never interact with their internal addresses. They belong to different networks. If they interact on the internet, they identify each other with the public IP provided by the public network interface of the router.
Commands Summary:
| COMMAND | FUNCTION |
|---|---|
| ip addr / ip address / ip addr show | Prints information on all interfaces |
| ip addr show dev <Device> | Prints information on a specific interface |
| ip address show dev <Device> | “ |
| ip -4 a | Shows all IPv4 related information |
| ip -6 a | Shows all IPv6 related information |
| ip -4 addr show dev <Device> | Shows specific device IPv4 related data |
| ip -6 addr show dev <Device> | Shows specific device IPv6 related data |
| ip addr del <IP> dev <Device> | Removes IP address on specific device |
| ip addr add <IP> dev <Device> | Adds IP address to a specific device |
| sudo ip link set down <Device> | Disables a network device |
| sudo ip link set up <Device> | Enables a network device |
IP addresses recommended reading: https://linuxhint.com/ip-address-class-explained/.
Protocols, OSI Model, and the “Ping” Command
In networking, the transmitted data or information between devices is transmitted in segments known as “packets”, and the transmission process is known as “traffic”.
The traffic is the packet transmission. Packets are transmitted through “protocols”.
A “protocol” is a system of rules and defined traffic structure. There are different protocols that are classified in different levels (layers) for networking to be possible.
The standard OSI model used in conventional networking divides all protocols (all set of rules for traffic) in 7 layers ruling packet transmission with instructions (protocols) for the hardware device like network card to applications using the network functionalities like a web browser, Telegram, etc.
Hardware layers are the lower layers, and software layers are the higher. The 7 layers in the OSI model are the following:
- Physical layer 1: This is the first and lower layer, the farest from the user. It converts the bits into electrical, optical, or radio signals. This layer also specifies the voltage levels, voltage timing changes, physical data rates, transmission distances, channel access, and physical connectors. This includes the layout of pins, voltages, cable specifications, signal timing, and frequency for wireless devices among more capabilities.
- Data Link layer 2: This layer is controlled by the network device driver. This is the first control and protection level of the Physical layer. The Data Link layer detects and when possible, corrects the transmission errors from the Physical layer. This is the layer interacting with the previously described MAC addresses (network cards physical addresses).
- Network layer 3: The Internet Protocol (IP) works on the network layer. It splits or segments the data (because it also limits the packet size), finds and chooses the path or route between devices. It encapsulates the data, including necessary information on packet origin and destination in order to find and follow the correct route.
The network layer (The Internet Protocol working in this layer) then verifies that the transmission is correct, and reaches the correct destination, and then decapsulates the data.
The network layer is the layer interacting with router devices which helps to identify the best routes for packets to reach their destination. Routers work on this layer (in some exceptions, they can work on layer 2 Data Link).
Another relevant protocol that is present in the Network layer is the ICMP (Internet Control Message Protocol) which is used for incident acknowledgement, error, success, and operational information reporting between network devices. This is the protocol used by the ping command explained in this chapter.
Yet, this layer does not guarantee a correct packet delivery, nor error reporting. But this disability is corrected by the next layer, Transport.
- Transport layer 4: The Transport layer, the fourth of the OSI model, offers additional protocols which guarantees reliability like TCP (Transmission Control Protocol). This layer can track the traffic sequence, packet segments, detect and report errors, and retransmit a failed packet delivery. The top 2 used protocols within this layer are the TCP (Transmission Control Protocol) and UDP (User Datagram Protocol). While TCP offers reliability in packet transferences, UDP does not but offers a faster delivery. That’s why TCP is used by applications and UDP is used by streaming.
- Session layer 5: This layer keeps the communication in connections which delivers the packets permanently, returns confirmation, provides tolerance before networking failures, cam group messages into a unique packet, and more.
- Presentation layer 6: This layer guarantees that the transmitted data is readable by the application layer (explained in the next example) by converting it into standard format.
- Application layer 6: This is the last layer and is therefore the closest to the user because almost all protocols used by the end users work in this layer. For example, protocols HTTP or HTTPS for web servers, protocol FTP for file transference or SSH for secure sessions belong to the Application layer. These protocols are explained in the following chapters.
This section focuses on the ping command which uses the ICMP (Internet Control Message Protocol) belonging to the Network layer and is used mainly for network diagnostic purposes.
The ping command requests replies from other devices connected to the network. When the user pings a specific IP address or host, he is asking it “Hey, are you there?” If the other network device replies, it informs the timing for packets to reach the destination (in this case itself).
The ping command is one of the most basic ones, present in all operating systems, which is used to know if a device is connected to a network. If a user pings a device IP address and gets a reply, he knows that the device exists on the specified IP and that the host is alive (connected). If he doesn’t get a reply, the device is unreachable, and he cannot communicate; probably the device even does not exist at least with that IP address.
For example, if we join a network and we cannot access the internet, the first test we would do is to ping the router to make sure that we joined the network successfully. If a network administrator wants to assign an IP to a device, he can use the ping command to check if the IP address is free to use.
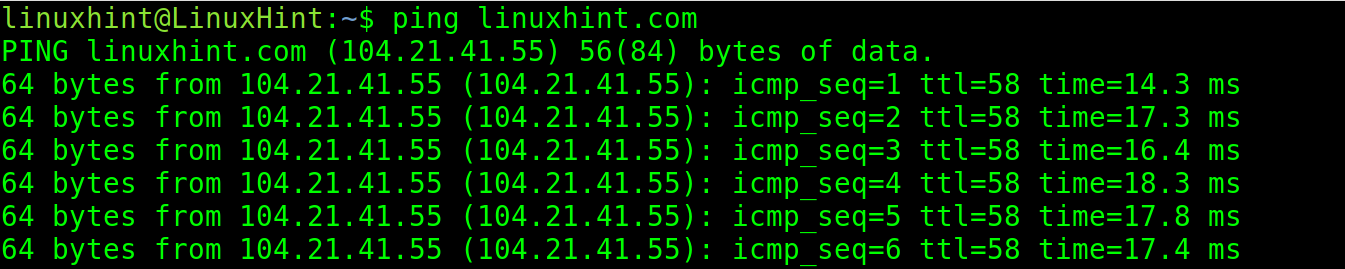
If the ping is successful and replies are sent back, the ping command output is similar to the ones shown in the following screenshot in which ping the packets are sent to the IP 192.168.0.1.

The following screenshot shows that the hosts and domain names can also be pinged.
If the ping doesn’t get a reply back, it returns an error as shown in the following image:
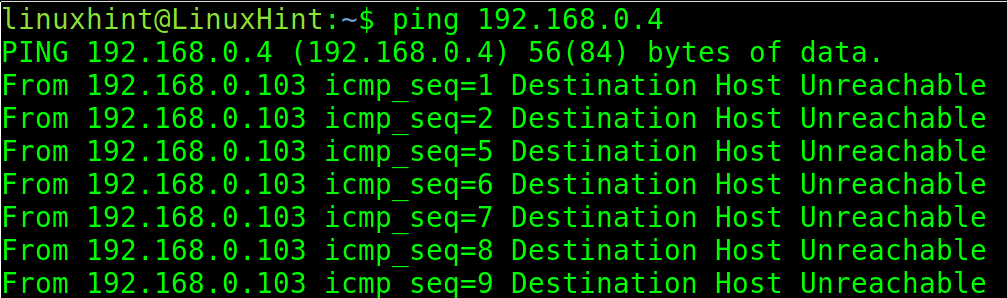
In the last screenshot, the ping wasn’t able to contact the IP 192.168.0.4.
Linux “dhclient” Command to Manage DHCP
In the previous chapters, the IP addresses were described as a unique identifier number for every device that is connected to a network.
There are two ways in which an IP address can be assigned to a device: statically or dynamically.
Static IP addresses are permanent and configured to remain in the device. On the other hand, dynamic IP addresses are assigned automatically by a router or a DHCP (Dynamic Host Configuration Protocol) server, and are not persistent. If the system reboots, it may receive a different IP address than the one obtained in the previous session.
Today, most routers include the DHCP function. Normally, when users connect to a network (by plugging the network cable or introducing the wifi password), they get an IP address to be identified within the network and become part of it. They can access the internet without manual configuration. This function is called DHCP, the automatic IP assignment that we always use.
In many cases, a user connects to a network, a wifi network for example, but he cannot access the internet. In some scenarios, the reason behind this problem is the DHCP function failed for some reason, and the device did not obtain a correct IP address. The user can confirm if the problem is the lack of IP, or a wrong one, using the ip addr command.
In such cases, the user can manually set an IP address within the subnet using the ip command as explained in the previous chapter (he may probably need to try several IPs if the chosen wasn’t unused).
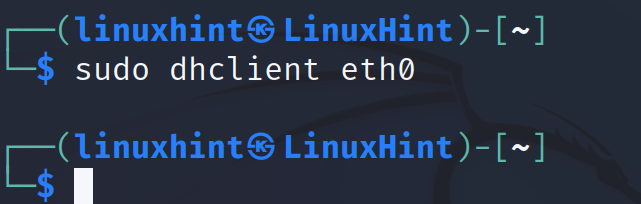
Another solution is to request from the router or DHCP device an automatic dynamic IP address. For this, the user can execute the dhclient command which sends a request to the router to be assigned an IP address.
Let’s suppose a user joined a network by connecting a cable or joining a wifi network, but there is no access to the internet because the device does not get an IP address or a wrong one is assigned.
In such a scenario, the following command will request the router or DHCP service an IP address for the network device eth0. The user does not need to specify the router or DHCP address, but only the network device to which we want the IP to be assigned.
Note: If your network device has an IP address already, the command returns an error. To test this command on, you can delete your interface IP address to assign a new one through DHCP.
This basic network utility is available both for IPv4 and IPv6. The DHCP service for IPv6 is known as DHCPv6.
DNS and /etc/resolv.conf File
As explained in previous chapters, the devices which are connected to a network are identified by an IP address, an address to which the other network devices can reach it.
IP addresses consist of 4 octets separated by periods, with numbers ranging from 0 to 255 in each octet. For example, 212. 123. 56.2 (IPv4). This format is not human friendly. People cannot remember the IP address of each website or application that they want to access.
To solve this, the domain names were created so users can remember the domain name www.google.com instead of 142.251.134.46 (the Google IP). Domain names are human friendly and make it possible for us to remember the location of the sites or servers that we want to access.
When we type a domain name like www.google.com, we are typing an IP address. Domain names are associated with IP addresses. In other words, a specific domain name points to a specific IP address.
The service which translates the domain names into IP addresses and vice versa is called DNS (Domain Name System). In the Domain Name System settings, users define the IP addresses of the domain names.
For example, if an administrator has a server with a website and buys a domain name for his website, he will configure the DNS settings to specify that his domain name points to his server IP. These settings are replicated over all DNS servers around the world which exchange the information on all domains.
From the user side (the website visitor), the network device (like a computer) must be configured to connect to available DNS servers which allows the device to access the domain names (like www.something.com) by translating them into the proper IP addresses.
If the device has not defined the DNS, he won’t be able to access or interact with the domain names, but only with the IP addresses.
In some scenarios, users connect to the internet but can’t access the websites. If the user pings a domain name like google.com and the ping does not generate a reply. But the user gets a reply when pinging an IP address like 8.8.8.8 (a google server), the problem are the defined (or undefined) DNS servers in the configuration file /etc/resolv.conf. It means that the device is connected to the network but cannot resolve the domain names into the IP addresses.
The /etc/resolv.conf file is a plain text file where we can define the DNS servers that our device can access to request the IP/Domain resolution.
Normally, DNS servers are added in our configuration files by default when we connect to a router or network. If we connect through a router, normally, the default defined DNS is the router itself.
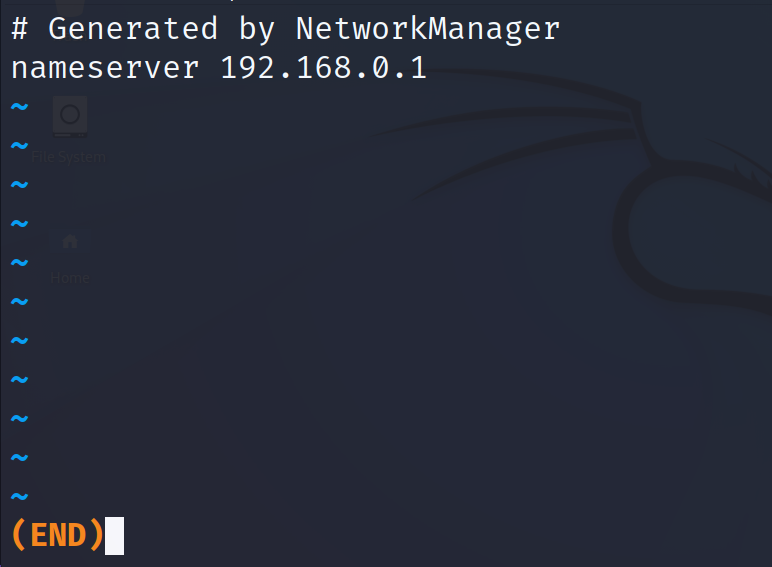
In the following example, the less command is used to show the content of the file /etc/resolv.conf.
As you can see, the syntax to add a DNS server is the following:
In the previous screenshot, the defined DNS is the router (192.168.0.1).
If the DNS resolution isn’t working properly or you just want to add an additional server, open the configuration file /etc/resolv.conf with privileges using any text editor.
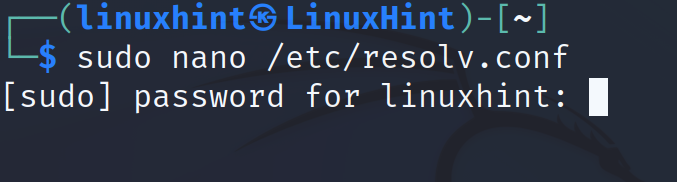
In the following example, Google DNS server with IP address 8.8.8.8 is added with the same syntax. You can use this reliable server (8.8.8.8) if your name resolution fails.
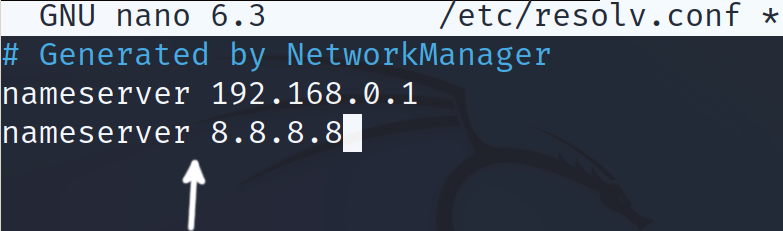
That’s how you define a DNS server, making sure that your device can resolve the domain names.
The “Host” Command
The host command is used for DNS resolution. It allows us to learn the IP address of a specific domain name.
For example, to show the IP of the domain name linuxhint.com, execute the host command followed by the URL whose IP you want to learn, as shown in the following figure:
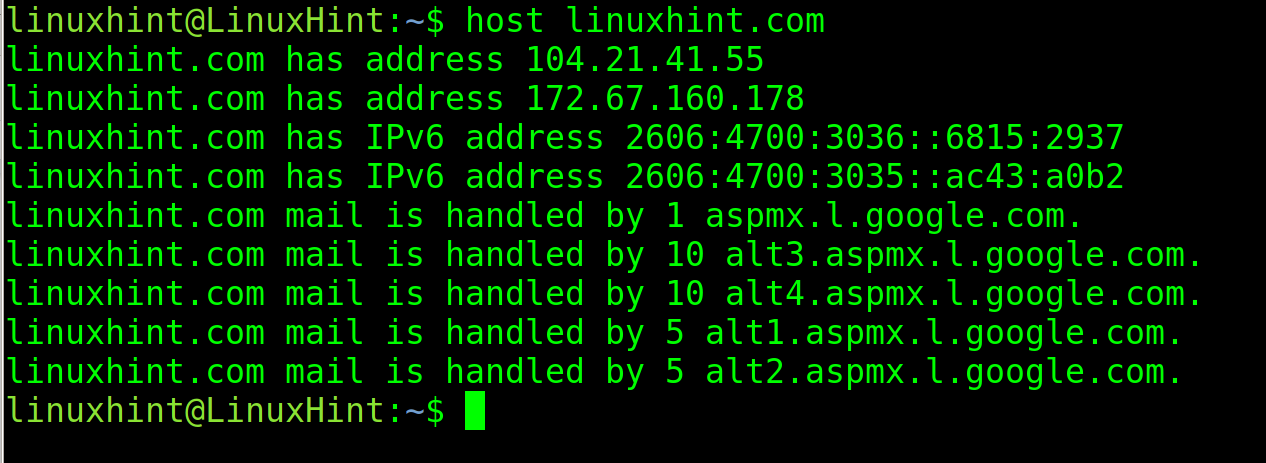
As you can see, the output returns both IPv4 and IPv6 addresses and the mail servers.
If the user executes the same command with an IP address instead of a domain name, it returns the hostname.

This command is very useful, for example, to detect a problem in the DNS resolution or to learn the IP address of a device identified with a hostname or domain name.
The “Hostname” Command
The hostname command allows the users to temporarily edit their system hostname until the next reboot.
Changes that users can make with this command are not persistent, and will last only until the next reboot (the next section of this tutorial explains how to edit it permanently).
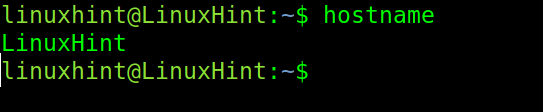
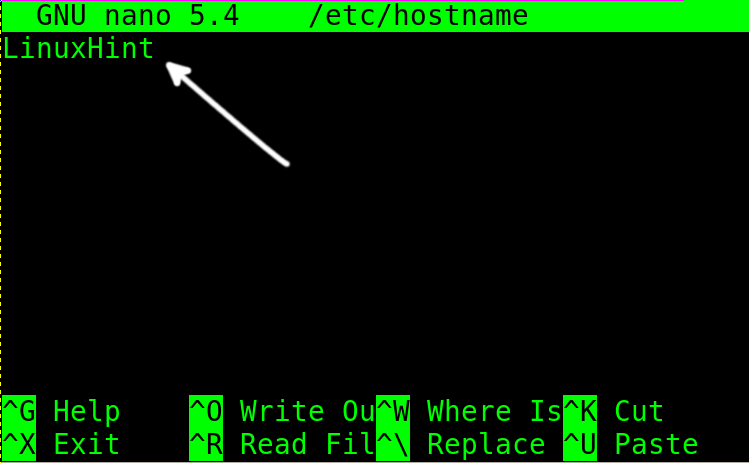
If the hostname command is executed without parameters, it returns the current system hostname. As you can see in the following, the system hostname is LinuxHint.
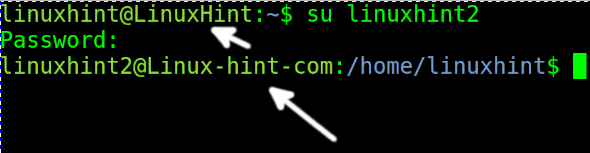
To change the current host (without persistence), run the command with privileges followed by the new hostname that you want to set. In the following example, the LinuxHint hostname is replaced with Linux-hint-com.
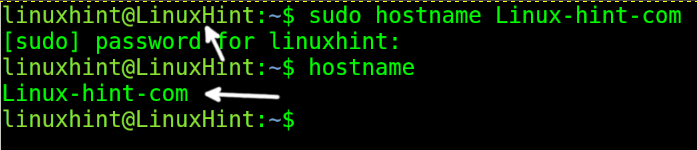
You won’t see the change in the current terminal unless you restart the session or change the user. You can change the user with the su command, followed by the username (privileges are required).
The following section describes the steps to change the hostname permanently.
The /etc/hosts and /etc/hostname Files
To edit the system hostname permanently, the user needs to edit two files: /etc/hosts and /etc/hostname.
If you check both file contents using the less command, you can see that both files contain the hostname LinuxHint.
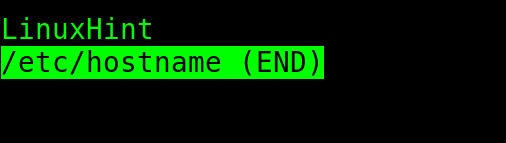
The /etc/hostname file is pretty simple. As you can see, it only contains the hostname.
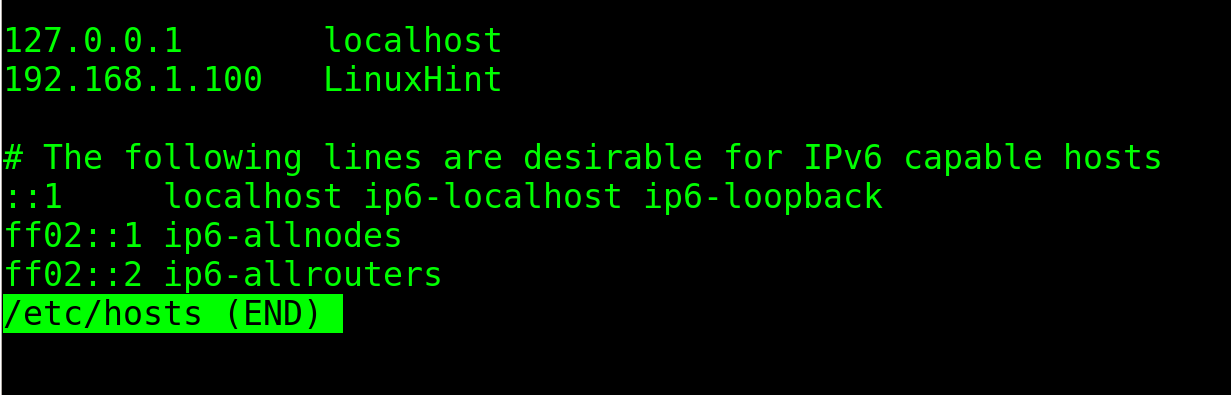
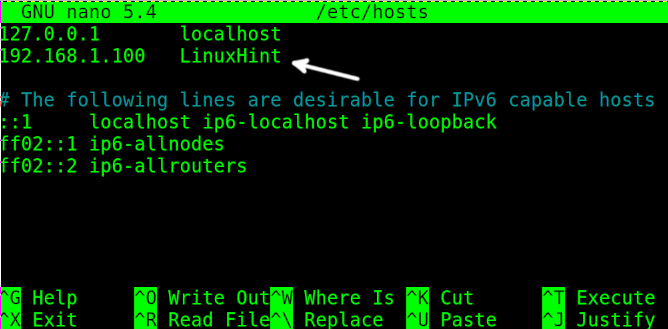
The /etc/hosts file contains more information including host and IP address for all interfaces including the loopback which, by default, is named localhost (With default IP 127.0.0.1).
To permanently edit the hostname, open first the /etc/hostname file with privileges using any text editor.

Change the host, replacing it with the new one and exit to saving changes.
Open the /etc/hosts file with privileges using a text editor.
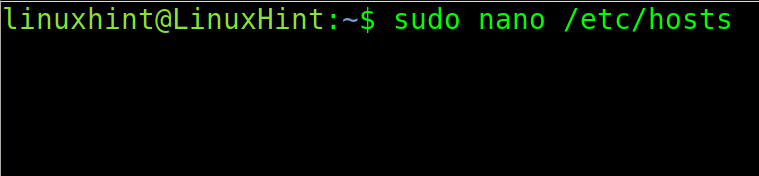
Find the computer IP address and replace the hostname next to it, as shown in the following example. Then, exit to saving changes.
The user can also permanently change the hostname using the hostnamectl command shown in the following:

That’s how to easily change your hostname permanently.
The “iwlist”, “iwconfig” and “wpa_supplicant” Commands to Manage the Wireless Interfaces
The Linux iwlist command is used to scan the wifi networks. This is the command that you need to run to discover the available wifi routers. It’s syntax to scan for available networks is the following:
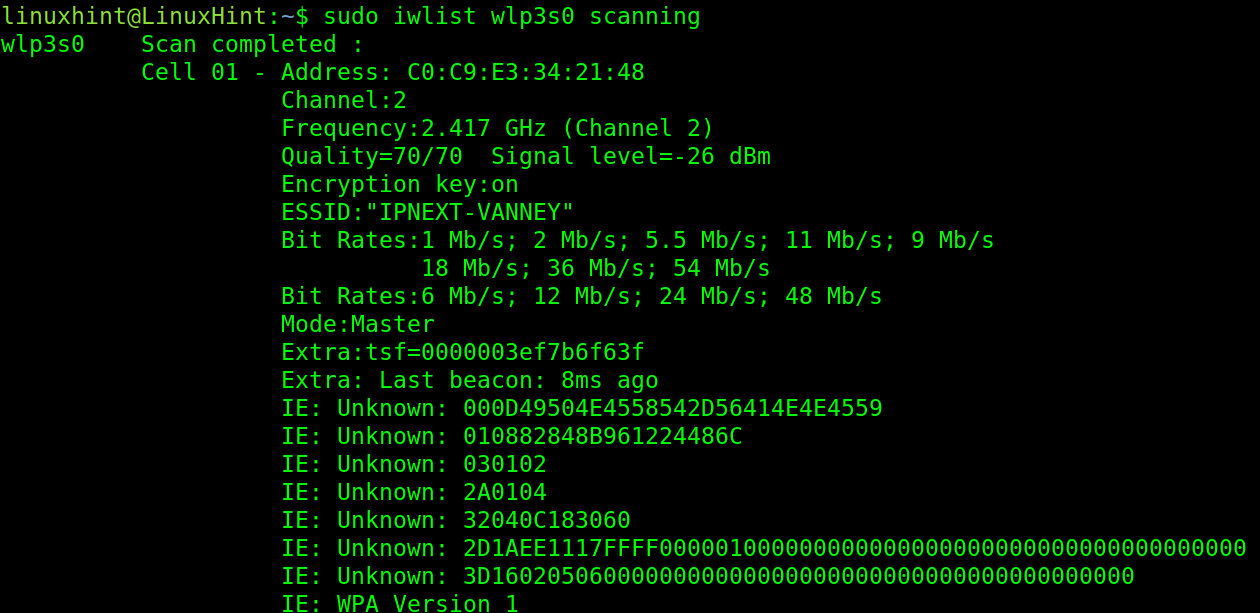
In the previous screenshot, the important information is the ESSID, the access point or router name.
You can get a more human friendly output which shows only the relevant information (ESSID) by implementing grep.

The iwconfig command is used specifically to manage the network interfaces and show their current configuration.
If executed without parameters, iwconfig returns the information on the wireless network interfaces (in this case is wlp3s0). But it also shows the wired cards information (in this case is enp2s0).
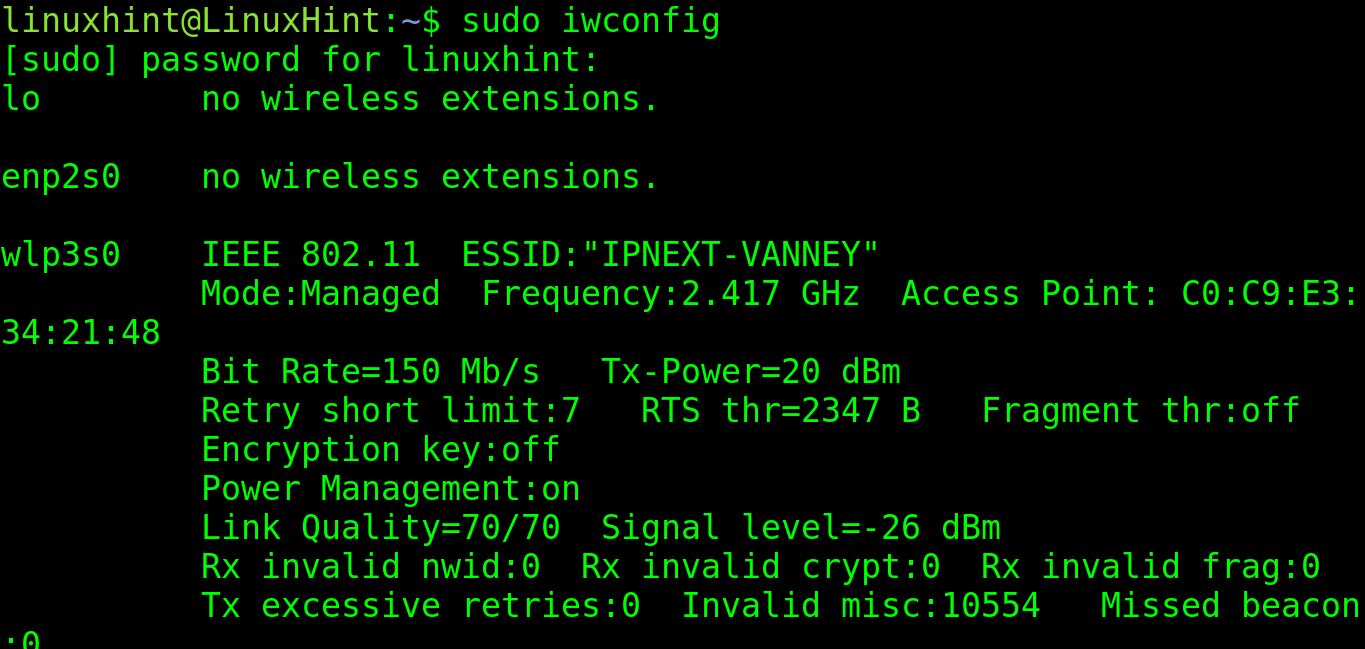
The two most important fields that you may need from this output are ESSID and Access Point. Their meaning is explained in the following:
- ESSID: This is the name of the router that you are connected to.
- Access Point: This is the MAC address (physical network card identifier) of the router that you are connected to.
If you want to know the IP address that is assigned to the network card, you can use the ip command which is explained in the first section of this document.
As you can see in the following illustration, the third network card is wlp3s0, the wireless interface with IP 192.168.0.103.

It is important to clarify that the iwconfig command is almost discontinued to join the wifi networks because it only supports WEP encryption which is almost unused and replaced by more secure authentication methods.
For most users, the way to connect to a wifi network is through the wpa_supplicant, a different method to join the wifi networks.
To install it on Debian based systems, run the following command:

On Red Hat based systems, you can install it by running the following command:
Once installed, you can execute the following command, replacing <ESSID> with your network or router name and <Password> with your network or router password. This edits the /etc/wpa_supplicant.conf configuration file, adding the router name and the password.
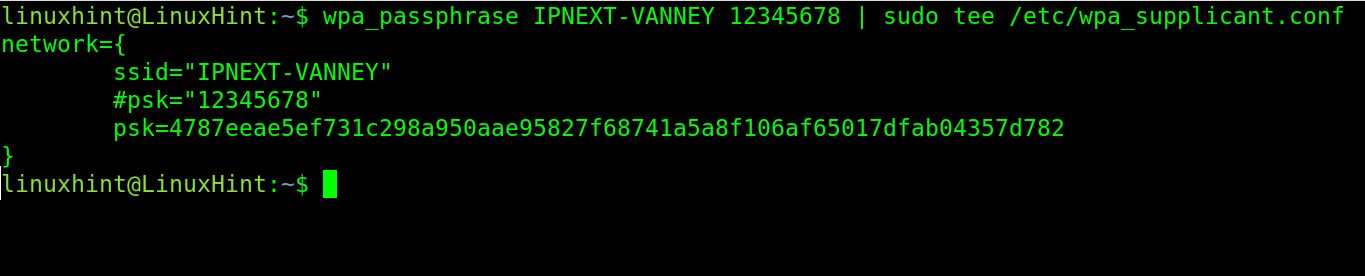
After adding the ESSID and password, you can connect by running the following command where the -c option specifies the configuration file and -i specifies the network interface:
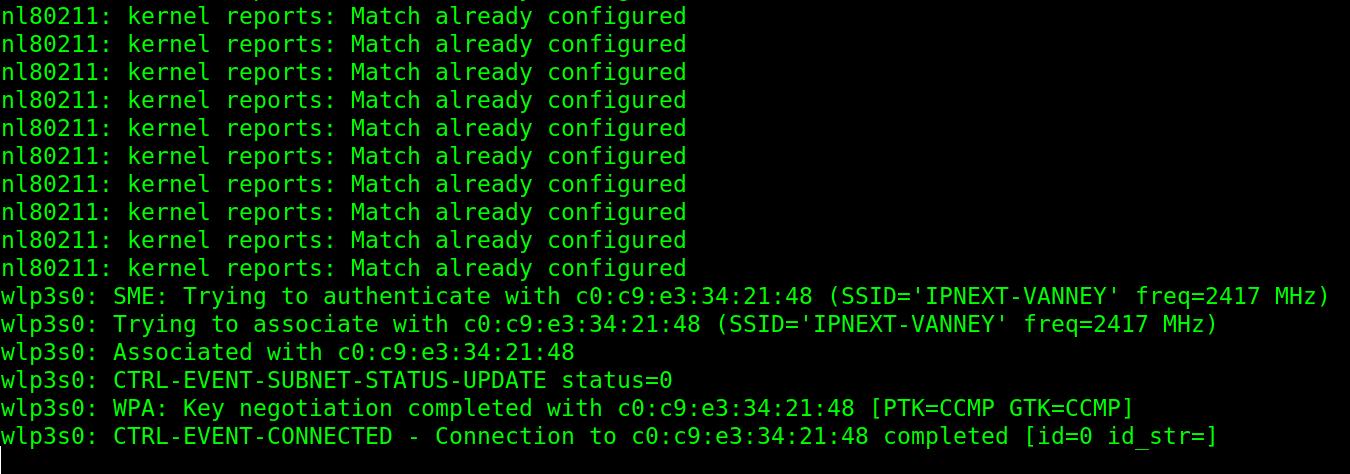
As you can see, the connection is successfully done from the Linux terminal.
The “Ip Route” Commands
A routing table is a file with information about the path or route through which data or packets should be transferred. It is a map used by the devices and routers to deliver the traffic to the correct destination.
In the routing table that we specify, for example, to what router should we follow the traffic to reach a specific network. The router that is used to reach the destination network is known as gateway. The gateway is the device through which the traffic can be directed to reach a specific destination.
Each router device packets that go through until the reaching destination are known as “hops”, including the gateway, the first hop.
In the hop-by-hop routing, packets contain the sufficient routing table to reach the next hop. Once reached, it gets the routing table again from the current hop to reach the next hop.
Using both the route or ip route commands, you can communicate with different subnets and different networks. You can also block the traffic between networks or devices by modifying the routing table.
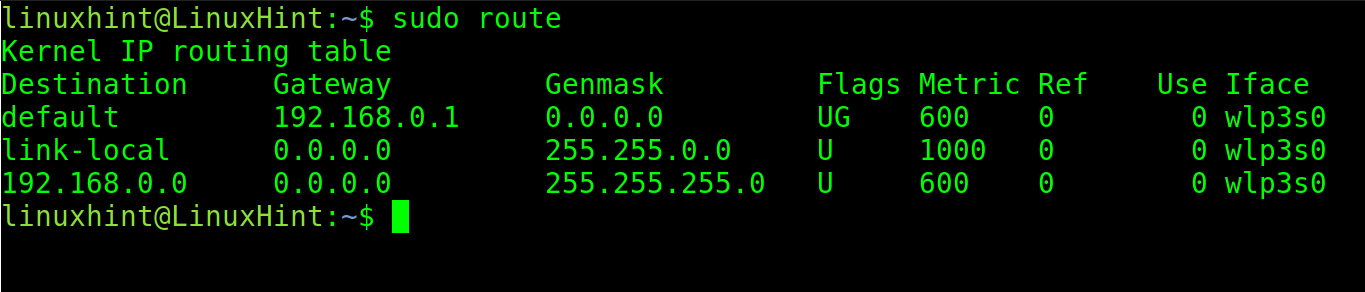
This tutorial focuses mainly on the ip route command which replaces the old route command that is still used by many old school administrators.
The ip route command, if executed without parameters, shows the configured gateways.
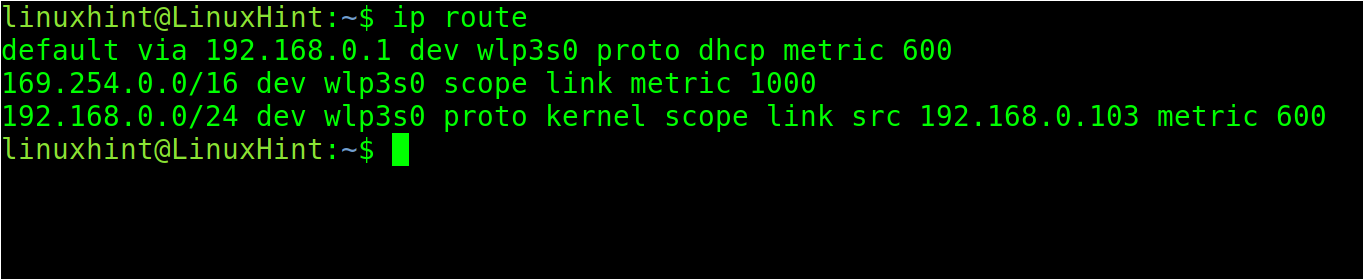
As you can see in the previous output, the default gateway is 192.168.0.1, the router. This means that my configuration is specified to reach the other destinations (in this case the internet). My gateway is the router.
The ip command followed by the r parameter displays the same output.

The old net-tools package which include the ifconfig command, also include the route command. If you have the net-tools package installed, you can try it.
Note: You can run the sudo apt install net-tools on Debian based Linux distributions.
Let’s say you are connected to a big network with different subnetworks. Your router only provides access to your specific network with IP 192.168.0.x. And you want to access the network with IP 10.0.0.x.
There are no security measures nor structure that forbids you from accessing the desired network, but its path is not present in the routing table.
You can add a default gateway to access the network using the following syntax:
In such a scenario, if the 10.0.0.x network router is 10.0.0.1, a user should try this command:

If you want to apply the default gateway for a specific interface, use the following syntax:
For example, to associate the default gateway to the enp2s0 network interface, run the following command:

To block a default gateway, use the following command, replacing the IP with the computer’s:

To remove a default gateway, execute the following command.

There are different routing types: Static, Dynamic and Default. All of them are deeply explained in the second part of this course. We also published a dedicated article about routing and the ip route command.
Ports and the “nc” or “netcat” Commands
As said in the first section of this tutorial, all computers or devices connected to a network are identified with an IP address. The address is necessary to reach the devices.
Additionally, to the IP address which belongs to the Internet Protocol, the connected devices have ports at software level. You can think about the device or computer as a home, the IP as its address, and the ports as different doors to send or receive the traffic from and to a computer.
There are 65536 ports in our systems (most of them unused). There are 65536 doors through which your computer can send or receive packets, but most of them are closed because they are intended for services that most users don’t use.
Many of these ports are associated with protocols. For example, when we open a website, we normally access the port 80 for http or 443 for https of the server. When we download or upload the files from or to an FTP server, we normally use the default port 21.
The user can change these ports and make a service available on a different port. So, while the protocols are associated with default ports, they can be configured to work on different ports.
An example of this would be when a user changes the default port 22 for ssh (explained two chapters in the following discussion) to prevent the random hacker scans looking for victims.
Users must know how to check which of their ports are open, closed, sending, or receiving the traffic. This is very helpful to diagnose the networking problems or to make security checks before anomalies.
In this chapter, the Netcat tool to check for open ports is explained. Netcat includes additional features which are explained in the second part of this document.
To install Netcat on Debian based Linux distributions, run the following command:
Redhat based Linux distributions can install Netcat using the following command:
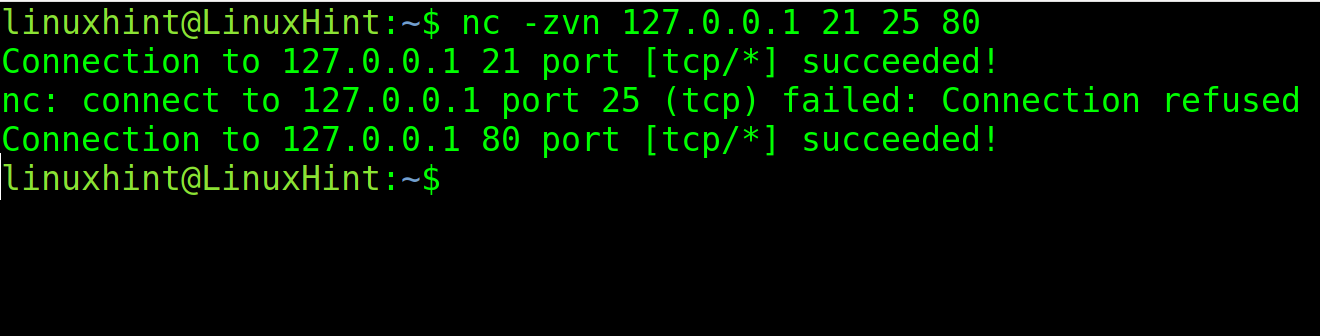
Once installed, execute nc (or netcat) followed by the -zvn options, the IP address, and port to scan.
In the following example, nc is executed to check the port 22 (ssh) of the localhost:

As you can see in the output, port 22 is open.
You also can specify many ports to be scanned. In the following example, ports 21, 25, and 80 are checked.
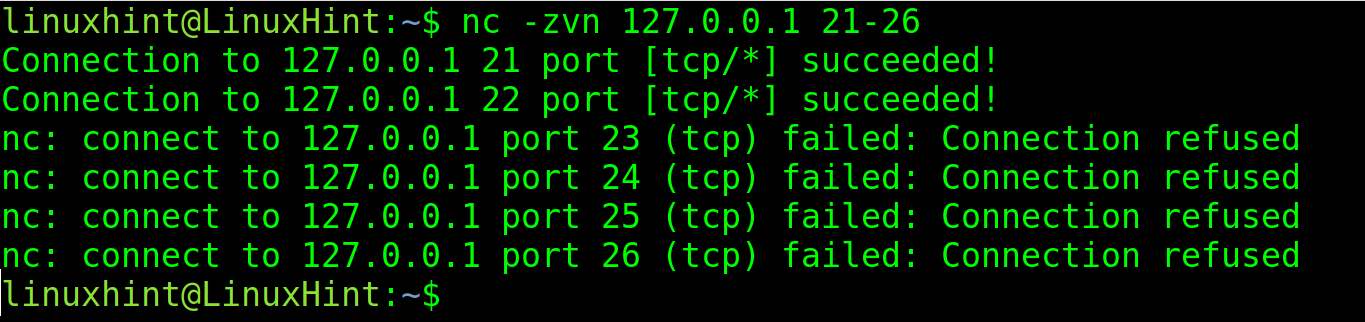
By implementing a hyphen, you can specify a port range.
In the following example, all ports between 21 and 26 are scanned.
There are even better tools to check for port status. The most popular one is Nmap which is explained in the next chapter.
Nmap Basics
Nmap (Network Mapper) is the most popular port and vulnerability scanner. It is also useful to discover the hosts to map and scan the networks.
By implementing the NSE (Nmap Scripting Engine), you also can detect vulnerabilities or security holes on your target to fix them and prevent the hacker attacks.
When scanning ports with Nmap, it may report 6 different states or condition for ports:
- Open: The port is open and a service is listening.
- Closed: The port is closed.
- Filtered: A firewall blocks Nmap.
- Unfiltered: Nmap is unable to check the port.
- Open|filtered: Nmap can’t determine if the port is filtered or open.
- Closed|Filtered: Nmap can’t determine if the port is filtered or closed.
To launch a basic scan on linuxhint.com, execute the following command:
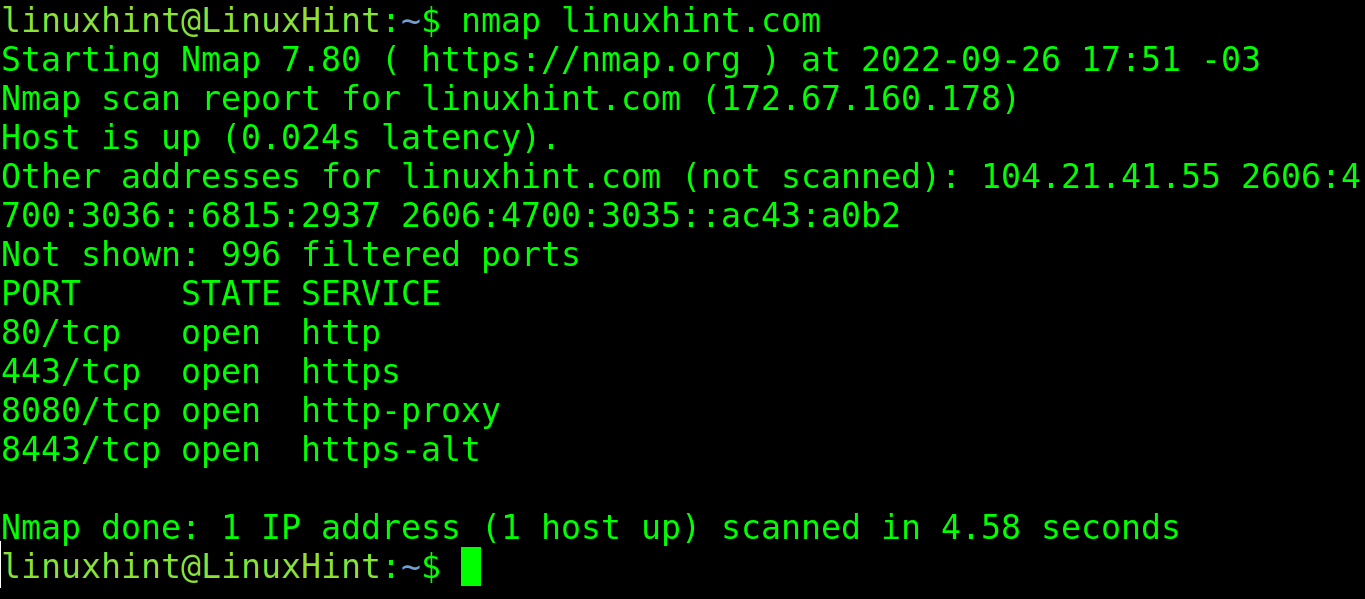
As you can see in the previous screenshot, Nmap found the ports and protocols 80, 443, 8080, 8443 are open with services listening. All of them are web related protocols: http, https, http-proxy and https-alt.
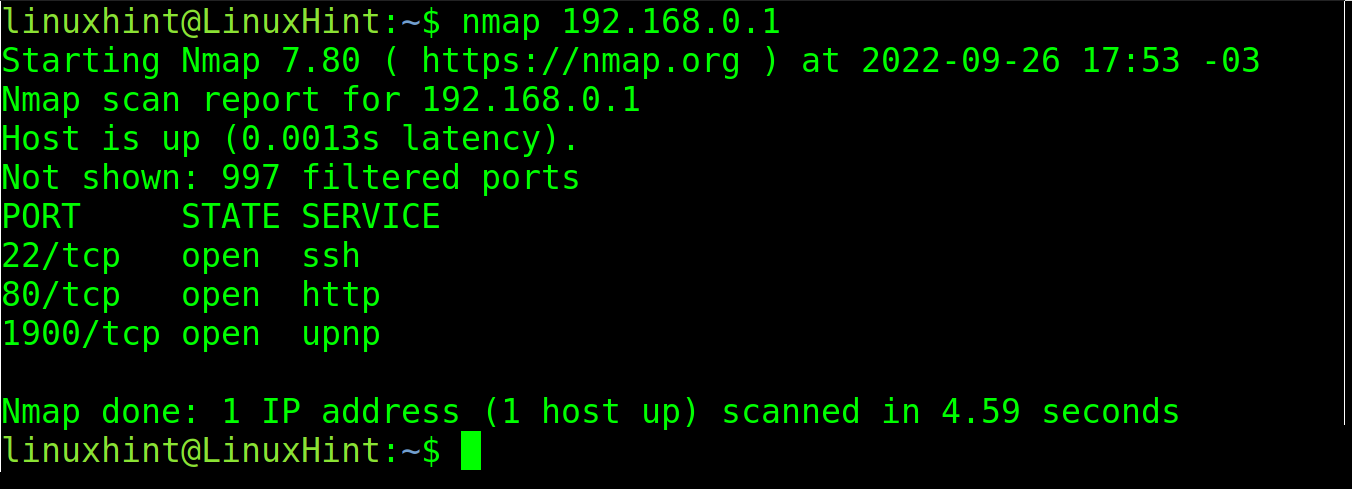
You also can specify the IP addresses instead of the domain names or hosts. In the following example, a router device is scanned:
Nmap can discover all alive hosts within a network. To discover the hosts, execute nmap followed by the -sP flag as shown in the following illustration in which all devices connected to network 192.168.0.1/24 are discovered.
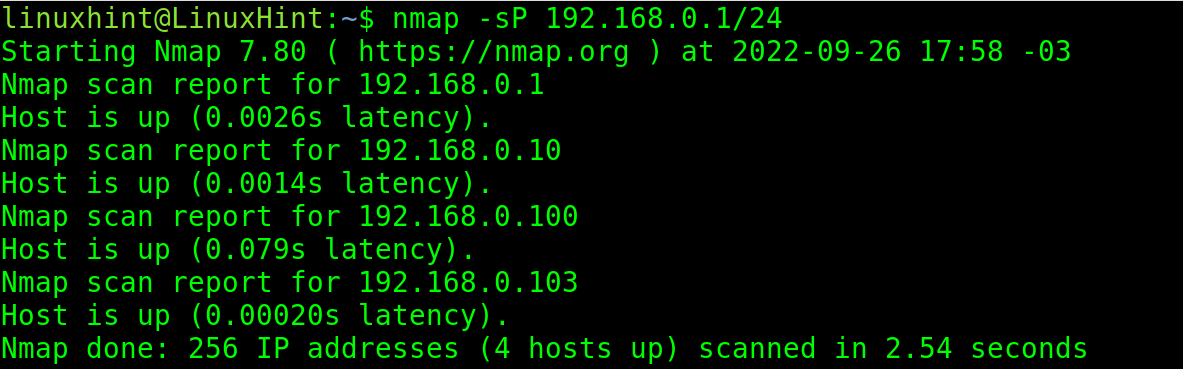
As you can see, 4 hosts or devices were discovered.
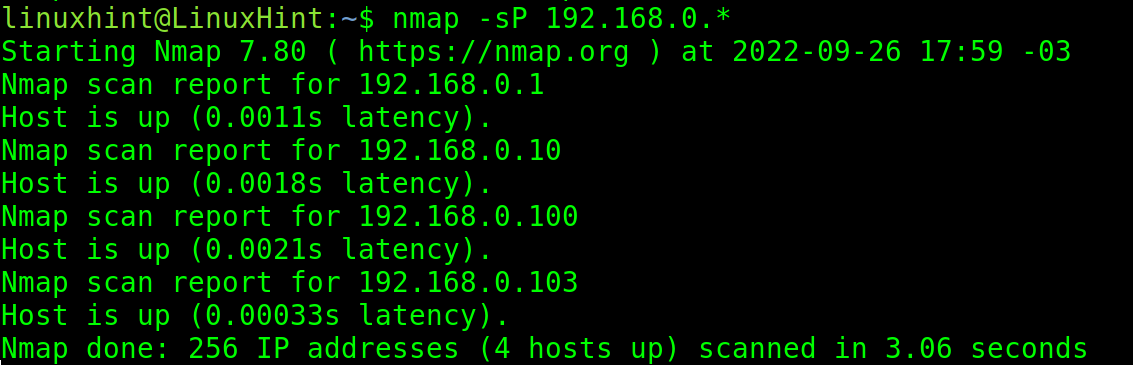
You also can use a wildcard to find all IP addresses belonging to the network.
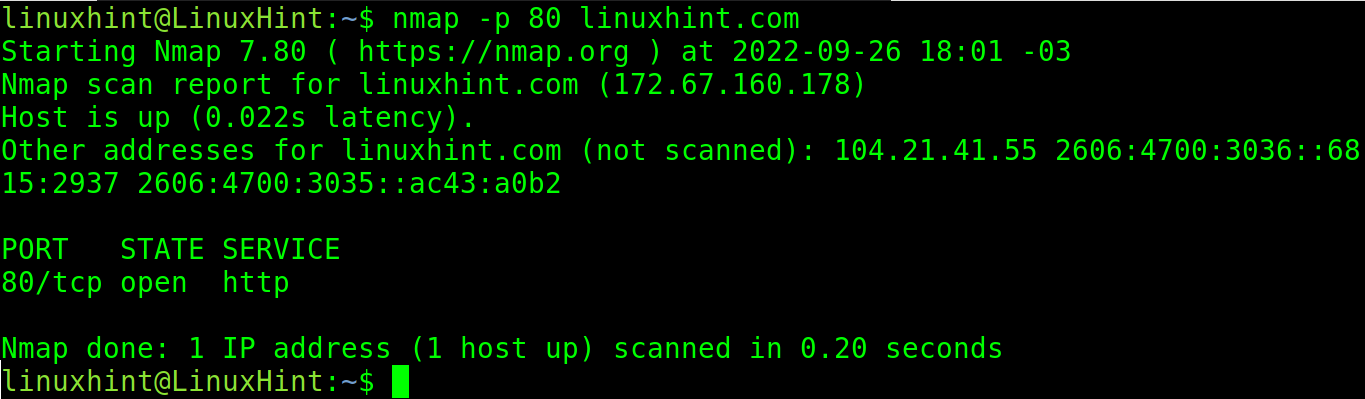
To scan a specific port to check if it’s open or closed, use the -p (port) flag followed by the port and the URL or host to scan.
In the following example, the port 80 of the site linuxhint.com is scanned:
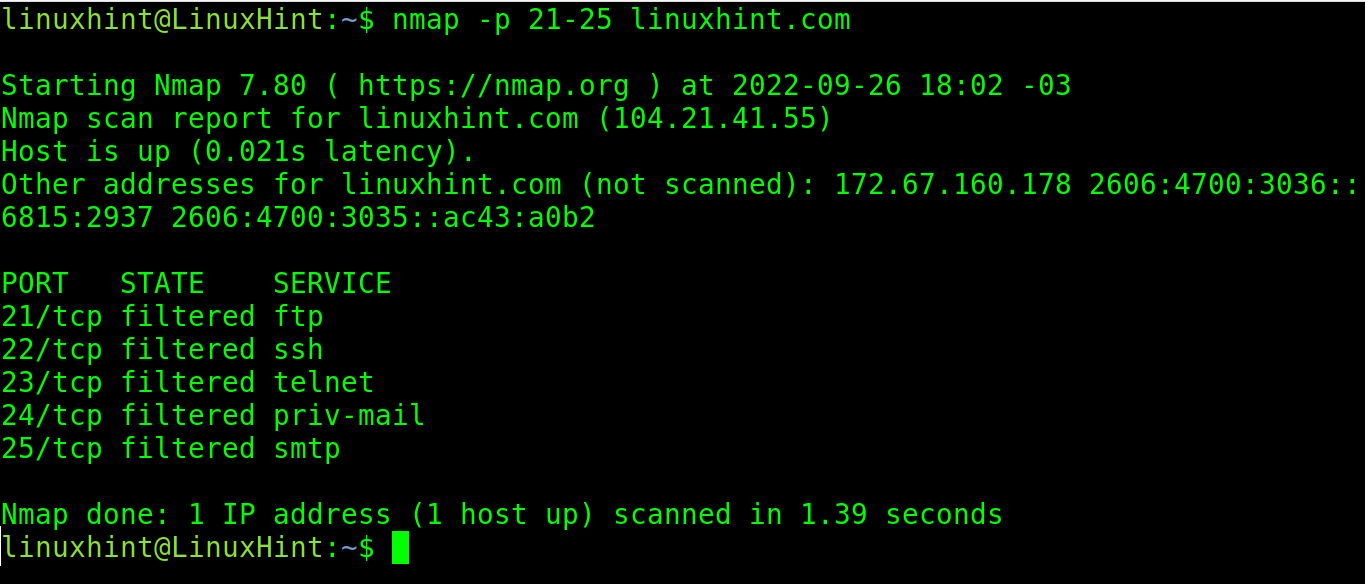
You also can specify a port range. In the following example, all ports between 21 and 25 of the site linuxhint.com are scanned:
We published a lot about Nmap and I highly recommend this reading to users who are learning the networking and are interested in this powerful tool. At the end of that tutorial, you can find some useful links to a more advanced Nmap content.
Setting Up Web Server and Managing Services
Websites, applications, and all resources that we use from the internet are stored or hosted in servers.
Servers are computers storing or hosting the necessary files for the website or application to show up and work.
This section describes the process to create a web server where to store a website, its html, php, and other necessary files and directories for the site to show up.
The section covers the installation of the Apache web server, one of the most popular web server softwares.
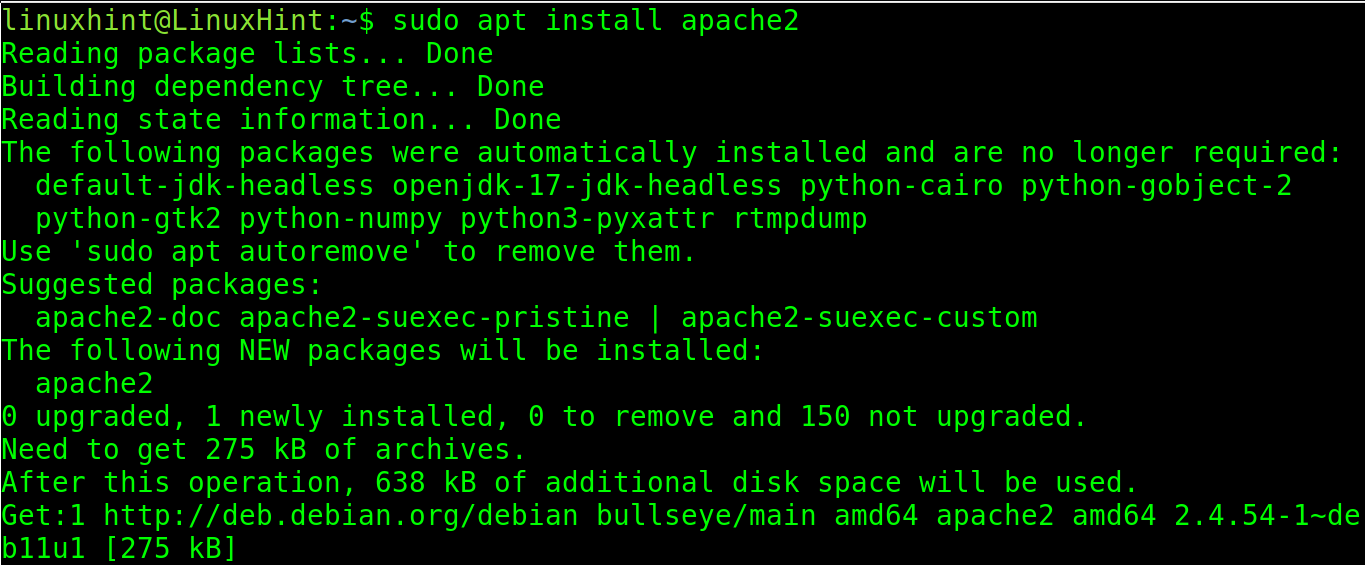
To install Apache on Debian based Linux distributions including Ubuntu, run the following command:
To install Apache on Redhat based Linux distributions, run one of the commands shown in the following:
Or

To start the Apache service on Debian based distributions, use systemctl to manage services as shown in the following:

On Red Hat based distributions, run the following command:
systemctl start httpd
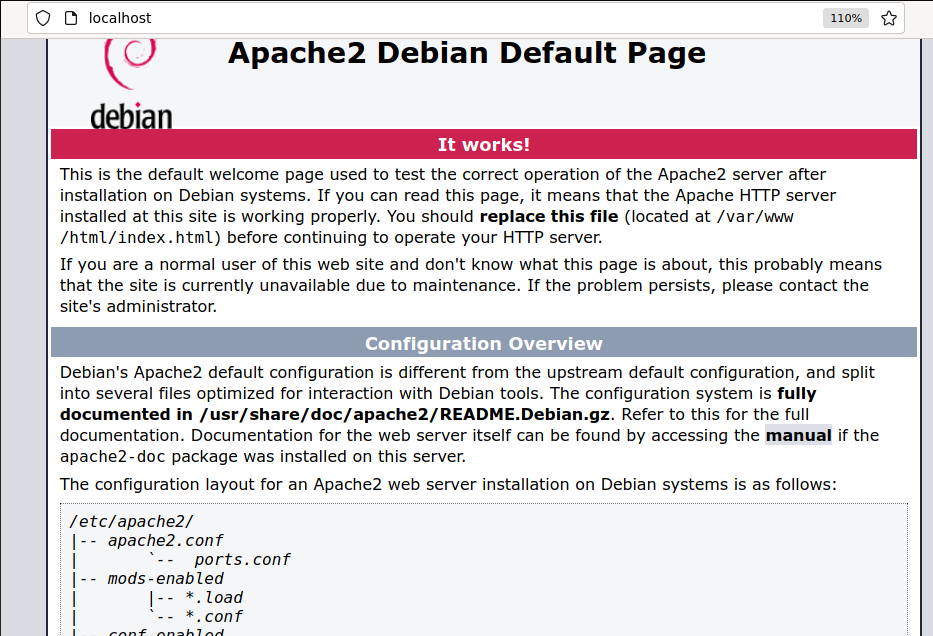
If you access your localhost on port 80 with a web browser at http://localhost or http://127.0.0.1, you will see the Apache default home page shown in the following figure:
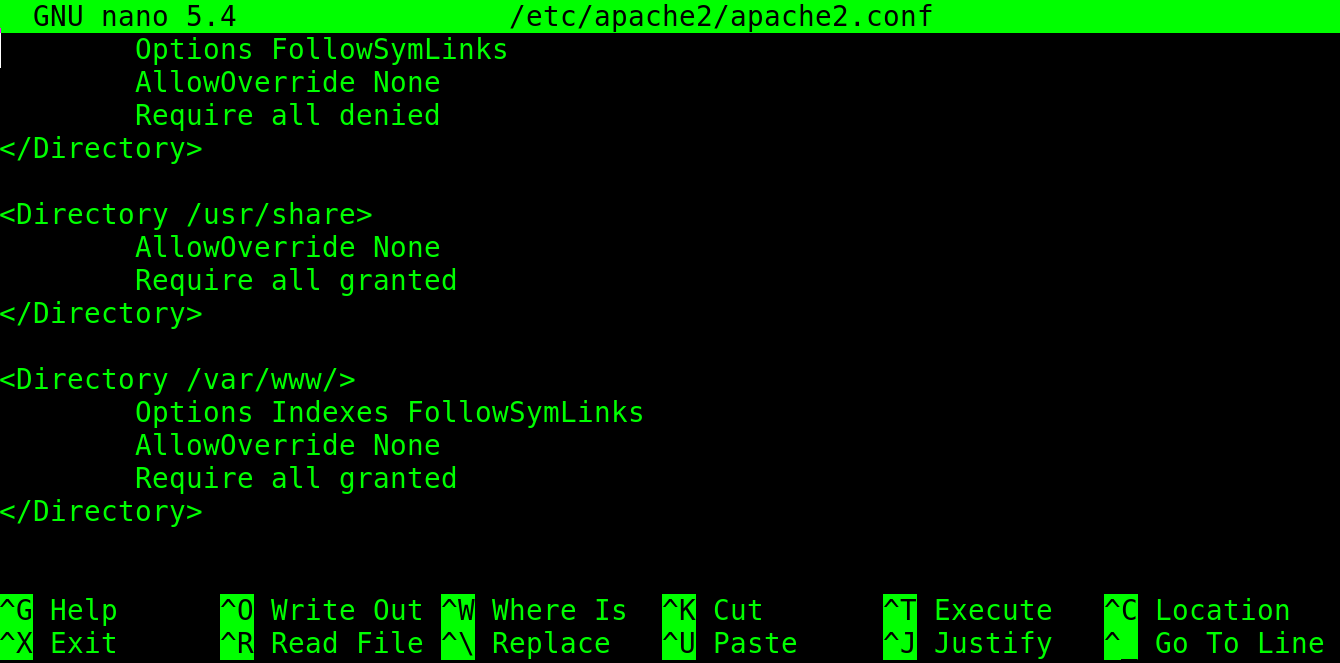
The Apache configuration file is /etc/apache2/apache2.conf (Debian based Linux). You can edit it by opening with a text editor with privileges.

By scrolling down, you will see the section which is shown in the previous image. As you can see, the directories /usr/share and /var/www are accessible to Apache. There, the user needs to place the website files.
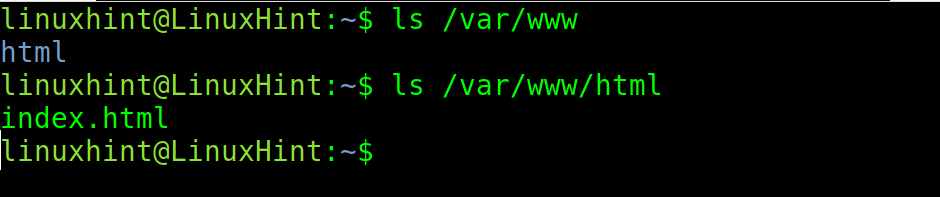
You can use the ls command to see the content of the /var/www directory.
As you can see in the following screenshot, it contains the subdirectory html. Another ls shows the /var/www/html directory that contains the Apache home page.
In this directory, you can replace the html file and place the website files.
More Apache configuration options are explained in the Advanced Linux Network Commands document.
The SSH Protocol
The ssh (Secure Shell) protocol allows the users to login into a remote computer and use it. If the user has privilege rights, he can take full control of the remote system.
This protocol is especially useful to remotely manage the servers, or for regular access to their home or work computers remotely. It is also used for remote support among more usages.
This section explains how to access a remote Linux computer using a password, how to login using a public key, and how to increase the security to prevent malicious logins.
If you have not an additional computer to test this protocol, install a virtual machine and configure it as NAT.
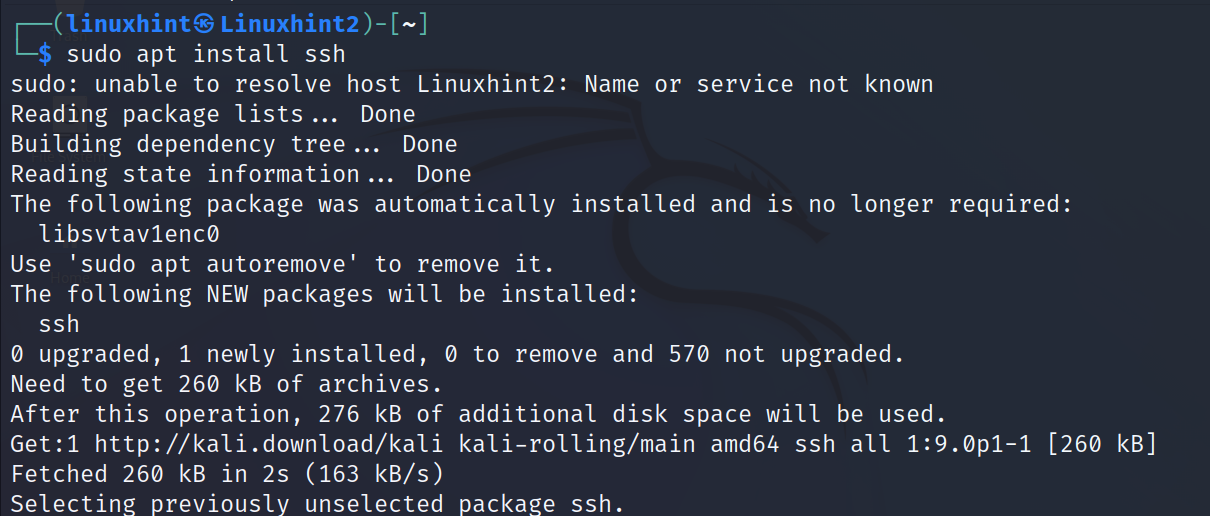
To install the ssh service on Debian based distributions, run the following command:
Once installed from a client (from another computer), run ssh with the following syntax where <User> must be replaced with a remote user (an existing user on the server side) and <IP/Host> with the server IP/Host.
In my case, I want to access the computer with IP address 192.168.0.103.
In this case, I do not need to specify a port because the service is using the default one for ssh, the port 22.
After executing the following command, you will be requested to type the remote user password to login:
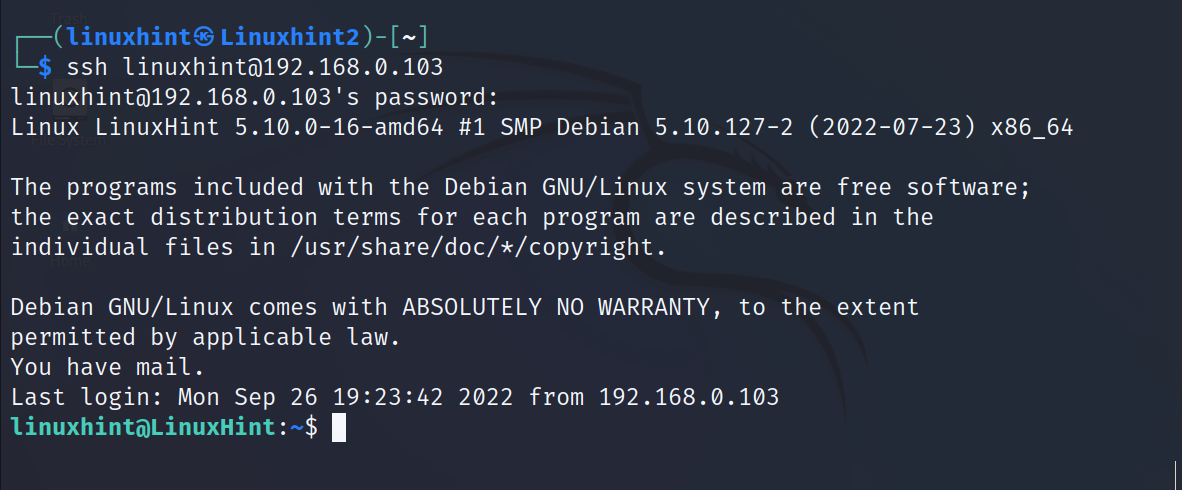
As you can see, after typing the password, I logged in and accessed from the computer Linuxhint2 the computer with host LinuxHint as the user linuxhint.
The password protected ssh method is unsafe before certain hacker attacks.
This section describes how to replace the password authentication method with key authentication.
The key authentication is consists of two files – one stored in the client side and one stored in the server side.
The client generates both keys, then shares the server key with the server. When trying to login to the server, if keys are compatible, the authentication takes place. If the keys are not compatible, the connection is refused.
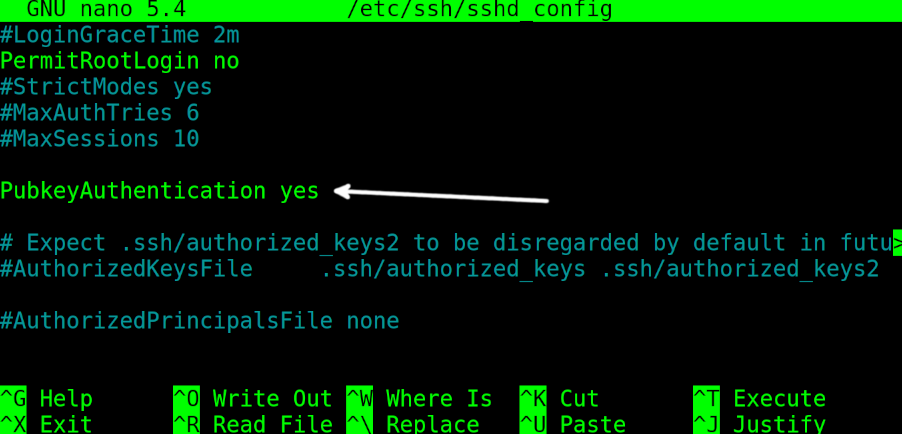
Before generating the key pair for client and server, you need to enable the key authentication on the server /etc/ssh/sshd_config file.
Open it with privileges using any text editor. This step must be done on the server that the user wants to connect to.
To enable the key authentication, find the line containing PubkeyAuthentication no and replace it with PubkeyAuthentication yes (replace the “no” with “yes”).
Exit to saving changes and restart the ssh service by executing the command shown in the following screenshot:

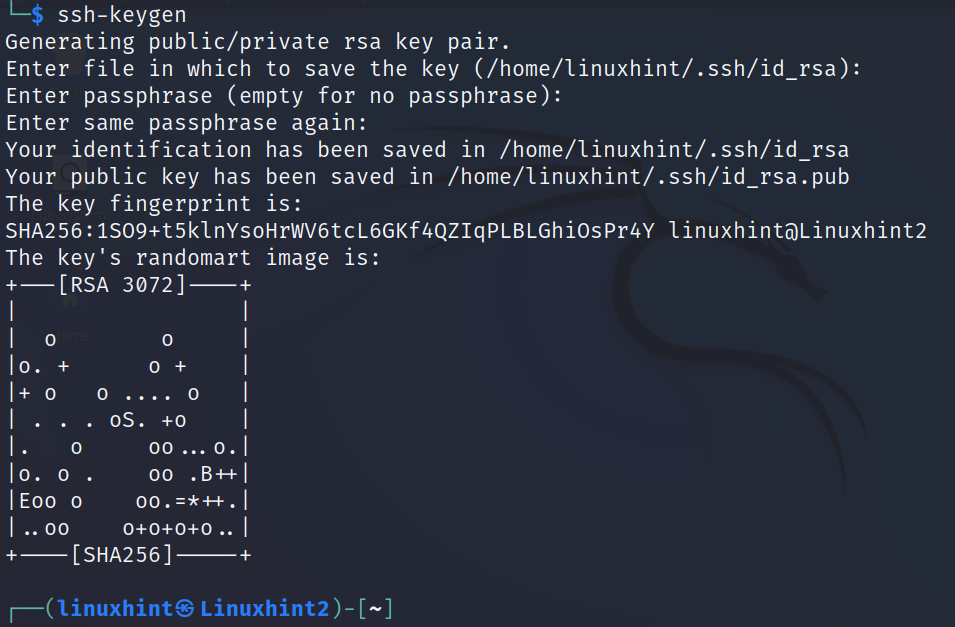
On the client side, on the device which will be able to connect to the server, the user needs to generate the keys using the ssh-keygen command as shown in the following. This command must be executed on the client, not on the server:
In my case, the server is the IP 192.168.0.103 and the user is linuxhint.
Run the following command, replacing the user and IP with yours. And when the requested type the remote user password to login. After the login, the ssh key is automatically saved on the server.
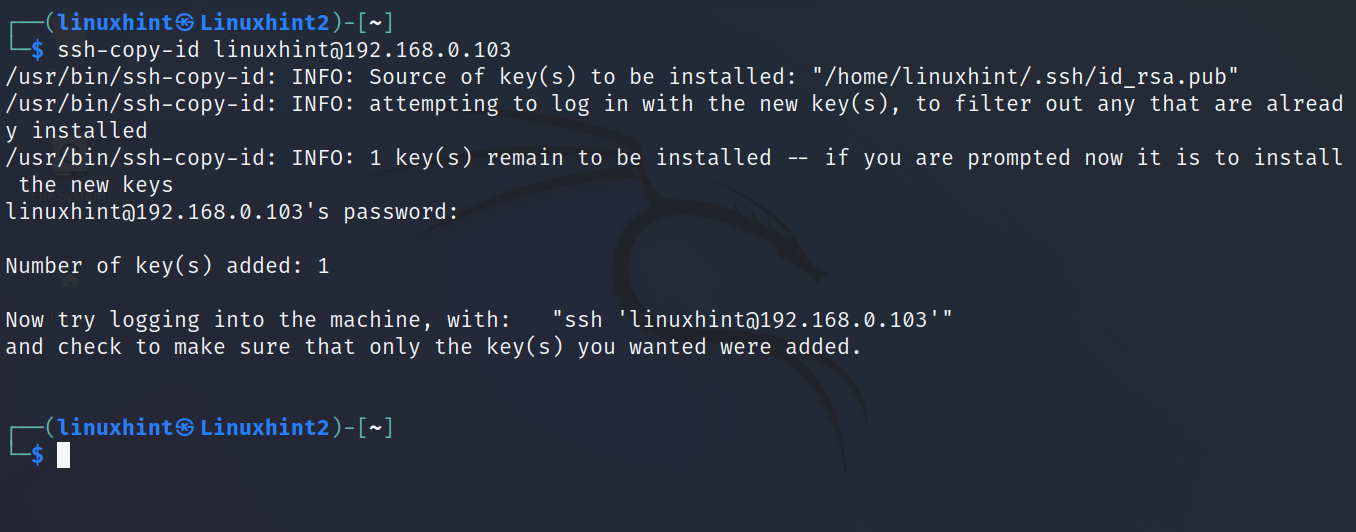
As you can see in the previous screenshot, the process allows you to define a passphrase (like a password) to authorize the key authentication. In my case, I selected the option by typing a passphrase.
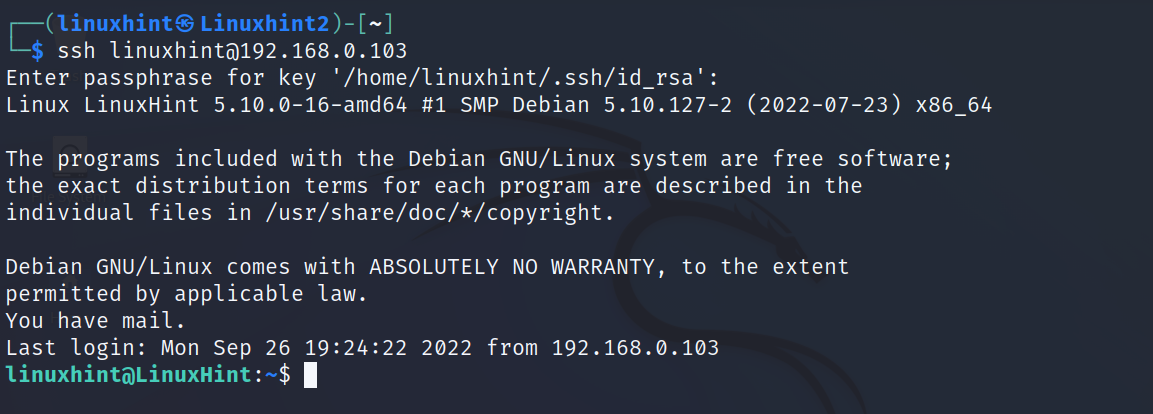
Once the key is copied into the server, you can connect by running ssh normally. If you enabled the passphrase, you will be asked to type it.
To add security measures to the ssh service and prevent the hacking attacks from succeeding, edit the /etc/ssh/ssh_config file with privileges using any plain text editor.

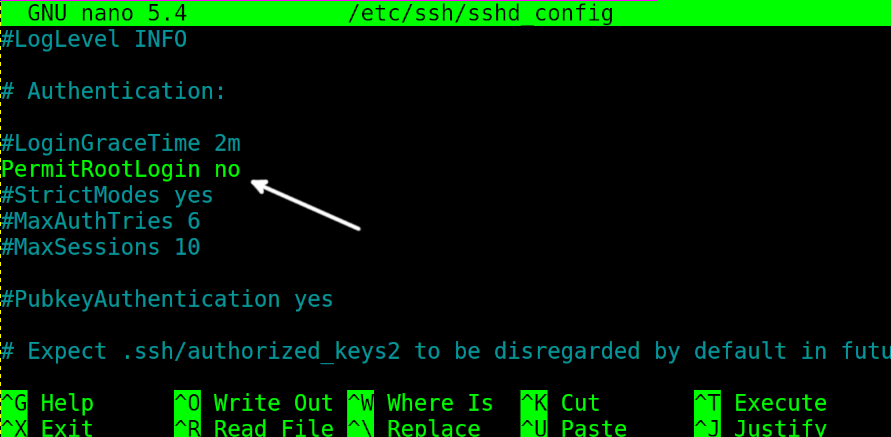
All Linux systems have a root superuser which allows the users to login through ssh. Since the root is risky, hackers may bruteforce the root user or access with privileges.
This section shows how to disable the root login.
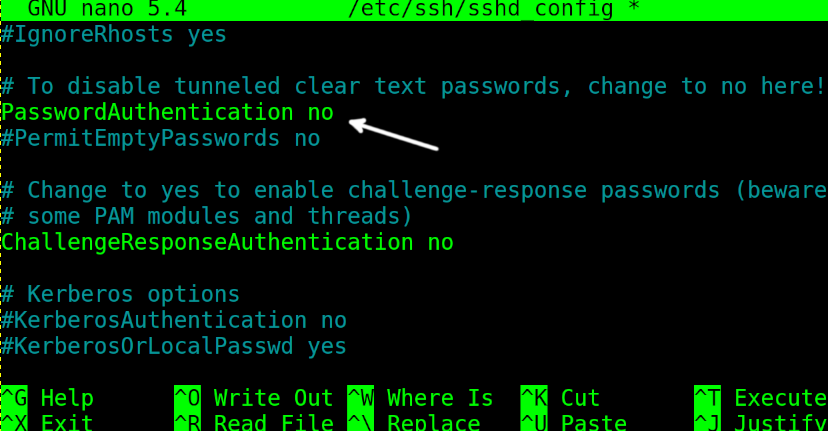
Scroll down the /etc/ssh/sshd_config file and replace PermitRootLogin yes with PermitRootLogin no (just replace the “yes” with “no”).
If the key login is enabled correctly, disable the password authentication by replacing PasswordAuthentication yes with PasswordAuthentication no (again, replace the “yes” with “no”).
After making the changes, exit to saving changes and restart the ssh service by running the following command:

This protocol is deeply explained in the second part of this tutorial.
Getting Started with UFW (Uncomplicated Firewall)
Firewalls are defensive softwares used to block the traffic with protective purposes.
A firewall allows the users to close or open the ports, to define the rules regarding the traffic type going through ports, to whitelist or blacklist traffic sources, and more.
The most widely used firewall in Linux systems is Iptables, despite it being discontinued and replaced with Nftables.
Nftables has a dedicated chapter in the second part of this course. This section focuses on UFW (Uncomplicated Firewall), an Iptables frontend which makes creating the firewall rules very easy.
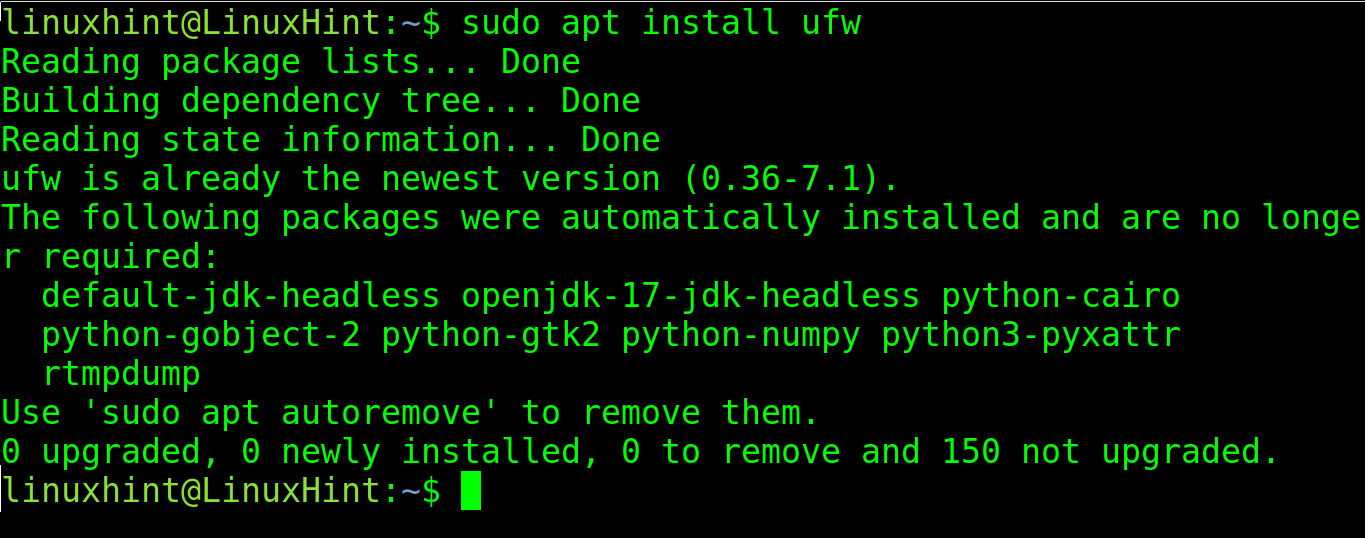
The first step is to install UFW. UFW can be installed using apt in Debian based Linux systems as shown in the following:
After installing UFW, enable it by executing the following command:

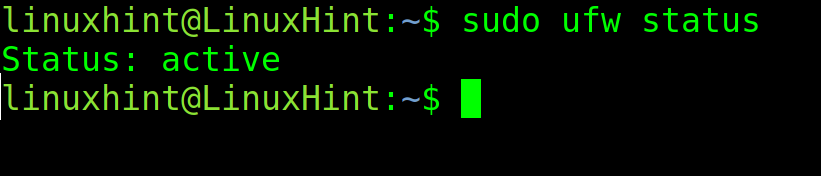
As you can see, the firewall is active and enabled.
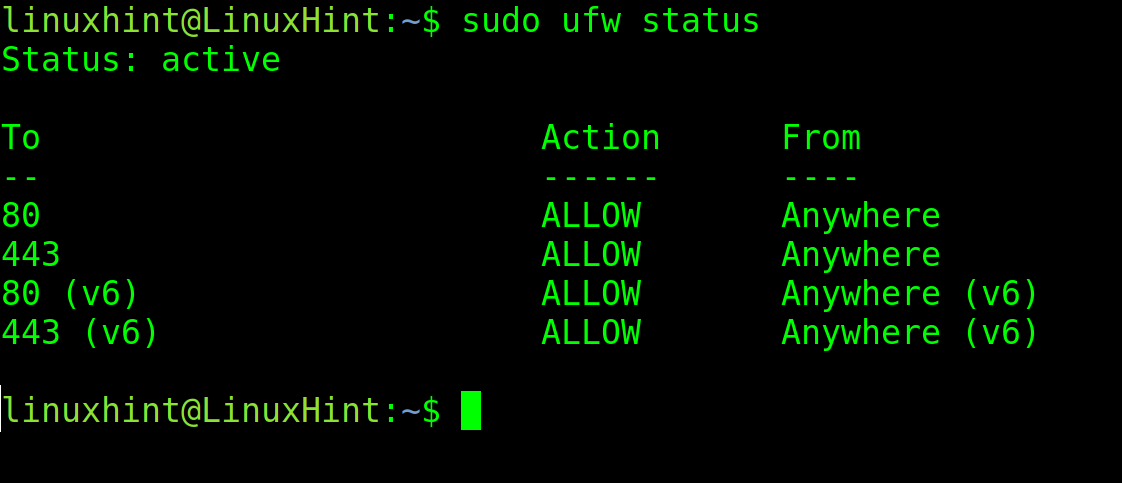
The user can check if UFW is properly enabled and if there are existing rules by executing ufw followed by the status flag.
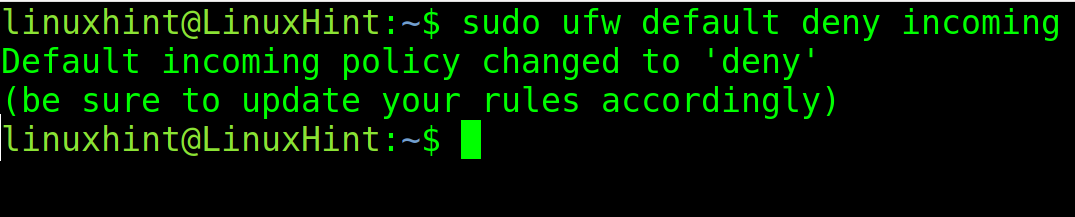
In the following two examples, a restrictive firewall is configured with all incoming traffic blocked except for specified exceptions.
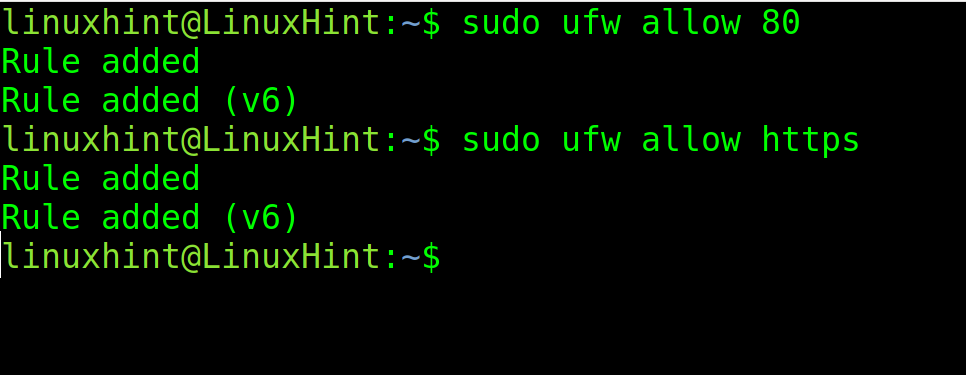
The following command instructs UFW to deny (block) all incoming traffic by default:
Then, add exceptions to allow the incoming traffic through ports 80 (http) and https (443). As you can see, you can specify the ports or protocols with numerical values or by their name.
sudo ufw allow https
Run the ufw status again to check if the rules were correctly added:
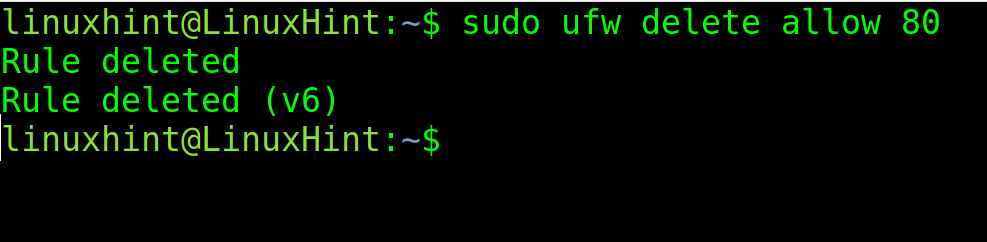
You can delete a specific rule using the delete flag followed by the rule to remove as shown in the following:
That’s how you can set up a restrictive, very defensive firewall. Deny all incoming traffic and add the exceptions that you want to allow.
More about firewalls is explained in the Advanced Linux Network Commands tutorial.
The “Netstat” Utility
Netstat (Network Statistics) is a command to monitor the network activity.
It can show us all connections and their status, as well as their protocol, port, and destination or origin address.
If netstat is executed without flags, the output is similar to the following:
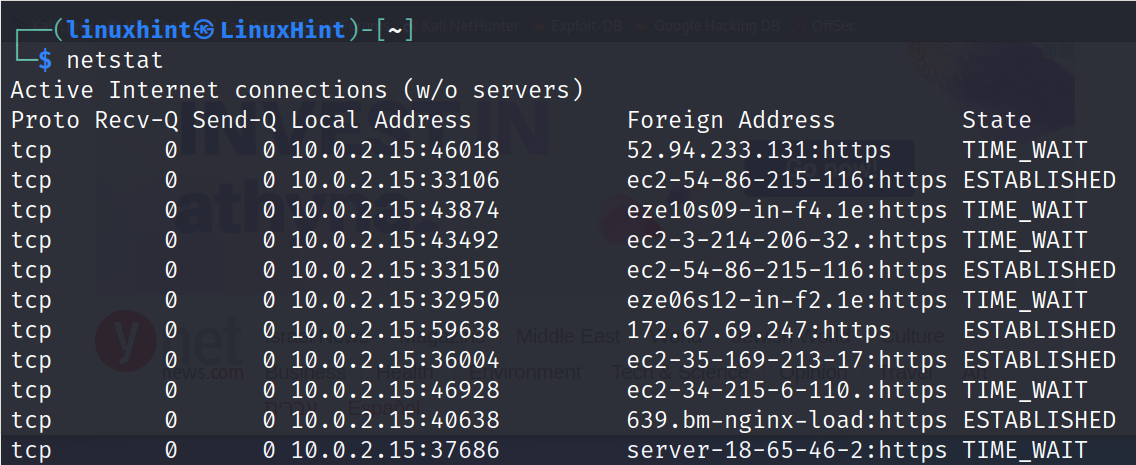
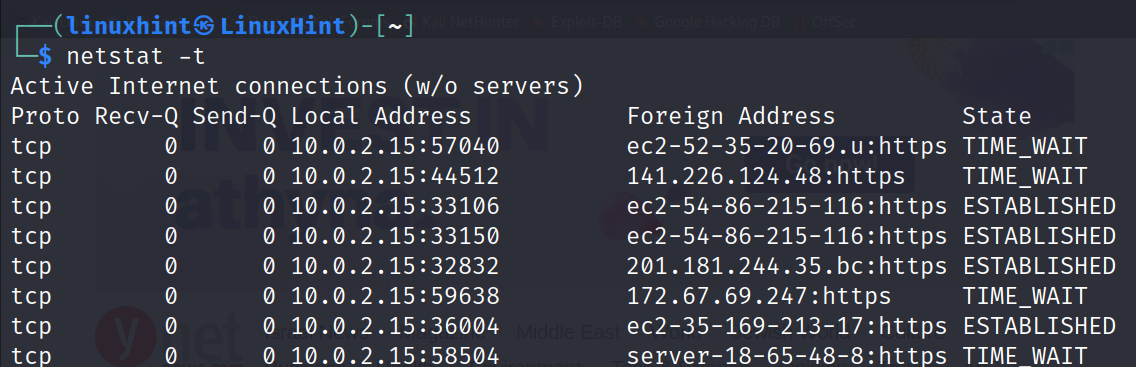
As you can see in the previous output, the first column shows the protocol (in this case TCP), the fourth column (Local Address) shows the local IP and local open port. The fifth column (Foreign Address) shows the hosts of the devices/servers that I’m connected to. In this case, all connections are https (Ports 443), meaning all of them belong to the web browser activity. The last column shows the connection state. In this case, the connections are established (Active).
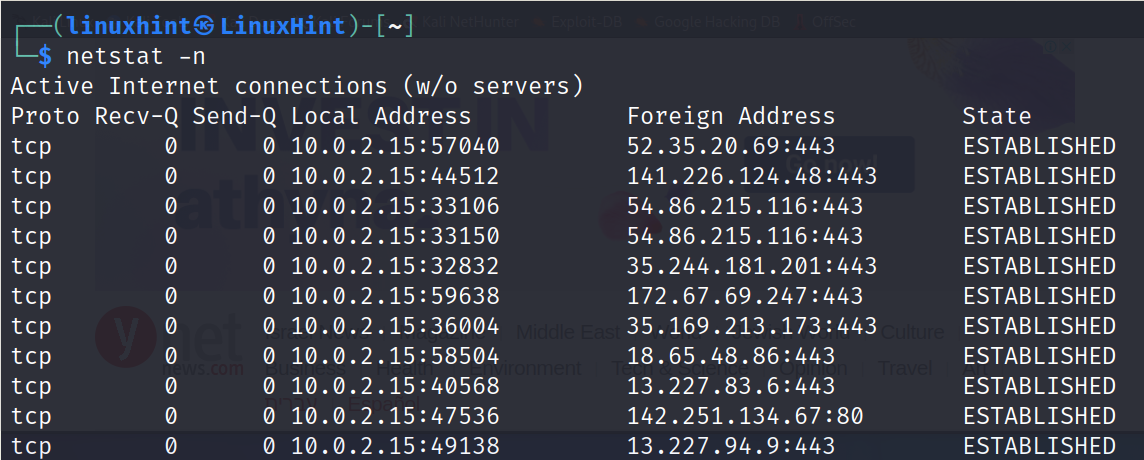
We can instruct the netstat to show the remote hosts that we are connected to by IP address instead of host by adding the -n flag as shown in the following example:
By adding the -t flag, we can instruct netstat to show the TCP connections only:
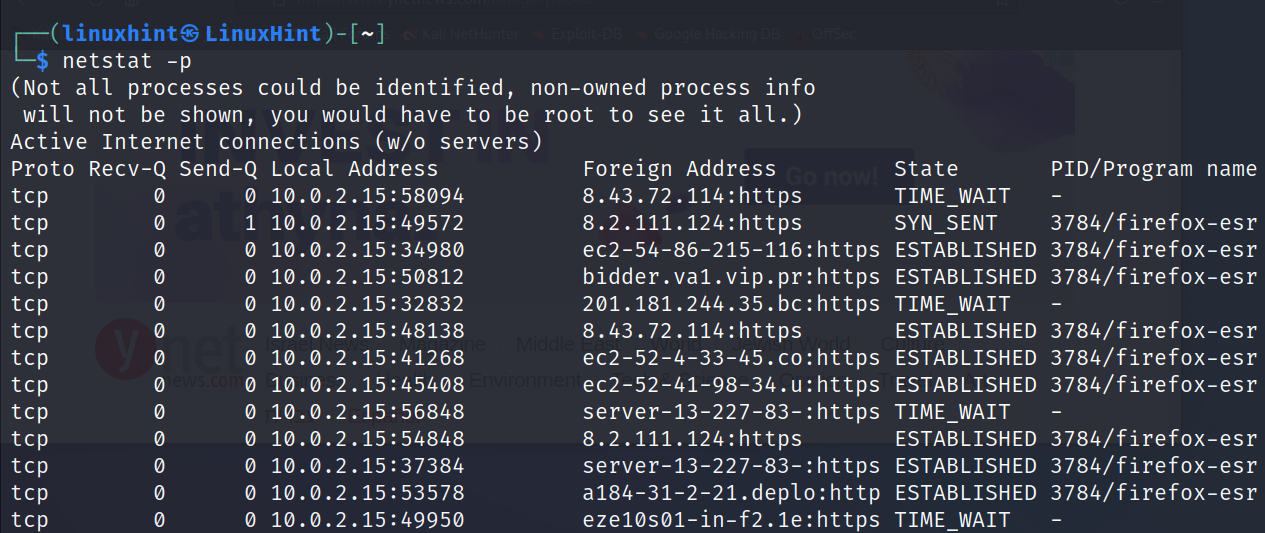
With the -p flag, we can instruct netstat to display a new column including the PID and the name of the program that generates the connection. In the following example, the PID is 3784, all belonging to the Firefox web browser:
That’s all for the first part of this course. After applying all the examples to practice, I highly recommend continuing with the second part of this course which is dedicated to Advanced Linux Network Commands.
Conclusion
As you can see, networking is not a difficult subject. Reading and practice will bring you all the knowledge that you need to administer a network. This tutorial is an excellent introduction that you may learn to understand the basics of networking and how to manage it. We encourage you to share it with anyone who is looking for a networking course. All the content explained is valid for all Linux distributions and some Unix systems, too. Remember to continue learning with the second part of this course: Advanced Linux Network Commands.
Thank you for reading this document that we wrote for you to understand about networking and learn the Linux network commands. Keep following us for more Linux and networking professional content.
Source: linuxhint.com