Vim Redo Command
Vim Editor Installation
To get started, you must ensure that the Vim editor utility has been fully configured on your end. For this, you need to check out its installed version by the use of a simple “version” command. The output has demonstrated that the “vim” editor is not found. Thus, it also displayed some of the useful “Apt” instructions to install it from scratch on your system.

Thus, we have been trying the very first “apt” package installation instruction to install the “vim” editor on the Ubuntu 20.04 Linux operating system as quickly as possible. Try to update your system before any installation to avoid any issues during the installation process. It is required to add the currently logged-in user’s password to continue this administrative task. Therefore, we have provided it with the password and hit the key “Enter,” i.e., the installation has started.

In a few seconds, it will show us some questions about the space concerns of our system, i.e., the installation may take up to 34.6 MB of space on our system, and if we want to install it or not. You have to press the “y” key to continue this process, as we did below.
![]()
Our system will start installing it at our end without any hindrance. So, sit calmly and wait until it’s completed, i.e., approaches 100 percent.

At the end of the installation of the Vim editor on the Ubuntu 20.04 Linux system, we may get some processing lines that are like those shown below. Now, it’s fully installed and functional in our system.

Create File
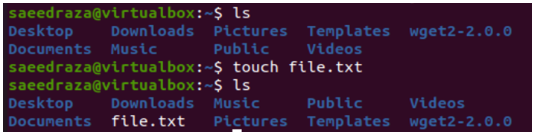
To perform a redo operation, we need some text files to be opened in the vim editor. While listing the home directory contents with the use of the “ls” command, we have found that there is no text file in it, i.e., we need to create one in this case. So, we have tried Ubuntu’s “touch” query at the console query area and created a new text file named “file.txt” as shown. After listing the contents of the current working directory again with the “ls” instruction, we find that the text file has been successfully created in it.
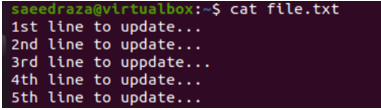
We have added five lines of text data to it using the text editor first. After trying the cat instruction along with the name of a file, we have displayed the data within the “file.txt” file on the console. You can see it has a total of 5 lines.
Open File in Vim
To perform the redo shortcut on the file, we will be opening it (file.txt) within the Vim editor using the “vim” instruction along with the file name as displayed in the small image.
![]()
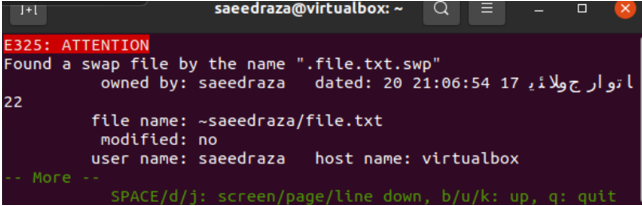
After the execution of the vim instruction, we got the shown-below vim screen quickly opened in the console shell of the Ubuntu 20.04 system. It is giving us the attention message along with some quick shortcuts to be used in the vim editor, i.e., how to quit, how to edit, and many more. Press the Enter key, Esc key, or space until it opens your file.txt data in the editor.
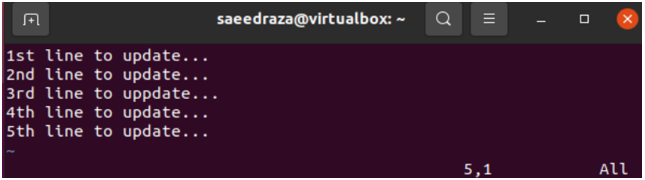
Our 5-line text file “file.txt” has been successfully launched within the normal mode of the vim editor as per the shown screen below. Within the normal mode, you cannot insert the file contents, so you need to move within the insert mode of Vim by pressing the “I” key on the keyboard.
Vim Redo vs Undo Command
On pressing the “I” key, we got into the insert mode of the vim as shown from the last 2 displayed lines in the image. So, we have to press Enter and remove the 4th line from the file.
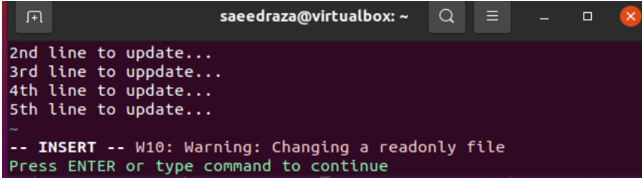
After this, we have also removed the 2nd line from the text file using the backspace button while we are in the Insert mode of the Vim editor. Now, you need to save it and move within the normal mode by pressing the “Esc” key.

To perform undo and redo changes, you must have been in the command mode of the vim. To open the command mode, press “:” on the keyboard. You can try any command in it to make changes to this file. To perform the redo command, we must use the undo command first on this file. So, we have tried the “undo” command within the command area of this Vim editor after the use of the “:” sign. Press Enter to execute the undo instruction as shown in the image.
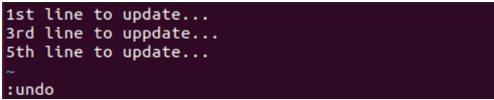
The 4th line is back in the file as below.
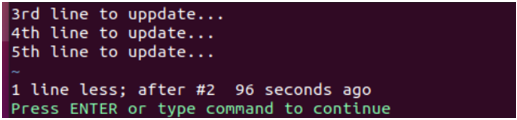
Again, we used the “undo” command.
The 2nd line is also back in the file.
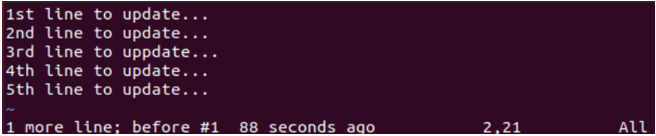
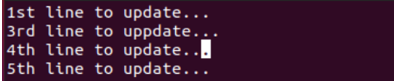
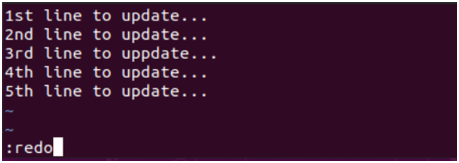
Now, while you are in normal mode, press “Ctrl+R” to redo the undo command changes that we have just implemented. You can also try the “:redo” command in the command mode of vim.
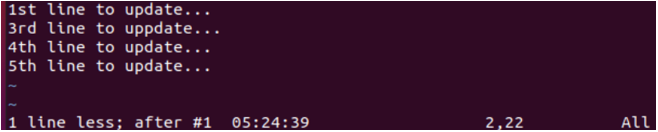
Using the redo command, you will see that the second line is now deleted.
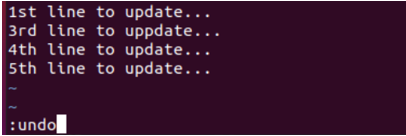
We have again used the redo “ctrl+R” or “:redo” command.
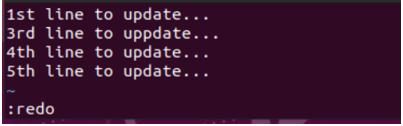
We are now at our last change made before the use of the “undo” instruction, i.e., 3 lines.
Conclusion:
This article has been an informative guide toward the use of “redo” and “undo” commands in the Vim editor. For this, we have explained the terms “undo” and “redo” quite well in the introduction. After that, we tried to install Vim and opened the newly created text file in it to perform “undo” and “Redo” commands to see the changes made by the “Redo” especially. The examples given above are very easy to do for every user, especially for learners.
Source: linuxhint.com