Tkinter Grid
Python is a versatile programming language, particularly in the field of graphical user interface (GUI) development. Among the numerous GUI frameworks available, tkinter stands out as a popular choice due to its simplicity and ease of use. One of the fundamental aspects of tkinter is its versatile grid system, which allows developers to create dynamic and responsive user interfaces effortlessly.
This article explores the intricacies of the tkinter grid, its syntax, functionalities, and best practices in building intuitive user interfaces.
What is the tkinter Grid?
The “tkinter grid” is a powerful tool that offers a flexible layout management system. At its core, the tkinter grid is a two-dimensional table with rows and columns, where each cell can hold a widget such as buttons, labels, or entry fields. The grid allows developers to specify the location of each widget by row and column indexes.
It allows developers to arrange GUI elements, such as buttons, labels, and entry fields, into rows and columns. This arrangement brings about a structured and organized layout, making user interfaces visually more appealing and user-friendly.
Syntax
In this syntax, the “grid_options” can be the following:
column: The column to place the widget; the default value is 0 (the leftmost column).
columnspan: By default, a widget occupies one column.
ipadx, ipady: These refer to the pixels padding the widget’s boundaries both horizontally and vertically.
padx, pady: These correspond to the pixels padded outside of the borders of v, in both the horizontal and vertical directions.
row: The first row that is still vacant by default is the row where the widget should be placed.
rowspan: It points to the number of spaces a rowswidget takes up; the default value is 1.
sticky: What to do if the cell is bigger than the widget, sticky. With sticky=”, the widget is centered in its cell by default. Sticky is a string made up of zero or more of the compass directions N, E, S, W, NE, NW, SE, and SW, which indicate the edges and corners of the cell to which the widget adheres.
Basic Grid Configuration
To effectively utilize the tkinter grid, developers must understand the basic configuration parameters. Setting up the rows and columns, adjusting their sizes, and defining the relative positioning are key factors.
Once the grid structure is established, developers can focus on managing individual grid cells. Properties such as padding, margins, spacing, and spanning allow refinement of the user interface. By specifying these characteristics for each grid cell, a desirable level of control is achieved, ensuring that GUI elements align optimally within the overall grid layout.
With the grid structure in place, tkinter offers precise control over widget placement and positioning. The grid manager allocates each widget to a specific cell, allowing developers to control its location. Additionally, by specifying the row and column for each widget, along with any desired span, developers maintain utmost control over the final layout of their user interface.
Creating a Tkinter Grid
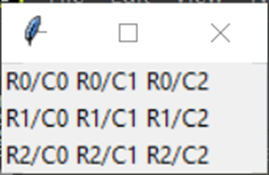
The following code creates a basic Tkinter grid:
root = tkinter.Tk()
for r in range(3):
for c in range(3):
tkinter.Label(root, text='R%s/C%s'%(r,c), borderwidth=1 ).grid(row=r,column=c)
root.mainloop()
In this code snippet:
-
- The primary application window is first created by importing the “tkinter” module and using “tkinter.Tk()”.
- The grid’s rows and columns are then iterated using stacked “for” loops. There is a tkinter for each grid cell. The label widget has the text “Row_number/Column_number” in it.
- To give each label a border, the “borderwidth” option is set to 1. Each label in the grid is placed by using the “grid()” method.
- With “root.mainloop()”, the application’s main event loop is launched after configuring the entire grid, enabling the GUI to react to user interactions.
Output
Dynamic Grid Adjustments
The tkinter grid becomes invaluable when it comes to building responsive user interfaces. It enables developers to dynamically adjust the grid layout based on changing window sizes or requirements. By adopting the grid’s flexibility, developers can create GUIs that adapt seamlessly to varying screen resolutions or user preferences, ensuring a consistent viewing experience across multiple devices.
Binding Events and Callbacks with Tkinter Grid
Incorporating interactivity is a critical aspect of GUI development. The tkinter grid system allows developers to bind events, such as button clicks or keystrokes, to callbacks. By specifying these relationships within the grid, developers can create dynamic user interfaces that respond to user input while maintaining an organized and structured layout.
from tkinter.ttk import *
root = Tk()
l1 = Label(root, text = "First Label:")
l2 = Label(root, text = "Second Label:")
l1.grid(row = 0, column = 0, sticky = W, pady = 2)
l2.grid(row = 1, column = 0, sticky = W, pady = 2)
e1 = Entry(root)
e2 = Entry(root)
e1.grid(row = 0, column = 1, pady = 2)
e2.grid(row = 1, column = 1, pady = 2)
mainloop()
In this block of code:
-
- Import the “tkinter” module and the “ttk” submodule.
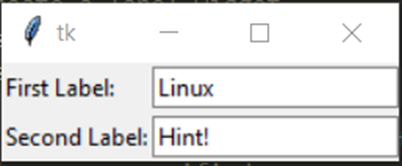
- The primary application window is then created using “Tk()”. The phrase “First Label” and “Second Label” are used to generate the two labels, l1 and l2.
- The “grid()” method is used to position them in the grid arrangement.
- Each label’s location in the grid is determined by the “row” and “column” parameters. When the “sticky” parameter is set to “W”, labels will adhere to the left side of their corresponding cells. The “pady” option increases the vertical space between labels and adjacent widgets.
- Using “Entry(root)”, two additional entry widgets, e1, and e2, are also created. User input is handled by entry widgets. Similar to how labels are inserted, they are also placed in the grid layout next to the labels using the “grid()”
- Lastly, the application’s main event loop is launched via the “mainloop()” method when the labels and entry widgets are configured, enabling the GUI to react to user events.
Output

We can add text in the above appeared text boxes as follows:
Conclusion
The tkinter grid system stands out as a powerful and intuitive tool for building visually appealing and responsive user interfaces in Python. With its comprehensive set of features and capabilities, developers can leverage grid-based layouts to create GUIs that are both aesthetically pleasing and functionally efficient.
Source: linuxhint.com