Tkinter Frame
By enabling intuitive and aesthetically pleasing user experiences, “Graphical User Interfaces (GUIs)” have altered the way we communicate with computers. Among the various frameworks available for GUI development in Python, “Tkinter” emerges as a robust and versatile option.In this article, we will delve into the “Tkinter Frame”, a fundamental component of Tkinter, and unravel its vast potential for creating sophisticated and user-friendly Python-based applications.
What is Tkinter?
Tkinter, a widely-used Python library, is the standard package for GUI development. It gives developers access to the “Tk GUI toolkit“, enabling them to make complex and interactive desktop programs. Tkinter serves as a bridge between the Python programming language and the underlying Tcl/Tk library, offering a simple and accessible means of creating GUIs.
What is Tkinter Frame?
Tkinter Frame serves as a container within a window, providing structural organization by grouping and arranging other widgets. It acts as a building block for creating complex user interfaces by allowing widgets to be placed inside it.
The “Frame” class in Tkinter is highly flexible, offering numerous configuration options such as colors, borders, and padding to enhance the visual appeal and layout of an application.
Syntax
Parameters
master: Represents the parent window.
option: The most popular options for this widget are listed below. These choices can be used as key-value pairs with commas separating them.
- bg: The standard background color that is displayed behind the label and indicator is represented by this option.
- bd: The default value for this parameter is 2 pixels, which is used to represent the border size around the indication.
- cursor: if this option is selected, the mouse cursor will adopt that pattern when moving over the frame.
- height: The new frame’s height from the ground.
- highlightcolor: When the frame is in focus, this option is utilized to display the color of the focus highlight.
- highlightthickness: When the frame is not in focus, this option is utilized to show the hue of the focal highlight.
- highlightbackground: The focal highlight’s thickness is represented by this option.
- relief: The style of the frame’s border. “FLAT” has been set as its default value.
- width: Previously, this selection represented the frame’s width.
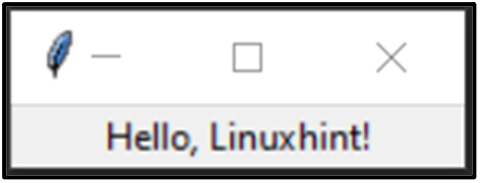
Example 1: Create a Basic Tkinter Frame
Overview of the following code to create a basic frame:
root = tk.Tk()
frame = tk.Frame(root)
frame.pack()
label = tk.Label(frame, text="Hello, World!")
label.pack()
root.mainloop()
In this example, create a frame widget and establish a basic tkinter window. The “pack()” method is then used to pack the “Frame” widget into the window. After that, generate and pack a “Label” widget inside the frame. The Frame contains the Label widget.
Output
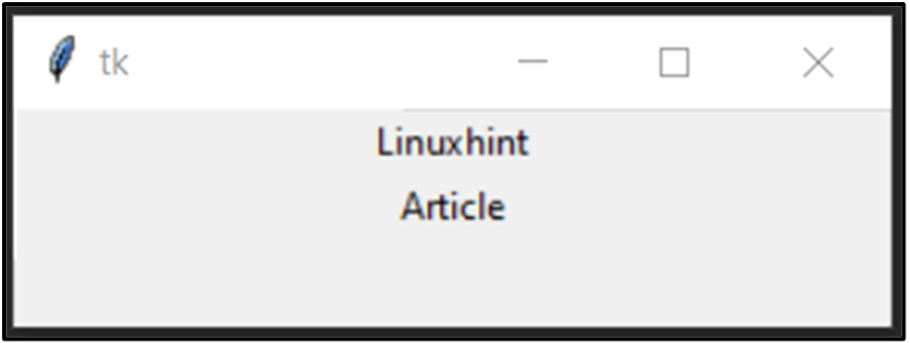
Example 2: Create Tkinter Frames with Frame Hierarchy
The tkinter frame follows a hierarchical structure, allowing the creation of nested frames within other frames. This feature enables the construction of multi-layered and modular GUIs. By defining and organizing frames in a thoughtful manner, developers can achieve cleaner code and optimize user navigation:
root = tk.Tk()
frame1 = tk.Frame(root)
frame1.pack()
label1 = tk.Label(frame1, text="Linuxhint")
label1.pack()
frame2 = tk.Frame(root)
frame2.pack()
label2 = tk.Label(frame2, text="Article")
label2.pack()
root.mainloop()
In this example, two frames, “frame1” and “frame2”, are created and placed inside the root window. We placed “label1” within “frame1” and “label2” inside “frame2”. The “label1” appears within “frame1”, and “label2” appears within “frame2”. The widgets are arranged hierarchically.
Output
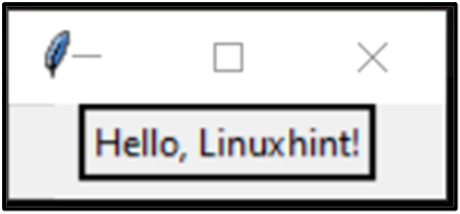
Example 3: Customize a Tkinter Frame
The many customization possibilities offered by tkinter frame allow programmers to change the look and functionality of their programs to satisfy particular needs. With properties like “background-color”, “border styles”, and “padding”, developers can create visually cohesive and aesthetically pleasing interfaces demonstrated below:
root = tk.Tk()
frame = tk.Frame(root, bd=2, relief=tk.SOLID)
frame.pack()
label = tk.Label(frame, text="Hello, Linuxhint!")
label.pack()
root.mainloop()
In this code block, create a “Frame” widget with a “SOLID” relief and a “2 pixel” wide border. The “frame” receives the styling and the Label widget is added inside it.
Output
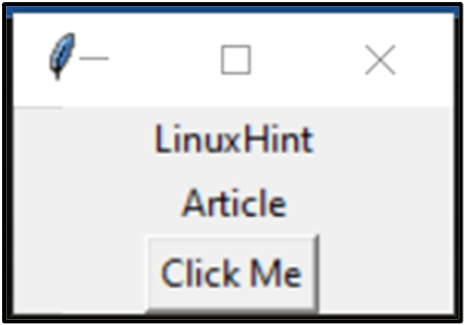
Example 4: Manage Widgets Within Tkinter Frames
By placing widgets within frames, developers can group related components, customize their placement, and handle events effectively. By binding events to widgets within frames, the application becomes dynamic, responding to user actions such as “mouse clicks” or “keyboard events”, as follows:
root = tk.Tk()
frame = tk.Frame(root)
frame.pack()
label1 = tk.Label(frame, text="LinuxHint")
label1.pack()
label2 = tk.Label(frame, text="Article")
label2.pack()
button = tk.Button(frame, text="Click Me")
button.pack()
root.mainloop()
In this snippet of code, a frame widget is created and packed into the tkinter window. After that, include three widgets in the frame: two labels and a “Button”. The widgets are stacked vertically within the Frame, appearing one after the other.
Output
Conclusion
The tkinter frame forms the backbone of GUI development in Python, providing the necessary tools and flexibility to create intricate, sophisticated, and visually appealing user interfaces. Its hierarchical structure, customization options, and integration with other widgets make it a powerful asset for developing a wide range of applications.s
Source: linuxhint.com