Tkinter CheckBox
The Checkbutton widget is employed to present a user with a range of substitutes as toggle switches. By hitting the button beside each choice, the viewer can then choose one or more of them. Within this article, we will take a look at the Python’s Tkinter library to create the checkboxes in a graphical user interface. Getting started with this article, we have to make sure that the “Tkinter” utility of Python is already configured at our end. If not, try the following instruction in the console application query area.
We created a new file after the installation of the Python’s Tkinter module. For this, we tried the touch instruction on the shell with the title for a file to be created.
![]()
Upon listing the contents of the main working directory within the console using the “ls” instruction, we found that the file is successfully residing in it and is ready for use. We opened the file explorer of the Ubuntu 20.04 Linux operating system and double-clicked on the “test.py” file to use it.

Example 1:
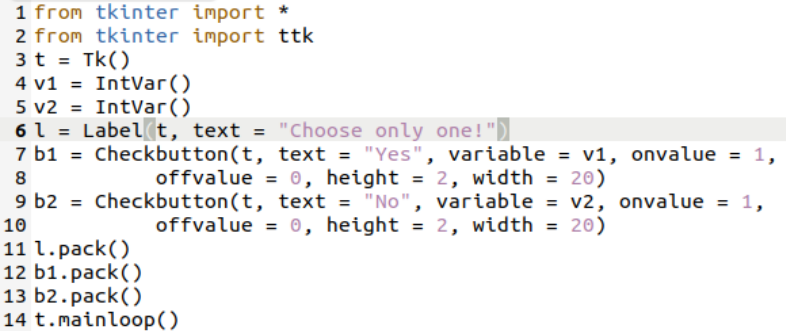
Let’s take a good look at our first Tkinter example to create a checkbox in Python. The following code is added to the file. First, we imported all functions and objects of the Tkinter module using the import keyword at the 2nd line. After that, we created an object “t” of the Tkinter library to use for further access. Two variables v1 and v2 of the integer variable type are created using the IntVar() function of the Python’s Tkinter utility.
Then, we created a label “l” using the “Label()” built-in function from the Tkinter utility. The object “t” of the Tkinter module is passed to it. The text parameter is used to mention the label as “choose only one!”. Then, we created two checkboxes b1 and b2 using the Checkbutton() function of the Tkinter module in Python. These checkboxes are created with the help of the Tkinter object “T” and added a separate name for each checkbox using the “Text” parameter, i.e. Yes and No.
The variables v1 and v2 are utilized as the third parameter of this checkbutton function. The parameter onvalue is set to 1. When the checkbox is marked, it would be true. The parameter offvalue is set to 0. When the checkbox is left unmarked, it would be false. Also, we added the height and width for both checkboxes. In the end, we used the pack() function to rap up the label and both checkbox buttons. In the end, the main execution is done using the mainloop() function via the Tkinter object “t”.
After saving and closing the file, we came back to the terminal and tried the following Python3 instruction to execute the test.py Python file.

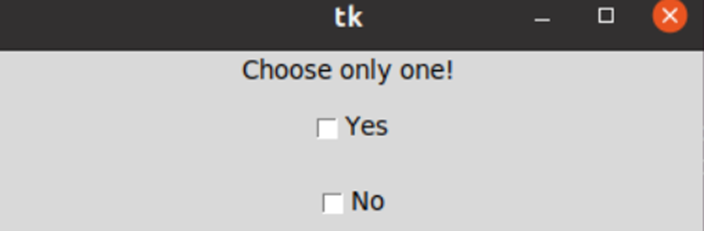
Upon the execution of this particular code file, we got the following Tkinter’s Graphical User Interface that is quickly launched at our terminal application screen. You can see that it is labeled as “tk”. After that, it contains the “Choose only one!” label along with two checkboxes.
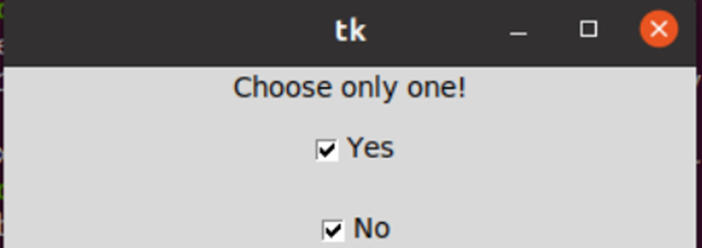
The following image output shows the checked-mark checkboxes.
Example 2:
Our first Python example demonstrated how a simple checkbox can be created in Python using the Tkinter Graphical User interface and get more interactive. Within this example, we will take a look at the deeper side of creating the checkboxes and see what we can do with them. So, we imported the Tkinter library object “tk” in the first line and imported the ttk object as well.
From its message box class, we imported the showinfo() function. The object “tk” is here to save the function tk() resulting in the object “t”. The geometry() function is called using the object “t” to set the geometrical area for the graphical user interface of Tkinter. We use the title() function of the Tkinter using the object “t” to add the title “Do you Agree?” for the GUI screen.
Then, we created a new string variable with the help of the StringVar() function of the Tkinter module with the help of the tk object. Then, we added a choose() function definition that creates a message box with the “tk” object. The showinfo() built-in function is utilized here to create a message box with the title “Confirmation” and the message is received from the variable “v”.
After this function, we created a checkbox using the Checkbutton of ttk object with its text “Yes, I Agree!”. The command parameter executes the choose() function while on check-marking. The message box displays “Agreed”. On the left unmarked, it displays “Not Agreed”. The program is completed here now.

We executed the updated code file.

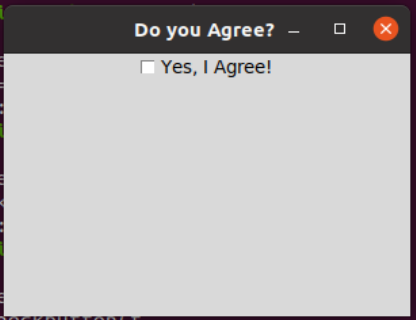
The Tkinter GUI is opened with the title “Do you Agree?” and the checkbox “yes, I Agree!”.
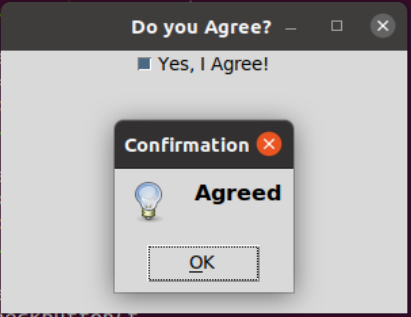
To check-mark the checkbox, we get the message box named “Confirmation” which shows that the user agreed. Press Ok to close it.
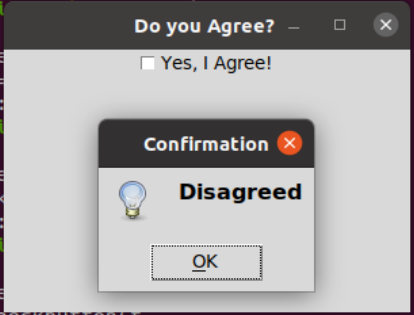
To uncheck the checkbox, we have got another checkbox which shows that the user disagrees.
Conclusion
This article is about the use of checkboxes in Python via the Tkinter module that provides us with the Graphical User Interface. We added a total of two examples here in the article to make it easier and more understandable for our Linux users.
Source: linuxhint.com