SSL Nginx Web Server
“Nginx, also abbreviated as “Engine-x,” is an open source Linux software that serves as a web server for HTTP caching, reverses proxy, and balancing of load. It proves to be a high-performance web server for its high-performance stability, HTTP capabilities, improved application-based deliveries, and security of the websites with the reduction of the long waiting times for the busiest web pages by acting as a load manager/balancer for the websites. Being a competitive lightweight server, Nginx offers a tremendous variety of features, and one of these features includes “Secure Service Layer (SSL)”. SSL is the technology that enables HTTP websites to secure the connection between the web server and web browser from any malicious attacks from unknown sources.”
In this article, we’ll learn the configuration of the SSL certificate in Nginx. Let’s accomplish this by following the detailed procedure provided below:
Prerequisites
- Nginx running on the system
- Private key
- Server certificate from CA (Certificate Authority) domain-specific
Step 01: Update the Server
We must first upgrade the server before adding any new software to the system. This allows the server to install all the latest packages or to update the old version with new ones. So, let’s first update the server. To do so, first, click on the “Activities” from activities, select the search and then search for the terminal window. Type the next command into the terminal window:

All the repositories are being updated here.
Step 02: Install Nginx
The next step after updating the server is to install the Nginx package from Ubuntu’s repository. Nginx is the default package offered by Ubuntu. The subsequent command should be entered into the terminal window to install Nginx:
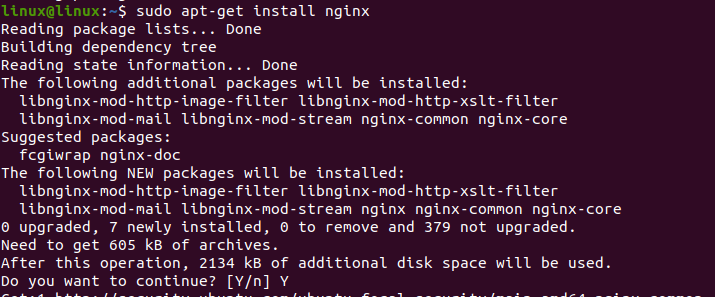
After reading all packages from the repository lists, the system will then ask if you want to continue with the installation of Nginx or not, so for that, simply type (y), and the installation will then be completed successfully.
Step 03: Verification
To ensure that the Nginx has been correctly installed in the system, use the following given command as shown below:
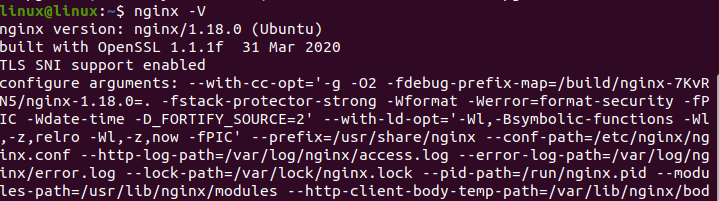
For Nginx, if the output returns the version of Nginx, then this means that Nginx has been installed correctly.
Step 04: Obtain an SSL Certificate
In this step, we are required to obtain the SSL certificate from the CA (certificate authority). Every website’s domain name is awarded one of these certificates by CA. Now we’ll generate the following CSR in Nginx using OpenSSL. This can be done by first logging into your server via terminal and running the following given command in the terminal window:
![]()
The process of generating the files has been started now; it will generate the following two files:
-
Your private key file
This file generates the CSR, which is then used later by the certificates to secure connections.
-
CSR file
CSR is known as a certificate signing request. It orders the SSL certificate for Nginx and encrypts the message/information, which can only be decrypted with the provided private key by CA. We need to provide this CSR with the domain name and geographic location of our website/organization. After setting this default information, we can now ask/order for the SSL certificate by opening this CSR.file via any text editor and then writing the request for the SSL certificate. Now we can easily install an SSL certificate using a private key.
Step 05: Linking of SSL Files
Now that we have installed all three files, including the Private key, CSR.file, and SSL certificate, we have to move a step further and have to link these SSL files. For this purpose, first, we have to create the new directory for these three files, and we can do it by writing the following given command in the terminal window:

We have now downloaded the above-mentioned three files into this newly created direct, so we then moved forward and linked the two intermediate and one SSL certificate by creating a bundle. cart file using the above-mentioned commands.
Step 06: Configuration of Nginx
Following step number 05, we will now configure the Nginx. We have configured the virtual host for the website with the domain name “www.example.com” separately here, so to configure this, we will run the following command in the terminal window:
This will open the configuration files for the website. We’ll do the configuration code in the next step.
Step 07: SSL Certificate Configuration in Nginx
Following the above-mentioned step, we now need to create the server block that will allow the traffic at 443 (HTTPS port). To do so, we’ll write the following code in the server block that we have just opened in the earlier step. The procedure is shown in the subsequent figure:
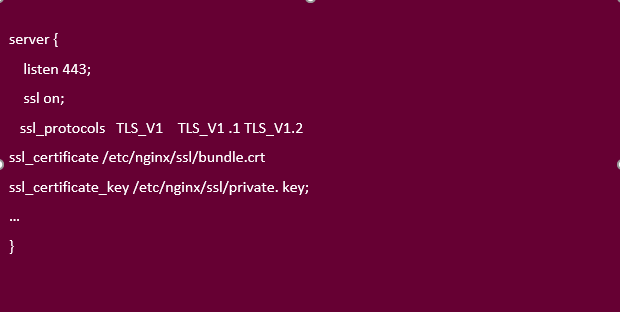
In the configuration shown above, the first line of the code is written to ensure that the server would always listen to port 443. The second line makes the Nginx server enable the SSL module. In the third line of the code, we have enabled the TLS version, which are the protocols of SSL, and they are supported by the Nginx server.
The last two commands in the codes talk about the specification of the file paths towards the bundle. Cart and private-key file (directory made for three SSL files linkage). We can make changes in the above code to make it specific for the server block named “www.example.com” as shown in the figure below:

Now this server block has become domain-specific, i.e., www.example.com.
Step 08: Restart
The following command would let the web-server restart.
Step 09: Testing
In the last step, we would like to test the configuration of SSL that we have done for the Nginx server. For testing, navigate to the browser by typing the http//: domain; in our case, it is “https//: www.example.com”. It will redirect you to the URL “example.com” which means that SSL has been configured successfully and is functional, too sown in the figure below:

Conclusion
This guide represents the step-by-step procedure to Install and configure the SSL web server for Nginx. In this guide, we have learned how to obtain the SSL certificate from Certification Authority which are “Namecheap”, “Rapid SSL, “and “Comodo”. We have installed and configured the SSL using CSR and private key files (bundle. cart). After the successful configuration of SSL, we have run a verification test on it using a specific reference domain, i.e., www.example.com. We hope that with the help of this Guide, you will be able to configure the SSL on your systems as well.
Source: linuxhint.com