SQLite Except Operator
In most cases, we utilize the SQLite Except clause with Select statements. All of the Select statements, then, that include the Except clause should have the same number of records. The Except clause in SQLite is summarized in the figure below:
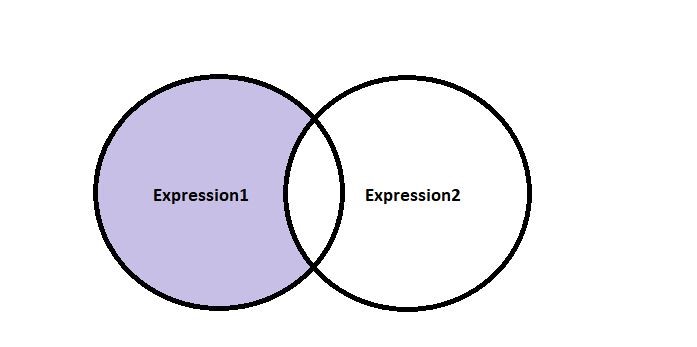
If you look at the above SQLite Except clause pictorial representation, it will return the records that are in the color shaded area. This indicates that the Except clause will provide all of the records from the first Select statement except those that are in the second Select statement.
Syntax of the Except clause in SQLite:
The SQLite Except clause is used with a select statement in the following pattern:
FROM TABLE_NAME
[WHERE condition]
EXCEPT
SELECT column_Name1, column_Name2,..., columnn_Name_n
FROM TABLE_NAME
[WHERE condition];
We recognized two Select queries with the Except operator in SQLite, as you can see above. In this case, the SQLite Except operator produces entries of the first SELECT query that do not occur in the second Select query. We specified some of the attributes that are used in the Except operator syntax above:
Column: You want to compare the columns or operations between both the SELECT statements. For each of the Queries, the fields do not have to be the same, but the related columns must be of similar data types.
Table_Name: The Table_Name out of which you would like to retrieve records. The FROM clause must mention at least one table.
WHERE condition: The Where condition is Optional here. We used the Where condition for the criteria that should be required for records to be chosen.
Create Tables for the Except clause:
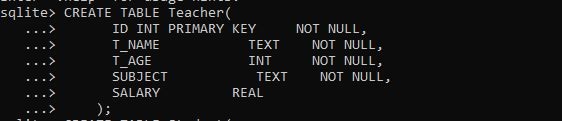
We should first construct tables in the database before we can use the Except clause. We have created a table “Teacher” and set its fields as mentioned in the figure.
The insert query is used in the following figure to insert the record in the table “Teacher”.

From the SELECT query, we can fetch the table record as follows:

As we have created the table “Teacher”. Now, we are required to make another table for the except clause. For this, we have created the second table in the existing database as “Student”. The fields are set for the table “Student” as mentioned below.

Then, we have inserted the entries for the table “Student” by utilizing the insert query as follows:

You can see the record in the ‘’Student” table in the following prompt shell.

Example 1: Program of using SQLite Except clause with the single expression:
For that basic SQLite query, we will examine how to use the SQLite Except clause in Select statements with a single column. Within our SQLite shell, we provided our first SELECT expression that included the field ID from the table “Student” and then we used the Except clause. After that, the second SELECT expression is utilized to select the same field ID but from the table “Teacher”. This example of the EXCEPT clause retrieves all ID entries from the table Student but not from the table Teacher. This means that if an ID value was present in both the Student and Teacher tables, the ID value would not appear in the EXCEPT query data.
As the ID “6” is a unique ID found in the table Student so it is displayed in the output here:
FROM Student
EXCEPT
SELECT ID
FROM Teacher;

Example 2: Program of using SQLite Except clause with the multiple expression:
Next, let’s examine a case of an SQLite EXCEPT query that returns multiple columns. Here, we have two SELECT expressions with the WHERE condition. We have taken the fields ID, St_NAME, SUBJECT, and CGPA from the table student. Then, we applied a WHERE condition that only displays the record whose CGPA is greater than and equal to “3.0”. We have a second SELECT expression which selects the column ID, T_NAME, T_AGE, and SUBJECT from the table Teacher. The second SELECT expression uses the WHERE condition that fetched the record from the table Teacher where the SUBJECT is equal to Computer. In between these two SELECT expressions, we have an EXCEPT clause that returns only the record of the table Student with the specified field values but not the field values matched with the Teacher table.
FROM Student
WHERE CGPA >= 3.0
EXCEPT
SELECT ID, T_NAME, T_AGE ,SUBJECT
FROM Teacher
WHERE SUBJECT = 'Computer';

The output from the Except query is as follows:

Example 3: Program of using SQLite Except for clause with ORDER BY clause:
Here, we have used the Except clause along with the order by descending order. First, we have defined two SELECT expressions with the different fields from the table Student and Teacher. These SELECT expressions are called the except clause in between them. As the field names in the two SELECT expressions differ, it’s preferable to refer to the fields in the ORDER BY clause by their result set position.
FROM Student
WHERE SUBJECT = 'Science'
EXCEPT
SELECT ID, T_NAME, SUBJECT
FROM Teacher
WHERE ID < 4
ORDER BY 1 DESC;

We have successfully retrieved the record from Except query in descending order as follows:

Conclusion:
This is how we may utilize the SQLite Except clause to retrieve data from Select statements that match our conditions. We have provided a quick introduction with a pictorial representation in this post. Also, described the syntax of except clause and used this syntax in the example to show the results. We can use the except clause for the single column and multiple columns. The order by clause is also used with the except clause for the sorted results.
Source: linuxhint.com