Salesforce Conditional Rendering in LWC
Salesforce Spring 23 released the “lwc:if”, “lwc:elseif”, and “lwc:else” conditional directives which provides the functionality that is similar to the “if:true” and “if:false” directives. But we can utilize them still. As we know, the LWC component is a combination of an HTML file, Javascript file and Meta-XML file.
Conditional Rendering in LWC
- The conditions have to be specified inside the HTML file. It is included within the tag that is assigned with property.
- The component/s that are specified within this <template> tag are displayed on UI if the condition becomes true. We can handle the property in the “Javascript” file.
- It is good to declare the property value to false in the “Javascript” file. When the LWC is loaded in the UI, the component will not be displayed (as the condition is false).
- We need to make the property to true for the component to be displayed in the handler method.
If:true and If:false
These directives are used to insert/remove the DOM elements by binding the data to the template.
Syntax:
Let’s see how to specify the “if:true” and “if:false” directives.
- <template if:true={property}>
…
…
</template> - <template if:false={property}>
…
…
</template>
Example 1: If:true
Create an LWC that displays the course information if the checkbox is selected. Otherwise, the course information will not be displayed.
- First, we create an HTML component that holds one checkbox with the “View our tutorial” label with the “handleTutorial” handle functionality.
- Then, we assign the “displaydata” property to the “if:true” directive.
- A Python string is declared in the “Javascript” file that is rendered if this property is true.
- In the “Javascript” file, we set this property to false. When LWC is loaded, it will be false by default.
- Inside the “handle” method, we set the checkbox to true using the “event.target”.
ifTrueExample.html
<div style="width: 500px">
<lightning-card title="Welcome to LinuxHint">
<div class="slds-m-around_medium">
<lightning-input type="checkbox" label="View our tutorial" onchange={handleTutorial}></lightning-input>
<template if:true={displaydata}>
<div class="slds-m-vertical_medium">
{python}
</div>
</template>
</div>
</lightning-card>
</div>
</template>
ifTrueExample.js
export default class IFTrueExample extends LightningElement {
// This message is displayed when the DOM is inserted.
python ='PySpark, Pandas are our best Python tutorials.';
// Set property to false
displaydata = false;
// Handle the event by setting the checkbox to true.
handleTutorial(event) {
this.displaydata = event.target.checked;
}
}
ifTrueExample.js-meta.xml
<LightningComponentBundle xmlns="http://soap.sforce.com/2006/04/metadata">
<apiVersion>57.0</apiVersion>
<isExposed>true</isExposed>
<targets>
<target>lightning__RecordPage</target>
<target>lightning__AppPage</target>
<target>lightning__HomePage</target>
</targets>
</LightningComponentBundle>
Output:
Add this LWC to your record page of any object.
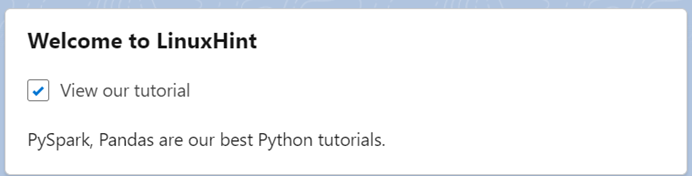
The checkbox is unchecked.

The checkbox is checked.
Example 2: If:false
Utilize the previous LWC by making changes to HTML. Change the directive to false in the HTML file.
ifFalseExample.html
<div style="width: 500px">
<lightning-card title="Welcome to LinuxHint">
<div class="slds-m-around_medium">
<lightning-input type="checkbox" label="Hide our tutorial" onchange={handleTutorial}></lightning-input>
<template if:false={displaydata}>
<div class="slds-m-vertical_medium">
{python}
</div>
</template>
</div>
</lightning-card>
</div>
</template>
ifFalseExample.js
export default class IFFalseExample extends LightningElement {
python ='PySpark, Pandas are our best Python tutorials.';
// Set property to false
displaydata = false;
// Handle the event by setting the checkbox to true.
handleTutorial(event) {
this.displaydata = event.target.checked;
}
}
Output:
Add this LWC to your record page and test the component.
The checkbox is unchecked. So, the condition is true. The message is rendered.
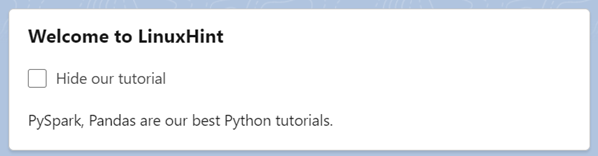
The checkbox is checked. The message is hidden.

Example 3: If:true and If:false
If displaydata=true, we display the Python detail. Otherwise, the Java details are displayed (displaydata=false). The “Example.js-meta.xml” is the same as in Example 1.
Example.html
<div style="width: 500px">
<lightning-card title="Welcome to LinuxHint">
<div class="slds-m-around_medium">
<lightning-input type="checkbox" label="Python tutorial" onchange={handleTutorial}></lightning-input>
<template if:true={displaydata}>
<div class="slds-m-vertical_medium">
{python}
</div>
</template>
<template if:false={displaydata}>
<div class="slds-m-vertical_medium">
{java}
</div>
</template>
</div>
</lightning-card>
</div>
</template>
Example.js
export default class Example extends LightningElement {
python ='PySpark, Pandas are our best Python tutorials.';
java='Java - Spring, Java Collections';
// Set property to false
displaydata = false;
handleTutorial(event) {
this.displaydata = event.target.checked;
}
}
Output:
Add this LWC to your record page and test the component.
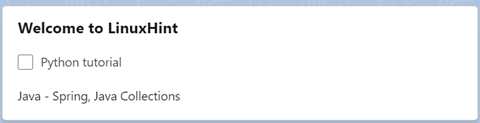
The checkbox is unchecked. So, the condition is false. It goes to the false block and the Java message, “Java – Spring, Java Collections”, is rendered.
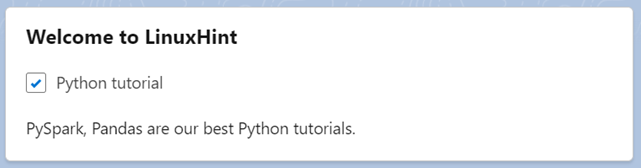
The checkbox is checked now. So, the condition is true. It goes to the true block and the Python message, “PySpark, Pandas are our best Python tutorials”, is rendered.
Lwc:if
This directive is used to insert/remove the DOM elements by binding the data to the template that is similar to the previously discussed directives. If the property is true, the component inside this template will be rendered.
Syntax:
Let’s see how to specify this directive.
<template lwc:if={property}>
…
…
</template>
Example:
Create the “ifExample” LWC that displays the course information if a button is clicked. It hides the information again when the button is clicked.
- First, we create an HTML component that holds one button with the “handleTutorials” handle functionality. The button label will be changed dynamically. It is set to “View Python Tutorials” by default.
- Then, we assign the “displayDetails” property to the “lwc:if” directive.
- A Python string is declared in the “Javascript” file that is rendered if this property is true.
- In the “Javascript” file, we set this property to false. When LWC is loaded, it is false by default.
- Inside the “handleTutorials” method, we enable the content by setting the “displayDetails” to true and the button label to “Hide Python Tutorials”.
ifExample.html
ifExample.js
export default class IfExample extends LightningElement {
python = 'Go to Linuxhint and look at Python category...';
// Set displayDetails to false
displayDetails = false;
// Declare the label
label_acc = 'View Python Tutorials';
// When you click the button with label - 'View Python Tutorials', displayDetails is set to true
// and the button will be updated to 'Hide Python Tutorials'.
// Similarly, when you click the button with label - 'Hide Python Tutorials', displayDetails is set to false
// and the button will be updated to 'View Python Tutorials'.
handleTutorials() {
this.displayDetails = !this.displayDetails;
this.label_acc = this.displayDetails ? 'Hide Python Tutorials' : 'View Python Tutorials';
}
}
ifExample.js-meta.xml
<LightningComponentBundle xmlns="http://soap.sforce.com/2006/04/metadata">
<apiVersion>57.0</apiVersion>
<isExposed>true</isExposed>
<targets>
<target>lightning__RecordPage</target>
<target>lightning__AppPage</target>
<target>lightning__HomePage</target>
<target>lightning__Tab</target>
</targets>
</LightningComponentBundle>
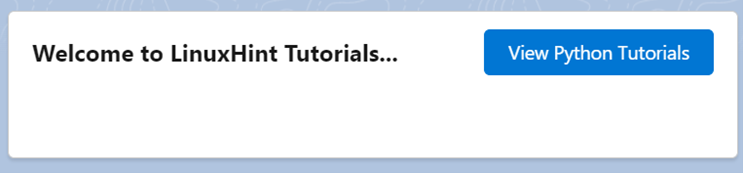
Output:
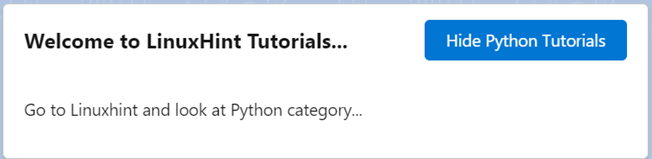
When LWC is added to the page, the message is hidden with a “View Python Tutorials” label.
If we click the button, the message is displayed and the button label is updated to “Hide Python Tutorials”.
Lwc:else
If the property is false in the “lwc:if”, the component under “lwc:else” is rendered. It won’t take any property.
Syntax:
Let’s see how to specify this directive.
…
…
</template>
<template lwc:else>
…
…
</template>
Example:
Create the “ifelseExample” LWC that displays the Python course information if a button is clicked. It shows the information related to the Java course again when the button is clicked.
- First, we create an HTML component that holds one button with the “handleTutorials” handle functionality. The button label will be changed dynamically. It is set to “View Python Tutorials” by default.
- Then, we assign the “displayDetails” property to the “lwc:if” directive.
- Two strings, Python and Java, are declared in the “Javascript” file such that Python is rendered if this property is true. Otherwise, Java is rendered.
- In the “Javascript” file, we set this property to false. When LWC is loaded, it is false by default. So, Java is rendered by default.
- Inside the “handleTutorials” method, we enable the Python content by setting the “displayDetails” to true and the button label to “View Java Tutorials”.
We can utilize the previous “meta.xml” example for this “ifelseExample.js-meta.xml” also.
ifelseExample.html
<div style="width: 500px">
<lightning-card title="Welcome to LinuxHint Tutorials...">
<p class="slds-p-around_medium">
<template lwc:if={displayDetails}>
{python}
</template>
<template lwc:else>
{java}
</template>
</p>
<lightning-button variant="brand" slot="actions" label={label_acc} onclick={handleTutorials}></lightning-button>
</lightning-card>
</div>
</template>
ifelseExample.js
export default class IfElseExample extends LightningElement {
python = 'Go to Linuxhint and look at Python category...';
java = 'Go to Linuxhint and look at Java category...';
// Set displayDetails to false
displayDetails = false;
// Declare the label
label_acc = 'View Python Tutorials';
// Handle the button
handleTutorials() {
this.displayDetails = !this.displayDetails;
this.label_acc = this.displayDetails ? 'View Java Tutorials' : 'View Python Tutorials';
}
}
Output:
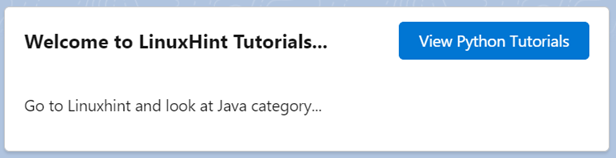
When LWC is added to the page, the Java message is displayed with the “View Python Tutorials” label. Since the property value is set to false, the “lwc:if” directive fails and the component inside the “lwc:else” block is rendered.
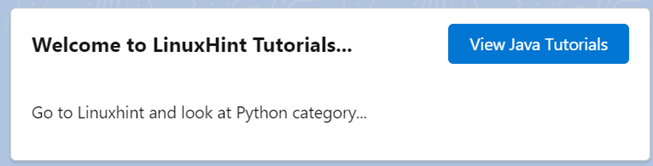
If we click the “View Python Tutorials” button, the Python message is displayed and the button label is updated to “View Java Tutorials”.
Lwc:elseif
This directive becomes true if “lwc:if” is false. The component with this directive is rendered on the UI.
Syntax:
Let’s see how to specify this directive.
<template lwc:if={property}>
…
…
</template>
<template lwc:elseif>
…
…
</template>
Example:
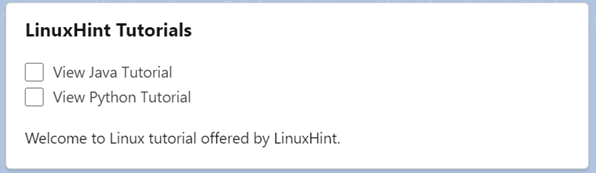
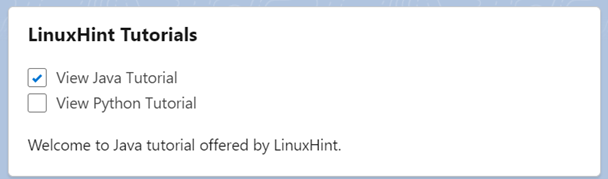
Create the “Example3” LWC that displays the Python course information when the “View Python Tutorial” is checked. The Java course information is displayed when the “View Java Tutorial” is checked. In other cases, the Linux info is displayed.
- First, we create an HTML component that holds two checkboxes with the two handle functionalities – “handleJava” and “handlePython”.
- The “javaDetails” property is passed in the “lwc:if” directive and renders the “Welcome to Java tutorial offered by LinuxHint” message if the first checkbox is checked. We make this checkbox checked using the target variable. Also, we uncheck the second checkbox.
- The “pythonDetails” property is passed in the “lwc:elseif” directive and renders the “Welcome to Python tutorial offered by LinuxHint” message if the second checkbox is checked. We make this checkbox checked using the target variable. Also, we uncheck the first checkbox.
- If any of the previous conditions fail, the “Welcome to Linux tutorial offered by LinuxHint.” message renders is specified in the “lwc:else” directive.
We can utilize the previous “meta.xml” example for this “ifelseExample.js-meta.xml” also.
Example3.html
<div style="width: 500px">
<lightning-card title="LinuxHint Tutorials">
<div></lightning-input>
<lightning-input type="checkbox" label="View Python Tutorial" onchange={handlePython}></lightning-input>
<template lwc:if={javaDetails}>
<div class="slds-m-vertical_medium">
Welcome to Java tutorial offered by LinuxHint.
</div>
</template>
<template lwc:elseif={pythonDetails}>
<div class="slds-m-vertical_medium">
Welcome to Python tutorial offered by LinuxHint.
</div>
</template>
<template lwc:else>
<div class="slds-m-vertical_medium">
Welcome to Linux tutorial offered by LinuxHint.
</div>
</template>
</div>
</lightning-card>
</div>
</template>
Example3.js
export default class Example3 extends LightningElement {
javaDetails = false;
pythonDetails = false;
// Handle this event by setting javaDetails to true and pythonDetails to false.
handleJava(event) {
this.javaDetails = event.target.checked;
this.pythonDetails != event.target.checked;
}
// Handle this event by setting pythonDetails to true and javaDetails to false.
handlePython(event) {
this.pythonDetails = event.target.checked;
this.javaDetails != event.target.checked;
}
}
Output:
1. Nothing is checked. The component under “lwc:else” is rendered.
2. The first checkbox is checked. The component under “lwc:if” is rendered.
3. The second checkbox is checked. The component under “lwc:elseif” is rendered.

Conclusion
We learned how to render the HTML component conditionally by specifying the LWC directives like “if:true”, “if:false”, “lwc:if”, “lwc:elseif”, and “lwc:else”. The “lwc:if”, “lwc:elseif”, and “lwc:else” replaces the “if:true” and “if:false” directives after the Salesforce spring release 23. All are explained with examples with good screenshots. For better understanding, we had taken similar examples in all the scenarios.
Source: linuxhint.com