NumPy Slice 2D Array
Slicing is one of the important functions of NumPy which is used to extract the data from one index to another index by passing the objects in the slice() function.
Slicing is a process that is used to slice the sequence of the data through slice objects. In simple words, slice means to select or retrieve some sort of data/elements from the input array. We use the (:) in the slice() function to tell the compiler the start index and the end index of the input array so that we get the desired output.
Syntax:
Let’s understand how to write and implement the slice() function on the input 2-dimensional array. First, we write the array name that we already created. Then, we write the row index of the input array that we want to slice. We use “:” to tell the start index before “:” and then tell the end index after the “:”. Then, we tell the column index of the input array before “:”. We write the column start from where we want to start the column slicing and we write the column end after the “:”.

Parameters:
start: It tells us the starting index of the input array that we want to slice. The start index is by default 0 and is included in the slicing.
end: It tells us the end index of the input array that we want to slice. The end index tells the length of the input array and is not included in the slicing.
step: The default object of the slice() function and its value are 1.
Return Value:
In return, the slice() function gives the sliced array. This means it gives us the retrieved data which we want to get through the slice() function of the NumPy.
Example:
Here is the first simple example of the NumPy slice() function. To implement the code, we need a Python compiler. Open any Python compiler to implement the 2D slice() function code.
First, we import the library which we use to implement the slice() function. As you know, the slice() function is one of the functions of the Python module, NumPy. We write the “import” keyword which tells the compiler that we want to import the library. Then, we write the library name that we want to import which is NumPy. Then, we write the alias of the NumPy which is np.
After importing the NumPy library, we write the actual line of code that we want to implement. We use the print() method to display the message that tells the user that we are going to implement the slice() function on the 2-dimensional array. As you have noticed, we use the “\n” which is called the format specifier that is used to enter the new line in the displaying output. It always writes in double quotation marks in Python.
Then, we create an input 2-dimensional array by utilizing the array() function. But before calling the array() function, we write the NumPy alias which shows that it is the function of the Python module, NumPy. And then, we store this array in another variable which is named “array”. We can avoid repeatedly writing the entire code by doing this. We just simply call the function through its name anywhere in the program. Then, we use the print() method again to display the array that we created recently and display the message related to the array so that the user can understand easily what we are doing in this example.
print("Implementation of slice() function on 2D Array: \n")
array = np.array([[3, 5, 7, 9, 11],
[2, 4, 6, 8, 10],
[7, 9, 31, 0, 9]])
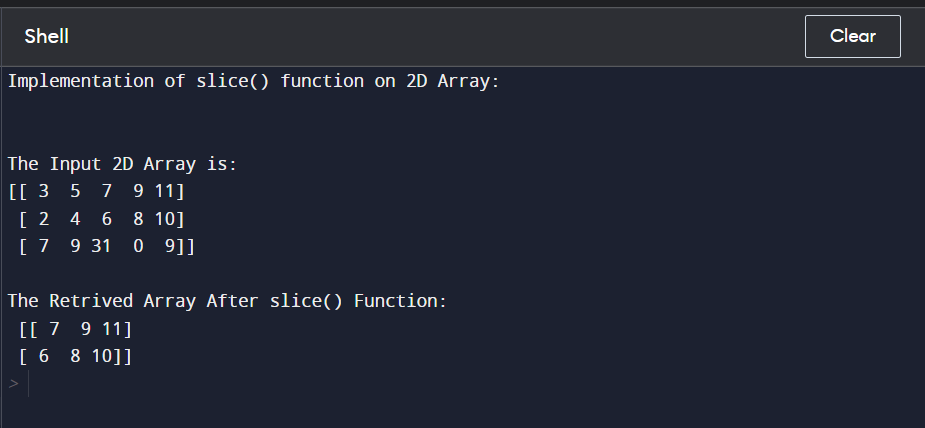
print("\nThe Input 2D Array is: \n", array)
slice_array = array[0:2, 2:5]
print("\nThe Retrived Array After slice() Function: \n", slice_array)
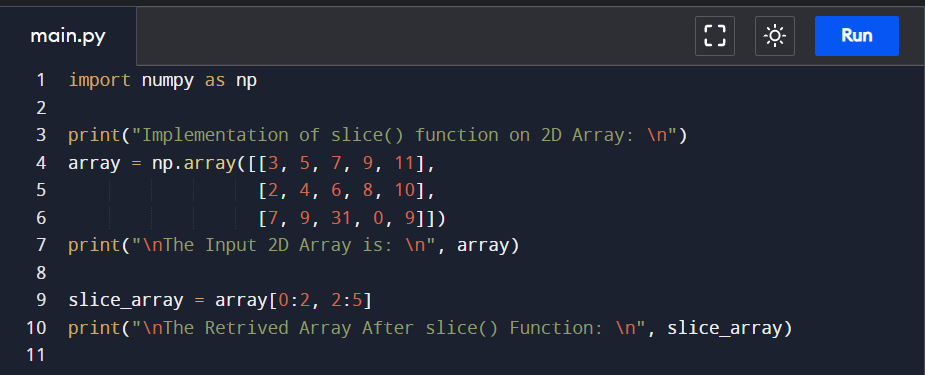
After creating the array, we use the slice() function to retrieve the data taht we want from the array by giving the index of the array. As you can see in line 9, we first have to write the array name that we previously created which is “array”. Then, in the array brackets, we pass the objects of the array which are the row and the column of the array. To pass the row, we give the start row index and the end row index and separate them using the colon symbol “:”. The same as what we use for the column. We store the array in another array which is the “sliced_array”.
Then, we display the array by passing the slice_array in the print() method and display the related message to the slice() function in double quotation marks. Let’s look at the output of the slice() function that we previously implemented:
Now, let’s start doing the changes in the slice_array and see what we retrieve by doing this:
print("\nThe Retrieved Array After slice() Function: \n", slice_array)

In this code, we only give the row starting value and the column starting value before the “:”. And we give nothing after the “:”. Then, we print the slice_array using the print() method. As you can see in the following illustration, the output that we get from the previous output changed. Now, we only retained two rows and two columns from the input 2-dimensional array.

Now, let’s do another example by giving the row end and the column end to the array. In this code, we only pass the row end value and column end value before the “:”.
print("\nThe Retrieved Array After slice() Function: \n", slice_array)

Let’s see what we get by altering the value of the parameters in the previous code. In this output, we get three rows and three columns from three rows and five columns of the input array.

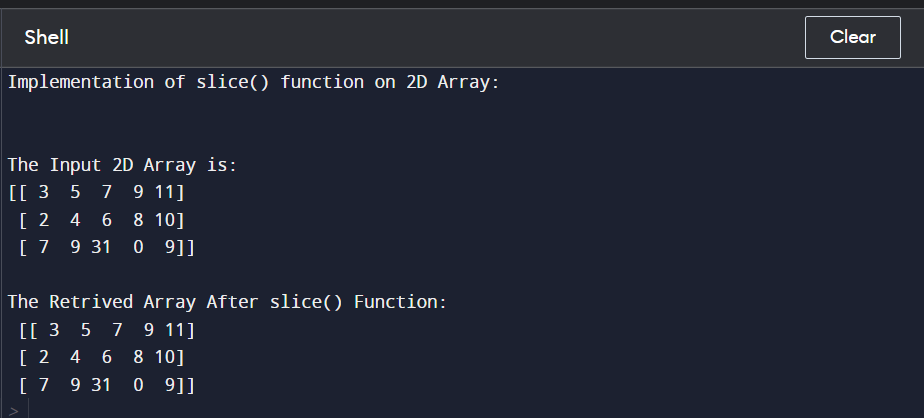
Now, let’s do the last change in the code and see what we get when we don’t pass any value to the row and the column of the array objects.
print("\nThe Retrieved Array After slice() Function: \n", slice_array)

Here is the output of the previously change code. Here, we get the same array since we have the input array:
Conclusion
In this article, we learned what the slice() function is and how to implement the slice() function on the 2-dimensional array. Then, we implemented the example with a detailed explanation of the code and implemented how to give the different values to the array objects.
Source: linuxhint.com