NMAP basics Tutorial
“This tutorial explains how Nmap works and how to install and use it from the terminal.
Nmap (Network Mapper) is probably the most used network scan, at least among Linux users.”
Nmap allows execute do the following tasks:
- Port scan
- IP range scan
- Hosts discovery
- Subnets scan
- Network problem diagnostics
- Vulnerability detection
- Vulnerability exploitation
This tutorial covers port scan, host discovery, and scanning IP ranges and subnets. In the end, the reader can continue with the links focused on Nmap for vulnerability detection and exploitation with the Nmap NSE (Nmap Scripting Engine).
The content is highly optimized for users without previous experience with Nmap. By reading this tutorial and applying the practical examples, the reader will acquire enough knowledge of how Nmap works, its usage, and output understanding to continue with the advanced usage readings recommended after this content.
All steps described below contain screenshots, making it easy for every Linux user to follow them independently of the experience level.
Index:
- Installing Nmap
- How Nmap basic scan types work
- Nmap port states and ports scan
- Defining targets in Nmap
- Host Discovery with Nmap
Installing Nmap (From Sources, Debian and RedHat Based Distros Repositories)
This section explains how to install Nmap on Debian based Linux distributions like Ubuntu, RedHat based Linux distributions like CentOS and from sources for all Linux distributions.
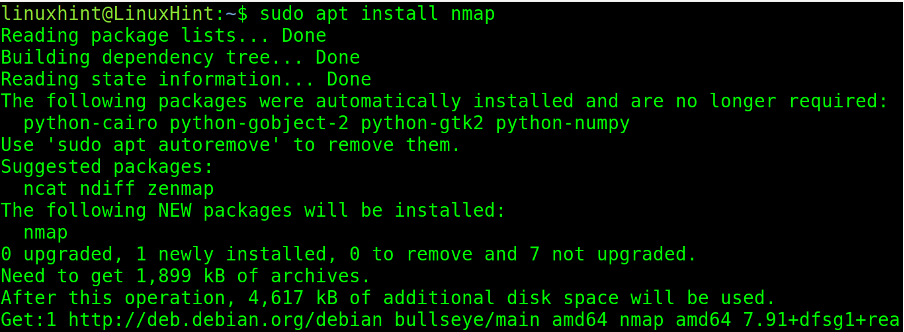
To install nmap on Debian based Linux distributions, execute the following command.
For RedHat based distributions, run the command shown in the screenshot below.

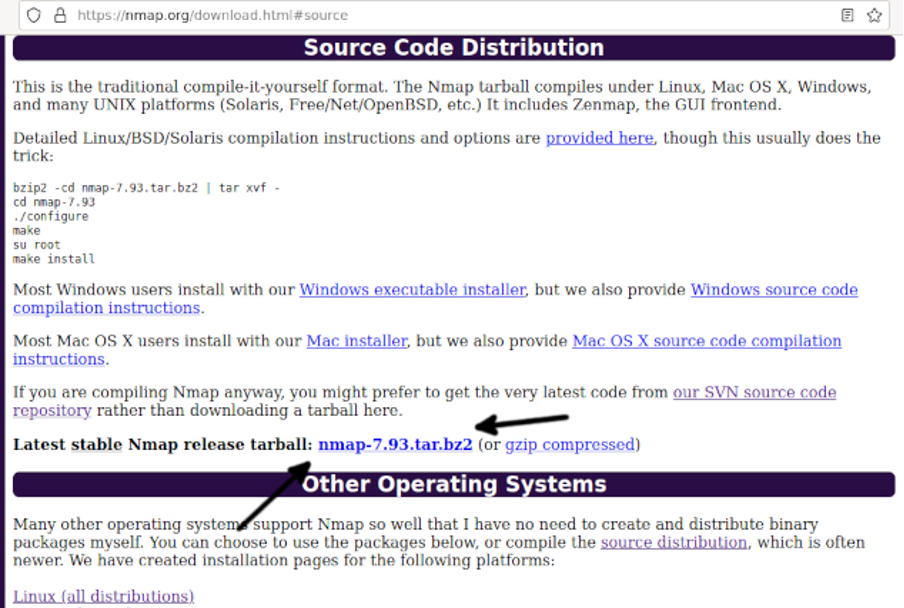
To compile Nmap from sources, visit https://nmap.org/download.html#source and download the last stable Nmap version from the link located in the section shown in the screenshot below (Arrow).
Once downloaded, extract the tar.bze2 file as shown below.
Note: Replace <7.93> with the downloaded Nmap version.

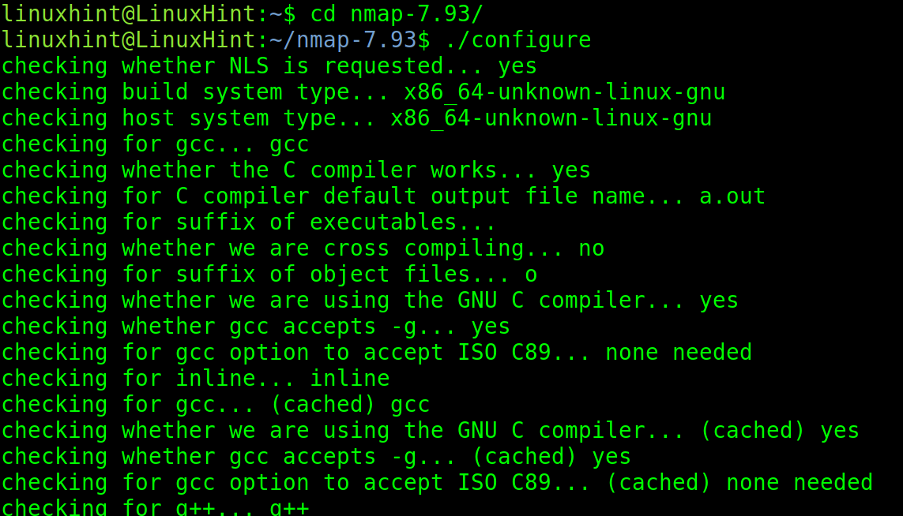
Once extracted, move into the nmap directory.
Execute the configuration script.
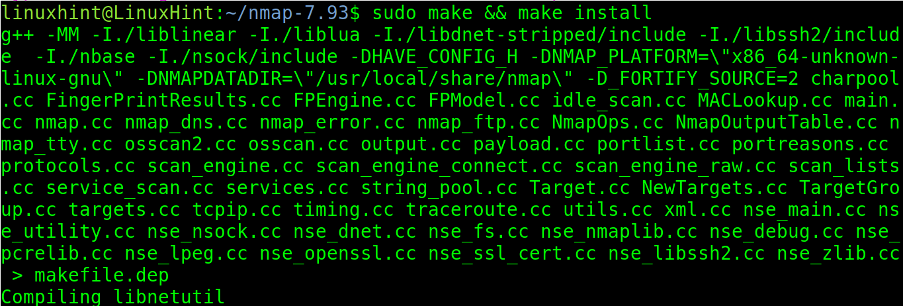
Finally, finish the compilation by executing make and make install.
How Nmap Basic Scan Types Work
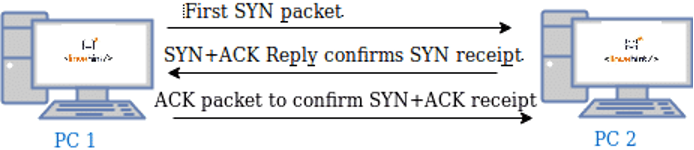
Regular Nmap scans are carried out through TCP and SYN scans. When the scan process is TCP, a connection is established with the target. With a SYN scan, the connection is canceled or dropped before getting established.
The following figure shows how connections are established: first, the computer (PC 1) trying to establish the connection sends a SYN packet requesting the destination device to synchronize. If the destination device (PC 2) is available to establish the connection, it replies with both another SYN packet allowing synchronization and with an ACK (Acknowledge) packet confirming the receipt of the first SYN packet sent by the computer which requested the connection, then the computer which requested the connection (PC 1) sends an ACK packet confirming the receipt of both the SYN and ACK packets sent by the destination device (PC 2).
When a connection is established, it is detected by firewalls and logged; that’s why the SYN scan was implemented, the SYN or Stealth scan sends a SYN packet, and after receiving the destination replies instead of replying back with an ACK packet, it sends a RST (reset) packet to cancel the connection before it was established as shown in the following image:
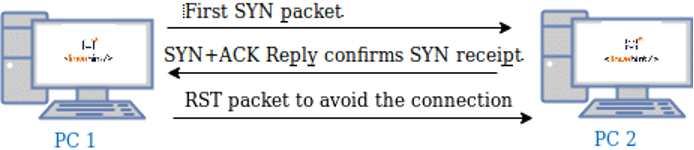
In this way, the connection isn’t logged, but you still need to deal with Intrusion Detection Systems with SYN packet detection capabilities. To avoid detection, you can use stealth scan techniques.
Nmap Scan Phases
Nmap goes through 11 stages during the scanning process depending on the passed flags; some of them are optional according to specified parameters. For example, pre and post-scan scripts are executed only if the user implements NSE for vulnerability detection or exploitation.
The 11 possible phases are listed below:
- Pre-scanning script: the “Script pre-scanning” option calls scripts from the Nmap Scripting Engine (NSE) for the pre-scanning phase; this stage only takes place when the NSE is used.
- Target enumeration: In this phase, Nmap processes information on the targets to scan, such as IP addresses, hosts, IP ranges, etc.
- Host discovery (ping scanning): Nmap learns what targets are online or are reachable.
- Reverse-DNS resolution: Nmap looks for hostnames for the IP addresses.
- Port Scanning: Nmap will discover ports and their status: open, closed, or filtered.
- Version detection: in this phase, nmap will try to learn the version of the software running in open ports discovered in the previous phase, like what version of apache or FTP.
- OS detection: nmap tries to detect the target’s OS.
- Traceroute: nmap will discover the target’s route on the network or all routes in the network.
- Script Scanning: This phase is optional; in this phase, NSE scripts are executed; NSE scripts can be executed before the scan, during the scan, and after it, but they are optional.
- Output: Nmap shows us information on the gathered data.
- Post-scanning script: optional phase if scripts were defined to run after the scan.
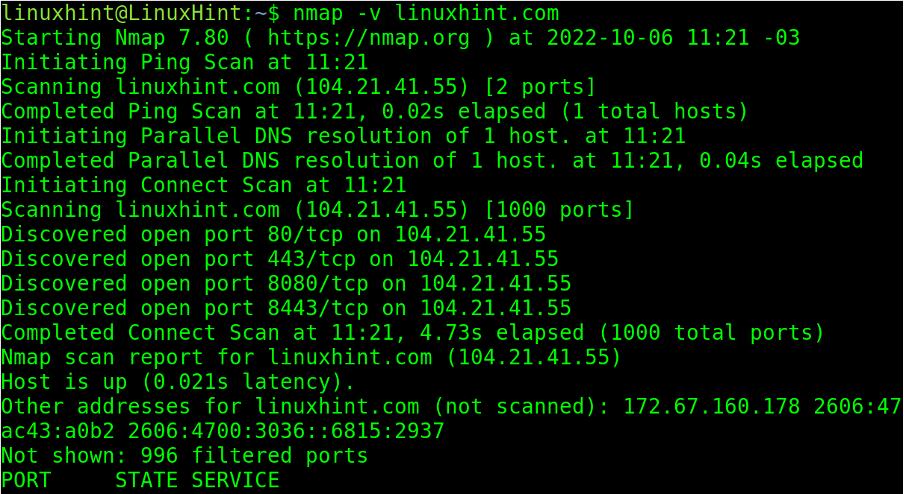
A simple nmap scan without a flag other than -v (Verbosity) will show some of the phases previously listed.
Note: When no ports are specified, by default, Nmap scans the most used 1000 ports, including all protocols.
Port States and Port Scan Types With Nmap
One of the main Nmap features is the capability to scan ports learning their state, the software version listening behind them, and even using ports as conditions for massive or multiple IP scans.
When scanning for services Nmap may report up to 6 states or conditions of the scanned ports:
- Open: the port is open, and an application is listening through it.
- Closed: the port is closed, and no application is listening.
- Filtered: a firewall prevents nmap from reaching the port.
- Unfiltered: Port is accessible, but nmap is unable to check its state.
- Open|filtered: Nmap is unable to determine if a port is open or filtered.
- Closed|Filtered: Nmap is unable to determine if a port is closed or filtered.
As said in the previous section. When the user does not specify ports, by default, Nmap scans the 1000 most popular and used ports.
The most basic Nmap flag to specify a port is -p, followed by the port number or protocol.
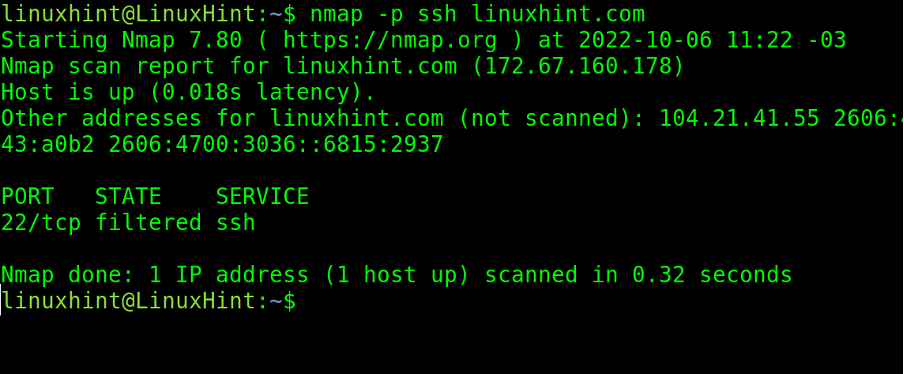
In the practical example below, the user scans port 22 on the target linuxhint.com.
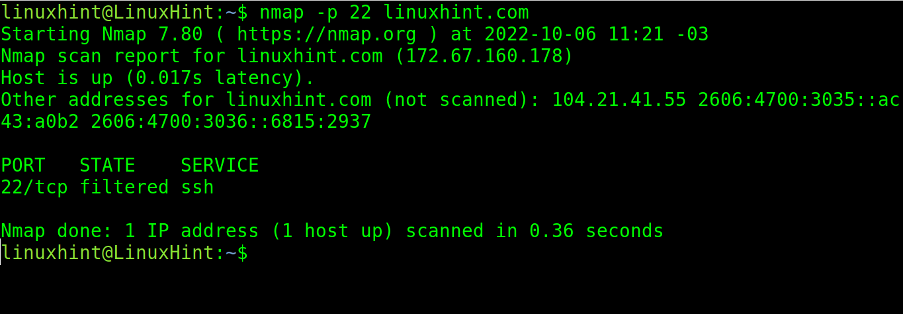
As you can see in the screenshot above, port 22 is filtered by a firewall.
Instead of the port number, the user can also define the protocol name. Below the user executes the same scan but specifies the protocol name ssh instead of port number 22.
There are flags and characters to define more than one specific port to scan. The comma (,) allows for defining different ports from different ranges.
In the screenshot below, the user uses commas to scan ports 22, 80, and 179. As you can see, port 80 was defined by its protocol name, http.
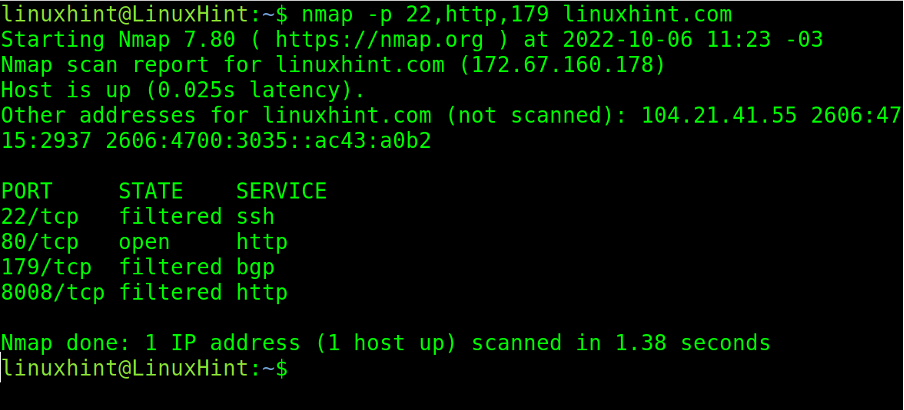
As you can see, port 80 was found open while the rest were filtered by a firewall.
The hyphen is an important character when scanning both port or IP ranges.
In the following example, a hyphen is implemented to define a port range between 21 and 30.

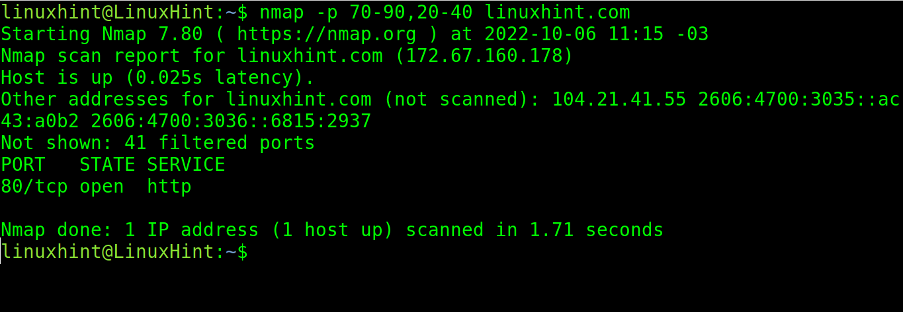
Nmap allows defining more than the ports range by implementing both commas and hyphens, as shown below, where port ranges from 70 to 90 and from 20 to 40 are scanned.
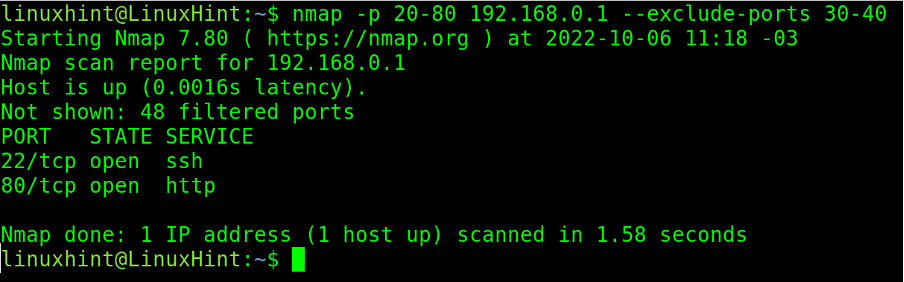
When scanning port ranges, the user can exclude specific ports or ranges from the scan process by implementing the –exclude-ports flag.
In the example below, the user scans the port range from port 20 to port 80 but excludes ports 30 to 40. The user also can exclude a single port or different ports separated by a comma.
If the user wants to scan all ports on the target, he has two options. He can define the whole range from 1 to 65535, as shown below.
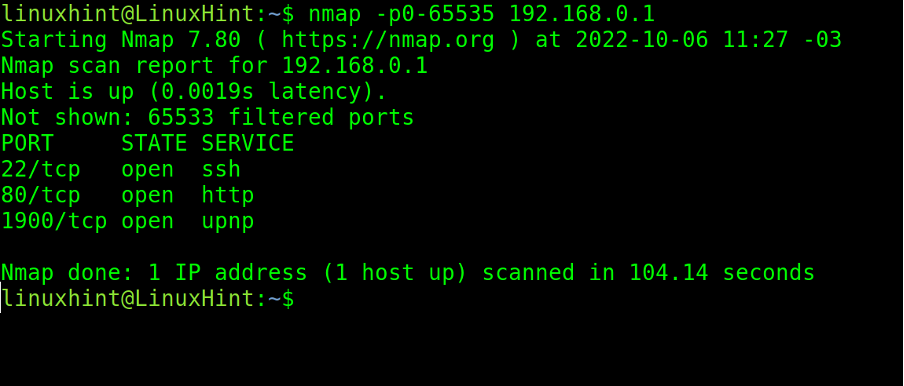
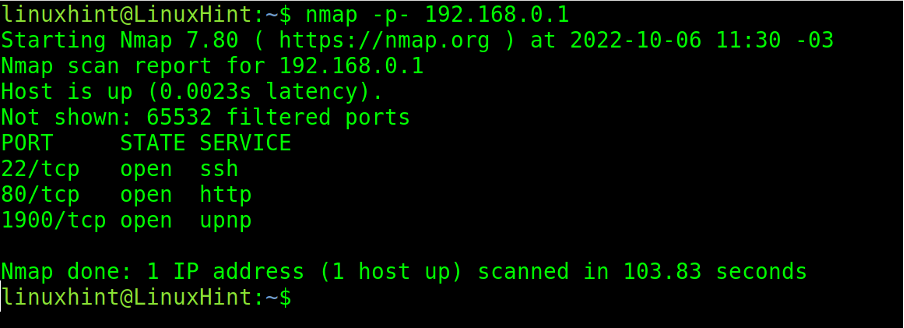
The most practical option to scan all ports is to implement two hyphens, before and after the p, as shown below.
Defining Targets in Nmap
This section describes different techniques to define scan targets, including multiple targets.
In the previous section, hyphens were used to define port ranges.
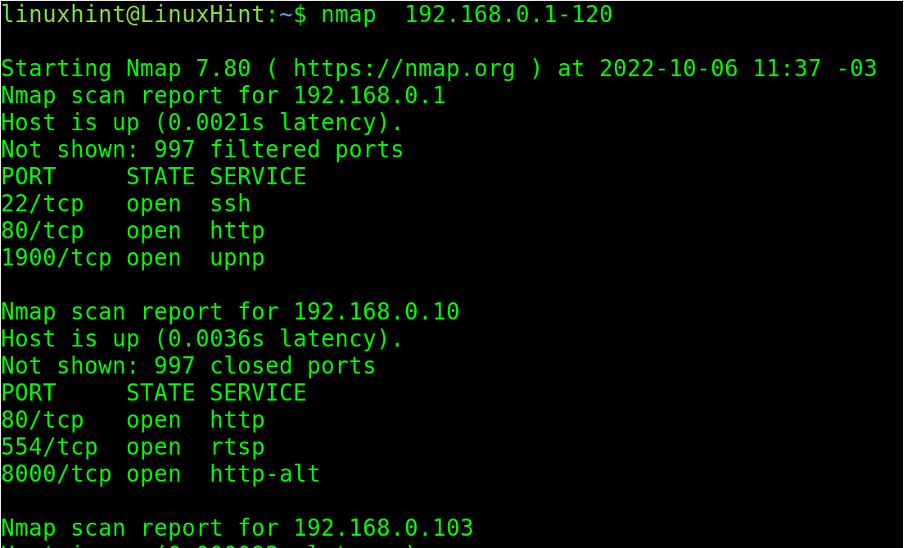
Hyphens can also be used to define IP ranges, as shown in the screenshot below, where the user defines an IP range starting from 192.168.0.1 and ending at 192.168.0.120.
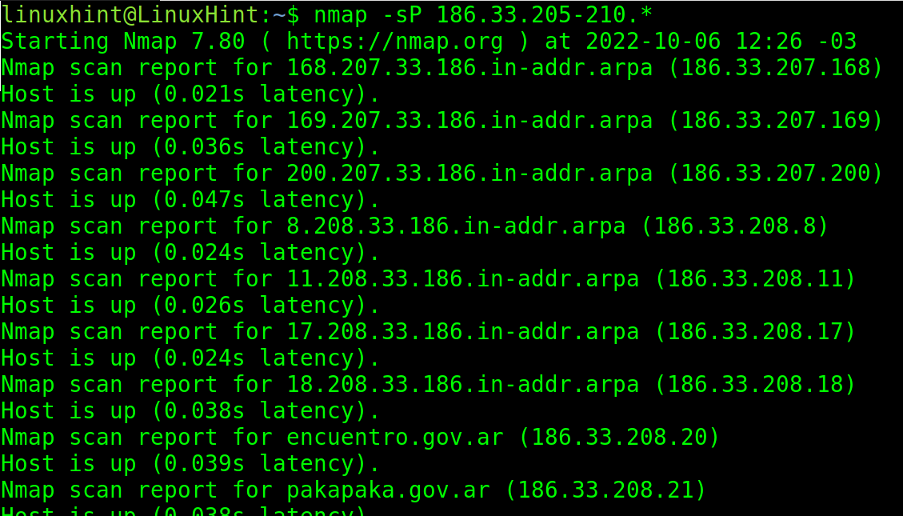
In the example below, two ranges are defined in the last two octets (200-210 and 80-90).
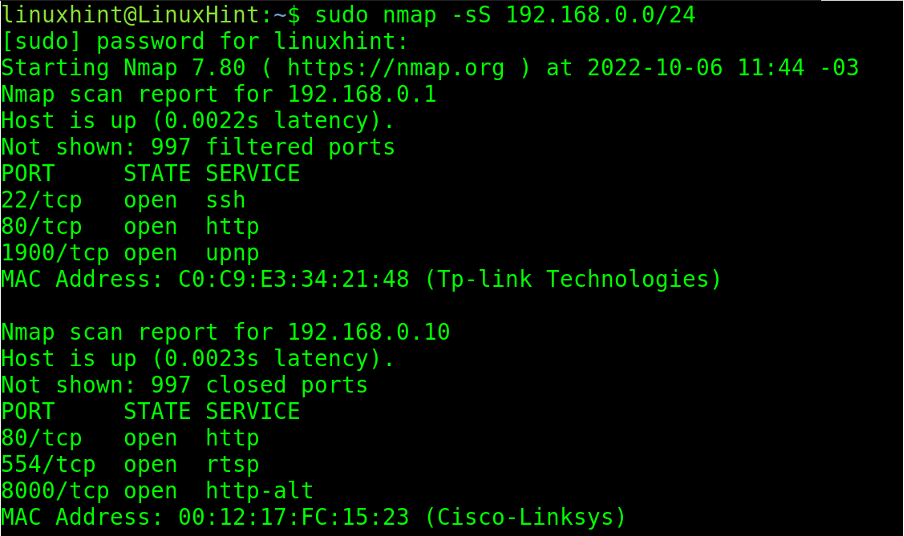
Users can use the CIDR format. In the example below, the subnet /24 is scanned.
The -sS flag instructs Nmap to execute a SYN scan undetected by firewalls.
Note: SYN scan requires root privileges.
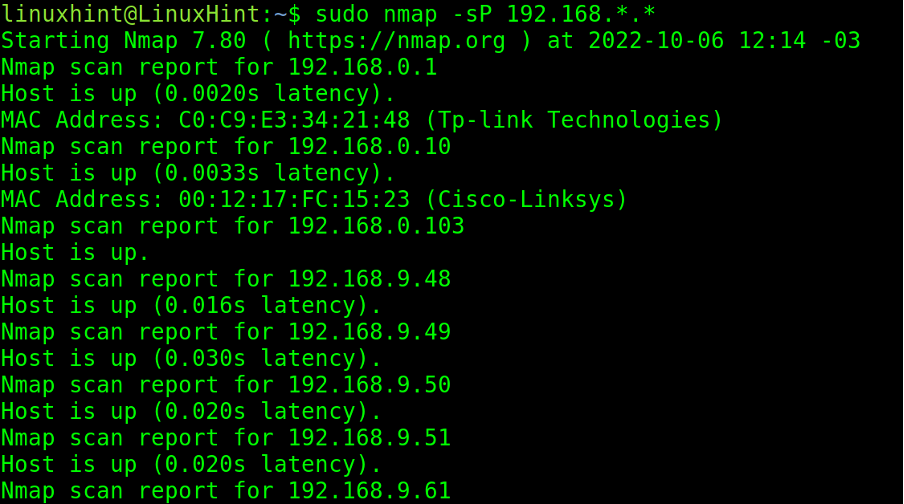
In the example below, the wildcard (*) is implemented to instruct Nmap to scan the whole last IP address octet, from 0 to 255.
The -sn (Ping sweep) flag instructs Nmap to omit port scan, limiting to host discovery.

In the next screenshot, the user implements two wildcards to scan the two last octets. The -sP (Ping sweep) flag is equivalent to the above (The -sn flag is replacing -sP),
Wildcards and hyphens can be combined for custom targets definition.
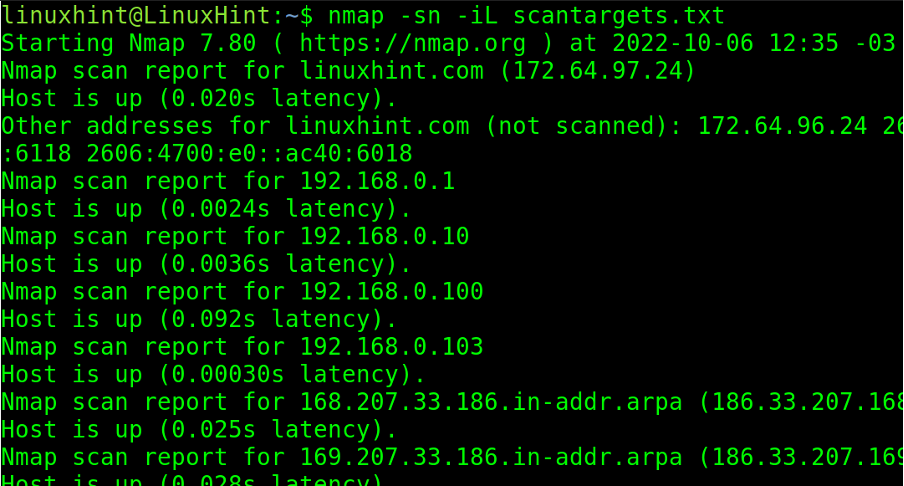
Targets can also be loaded from a target’s plain text list.
The following list is named scantargets.txt and contains a domain name, an IP address, a subnetwork, and IP ranges defined both with a hyphen and wildcard.
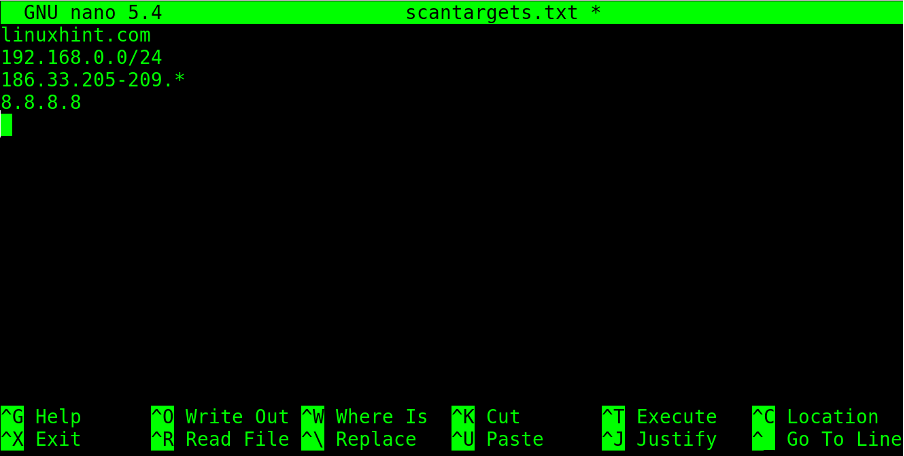
The -iL (List) flag followed by the path to the targets list will launch the scan against the listed targets in the file.
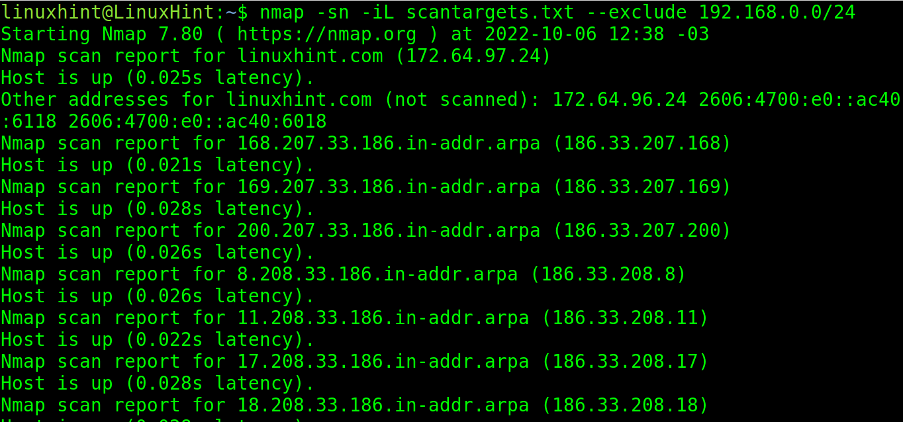
The user can scan targets defined in a list while excluding specific ones.
In the example below, the user scans targets defined in the scantargets.txt file, omitting the target 192.168.0.0/24 with the –exclude option.
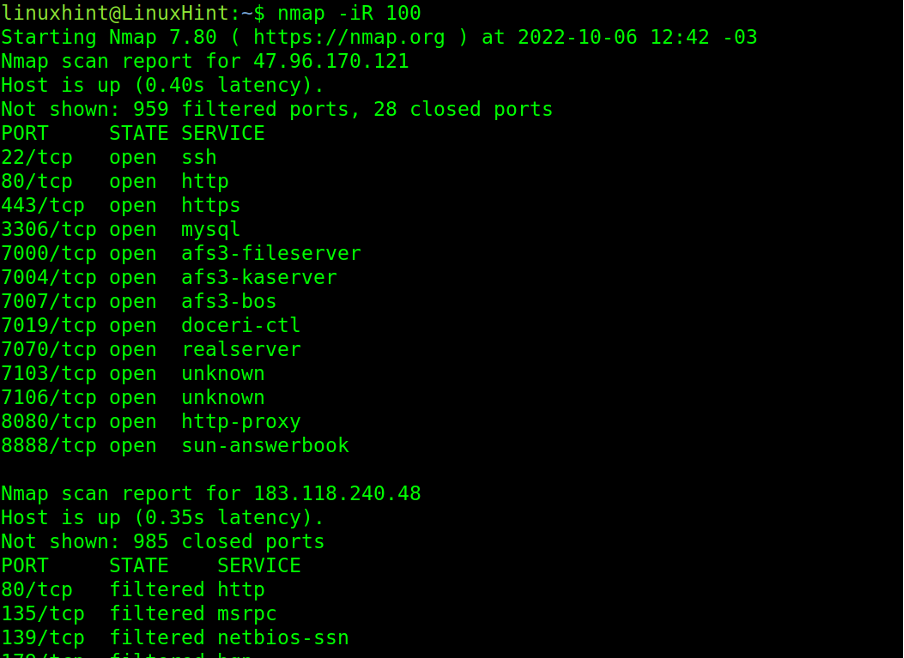
The -iR (Random) flag instructs Nmap to scan random targets. With this flag, Nmap scans randomly generated targets, many of which may be dead hosts.
This flag must be followed by the number of random targets the user wants to be generated.
In the example below, the -iR flag is used to scan 100 random targets.
Host Discovery With Nmap
Some host discovery options were already implemented in the previous section with flags -sn and -sP, which instruct Nmap to omit the port scan process, limiting itself to discovering alive hosts.
There are additional flags to execute discovery tasks with Nmap.
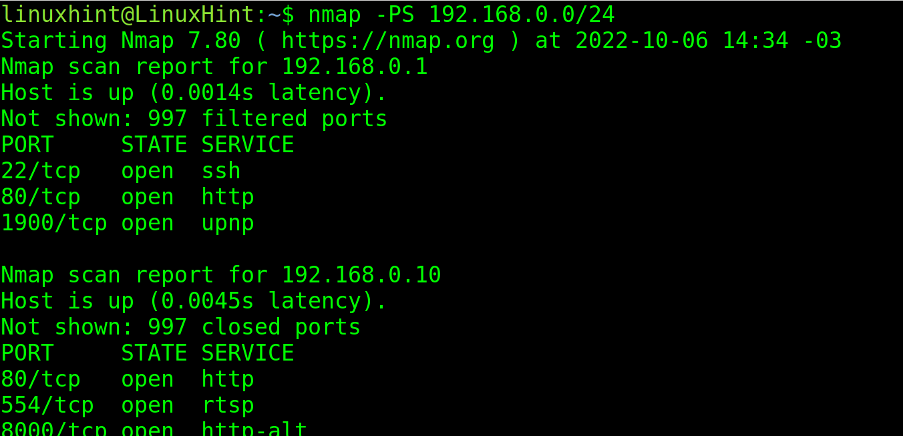
The -PS (SYN Ping) flag sends an empty TCP packet with the SYN flag set. In case the remote port is open when the target replies to a SYN/ACK packet, Nmap will cancel the connection by sending a RST packet instead of an ACK one.
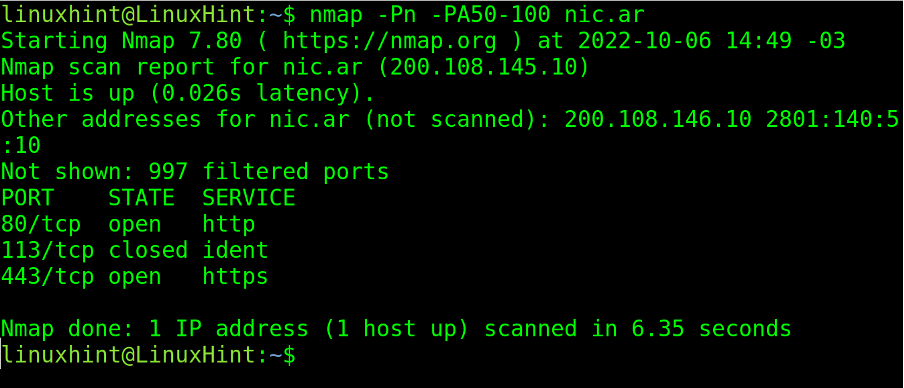
The PA (ACK Ping) sends a TCP packet with the ACK flag set. This packet sends acknowledgment messages to non-existent connections generating RST packets by the remote host, revealing its existence.
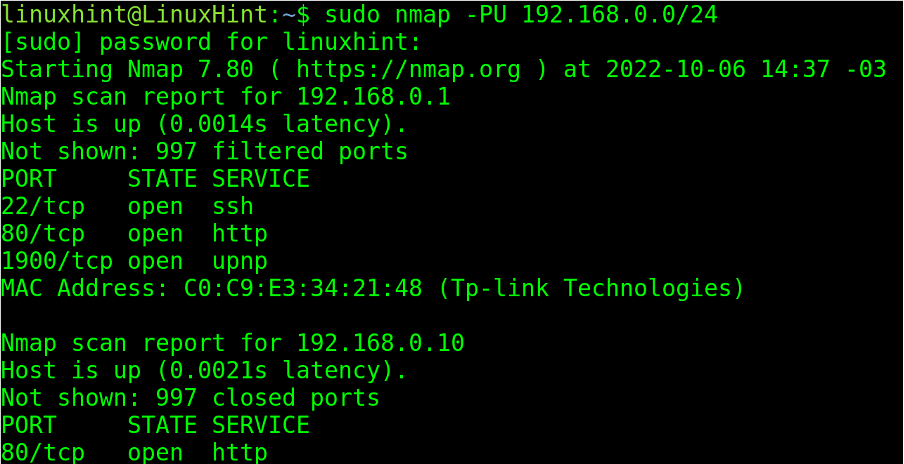
The -PU (UDP Ping) flag sends UDP packets to remote addresses. If ports are not specified, packets are sent to ports 40 and 125.
Sends IP packets with the headers of a different protocol. If not specified, by default, the headers are ICMP, IGMP, and IP-in-IP protocols.
The next recommended reading to continue with Nmap is Nmap flags and what they do, which describes additional flags and introduces the reader to the NSE (Nmap Scripting Engine).
Conclusion
As you can see, Nmap is a very powerful tool but easy to learn. Every network user dealing with a terminal can get started by following examples like the one offered above.
Other Nmap functionalities like traceroute can be used to diagnose network problems, or the NSE suite can be used to detect and exploit vulnerabilities.
The instructions in this tutorial are valid for all Linux distributions. It is highly recommended to apply all given examples in order to incorporate the knowledge.
Thank you for reading our Nmap basics tutorial. Keep following Linux Hint for more professional Linux and networking content.
Source: linuxhint.com