Mount and Use Google Drive on Linux Mint
The procedure through which the software of a computer makes the directories and files on a storage device (such as a hard disk, CD-ROM, or a network share accessible to users via the computer’s file system) is known as mounting. We will explain how to use Google Drive and mount it in Linux Mint in this article.
How to Utilize Google Drive and Mount it in Linux Mint
A drive or other storage appears to be integrated into the Linux file system through mounting, which is crucial for rights as well as other regulations. Google Drive on Linux Mint works just like it does on both Mac and Windows. Google offers a sizable number of free Cloud storage. New customers will still have access to approximately 15 GB. However, current users will have significantly more storage according to the bundle they choose. Utilizing Google Drive, we can safely save our files and access, view, or modify them from any device.
We will show you how to use gnome online accounts to mount Google Drive on Linux. The steps indicated below must be followed to accomplish this.
Let us open the Gnome Online Accounts application and add our Google account. To do this, click the Start button on the desktop, which is located on the right side of the button. As shown in the figure below, when we click the start button, a menu appears on the screen with a search bar at the top.

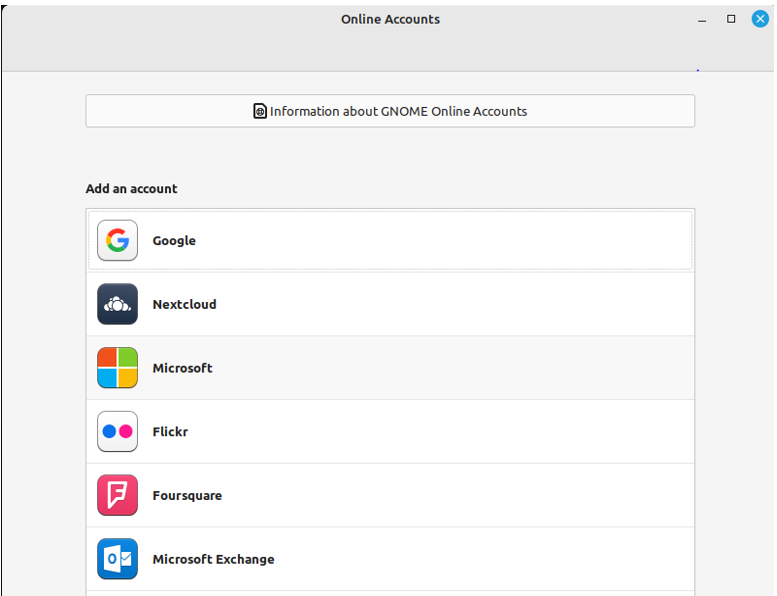
We will write “online account” in the search bar to look for it in the menu. When the “online account” option appears on the window screen, we click on that option to open it.

When you click “online account” the window shown in the screenshot will appear on the screen containing the information about Gnome google accounts. You must select “google” from the selections on this screen, which include a range of options.
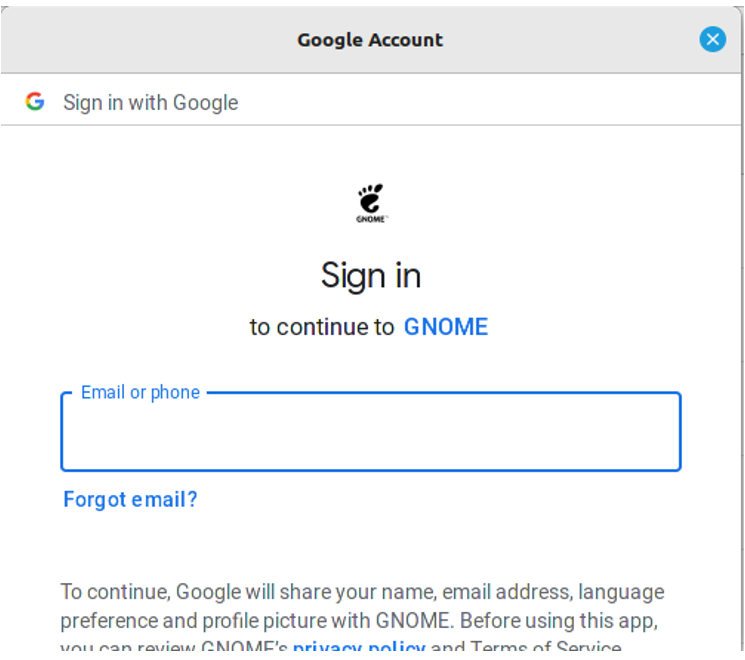
You will be prompted for your Gmail login information after clicking on Google, as shown in the image below. You must first provide your password and email address there. In the next step, you will be prompted to verify your account, which is an additional step that verifies that you are the one trying to log in.
When the authentication phase is complete, you must check the “Allow” box to show that you will accept Gnome.

The features you want to provide access to will be asked of you after your authentication. The features that are visible on the window screen include “Mail,” “Calendar,” “Contacts,” “Photos,” “Files,” and “Printers”. Here, you can choose whatever you want. Since this article is about mounting Google Drive in Linux, all that is required is that files be enabled. Thus, we merely switch on the “files” option. Make sure the switch next to the file is turned on and then close this dialogue box by clicking the cross button in the top left corner.

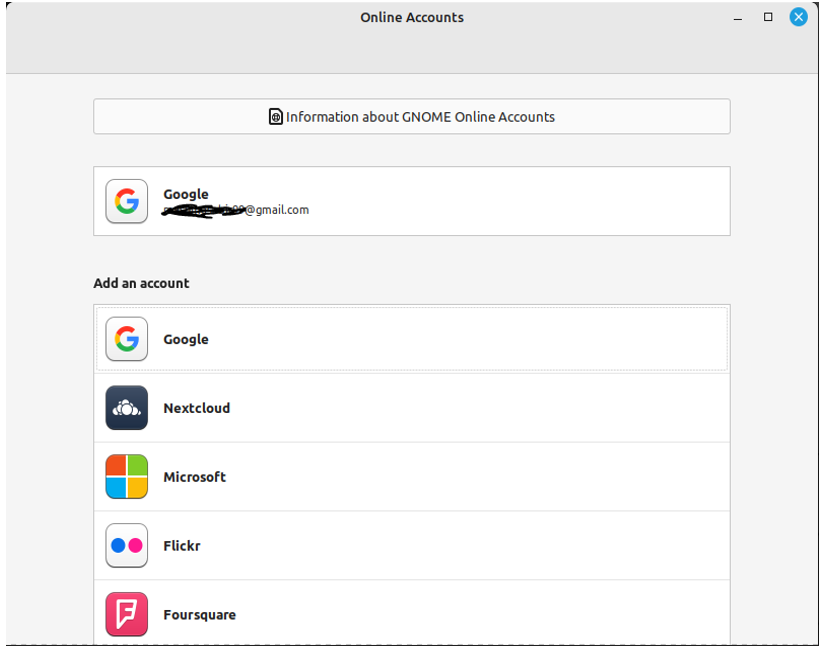
As shown in the screenshot below, your Google account is now successfully connected. When you reach this stage, Google Drive is ready for use.
Utilize the Linux GUI to Access Google Drive
This portion will demonstrate how to use the Linux GUI to access Google Drive. The term “Linux GUI” refers to a feature or utility that supports a user interface, enables user interaction with the system, and does it with the assistance of windows, icons, graphics, etc.
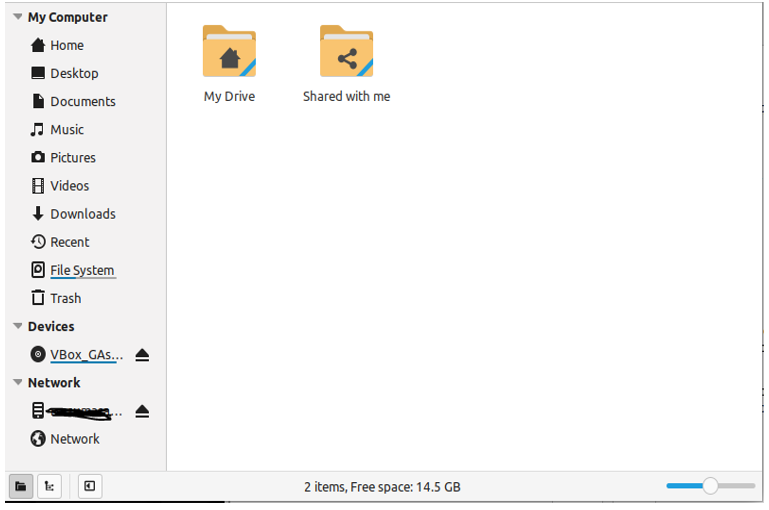
Your account is currently active, allowing you to use Google Drive. If you access a file that is formally referenced, you will notice a new disc and allocation menu with your Gmail address and its name. You can copy, delete, and rename files from this Google Drive by using the same steps as we did for the other folders. We can copy a file by right-clicking it and choosing copy to rename it; and to delete it, we choose delete.
Employing the Linux Command Line to Access Google Drive
In this part, we will explain how to use a Linux command to access Google Drive. First, we must obtain the “UID” for this. Every account on the system has a unique “UID”, which is issued by Linux. The user is identified by this number, which is also used to define which system resources they can access. So, to get “UID,” we can just type “UID” with the “$” sign and the echo command to display the UID on the console. Since this is an integer number with four digits, the id will be displayed on the terminal window when we input the echo command.
The UID, which is “1000,” is displayed on the terminal. When you run this command on your terminal, you can obtain a different ID depending on the system’s UID.
Then, in the following step, we will use the command to switch to the run user directory by first typing “cd.” Then, for the run user directory, we will type “/run/user.” We will enter our UID, which is “1000,” and then type “gvfs.” Finally, we will type “google-drive,” because we will be using the Linux command to access Google Drive and mention the Google account we use, “omar11,” remembering to add a slash between and at the end.
omar@omar-VirtualBox:/run/user/1000/gvfs/google-drive:host=gmail.com,user=omar11$
You can see that the directory is changed when we execute this command.
Now, we are going to display the files currently in Google Drive. To do this, we will use the Linux command “ls” which displays a list, followed by a dash and the “lrt.” As there are presently no files on our drive, the list of files will be displayed on the console.
omar@omar-VirtualBox:/run/user/1000/gvfs/google-drive:host=gmail.com,user=omar11$
The result of this command indicates that there are no files. However, since we have two directories in our Google Drive instead of the names of the directories, their IDs are displayed.
Dr-x------ 1 omar omar 0 Jan 1 1970 GVfsSharedWithMe
Drwx------ 1 omar omar 0 Jan 1 1970 0AI5FhhuutLBuUK9PVA
For displaying the name of the file or directories, we are going to utilize the “gio” command in which we first type “gio,”, type “list,”, use the dash “a,”, and type “standard,”. Then, insert a double colon and type “display-name” within the inverted comma.
omar@omar-VirtualBox:/run/user/1000/gvfs/google-drive:host=gmail.com,user=omar11$
Now that we have performed this command, you can see that the names of the two directories that are now existing in Google Drive have been displayed. The first one is called “My Drive,” and the second is called “Shared with me”. If there are any files on google drive, their names will also be displayed.
GVfsSharedWithMe 0 (directory) standard: : display-name=Shared with me
Conclusion
We have covered how to mount and utilize Google Drive on Linux in this article. To mount Google Drive in Linux using the gnome online account, we first connected to the Google Account by selecting the online account option and then entering the Google Account credentials. After the Google Account was verified, we enabled the file option from the dialogue box, which connected the Google Account. Then, in the following section, we described how to access Google Drive using the GUI, and in the last section, we demonstrated how to accomplish this with a Linux command.
Source: linuxhint.com