Laravel 9 Log
How It Works
Laravel 9 allows developers to log messages about the system behavior of any application to files, such as the system of error logs, and send them to notify the development teams.
It is based on the Laravel 9 channels. Channels are a specific way of writing a system’s log message. Every channel represents a different destination, and we can send messages to different channels simultaneously.
- Process One: Install Laravel 9 in the System
- Process Two: Configure Log in Project
- Process Three: Run and Test the System
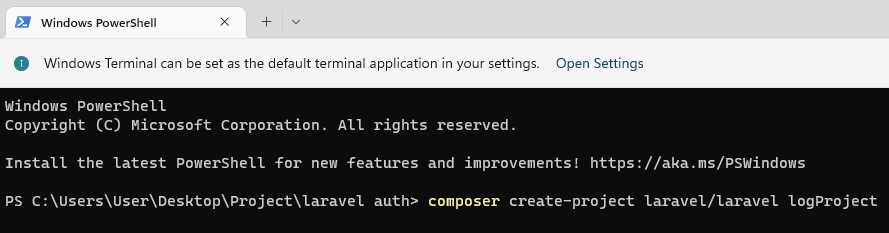
Process One: Install Laravel 9 in the System
We have to run the following command to install our log project:
It should look like the following image:
Then go to the project root directory and open the logging project.
Process Two: Configure Log in Project
All the project configuration options are located in your application config folder. Now, go to the logging.php file located in the config folder. The logging.php file allows developers to configure logging channels by adding, updating, or deleting.
By default, it should look like the following image:

The stack channel is selected by default. The channels look like the following image in the logging file:
'stack' => [
=> 'stack',
'channels' => ['single'],
'ignore_exceptions' => false,
],
'single' => [
'driver' => 'single',
'path' =>storage_path('logs/laravel.log'),
'level' =>env('LOG_LEVEL', 'debug'),
],
'daily' => [
'driver' => 'daily',
'path' =>storage_path('logs/laravel.log'),
'level' =>env('LOG_LEVEL', 'debug'),
'days' => 14,
],
'slack' => [
'driver' => 'slack',
'url' => env('LOG_SLACK_WEBHOOK_URL'),
'username' => 'Laravel Log',
'emoji' =>':boom:',
'level' =>env('LOG_LEVEL', 'critical'),
],
'papertrail' => [
'driver' => 'monolog',
'level' =>env('LOG_LEVEL', 'debug'),
'handler' =>env('LOG_PAPERTRAIL_HANDLER', SyslogUdpHandler::class),
'handler_with' => [
'host' => env('PAPERTRAIL_URL'),
'port' => env('PAPERTRAIL_PORT'),
'connectionString' => 'tls://'.env('PAPERTRAIL_URL').':'.env('PAPERTRAIL_PORT'),
],
],
'stderr' => [
'driver' => 'monolog',
'level' =>env('LOG_LEVEL', 'debug'),
'handler' =>StreamHandler::class,
'formatter' => env('LOG_STDERR_FORMATTER'),
'with' => [
'stream' => 'php://stderr',
],
],
'syslog' => [
'driver' => 'syslog',
'level' =>env('LOG_LEVEL', 'debug'),
],
'errorlog' => [
'driver' => 'errorlog',
'level' =>env('LOG_LEVEL', 'debug'),
],
'null' => [
'driver' => 'monolog',
'handler' =>NullHandler::class,
],
'emergency' => [
'path' =>storage_path('logs/laravel.log'),
],
],
A driver regulated the channels. The driver will set what log data will be recorded into the system log file. There are lots of drivers built-in Laravel 9. You have to check Laravel 9 driver documentation for the driver list.
Now, write a log message in the Laravel application. We can pass a log message throw log data.
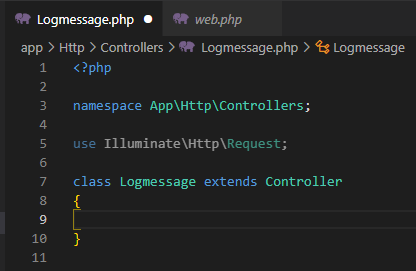
For that, we have to create a controller named “Logmessage”. Now, we need to run this command:
![]()
After being created, it should look like this:
Now, we need to create a function in the controller:
{
public function logtest()
{
Log::info(" Here is dummy log data");
return view('welcome');
}
}
We use log::info to see the logmessage.
Process Three: Run and Test the System
Now, run and test the logging project.
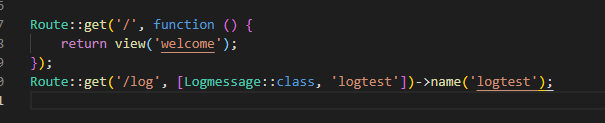
We need to create a route for checking.
Next, we need to run the project and use the following command:
Then, go to the route and log in to your application.
Before loading the URL, you can check under the storage directory.
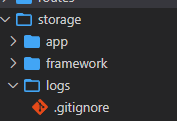
There is no log file.
Once you load the URL, it will show the log file.
The URL will look like the following image:
![]()
Then, load the URL:

The Laravel.log file was created, and we will open the following log file:

Here, you can check all your application errors.
Conclusion
In this article, we discussed how Laravel logging was accomplished in three processes. The processes included installing Laravel 9 in the system, configuring log in the project, and running and testing the system. We hope this article will help you with your application activity.
Source: linuxhint.com