Kubernetes HostPath Volumes
A hostPath volume points to a particular file system socket or directory on the node. In Kubernetes, there are various volume types. Because GitRepo and emptyDir volumes are erased, the hostPath volume is advantageous in Kubernetes applications because it preserves the content of the volumes. The hostPath volume and the Kubernetes volumes type are discussed in this article. You will learn how to launch the Minikube and build a YAML file manifest in this article. You will then be guided step-by-step through the configuration of the hostPath volume and the creation of the pod volume.
What Are Kubernetes Volumes?
The containers in a Kubernetes pod can access a data directory called a Kubernetes volume. Depending on the particular type of volume being utilized, the directory’s location, the storage medium that supports it, and its contents vary.
The processes within a pod of containers see a file system view that is made up of the following:
-
- A root files system that is identical to the container image’s content.
- Containers which are mounted with volumes (if defined). Within the container file system, each volume mounts on a distinct path.
The .spec.containers[*].volumeMounts defines the volumes. For each container image that is contained within the pod, you must provide the volumes and mounting paths for each pod.
In Kubernetes, there are various volume types such as:
-
- Persistent Volumes
- EmptyDir Volumes
- Ephemeral Volumes
- Kubernetes Volumes configMap
- Kubernetes hostPath Volumes
What Are Kubernetes HostPath Volumes?
In Kubernetes, the hostPath means to mount the resources such as files, sockets, or directories from the host or node inside the pod. The hostPath can specify things like directory which should already be existing or should be created at pod creation.
As seen in the following figure, a hostPath volume points to the resources on the node’s file system. The same files are visible to all pods that utilize the same hostPath volume and operate on the same node.
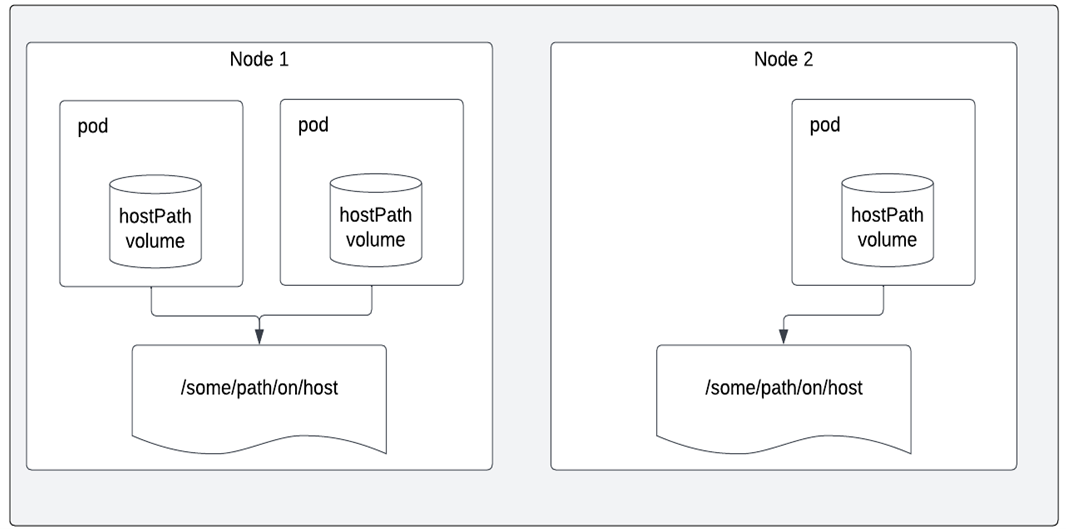
Figure 1: A worker node’s files or directories are mounted into the container’s file system by a hostPath volume.
When a pod is destroyed, the contents of the GitRepo and emptyDir volumes are erased, but not the contents of the hostPath volume. The following pod is able to view any files that the deleted pod left behind if it is assigned to the same node as the previous one and utilizes a hostPath volume that refers to the same path on the host.
The following are important hostPath volume usage cases. Although most pods won’t require it, it provides a strong escape hatch in some situations:
-
- Using the pod to deploy a few Nodes Specific files.
- Running a container that needs access to Docker internals using the following command:
-
- Running the cAdvisor in a container using the following command:
-
- Allowing a pod to specify a hostPath to declare if a particular hostPath has to exist or be established before the pod runs.
- Choosing a type for the hostPath volume; this can be configured in addition to the required path attribute.
How to Configure and Create a HostPath
Let’s begin to learn how to configure the hostPath and create it.
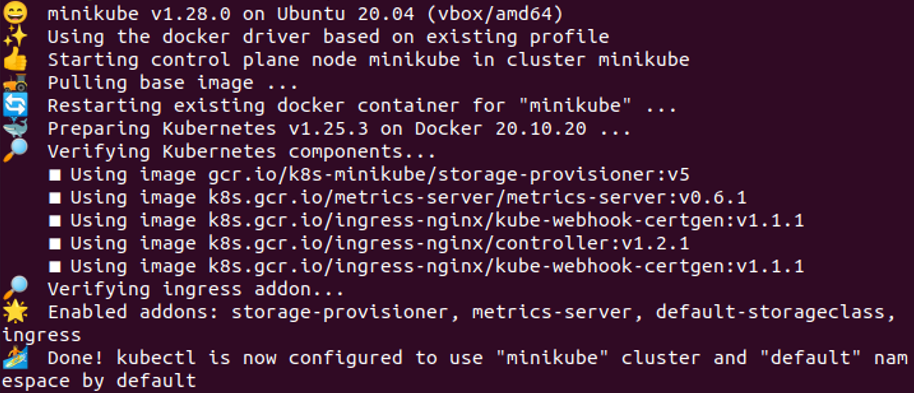
Step 1: Start the Minikube Server
In the first step, start the minikube server so that you can use the kubectl commands and run your application. The minikube allows you to deploy your nodes and pods in the Kubernetes environment. The following command must be used to maintain the minikube in active mode:
This activates the minikube and makes the Kubernetes environment ready to use.
Step 2: Create a Kubernetes YAML File
You will learn how to create a YAML manifest file for Kubernetes in this step. Application testing and deployment on Kubernetes require the YAML files.
When using Kubernetes, one typical action is the tendency to search for Kubernetes YAML files whenever we intend to deploy a test pod.
When using Kubernetes, there are several different ways to generate and edit the files. This article explains how to use the nano command to create a YAML file because it is the best choice for beginners.
Follow these steps to create a YAML file using nano:
-
- Start the minikube.
- To build a new file or modify an existing one, navigate to the location of the desired directory.
- The file’s name should be followed by nano. For example, you want to make a new file called host.yaml.
Run the following command to construct a YAML file host in the project directory:
The file is created after the command is executed. The next step is to work on the newly opened host.yaml file.
Step 3: Configure the HostPath VolumeMount
To create a volume and make it available to a pod, follow these two steps:
-
- Specify it in the spec:volumes element of the pod template before deploying the pod to a few nodes.
- Mount the volume using the spec:containers:name>:volume command to a particular container mounts property.
These actions are interrelated. You must mount a volume to a container when you create it. You cannot mount a volume without defining it first in the pod configuration. A sample of creating and mounting a volume in a YAML pod template setup is provided in the following:
containers:
—name: app-one
image: nginx-one
volumeMounts:
—name: volume-one
mountPath: /app/config
volumes:
—name: volume-one
In the provided code, we can observe that:
-
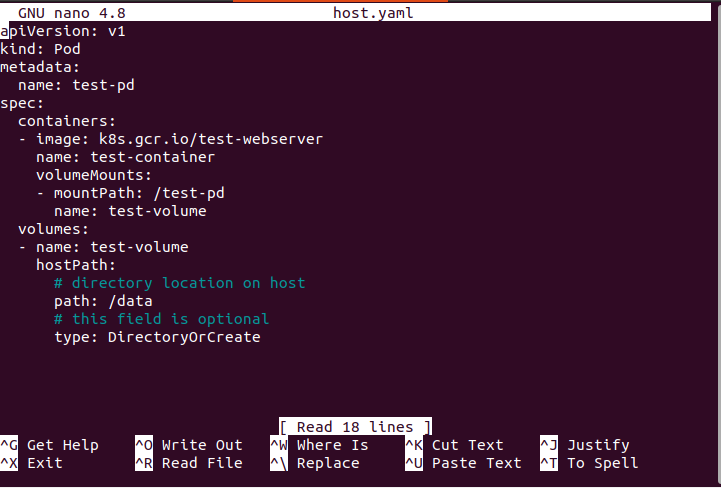
- The named test-volume is created in the spec.volumes by the volume command and is attached to the pod.
- Find the hostPath in the pod spec section. The particular path/data is created because the type:DirectoryorCreate means that the path should be created if it is not there.
- The/data is on the node where the pod is sendups and it is mounted inside the container in the /test-pd directory.
- The volume declaration and the volumeMounts property both require the same volume name to be utilized.
Step 4: Create the HostPath Volume Pod
In this step, let’s use the (host.yaml) yaml file to build a hostPath volume as shown in the following:
As seen in the aforementioned screenshot, the pod called “test-pd” is successfully built.
Conclusion
This article gives a general overview of the hostPath and demonstrates how to create and configure the hostPath mounts in practice. As part of hostPath’s function which prevents the data from the node’s file system from being erased when a pod is removed, although hostPath has many benefits, there are also several security hazards. Avoid utilizing it whenever you can. A hostPath volume should only be scoped to the necessary directory or file, and it should be mounted as ReadOnly if you must use one. In this article, you learned how to successfully establish a pod volume step-by-step using an easy example while also learning how to create a path in the hostPath and mount it into the container.
Source: linuxhint.com