Kerberos Installation
It deals with a ticket-based framework to prevent intrusion from external attackers. Thus, it prevents any possibilities of secret phrase sniffing or secret password thefts.
This step-by-step guide illustrates the how to install Kerberos on Linux in the following ways;
- Kerberos installation prerequisites and an explanation of how to set up and design Kerberos in a Cluster
- How to install Kerberos KDC Server in one machine
- How to install Kerberos client in the rest of the machines
Step By Step Guide For Installing Kerberos on Linux
The Kerberos authenticating protocol is available for downloading from the official MIT repository. You can also find it at the Ubuntu store. Thus, you can install it on Ubuntu 22.04 or any Linux OS version using the following steps:
Step 1: Ensure Your Devices Meet the Kerberos Protocol Installation
Notably, Kerberos will only install if your devices meet all the necessary prerequisites. These prerequisites include;
- The same time frame between your host and client/user devices since a time difference of more than 5 minutes will lead to failure.
- Both devices have the same operating system.
Step 2: Run the Command apt-get install kbr5-user.
First, start up your computer and open the terminal window. Then, run the command sudo apt-get install kbr5-user.

Step 3: Enter a Local Account Password
Enter the local account password for your system. Press Y and then the ENTER key once prompted to continue.
Step 4: Input the Default Kerberos 5.
In the next step, the user will be requested to input a default Kerberos 5. Input the following text in capital letters LinHint@UBUNTUBOX.COM:
These first three steps come in handy in setting up the installation files. Once these installation files are ready, press the ENTER key, and Kerberos will execute automatically until the process is complete.
Step 5: Install Kerberos KDC Server
Kerberos KDC Server can be introduced in the Master workstation. Yet, that is certainly not a strict rule, making it possible to be introduced in any server inside the Cluster.
Step 6: Install the Kerberos KDC Client
Introduce Kerberos KDC client on every one of the nodes or machines in the cluster using the yum command.

Step 7: Configure Kerberos by Modifying Files
As a component of the setup, we should make changes to two records:
kdc.conf Changes
![]()
In the example, utilize a unique Realm name. For this demonstration, we will pick Realm’s name as LinHint@UBUNTUBOX.COM.
1, 2 are pretty straightforward, while 3 and 4 tell which machines are important for our Realm. Any machine with hostname abc.testdomain.local, g1.testdomain.local , gk.testdomain.local and testdomain.local is planned to LinHint@UBUNTUBOX.COM
Step 8: Create KDC Databases
It is time to create KDC (Key Distribution Center) data sets that the Kerberos server will use. This is our installation process:
Setting up a Master Password becomes mandatory after this step. Follow the commands as prompted and copy the password. This password will come in handy for any KDC dataset-related exercises like restarting your system or database changes later on.
Step 9- ACL Changes:
Follow the command $ vi/var/Kerberos/krb5kdc/kadm5.acl to prompt ACL changes.
Change it appropriately with your Realm name. We will use */LinHint@UBUNTUBOX.COM * in this demonstration.
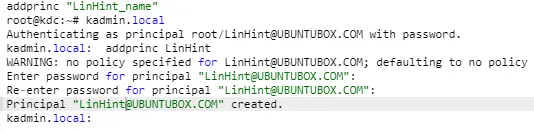
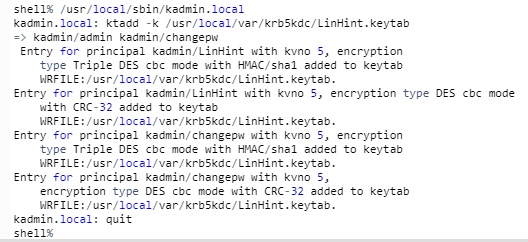
Step 10: Add Admin Name for KDC
It is vital to ensure that you can only add an admin for KDC in the machine with the KDC server. Adding it to any of the Kerberos client machines will not yield the desired results.
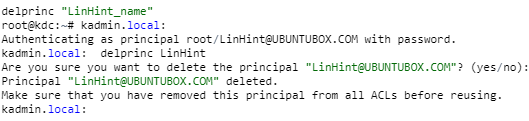
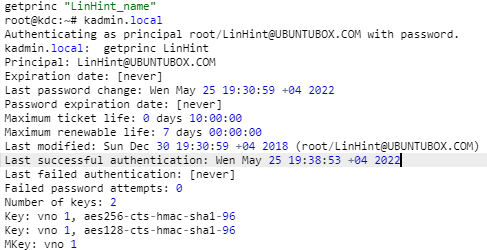
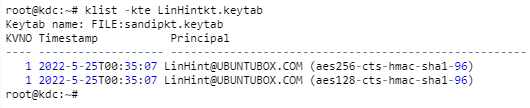
This command will bring you to the kadmin.local brief. You can then use the command below with your Realm name see all the principles created during your installation.
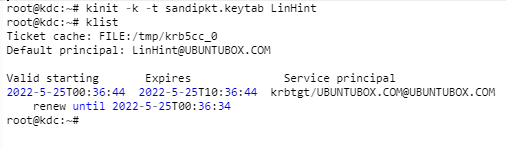
Step 11: Restart the Kerberos Admin and KDC Server
Again, these commands MUST only be done in the KDC Server machine. This step is a confirmation of full installation:
Restart KDC Server
Restart KADMIN Server
Conclusion
It is a relatively easier procedure for installing the latest Kerberos version, popularly known as KRB5, on Linux. Administrators can therefore grant permission to users to securely sign on to systems and programs without the keying in passwords every time.

Source: linuxhint.com