JavaScript getElementsByClassName
This write-up will guide about the implementation of the “getElementsByClassName()” method in JavaScript.
What is JavaScript getElementsByClassName() Method?
The “getElementsByClassName()” method returns the elements having the specified class name, which is passed as an argument. It returns an object that resembles an array of all child items with the specified class names. Additionally, it includes the HTML collection of all the child elements.
How to Use JavaScript getElementsByClassName() Method?
For the purpose of using JavaScript getElementsByClassName() method in JavaScript, follow the given syntax:
In the given syntax, “classname” is the mandatory argument to be passed. It is the string value that refers to single or multiple class names.
Example 1: Fetching a Single Element Using getElementByClassName() Method
In the following example, firstly, we will create a div, assign it a “Class” and add some text in it:
Implementation of Class
</div>
Now, apply the “getElementsByClassName()” method to access created div by passing the class name as argument:
Lastly, display the resultant value on the DOM using the “document.write()” method. This will return an array-like object:
The corresponding output will be:

In the above output, the [object HTMLCollection] refers to the array-like object.
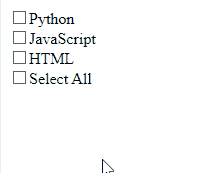
Example 2: Fetching Multiple Elements Using getElementsByClassName() Method
In the following example, firstly, we will add three checkboxes using the <input> tag, assign them the same class as “lang” and add the required text as shown below:
<input type= "checkbox" class= "lang" value= "JavaScript">JavaScript<br/>
<input type= "checkbox" class= "lang" value= "HTML">HTML<br/>
Now, include an additional checkbox with the value “Select All” and attach an “onclick()” event to it so that when the checkbox is selected, the “check()” function is called with the argument “this” like follows:
Next, in the JavaScript file, define a function called “check()” with a variable named “checkBox” as an argument referring to “this” specified before. Now, access the checkbox using the document.getElementsByClassName() method and place the value of the class attribute “lang” as its argument. finally, use a “for” loop to iterate each value in a checkbox and use the “checked” attribute to mark each value as checked:
get = document.getElementsByClassName(‘lang’);
for(var i=0;i<get.length;i++) {
get[i].checked = checkBox.checked;
}
}
Output
We have compiled the use of the getElementsByClassName() method using various examples.
Conclusion
The “getElementsByClassName()” method returns the elements having the specified class name, which is passed as an argument. It returns an object that resembles an array of all child items with the specified class names. You can utilize this method to select single or multiple HTML elements having the same class name. This article explained the use of the getElementsByClassName() method using various examples.
Source: linuxhint.com