Install Snort Intrusion Detection System in Ubuntu
This tutorial explains how to install and get started with the Snort IDS (Intrusion Detection System) in Debian-based Linux distributions including Ubuntu.
After setting up a server, among the first usual steps that are linked to security are the firewall, updates and upgrades, SSH (Secure Shell) keys, and vulnerability free hardware devices (like routers without PIN support).
But most sysadmins don’t scan their own servers to discover security holes, nor do they set up honeypots or Intrusion Detection Systems (IDS) like the one that is fully explained in this guide.
This document explains step-by-step on how to get started with Snort, the most popular IDS. All described steps include real screenshots which makes it easy for the reader to follow them.
Note: The Debian and RedHat-based Linux distributions installation is explained at https://linuxhint.com/intrusion_detection_snort_tutorial/.
Brief IDS and Snort Description
Intrusion Detection Systems are traffic and packet analyzing programs to detect anomalies such as malicious traffic (offensive scan, sensible ports connection attempts, etc). IDS detects suspicious behavior and reports it to the system administrator.
IDS allows the system administrators to set up the rules that define the suspicious or forbidden packets to be reported.
Snort is the most popular IDS, probably also the best. It allows you to implement the predefined rules from an up-to-date repository, or to create custom ones. Snort also allows you to choose among the seven alert modes that are deeply explained in this article.
Getting Started with Snort
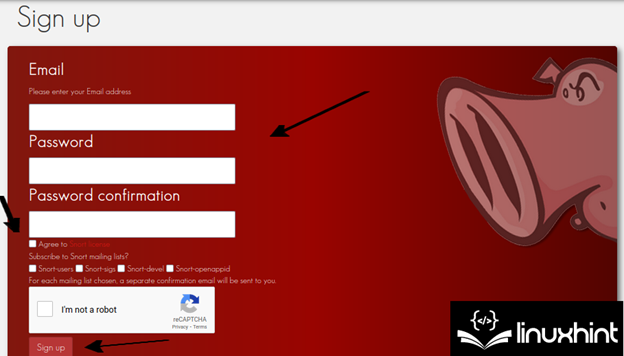
First of all, the user needs to register at https://www.snort.org/users/sign_up which is the official Snort website.
Fill all the required information, agree to the Snort license terms, validate the captcha, and press the “Sign Up” button.
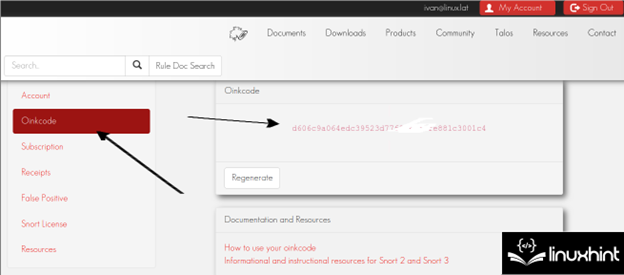
After registering, the user must verify the confirmation email. Once confirmed, login. On the left menu, press the “Oinkcode” button to access the called Oinkcode which is shown in the following screenshot which is useful to update Snort. Users just need to keep the Oinkcode or access it when necessary as explained in the following:
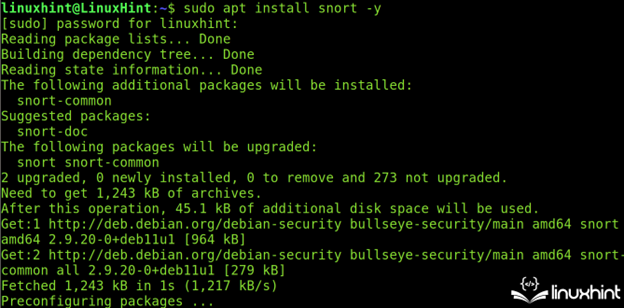
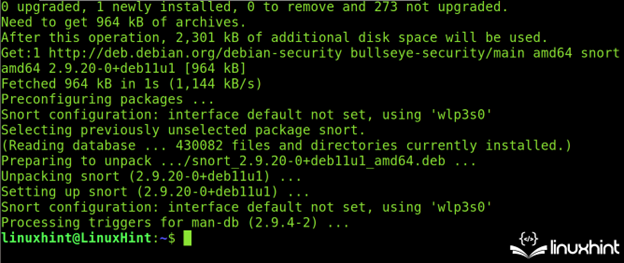
Once registered (or before it, that’s indifferent), Snort can be installed with the apt packages manager as shown in the following:
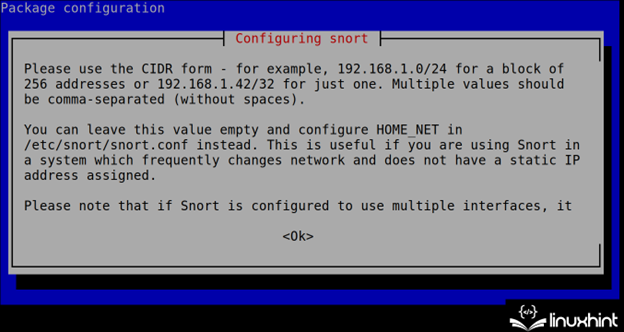
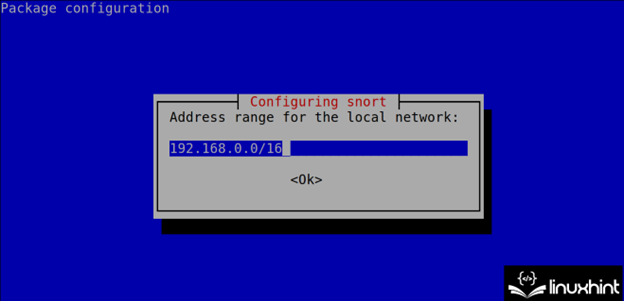
During the installation process, Snort shows you how to specify the network(s) in the next step (CIDR). This configuration can be edited and is stored in the /etc/snort.conf file as explained in the next section of this tutorial.
To continue the installation, press the TAB key to select the <OK> button. Then, press the ENTER key.
Define your network(s) in CIDR format as instructed in the previous step. Usually, Snort automatically detects the network(s) correctly. In case you want to define the additional networks, implement a comma.
Snort will end the installation process. The first recommended step is to update the rules using the Oinkcode that is obtained in the second step of this Snort tutorial.
The Oinkcode is implemented together with the installed Snort version in the following URL format where <Version> must be replaced with the installed version (without dots) and <Oinkcode> must be replaced with the Oinkcode.
https://www.snort.org/rules/snortrules-snapshot-<Version>.tar.gz?oinkcode=<OinkCode>
In the following example, the installed Snort version is 2.9.151 and the Oinkcode is d606c9a064edc39523d77f8762f0fe881c3001c4.
To download the updated rules, run the following:
https://www.snort.org/rules/snortrules-snapshot-29151.tar.gz?oinkcode=d606c9a0edc393d77f8762f0fe881c3001c4
The executed URL downloads the compressed rule files.
The “tar.gz” file content must be extracted to the /etc/snort/rules directory. You can use the “xzf” command and the -C flag to specify the extracted files destination as shown in the following screenshot:

After executing all previous instructions, the user can assume that Snort is properly installed including the latest rules. Yet some settings must be configured as described in the following section.
Configuring Snort in Ubuntu (The Snort.conf File)
The Snort configuration file is /etc/snort/snort.conf. It is the first file that the user needs to deal with after installation.
Note: For Debian users, the Snort configuration file is /etc/snort/snort.debian.conf.
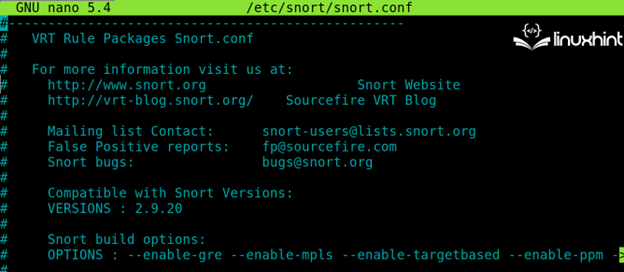
To begin, open the /etc/snort.conf file using a text editor as shown in the following (use privileges):

In the following illustration, you can see how the “snort.conf” file looks like:
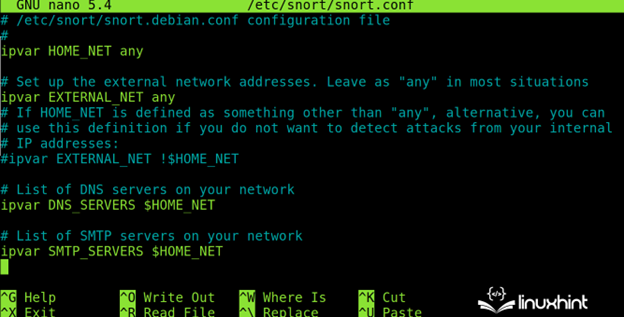
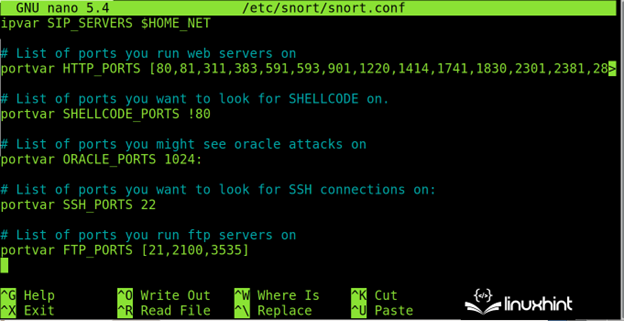
By scrolling down, the user will see the network related settings. As you can see, the default setting for the local network is “any” which instructs Snort to monitor all detected subnetworks.
The first Snort network settings functions are the following:
- ipvar HOME_NET: Here, the user specifies the local network(s) in CIDR format. The default option (any) checks all the local network(s).
- ipvar EXTERNAL_NET: Here, the user can define the external network.
- ipvar <SERVICE> $HOME_NET: The user will see a list of services in this format where the <SERVICE> must be replaced with the services to be monitored like HTTPS, FTP, SSH, etc.
Scroll down for additional service and port options like the one that is shown in the following:
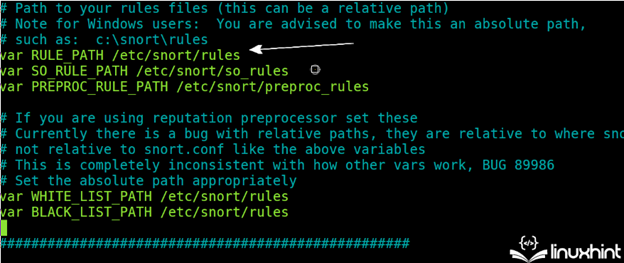
Keep scrolling down and make sure that the rules directory is correctly specified as shown in the following image (/etc/snort/snort.conf):
In the following illustration, you can see the commented (enabled) or uncommented (disabled) rules. As you can see, the rules are stored in the /etc/snort/rules directory and are managed from the “snort.conf” file.
In the following screenshot, the attack response, bad traffic, DDOS, backdoor, etc. related rules are enabled:
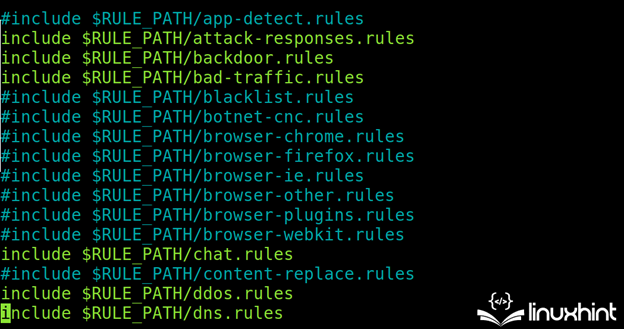
All rules can be found in the /etc/snort/rules directory.

The users not only can download the additional rules but they can also create their own. To learn how to create the custom Snort rules, follow this link.
Snort Alerts
Alert modes are a series of available reporting mechanisms for the users to choose.
The Snort IDS supports seven alert modes including a testing alert mode and not alerts at all mode.
Full: The full alert mode, as its name suggests, returns the most complete report including the datagram detailed information. The full mode is defined by adding the -A full flag.
Fast: The fast mode, which is implemented using the -A fast flag, is more user friendly than the full mode.
Console: The -A console option prints the real time alerts on the Linux terminal.
Syslog: The System Logging Protocol sends the alert logs remotely. Implement this mode using the -s flag.
Unsock: Snort can export an alert to the Unix sockets.
None: Skip alerts.
Cmg: The CMG mode is only used for testing purposes.
Note: Like Snort rules, Snort alerts deserve a dedicated tutorial that you can access at https://linuxhint.com/snort_alerts/.
In the following example, the -h flag specifies the host or network. Snort is executed with the -A flag which implements the console alert mode. The -c flag is printed to the Snort configuration file.
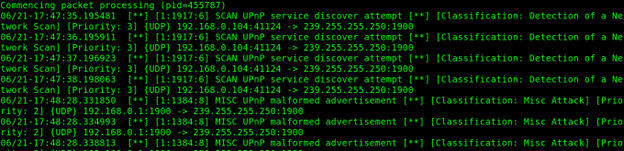
In the next example, a fast scan is executed.
By default, Snort results are stored under the /var/log/snort directory as shown in the following screenshot:

Conclusion
Snort like IDS are excellent tools to detect malicious behavior within a network. It can detect the defined scan methods and report the data on the source. But Snort can be configured against all types of suspicious traffic. Snort includes a comprehensive rules source that is easy to configure and keep updated. Users can write the custom rules and choose the different alert modes.
IDS implementation is a basic requirement to secure the networks that are included in the Linux security hardening list.
Snort is an open source and is a simple to manage security resource. It can be used for free which serves as a good alternative for many users. We highly recommend you to continue reading our articles that are quoted with links in this document which are dedicated to each aspect of Snort.
Source: linuxhint.com