Install Get Started Nginx
Nginx, read as “Engine-x”, is an open-source Linux software that serves as a web server for HTTP caching, reverses proxy, and balances the load. Nginx is designed mainly for maximum performance stability since it provides us with capabilities for the HTTP server. It also functions as a proxy server for email (IMAP, POP3, SMTP). In the most straightforward explanation, we can define Nginx as a web server that allows us to reduce the page load time to avoid long web page waits. The architecture of the Nginx is based on the master-slave approach for non-blocking, asynchronous and event-driven support.
This post serves as a tutorial for installing Nginx on Ubuntu.
Before the installation and configuration of the Nginx on Ubuntu, there are some pre-requisites that we need to follow, and they are as follows:
- We must ensure that we have Ubuntu installed and running on our system.
- We should have a user account on Ubuntu.
- We should have access to the terminal window.
These are the procedures that you can utilize to install Nginx.
- Update the Repositories Lists
We need to update all the repository lists before installing any new software. This enables and ensures the installment of all the latest updates and packages alongside the software. To do so, we must first log in to Ubuntu through the user account. Then we are required to access the terminal, and for that, click on the “Activities” > ‘’Search’’. Now, type the “Terminal” on the search, and a terminal window will pop up. On this terminal window, type the following command to refresh the repository lists:
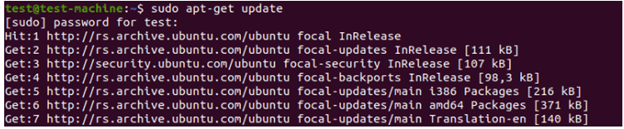
We need to give some time and allow this process to become completed. All the repositories are now being updated.
- Nginx Installation From Ubuntu Repositories
We need to install the Nginx from Ubuntu default repositories since the Nginx is already a part of the Ubuntu default repositories. For that, we need to type the following command on the terminal window as follows:
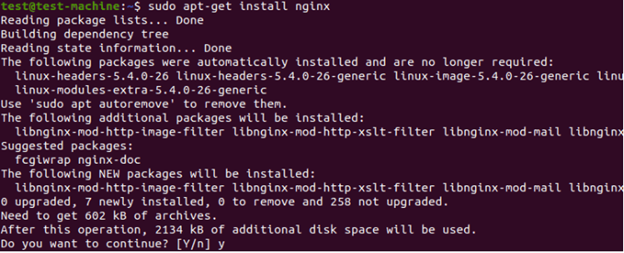
At this point, the Nginx is being installed from default repositories, and we want to continue with yes (y).
- Verification
After the installation of Nginx from the default Repositories, we are now required to verify whether we have installed the Nginx correctly. This can be done only if we know the version of the Nginx being installed. To know about the version of installed Nginx, simply type the following command on the same terminal window shown in the following:

Following the previous command, the system has returned the version of installed Nginx, which points out that the Nginx has been installed correctly earlier. Now, let’s move to the next step.
- Nginx Service Control
We may adjust the behavior of the Nginx, which means that we may start & stop or disable & enable the Nginx service while at boot. To do so, first, check the status of the service (Nginx) using the following command:
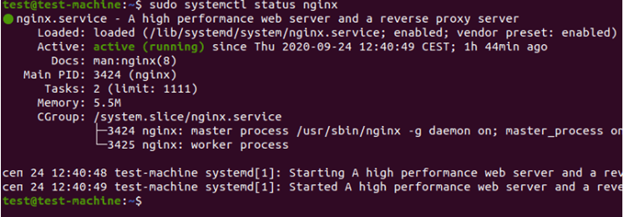
To know the status of the service, if after running the above command, the system displays the status as “active-running”, then this means that the system(service) has already been started earlier. If, in any case, the system doesn’t display the running status, then we may use the following command:
While the system starts and we want the Nginx to get set to enable, it can be done using the following command:

This way, the system gets enabled and starts loading. Suppose later, we want to disable the Nginx or intentionally prevent the system from getting loaded, and we want to stop the Nginx service for these two cases. In that case, we may use the following two commands respectively:
$ sudo systemctl stop nginx

In some cases, we may encounter a situation where we disable the service after loading the Nginx service and then configuring the system to specific requirements. Then, we re-think changing the configurations or want to restart the service hard. Then, in those cases, we may reload the Nginx service using the following two commands respectively:
$ sudo systemctl reload nginx
- Allowance of Traffic for Nginx
Nginx needs complete access to the system’s firewall to allow the traffic. For this purpose, Nginx uses and installs the combination of profiles of Ubuntu’s default “ufw”, known as “Uncomplicated Firewall”. To learn about the available profiles of these UFWs, we first need to display all the lists of profiles, and for that, we need to type the following command on the terminal window as follows:

Now, the list of these applications will be displayed on the terminal by the system, there might be other applications that the system would display, but we will disregard them for now. After this, now we need to access the Ubuntu firewall to grant access to Nginx using the following command:

Following the command, the system rules will get updated. We are now required to refresh the settings of the firewall, so first, we reload and then allow the HTTP traffic by entering these two commands respectively:
$ sudo ufw allow “nginx http”
![]()
- Testing Nginx
For testing, we need to make sure the running of the Nginx service. Then, we need to be directed towards the following given web address/page by typing in the terminal:
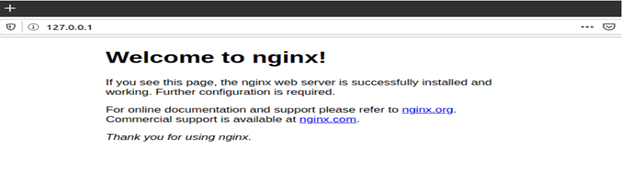
The system will redirect you to the Welcome page of Nginx, as previously shown. This web page can also be loaded through a terminal by entering:
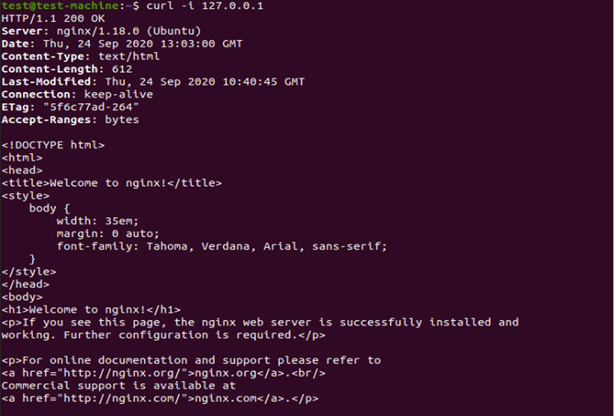
$ curl -i <a href="https://127.0.0.1"> 127.0.0.1</a>
On the terminal, the system would then display the code (HTML) for the welcome page of Nginx as shown:
Conclusions
In this article, we’ve learned about Nginx, open-source software that uses web servers to reduce page load time. We’ve shown in the article the step-by-step process to instal the Nginx on Ubuntu. For the guide, we’ve used Ubuntu 20.04 LTS. In the article, we have discussed seven main steps for Nginx installation and configuration, from which the first six steps represent the installation procedure of Nginx. We hope you’ve now understood the installation process of Nginx and would be able to quickly implement these steps yourself by following this guide.
Source: linuxhint.com