HTML Table tr Inside td
In HTML, the tables are designed to arrange too extensive or complex data and are fully represented in the paragraph. It enables the reader to view the findings quickly. Additionally, tables can be utilized to focus on developments or patterns within the information and to increase the accessibility of an article by excluding text-based quantitative information.
This post explains the method for creating the table “<tr>” inside the “<td>” element.
How to Create a Table “<tr>” Inside “<td>”?
To create a table “<tr>” inside the “<td>”, first, make a table with a “<table>” element. Then, inside the “<td>” element, define table rows by using the “<tr>” tag.
For practical implications, try out the stated procedure.
Step 1: Make a “div” Container
First, utilize the “<div>” element to make a div container. Also, insert an “id” or class attribute with a particular name. In this case, the id attribute is assigned the value “content”.
Step 2: Create a Table
Next, create a table with the help of the “<table>” tag. Furthermore, insert table rows using the “<tr>” element and data with “<td>”.
Step 3: Add “<tr>” Inside “<td>” tag
Inside the td element, insert another row with the help of the “<tr>” tag. By following the same procedure stated above:
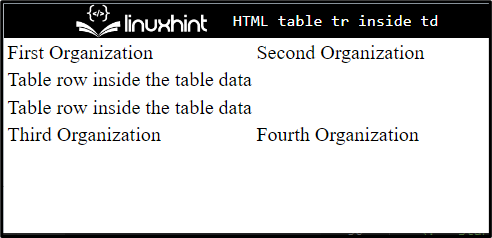
<table>
<tr>
<td>First Organization</td>
<td>Second Organization
<tr class="table-row">
<td>table row inside the table data</td>
</tr>
<tr class="table-row">
<td> table row inside the table data</td>
</tr>
</tr>
</td>
<tr>
<td>Third Organization </td>
<td>Fourth Organization </td>
</tr>
</table>
</div>
Output
How to Style the Table “<tr>” inside “<td>”?
To style the table “<tr>” inside “<td>”, users can utilize the various CSS properties. To do so, follow the given procedure.
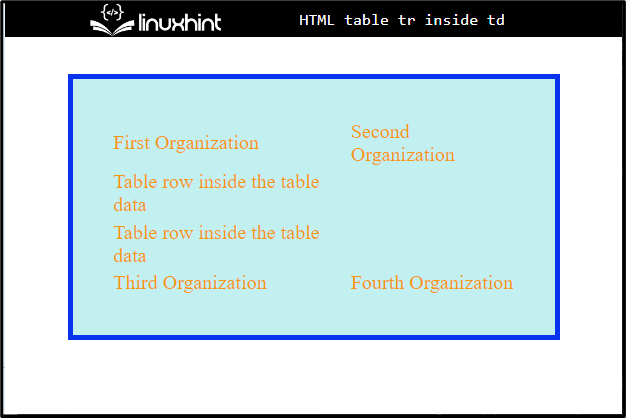
Step 1: Apply CSS Styling on “content” Container
Access the “div” container by using the “id” value, which is “content”, and apply the following CSS properties:
border: 4px solid rgb(8, 50, 238);
color:rgb(243, 152, 15);background-color: rgb(194, 240, 241);
margin:30px 50px;
padding: 30px;
}
Here:
- “border” defines a boundary around the element.
- “color” is used for specifying the color of the added text inside the element according to the assigned value.
- “margin” allocates the space around the element’s boundary.
- “padding” adds space around the element inside the boundary.
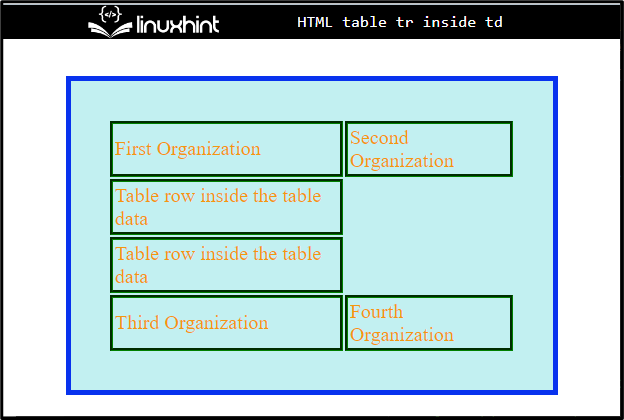
Step 2: Apply border around Table Data
Access “table” and “td” in CSS:
border: 3px groove green;
}
Apply the border CSS property for specifying the boundary around the table data.
Output
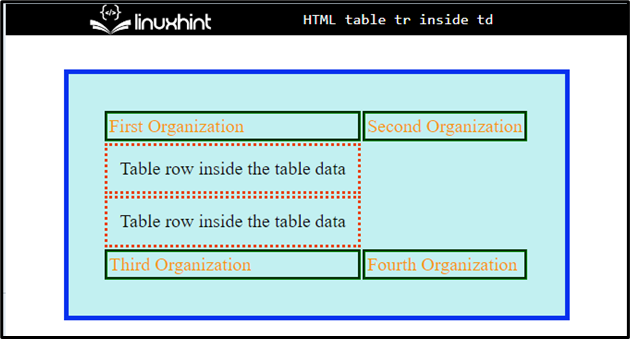
Step 3: Style “tr” inside the “td”
Now, style the “tr” that is defined in the “td” by using the class name with dot selector as “.table-row”:
padding: 10px;
border: 3px dotted rgb(233, 64, 12);
color:rgb(15, 15, 15);
}
Here, apply the CSS properties according to your choice. In our case, the “padding”, “border”, and “color” are used for styling the table rows in the table data.
From the given output, it can be observed that we have successfully added “<tr>” inside “<td>” and styled it accordingly:
That’s all about adding and styling the table tr inside the td.
Conclusion
To insert the table tr inside the td, first, create a table by utilizing the “<table>” tag. Then, specify the “<tr>” and “<td>” inside the table. After that, inside the “<td>” tag, insert “<tr>” to add rows inside the table data and style them using CSS properties. This post has explained about adding the table tr inside the td.
Source: linuxhint.com