HTML Checkbox
Purpose of Checkboxes in HTML
The checkboxes and radio buttons are both used for providing multiple options to choose from for the user. However, one might ask where do these two HTML elements differ then? Well, a radio button is always used in situations where you want to restrict the user to choose exactly one option and not more than that. On the other hand, a checkbox is used when you want to allow the user to even choose more than one option. Therefore, whenever you want to get the maximum possible choices out of the given list, then you always make use of the checkboxes in HTML. To understand this usage in detail, you will have to read the next section of this tutorial.
HTML Code for Creating Checkboxes
You can create checkboxes in HTML very quickly. All you have to do is to follow the two examples below to learn this hack:
Example 1: Fetching the Occupation of a Person
We have already mentioned that the checkboxes in HTML and any other language are always used whenever you have the liberty to choose more than one option. Therefore, in this scenario, we will be designing an HTML script for fetching the occupation of a person. Now, this person can either be a “Student”, a “Teacher”, or both. In the case of the last option, we want to give the person the liberty to select both the checkboxes at once. For devising such functionality, we have designed the following HTML script:
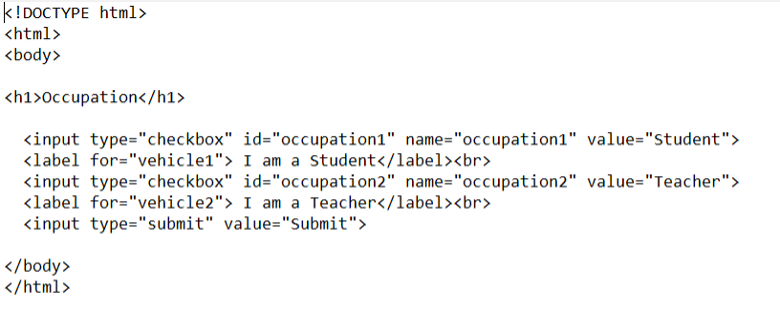
After using the document type declaration statement, we have used the “<html>” and “<body>” tags so that we can write our HTML script. Then, we have used the “<h1>” header flag for specifying the heading of our web page. This is followed by the “input type” flag that we have used to notify that we are going to create a checkbox in HTML. Then, we have created an “id” and “name” for this checkbox. We have also assigned a label to this checkbox. After that, we have used the “label” tag for mentioning the label against each of our HTML checkboxes. In the same manner, we have designed the other checkbox. After that, we have also created a “submit” button just for the sake of making the appearance of our web page nice.
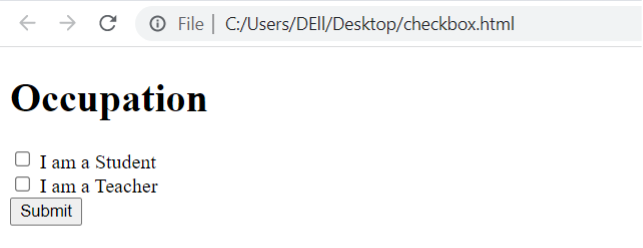
After saving and executing this HTML script with Google Chrome, the web page shown in the image below appeared on our browser:
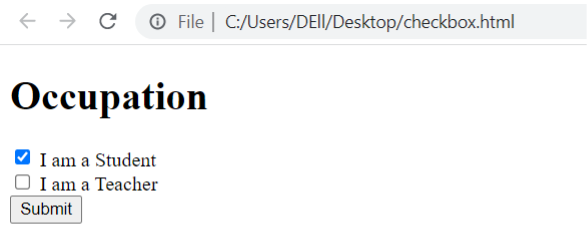
Now, you are allowed to select as many options from this web page as you want. In the following image, we have only selected one of the two checkboxes.
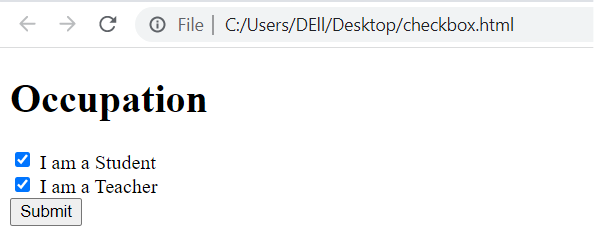
In the image shown below, we have selected both the checkboxes.
For enhancing the functionality of this HTML script, you can even design an action page by using PHP so that when you will press the “submit” button after selecting your desired checkbox[s], relevant action is taken against it.
Example 2: Selecting one’s Favorite Flavor of Milkshake:
At times, you may even choose to design a very simple web page while using the HTML checkboxes without any action buttons. For example, you might simply want to present a few checkboxes to the user for choosing his/her favorite flavor of milkshake. However, you do not want him to do anything further after making this selection. Such instances are very rare. Normally, you ask the user to take any action after selecting such as clicking a button. Nevertheless, we would still like to show you such an example. To illustrate this example, we have designed the following HTML script for you:
In this HTML script, the essentials of the script are: the document type declaration, the “<html>”, and the “<body>” tags are the same and their purposes are also exactly the same as we have described in our first example. Then, we have used a paragraph tag for displaying a message to the user asking him to choose his/ her favorite flavor of milkshake. A user can conveniently choose more than one flavor of his choice if he/ she wishes to. Then, we have defined the labels for these checkboxes followed by the respective declaration of the checkboxes. You need to notice here that this time, we have not used the HTML “label” tag for specifying the label. Rather, we have just defined the labels as it is. It means that it is another way in which you can create labels for your checkboxes just for the sake of simplifying your HTML script. After completely writing this script, we simply saved this notepad file with the “.html” extension so that it can be executed easily with any browser of our choice.
We have executed this HTML script while using Google Chrome and it displayed the web page shown in the image below on our browser:
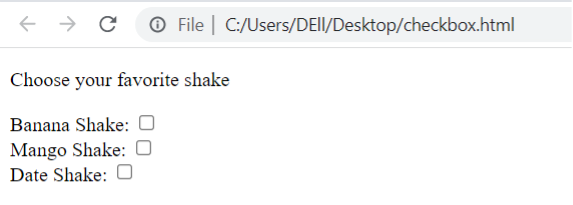
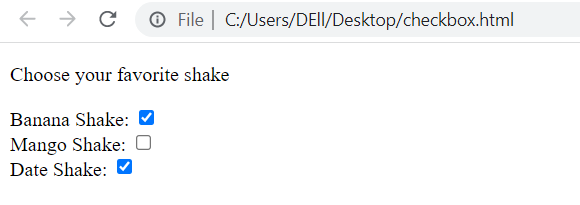
Now, you can conveniently select as many of these checkboxes as you want. This is shown in the following image:
Conclusion
With this tutorial, we wanted to share with you the usage of the HTML checkboxes in the easiest manner. For doing so, we first introduced you to the basic purpose of this HTML element. After that, we explained two different examples to you that made use of this HTML element. By going through these explanations, you can easily start using the HTML checkboxes whenever you wish to provide your users with the flexibility to choose more than one option from any given list of options.
Source: linuxhint.com