How to Write a Caption Under an Image? – CSS
This post explains about writing a caption under an image.
How to Write a Caption Under an Image?
To write a caption under an image, we will provide different methods mentioned below:
- Method 1: How to Add Image Caption Using HTML “<figcaption>” Element?
- Method 2: How to Add Image Caption Using “<div>” Element?
Method 1: How to Add Image Caption Using HTML “<figcaption>” Element?
To add an image caption, go through the following instructions:
- First, add the “<figure>” element, which is utilized for representing self-contained content, potentially with an optional caption.
- Next, insert a “<img>” tag inside the paragraph “<p>” tag. Add the image by utilizing the “src” attribute. The “alt” property shows the added content if the image did not display due to some reason.
- Set the image width as “200px”.
- Then, the “<figcaption>” tag is used to add the caption for the image. Moreover, add the caption in between the “<figcaption>” tags:
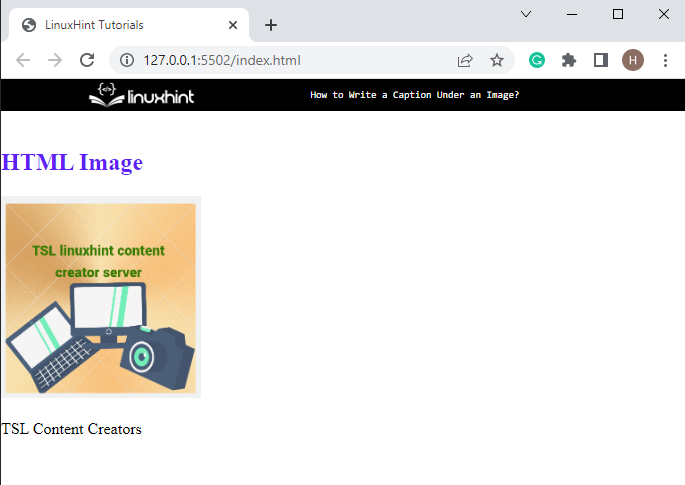
<p><img src="TSL.png" alt="TSL Content Creators" width="200">
<figcaption>TSL Content Creators</figcaption><p>
</figure>
You can see that the image with the specified caption has been displayed:
Now, move toward the second method for adding the caption using CSS.
Method 2: How to Add Image Caption Using “<div>” Element?
To add the image caption using the “<div>” element, try out the given instructions:
- Create a “<div>” container and add a class attribute with the name “image-holder”.
- Add heading tag “<h2>” for inserting the heading and style the heading according to your choice.
- Add another “<div>” element and insert a “<img>” tag along with “src”, “alt” and “width” attributes in between the div container.
- Add a third “<div>” with the class name “img-caption”. Then, provide the caption in between the “<div>” tags. Moreover, the “<br>” element is used to add one line break:
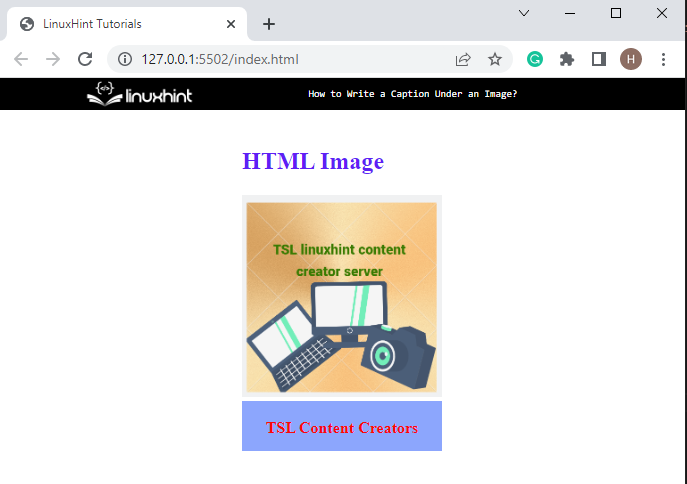
<h2 style="color:rgb(95, 31, 245)">HTML Image</h2>
<div>
<img src="TSL.png" alt="TSL Content Creators" width="200">
<div class="img-caption"><br>TSL Content Creators</div>
</div>
</div>
It can be observed that the caption for the image has been added successfully:
Now, let’s move toward the CSS section for applying the properties.
Style “.image-holder” in CSS
First, access the “<div>” element having a class “.image-holder”. Then, apply the following CSS properties:
position: relative;
height: 100px;
width: 200px;
margin:auto;
}
The details of the above mention properties are described below:
- The “position” is set as “relative” to specify an element’s original position that remains in the flow of the document, just like the static value.
- Then, “height” is used to define the element height.
- The “width” property specifies the size of the element in width.
- The “margin” is set as “auto” to set the space automatically around the element.
Style Caption in CSS
In this step, we will access the two classes with the name “image-holder” and “img-caption” and apply the following CSS properties:
position: absolute;
text-align:center;
font-weight:bold;
width: 200px;
height: 50px;
left: 0px;
color: #f80909;
background: rgb(140, 166, 253);
}
The description of the above-mentioned properties are as follows:
- The “text-align” property is set as “center” for aligning the text position in the center.
- Next, “font-weight” is allocated as “bold” to set the image caption font.
- Then, the “color” property is utilized for setting the color of the accessed element.
- The “background” property sets the color of the element background.
- Other properties, including “position”, “height”, and “width” are also used to apply the respective functionalities.
Output
We have discussed the methods for writing the caption under an image.
Conclusion
To write a caption under an image, users can either use the “<figcaption>” element or a simple “<div>” container. To use the “<figcaption>”, first, add the “<img>” element to embed the image inside the “<figure>” element, then, utilize the “<figcaption>” element and add a caption between its tags. In the second approach, users can simply use the “<div>” element and apply different CSS properties to beautify the caption. This post has demonstrated the methods for writing the caption under an image.
Source: linuxhint.com