How to Use the ChatGPT API in Python
ChatGPT, an artificial intelligence created by Open AI and a company that is owned by Elon Musk and Sam Altman, has managed to shake the world. It has had 1 million users in just 5 days since its launch on November 30, 2022. OpenAI has raised a firm valuation of $29B. The leading investor is Microsoft with the latest investment of $10B.
During the research, ChatGPT published its service for free which can be accessed on https://chat.openai.com. However, in this tutorial, we will use the ChatGPT service in our own program using the API from OpenAI.
We will learn the following:
ChatGPT is artificial intelligence (AI) which is a variant of the Generative Pre-training Transformer. ChatGPT is a language model based on Neural Networks. It uses the Supervised Learning and Reinforcement Learning to produce a natural language text. This model is trained by utilizing the text data from the internet. Its ability continues to be developed in order to carry out various kinds of human tasks. The presence of ChatGPT also has the potential to disrupt everything. ChatGPT can answer any question, do programming, make financial analyses, write poetry, compose songs, and write articles and essays. ChatGPT can also imitate, explain, and even remember what has been said. If the user asks about something, it could outline the ideas, challenge a false premise, and turn down inappropriate requests. It apologizes if it makes a mistake. More than that, ChatGPT can also summarize scientific articles, perform chat-based customer service functions, make predictions, and translate languages.
Microsoft plans to adopt ChatGPT into all of its products. Unfortunately, there is no official information on which products will be embedded with ChatGPT technology. But what is certain is that Microsoft will utilize ChatGPT in Microsoft’s Bing search engine application which challenges Google’s dominance.
Using ChatGPT API to Our Program
Utilizing the ChatGPT AI can help us to make the program that we want easily and more efficiently. For example, you as a blogger could ask ChatGPT to make an automation program in the Python programming language regarding an in-depth explanation of a certain topic and then upload the text result to your personal blog in one go. Let’s make the detailed code in another post about this case. For now, we will learn how to use the ChatGPT API in our program.
To be honest, the way to use ChatGPT in our program is very easy. It only requires two easy steps, including:
- Preparation. Register an account to OpenAI and create an OpenAI API key.
- Implementation. Use an OpenAI API key to our program; In this case, we use the Python program.
Preparation
First, register an account at https://platform.openai.com/. You can easily register using the OAuth of Google, Microsoft, or Apple account. Once you verify your phone number, your account is activated. Now, go to the “User Account Setting” in the top-right corner and choose “View API keys”.
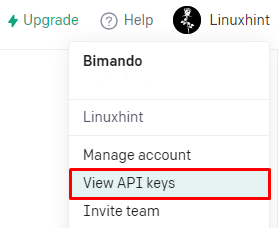
Figure 1
Then, click on the “+ Create new secret key”.
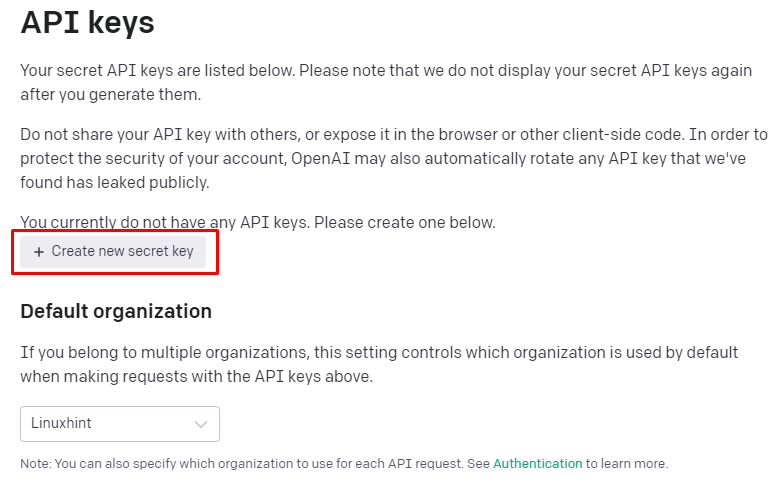
Figure 2
Define any name for your API. Then, click on “Create secret key”.
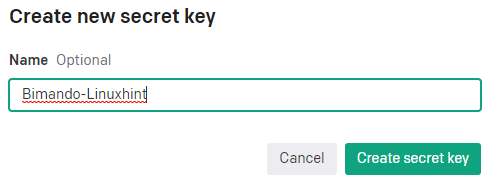
Figure 3
Before you click “Done”, make sure that you copied the API key and saved it in a notepad or somewhere.

Figure 4
NOTE: You will get a $5 free trial credit with an active period of 3 months. This policy may change at any time. You can monitor your credit usage at https://platform.openai.com/account/usage.
Implementation
To be able to communicate to an external API, we should make an HTTP request. Python provides a generic request library to handle this job named “Requests”. But OpenAI also provides a Python library itself named “openai”. In this tutorial, we only cover how to use the generic requests to make a strong basic fundamental of making a request to an external API endpoint.
First, we need to install the requests library using PIP and then import it using the following code:
import requests
Then, we need two important variables to store the string value of the OpenAI API key and the API endpoint. The API key here is what we created in the preparation step earlier. The API endpoint is a specific location or URL to access a particular function or service. There are a lot of OpenAI API endpoints, a few of them are as follows:
| API Endpoint | OpenAI Models |
| https://api.openai.com/v1/completions | ChatGPT – Text Completion |
| https://api.openai.com/v1/images/generations | DALL·E – Image Generator |
| https://api.openai.com/v1/audio/transcriptions | Whisper – Speech recognition |
Look at another detailed API endpoints information at https://platform.openai.com/docs/api-reference/.
From the previous information, we declare these variables:
api_key = "Your_personalized_OpenAI_API_key"
By the way, API keys are sensitive data; it should not be hardcoded in the source code. You should not share that information with anyone. But for now, leave it as it is. Who cares about your free trial API key?
Now, we have the API key for authentication and the API endpoint to determine which URL to connect. The next thing that we need to complete to our program is the metadata. This metadata contains the request header and request data for the ChatGPT model. Type the following code:
"Content-Type": "application/json",
"Authorization": "Bearer " + api_key
}
request_data = {
"model": "text-davinci-003",
"prompt": "left it blank",
"max_tokens": 1000,
"temperature": 0.7
}
Model
The model is the AI engine name; the latest model version has the latest training data date. If you are seeing this article a year later, the OpenAI could release an updated model. See the latest ChatGPT machine learning model and version at the OpenAI documentation at https://platform.openai.com/docs/models
Max_tokens
Max_toxens is the maximum number of tokens in your prompt. You can define the max_tokens value as much as the limit of each type of model. The GPT-3.5 models support 4,069 max tokens, while GPT-4 models support 8,192 max tokens. To test how many tokens are in your prompt, you can use the OpenAI Tokenizer at https://platform.openai.com/tokenizer. Note that the token is different from the character. Adjust the max number of tokens with your expected output. For example, if the prompt value that you write expects only the name of a person or object without a descriptive explanation, maybe you only need around 7 tokens.
Temperature
The temperature variable determines how creative the response of the API engine is. The temperature value range is between 0 – 2. A lower value like 0.3 makes the output very focused and angular, while a higher value like 1.7 makes it more creative and diverse.
Do you notice something weird on our previous request_data variable? It is the prompt’s value. We want to input this key each time we run the program. To do that, we apply this code:
Now, we have everything ready to be connected. We need to send this request data using the POST method along with the data that we previously created. Also, we need to capture the response to see the result of our request.
Now, we use the conditional statements for checking. When our request generates code 200 or is successfully connected, we display the result of the input (prompt) and save it in a file. If the response code that we receive other than 200 means that an error is raised, we display the error code along with the message. Add the following code:
response_text = response.json()["choices"][0]["text"]
print(response_text)
with open("output.txt", "w") as file:
file.write(response_text)
else:
print("Request failed with status code:", str(response.status_code),
"\n[+]", response.json()["error"]["message"])
That’s all. Finally, save the file to “chatgpt-api.py” and run the code. Here is the snapshot:

Figure 5
If the error is raised, you might look at the following output:
Figure 6
You can download the full code at https://github.com/bimando/python-chatgpt-api.
Conclusion
You can improvise the code according to your needs and creativity. As long as ChatGPT still provides this trial version, make the most of the potential that it can generate. Or if you need credit on a large scale, you can plan the paid version which definitely has better features and functions than the free version.
Source: linuxhint.com