How to Use HAProxy as an Ingress Controller in Kubernetes Environment
What Is an Ingress Controller?
An ingress controller is a component that allows the users to manage and control the access of services within their Kubernetes cluster. The ingress controller has two key elements:
- The Ingress Resource – It is a Kubernetes API object that defines the rules for routing the traffic of the services in the cluster based on the specified hostname and paths.
- The Ingress Controller – It is a software component such as HAProxy, Traefik, or NGINX that implements the rules that are specified in the ingress resource. It configures the load balancer to handle the traffic based on the changes made to the ingress objects.
How to Use HAProxy as an Ingress Controller in Kubernetes Environment
Having understood what an ingress controller is and why you need it, the next task is to cover the steps to use it. For our case, we set up HAProxy as our ingress controller following the provided steps.
N/B: Ensure that you have your Kubernetes cluster up and running. Then, proceed as follows.
Step 1: Start Your Kubernetes Cluster
There are different ways of setting up and starting a Kubernetes cluster. For this guide, we use Minikube. It is a tool that offers a simplistic way of deploying Kubernetes inside a virtual machine or Docker, especially if you have your Kubernetes locally on your machine.
Refer to the Minikube documentation on the installation commands to use for your platform. For this case, we run a stable “x64” Linux architecture and run the following commands:
$ sudo install minikube-linux-amd64 /usr/local/bin/minikube
The first command grabs the latest stable Minikube binary, while the second command installs and moves the binary into the specified path.
Once you installed Minikube, start it to bring up the cluster.

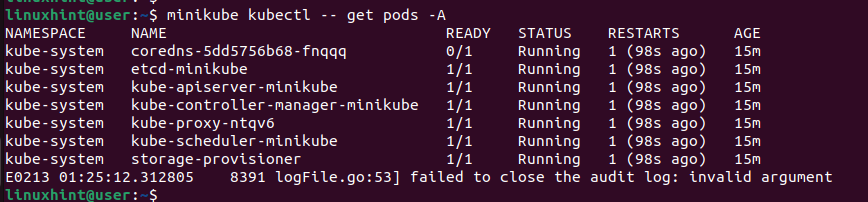
You then must have kubectl installed to access the cluster. However, you can use the kubectl version that is available with Minikube. For instance, to check the details of the running pods, you execute the “kubectl” command as follows:
That way, you don’t need to have kubectl installed. The (–) signals that the commands are for kubectl, not Minikube.
Step 2: Create a Namespace
The second step involves creating a dedicated namespace for the ingress controller. We named the namespace as “haproxy-controller”.

Step 3: Create and Deploy the HAProxy Ingress Controller
How you create the ingress controller depends on what you want to achieve. For instance, you can create a HAProxy ingress controller to route an HTTP traffic depending on the requested hostname. For such a case, start by accessing your DNS server and creating an “A” record to map the target hostname to your cluster.
Once you have your correct “A” record, create your ingress controller YAML file as shown in the following image. In the first section, we created a Deployment resource that uses the “jmalloc/echo-server” Docker container image as our example.
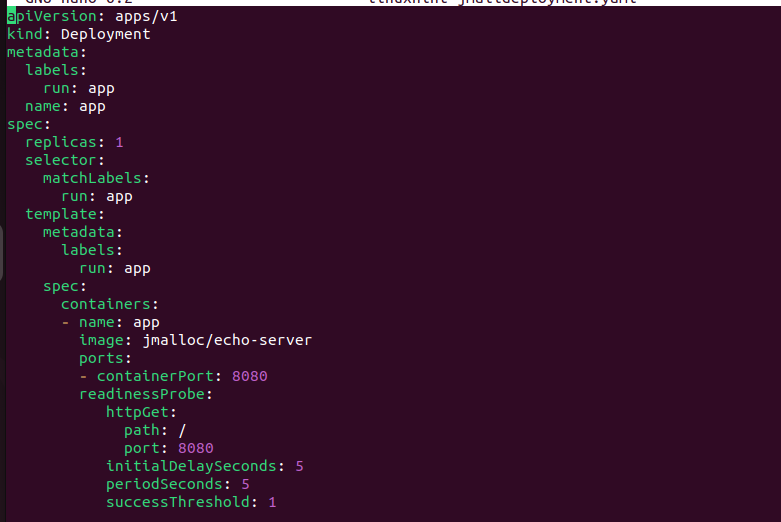
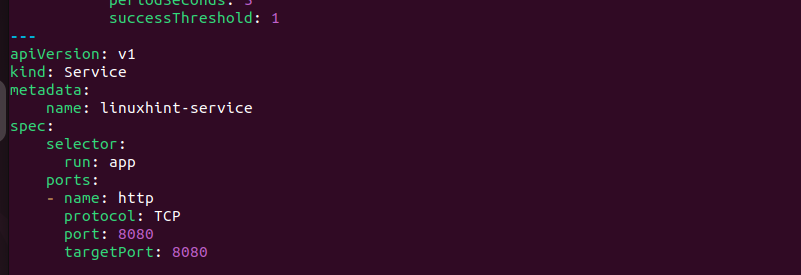
In the second section of the YAML file, we created the Service resource which gets mapped based on the hostname that is requested in the ingress controller which is created in step 4.
Save the file and deploy it to your cluster using kubectl. We reference the Minikube kubectl by running the following command for our case. Our HAProxy ingress controller is “linuxhint-jmaildeployment.yaml”.

Once you get an output showing that the service has been created, you can further verify that it has been deployed using the following command:

Ensure that you use the correct namespace that you created in step 1. You will get an output which confirms that the service is available which means that the deployment was successful.
Step 4: Create and Deploy an Ingress Resource
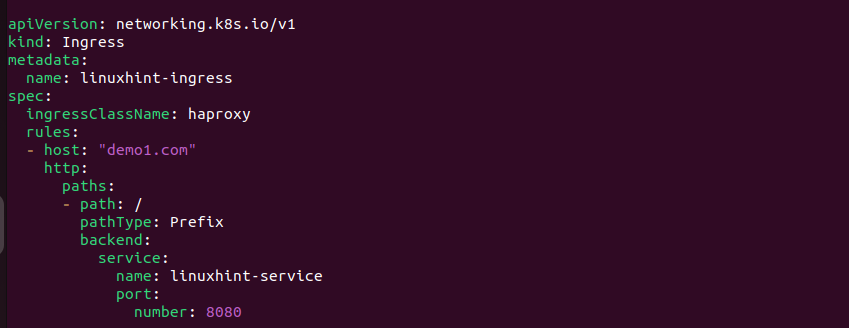
Create another YAML file which acts as the ingress resource that contains the rules for how HAProxy should route your traffic. Ensure that you use the correct domain name (host) that you are targeting and adjust the naming and the desired port to accept the incoming traffic.
Save the HAProxy ingress resource file and deploy it as we did with the controller.
We name our ingress resource as “linuxhint-ingresscontroller.yaml”.

That’s it! With the following command, you can verify that your HAProxy ingress controller is working by checking the port that is assigned to the NodePort.
For this case, it’s assigned with port 32448. You can access the created service using the port and check its status.

With that, you managed to use HAProxy as an ingress controller in a Kubernetes environment.
Conclusion
An ingress controller lets you define how to handle the traffic to your cluster based on the rules that are defined in your ingress resource file. HAProxy is a reliable ingress controller that you can use within a Kubernetes cluster, and this post covered what steps you should follow to use it. Try it out and enjoy using HAProxy as your ingress controller.
Source: linuxhint.com