How to Use AWS CLI to Manage AWS S3 Buckets
In this blog, we will discuss some basic commands used to manage the S3 buckets using the command line interface. In this article, we will discuss the following operations that can be performed on S3.
- Creating an S3 bucket
- Inserting data into the S3 bucket
- Deleting data from the S3 bucket
- Deleting an S3 bucket
- Bucket versioning
- Default encryption
- S3 bucket policy
- Server access logging
- Event notification
- Lifecycle rules
- Replication rules
Before starting this blog, first, you need to configure AWS credentials to use the command line interface on your system. Visit the following blog to learn more about configuring AWS command line credentials on your system.
https://linuxhint.com/configure-aws-cli-credentials/
Creating an S3 Bucket
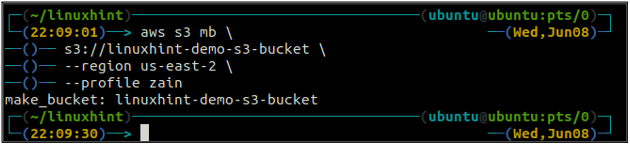
The first step to managing the S3 bucket operations using the AWS command line interface is to create the S3 bucket. You can use the mb method of the s3 command to create the S3 bucket on AWS. Following is the syntax to use the mb method of s3 to create the S3 bucket using AWS CLI.
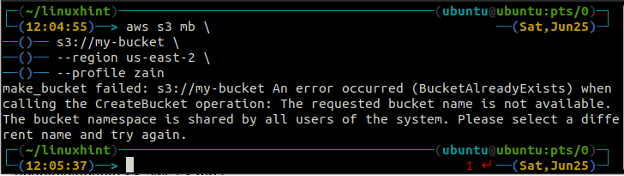
The bucket name is universally unique, so before creating an S3 bucket, make sure it is not already taken by any other AWS account. The following command will create the S3 bucket named linuxhint-demo-s3-bucket.
s3://linuxhint-demo-s3-bucket \
–region us-west-2
The above command will create an S3 bucket in the us-west-2 region.
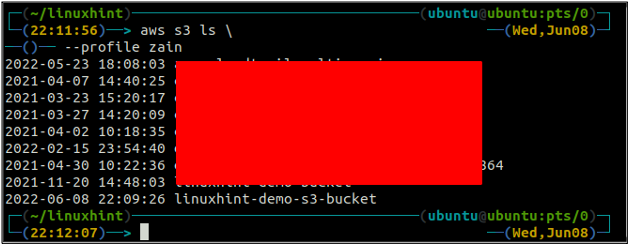
After creating the S3 bucket, now use the ls method of the s3 to make sure if the bucket is created or not.
You will get the following error on the terminal if you try to use a bucket name that already exists.
Inserting Data Into the S3 Bucket
After creating the S3 bucket, now it is time to put some data into the S3 bucket. In order to move data into the S3 bucket, the following commands are available.
- cp
- mv
- sync
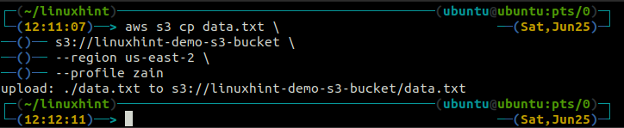
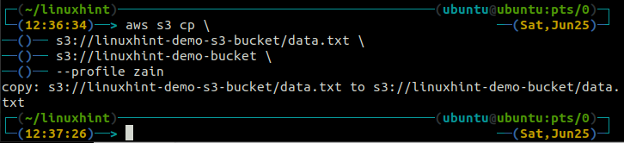
The cp command is used to copy the data from the local system to the S3 bucket and vice versa using AWS CLI. It can also be used to copy the data from one source S3 bucket to another destination S3 bucket. The syntax to copy the data to and from the S3 bucket is as below.
<S3 URI> (copy from local to S3)
<local path> (copy from S3 to local)
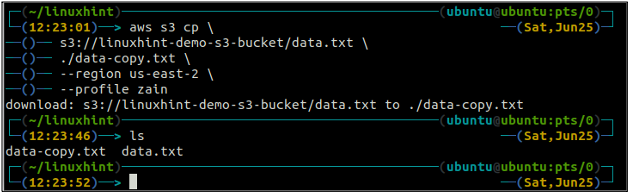
<S3 URI> (copy from one S3 to another)
The mv method of the s3 is used to move the data from the local system to the S3 bucket or vice versa using the AWS CLI. Just like the cp command, we can use the mv command to move data from one S3 bucket to another S3 bucket. Following is the syntax to use the mv command with AWS CLI.
<S3 URI> (move from local to S3)
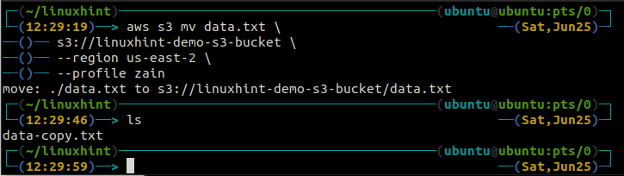
<local path> (move from S3 to local)
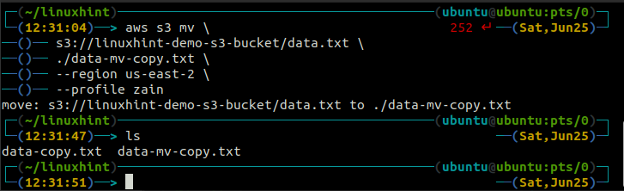
<S3 URI> (move from one S3 to another S3)

The sync command in the AWS S3 command line interface is used to synchronize a local directory and S3 bucket or two S3 buckets. The sync command first checks the destination and then copies only the files that do not exist in the destination. Unlike the sync command, the cp and mv commands move the data from source to destination even if the file with the same name already exists on the destination.
<S3 URI> (sync local directory to S3)
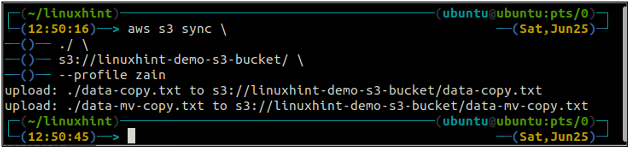
The above command will synchronize all the data from the local directory to the S3 bucket and will copy only the files that are not present in the destination S3 bucket.
Now we will synchronize the S3 bucket with the local directory using the sync command with the AWS command line interface.
<local path> (sync S3 to local directory)

The above command will synchronize all the data from the S3 bucket to the local directory and will only copy the files that do not exist in the destination as we have already synchronized the S3 bucket and the local directory, so no data was copied this time.
Deleting Data From the S3 Bucket
In the previous section, we discussed different methods to insert the data into the AWS S3 bucket using cp, mv, and sync commands. Now in this section, we will discuss different methods and parameters to delete the data from the S3 bucket using AWS CLI.
In order to delete a file from an S3 bucket, the rm command is used. Following is the syntax to use the rm command to remove the S3 object (a file) using the AWS command line interface.
s3://linuxhint-demo-s3-bucket/data-copy.txt

Running the above command will only delete a single file in the S3 bucket. In order to delete a complete folder that contains multiple files, the –recursive option is used with this command.
In order to delete a folder named files which contains multiple files inside, the following command can be used.
s3://linuxhint-demo-s3-bucket/files \
–recursive
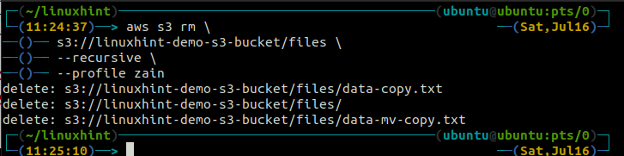
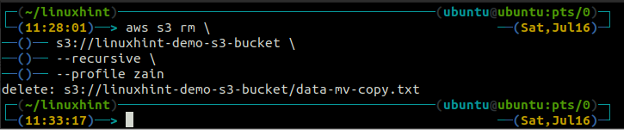
The above command will first remove all the files from all the folders in the S3 bucket and then remove the folders. Similarly, we can use the –recursive option along with the s3 rm method to empty an entire S3 bucket.
s3://linuxhint-demo-s3-bucket \
–recursive
Deleting an S3 Bucket
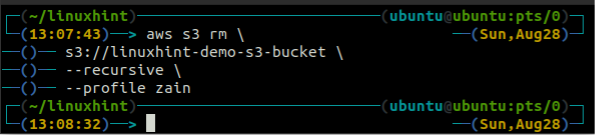
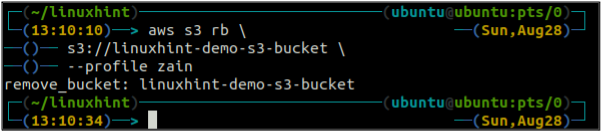
In this section of the article, we will discuss how we can delete an S3 bucket on AWS by using the command line interface. The rb function is used to delete the S3 bucket, which accepts the S3 bucket name as a parameter. Before removing the S3 bucket, you should first empty the S3 bucket by removing all the data using the rm method. When you delete an S3 bucket, the bucket name is available to use for others.
Before deleting the bucket, empty the S3 bucket by removing all the data using the rm method of the s3.
<S3 bucket URI> \
–recursive
After emptying the S3 bucket, you can use the rb method of the s3 command to delete the S3 bucket.
<S3 bucket URI>
Bucket Versioning
In order to keep the multiple variants of an S3 object in S3, the S3 bucket versioning can be enabled. When bucket versioning is enabled, you can keep track of changes you made to an S3 bucket object. In this section, we will use the AWS CLI to configure the S3 bucket versioning.
First, check the bucket versioning status of your S3 bucket with the following command.
–bucket <S3 bucket name>
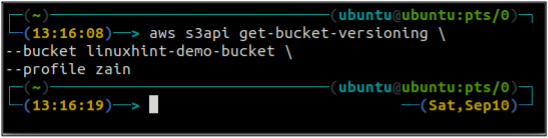
As the bucket versioning is not enabled, the above command did not generate any output.
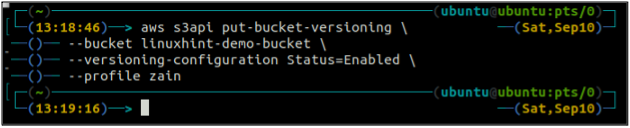
After checking the S3 bucket versioning status, now enable the bucket versioning using the following command in the terminal. Before enabling the versioning, keep in mind that the versioning can not be disabled after enabling it, but you can suspend it.
–bucket <S3 bucket name> \
–versioning-configuration Status=Enabled
This command will not generate any output and will successfully enable the S3 bucket versioning.
Now again, check the status of the S3 bucket versioning of your S3 bucket with the following command.
–bucket <S3 bucket name>

If the bucket versioning is enabled, it can be suspended using the following command in the terminal.
–bucket <S3 bucket> \
–versioning-configuration Status=Suspended
After suspending the S3 bucket versioning, the following command can be used to again check the status of the Bucket versioning.
–bucket <S3 bucket>

Default Encryption
In order to make sure that every object in the S3 bucket is encrypted, the default encryption can be enabled in S3. After enabling the default encryption, whenever you put an object into the bucket, it will automatically be encrypted. In this section of the blog, we will use the AWS CLI to configure the default encryption on an S3 bucket.
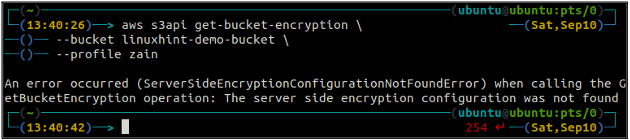
First, check the status of the default encryption of your S3 bucket using the get-bucket-encryption method of the s3api. If the bucket default encryption is not enabled, it will throw ServerSideEncryptionConfigurationNotFoundError exception.
–bucket <S3 bucket name>
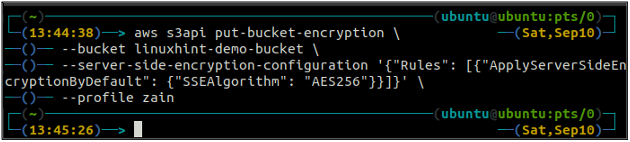
Now in order to enable the default encryption, the put-bucket-encryption method will be used.
–bucket <S3 bucket name> \
–server-side-encryption-configuration ‘{“Rules”: [{“ApplyServerSideEncryptionByDefault”: {“SSEAlgorithm”: “AES256”}}]}’
The above command will enable the default encryption, and every object will be encrypted using the AES-256 server-side encryption when put into the S3 bucket.
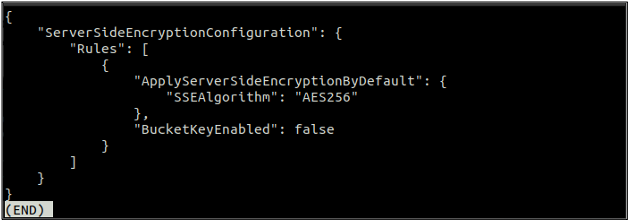
After enabling the default encryption, now again check the status of the default encryption using the following command.
If the default encryption is enabled, you can disable the default encryption by using the following command in the terminal.
–bucket <S3 bucket >

Now, if you check the default encryption status again, it will throw the ServerSideEncryptionConfigurationNotFoundError exception.
S3 Bucket Policy
The S3 bucket policy is used to allow other AWS services within or across the accounts to access the S3 bucket. It is used to manage the permission of the S3 bucket. In this section of the blog, we will use the AWS CLI to configure the S3 bucket permissions by applying the S3 bucket policy.
First, check the S3 bucket policy to see if it exists or not on any specific S3 bucket using the following command in the terminal.
–bucket <S3 bucket>
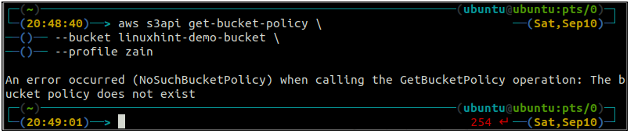
If the S3 bucket does not have any bucket policy associated with the bucket, it will throw the above error on the terminal.
Now we are going to configure the S3 bucket policy to the existing S3 bucket. For this, first, we need to create a file that contains the policy in JSON format. Create a file named policy.json and paste the following content in there. Change the policy and put your S3 bucket name before using it.
"Statement": [
{
"Effect": "Deny",
"Principal": "*",
"Action": "s3:GetObject",
"Resource": "arn:aws:s3:::MyS3Bucket/*"
}
] }
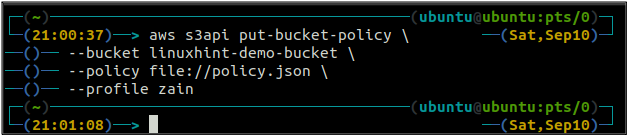
Now execute the following command in the terminal to apply this policy to the S3 bucket.
–bucket <S3 bucket> \
–policy file://policy.json
After applying the policy, now check the status of the bucket policy by executing the following command in the terminal.
–bucket <S3 bucket>

In order to delete the S3 bucket policy attached to the S3 bucket, the following command can be executed in the terminal.
–bucket <S3 bucket>

Server Access Logging
In order to log all the requests made to an S3 bucket into another S3 bucket, the server access logging must be enabled for an S3 bucket. In this section of the blog, we will discuss how we can configure the server access logging on and S3 bucket using the AWS command line interface.
First, get the current status of the server access logging for an S3 bucket by using the following command in the terminal.
–bucket <S3 bucket>

When the server access logging is not enabled, the above command will not throw any output in the terminal.
After checking the status of the logging, we now try to enable the logging on the S3 bucket to put logs in another destination S3 bucket. Before enabling the logging, make sure the destination bucket has a policy attached that allows the source bucket to put data in it.
First, create a file named logging.json and paste the following content in there and replace the TargetBucket with the name of the target S3 bucket.
"LoggingEnabled": {
"TargetBucket": "MyBucket",
"TargetPrefix": "Logs/"
}
}
Now use the following command to enable logging on an S3 bucket.
–bucket <S3 bucket> \
–bucket-logging-status file://logging.json
After enabling the server access logging on the S3 bucket, you can again check the status of the S3 logging by using the following command.
–bucket <S3 bucket>
Event Notification
AWS S3 provides us with a property to trigger a notification when a specific event occurs to the S3. We can use S3 event notifications to trigger SNS topics, a lambda function, or an SQS queue. In this section, we will see how we can configure the S3 event notifications using the AWS command line interface.
First of all, use the get-bucket-notification-configuration method of the s3api to get the status of the event notification on a specific bucket.
–bucket <S3 bucket>

If the S3 bucket does not have any event notification configured, it will not generate any output on the terminal.
In order to enable an Event notification to trigger the SNS topic, you first need to attach a policy to the SNS topic that allows the S3 bucket to trigger it. After this, you need to create a file named notification.json, which includes the details of the SNS topic and S3 event. Create a file notification.json and paste the following content in there.
"TopicConfigurations": [
{
"TopicArn": "arn:aws:sns:us-west-2:123456789012:s3-notification-topic",
"Events": [
"s3:ObjectCreated:*"
] }
] }
According to the above configuration, whenever you put a new object into the S3 bucket, it will trigger the SNS topic defined in the file.
After creating the file, now create the S3 event notification on your specific S3 bucket with the following command.
–bucket <S3 bucket> \
–notification-configuration file://notification.json
The above command will create an S3 event notification with the provided configurations in the notification.json file.
After creating the S3 event notification, now again list all the event notifications using the following AWS CLI command.
–bucket <S3 bucket>
This command will list the above-added event notification in the console output. Similarly, you can add multiple event notifications to a single S3 bucket.
Lifecycle Rules
The S3 bucket provides lifecycle rules to manage the lifecycle of the objects stored in the S3 bucket. This feature can be used to specify the lifecycle of the different versions of S3 objects. The S3 objects can be moved to different storage classes or can be deleted after a specific time period. In this section of the blog, we will see how we can configure the lifecycle rules using the command line interface.
First of all, get all the S3 bucket lifecycle rules configured in a bucket using the following command.
–bucket <S3 bucket name>
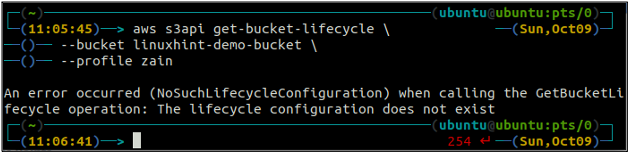
If the lifecycle rules are not configured with the S3 bucket, you will get the NoSuchLifecycleConfiguration exception in response.
Now let us create a lifecycle rule configuration using the command line. The put-bucket-lifecycle method can be used to create the lifecycle configuration rule.
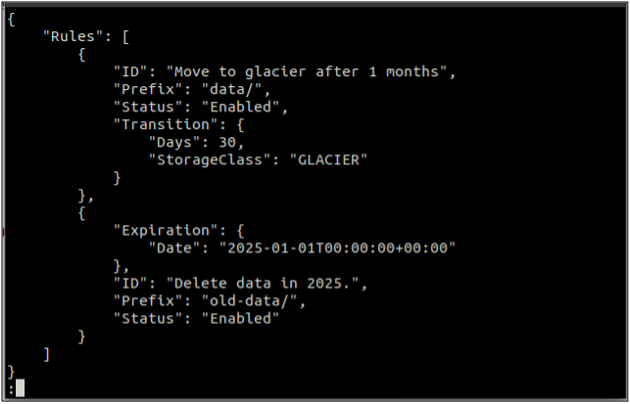
First of all, create a rules.json file that includes the lifecycle rules in JSON format.
"Rules": [
{
"ID": "Move to glacier after 1 months",
"Prefix": "data/",
"Status": "Enabled",
"Transition": {
"Days": 30,
"StorageClass": "GLACIER"
}
},
{
"Expiration": {
"Date": "2025-01-01T00:00:00.000Z"
},
"ID": "Delete data in 2025.",
"Prefix": "old-data/",
"Status": "Enabled"
}
] }
After creating the file with rules in JSON format, now create the lifecycle configuration rule using the following command.
–bucket <S3 bucket name> \
–lifecycle-configuration file://rules.json
The above command will successfully create a lifecycle configuration, and you can get the lifecycle configuration using the get-bucket-lifecycle method.
–bucket <S3 bucket name>
The above command will list all the configuration rules created for the lifecycle. Similarly, you can delete the lifecycle configuration rule using the delete-bucket-lifecycle method.
–bucket <S3 bucket name>
The above command will successfully delete the S3 bucket lifecycle configurations.
Replication Rules
Replication rules in S3 buckets are used to copy specific objects from a source S3 bucket to a destination S3 bucket within the same or different account. Also, you can specify the destination storage class and encryption option in the replication rule configuration. In this section, we will apply the replication rule on an S3 bucket using the command line interface.
First, get all the replication rules configured on an S3 bucket using the get-bucket-replication method.
–bucket <S3 bucket name>
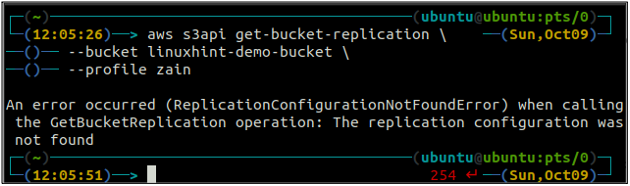
If there is no replication rule configured with an S3 bucket, the command will throw the ReplicationConfigurationNotFoundError exception.
In order to create a new replication rule using the command line interface, first, you need to enable the versioning on both the source and destination S3 bucket. Enabling the versioning has been discussed earlier in this blog.
After enabling the S3 bucket versioning on both the source and destination bucket, now create a replication.json file. This file includes the replication rules configuration in JSON format. Replace the IAM_ROLE_ARN and DESTINATION_BUCKET_ARN in the following configuration before creating the replication rule.
"Role": "IAM_ROLE_ARN",
"Rules": [
{
"Status": "Enabled",
"Priority": 100,
"DeleteMarkerReplication": { "Status": "enabled" },
"Filter": { "Prefix": "data" },
"Destination": {
"Bucket": "DESTINATION_BUCKET_ARN"
}
}
] }
After creating the replication.json file, now create the replication rule using the following command.
–bucket <S3 bucket name> \
–replication-configuration file://replication.json
After you execute the above command, it will create a replication rule in the source S3 bucket which will automatically copy the data to the destination S3 bucket specified in the replication.json file.
Similarly, you can delete the S3 bucket replication rule using the delete-bucket-replication method in the command line interface.
–bucket <S3 bucket name>
Conclusion
This blog describes how we can use the AWS command line interface to perform basic to advanced operations like creating and deleting an S3 bucket, Inserting and deleting data from the S3 bucket, enabling default encryption, versioning, server access logging, event notification, replication rules, and lifecycle configurations. These operations can be automated by using the AWS command line interface commands in your scripts and hence help to automate the system.
Source: linuxhint.com