How to Use Arduino Serial.read() and Serial.write() Functions
Arduino Serial.read()
Arduino Serial.read() function takes the data which is input to the Arduino board. Data is stored in int data type. It returns the first data byte of the data which is received as serial data. It also returns value -1 when no data is available.
Syntax
Parameter Value
Serial: It signifies the serial port object.
Return Values
It returns the first byte of incoming data or if no data is available at serial port it returns -1. Data type of return value is int.
Example Program
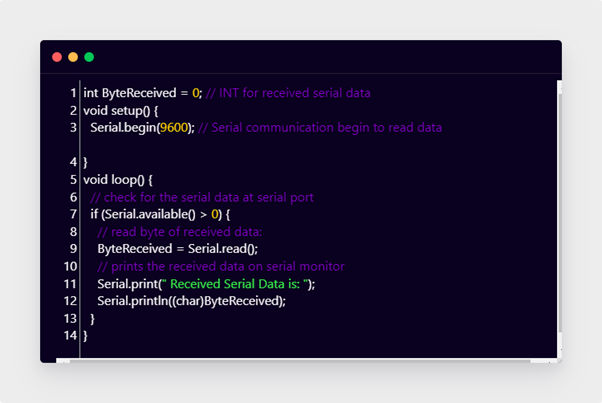
void setup() {
Serial.begin(9600); // Serial communication begin to read data
}
void loop() {
// check for the serial data at serial port
if (Serial.available() > 0) {
// read byte of received data:
ByteReceived = Serial.read();
// prints the received data on serial monitor
Serial.print(" Received Serial Data is: ");
Serial.println((char)ByteReceived);
}
}
Above code initialized a new variable at start with name “ByteReceived” next in void setup part serial communication is begin using baud rate.
In the loop section if condition is used to check whether any data is available at serial port or not if the data is available, it will store the read data into variable ByteReceived and using Serial.print() the received data is printed on serial monitor.
Output
Type any word on the serial monitor and press Ctrl+Enter. The data will be read by serial read and shown on serial monitor. Here we type the word “Hello” which is shown in output terminal as follows:

Arduino Serial.write()
Serial.write() Arduino functions send data serially in the form of binary. Data can either be sent as s byte or series of bytes. Serial.write() function returns the total number of bytes written. To send digits of numbers represented by characters user Serial.print() instead of Serial.write() function. Serial write is simpler and faster as compared to serial print because serial write returns data in binary while serial print converts data from ASCII to binary. Return data type is size_t.
Syntax
Serial write can be declared in three different formats as shown below:
2 - Serial.write(str)
3 - Serial.write(buf,len)
Parameter Value
Serial: It signifies the serial port object.
| val | used to send a single byte data |
| Str | used to send data containing series of bytes |
| Buf | an array is sent in form of bytes |
| len | length represent number of bytes to be sent by array |
Return Values
It returns the number of bytes written on serial monitor Data type which stored data is size_t.
Example Program
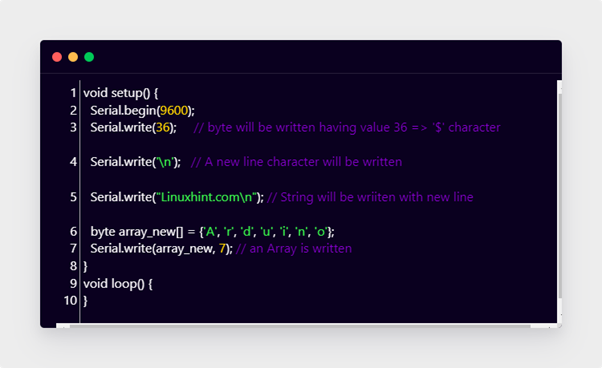
Serial.begin(9600);
Serial.write(36); /*byte will be written having value 36 =>'$'character*/
Serial.write('\n'); /*A new line character will be written*/
Serial.write("Linuxhint.com\n"); /* String will be written with new line*/
byte array_new[] = {'A', 'r', 'd', 'u', 'i', 'n', 'o'};
Serial.write(array_new, 7); /* an Array is written*/
}
void loop() {
}
In Serial.write() code first we begin serial communication using baud rate then write a “$” character using its ASCII value which equals to 36. Next a new line break is given followed by a string which represents “Linuxhint.com”. In the last part of code an array is written using serial write on the serial monitor.
Output
Conclusion
When it comes to reading and writing data on the serial monitor, Serial.write() and Serial.read() functions are used. Arduino is a versatile board so it can send instructions to different devices to do this we use these two serial functions. Using this article, we can print or send any type of data or instruction to devices.
Source: linuxhint.com