How to Upgrade VCS from 7.4.2 to 8.0 in RHEL
Veritas Cluster Server upgrade can be done smoothly by using the Install Bundles feature. This installer allows you to perform the upgrade directly to a base, maintenance, patch level or a combination of multiple patches and packages together in one go because the installer has the ability to merge all these packages. So, you don’t have to perform two or more install actions to install or upgrade systems to maintenance levels or patch levels.
If you are on an unsupported operating system version, ensure that you first upgrade to a supported verison of the operating system then perform VCS upgrade.
In this article, we will show you how to upgrade Veritas Cluster Server from 7.4.2 or 7.4.3 to 8.0, including Red Hat upgrade from RHEL 7.9 to RHEL 8.8.
Our Environment
- Two node Active-Passive VCS cluster 7.4.2 with RHEL 7.9
- Node1 – 2gvcsnode1 – 192.168.10.110
- Node2 – 2gvcsnode2 – 192.168.10.111
Upgrade Scenario
Our upgrade path is as follows.
- Red Hat upgrade from RHEL 7.9 to RHEL 8.8 using Leapp utility
- Veritas Cluster Server upgrade from 7.4.2 or 7.4.3 to VCS 8.0 node by node upgrade, which minimizes downtime
Prerequisites
Stop the VCS cluster on the system where you want to perform the RHEL 8.8 upgrade.
hastop -local
Rename the '/etc/llttab' file as shown below.
mv /etc/llttab /etc/llttab.save
System Upgrade
We have already added an article on Red Hat upgrade from RHEL 7.9 to RHEL 8.8 using Leapp utility. So follow the article for RHEL upgrade.
After RHEL upgrade, move ‘/etc/llttab’ file to original state.
mv /etc/llttab.save /etc/llttab
Check the Status of VCS cluster in another node (Node-1), at this point of time the Node-2 status would show as 'EXITED' because the ‘/etc/llttab’ was disabled before restarting the server.
hastatus -sum

-- SYSTEM STATE
-- System		State		Frozen

A  2gvcsnode1		RUNNING		0
A  2gvcsnode2		EXITED		0

-- GROUP STATE
-- Group		System		Probed	    AutoDisabled     State

B  ClusterService	2gvcsnode1	Y	    N		     OFFLINE
B  ClusterService	2gvcsnode2	Y	    N		     ONLINE
B  apachesg		2gvcsnode1	Y	    N		     OFFLINE
B  apachesg		2gvcsnode2	Y	    N		     ONLINE
Downloading Veritas InfoScale
As mentioned earlier, we need to download Veritas InfoScale base package, maintenance package, and required patches together. For this upgrade, you need to download following five archive files.
Veritas_InfoScale_8.0_RHEL.tar.gz			#Base Package
cpi-Patch-8.0.0.1400.tar.gz				#CPI Patch
infoscale-rhel8_x86_64-Patch-8.0.0.1800.tar.gz		#Cumulative Patch
infoscale-rhel8.7_x86_64-Patch-8.0.0.2600.tar.gz	#Common Updates Patch
infoscale-rhel8.8_x86_64-Patch-8.0.0.2700.tar.gz	#RHEL8.8 Patch
Creating directory structure
Create a proper directory structure and move the files to respective directory to avoid confusion. I have created the following directories as per my convenient.
/backup/vcs8			#Base Package Path
/backup/vcs8_cpi_patch_1400	#CPI_Patch Path
/backup/vcs8_patch_1800		#Patch_1 Path
/backup/vcs8_patch_2600		#Patch_2 Path
/backup/vcs8_patch_2700		#Patch_3 Path
Extracting the Packages
Extract the packages to respective location as created above.
tar -xf Veritas_InfoScale_8.0_RHEL.tar.gz -C /backup/vcs8
tar -xf cpi-Patch-8.0.0.1400.tar.gz -C /backup/vcs8_cpi_patch_1400
tar -xf infoscale-rhel8_x86_64-Patch-8.0.0.1800.tar.gz -C /backup/vcs8_patch_1800
tar -xf infoscale-rhel8.7_x86_64-Patch-8.0.0.2600.tar.gz -C /backup/vcs8_patch_2600
tar -xf infoscale-rhel8.8_x86_64-Patch-8.0.0.2700.tar.gz -C /backup/vcs8_patch_2700
Performing Upgrade
You can follow the below instruction for smoother upgrade.
Make a Note: CPI path must included in the beginning of the upgrade command as shown below.
Syntax:

./installer -require [Complete_Path_of_the_CPIscript] -patch_path [Path_to_the_patch 1] -patch2_path [Path_to_the_patch 2] -patch3_path [Path_to_the_patch 3]
Navigate to VCS 8.0 base directory and run installer as shown below (Please use your package location instead of ours). It is also advisable to use the latest CPI patch, other required patches along with the installer for a smoother upgrade. You can add a maximum of five patches using ‘-patch_path’ in a single command.
cd /backup/vcs8/dvd1-redhatlinux/rhel8_x86_64

./installer -require /backup/vcs8_cpi_patch_1400/CPI_8.0.0_P14.pl -patch_path /backup/vcs8_patch_1800 -patch2_path /backup/vcs8_patch_2600 -patch3_path /backup/vcs8_patch_2700
When you start the installer, the installer starts the product installation program with a copyright message. It then specifies where it creates the logs. Make a note of the directory name and path where the logs get stored.
		Veritas InfoScale Storage and Availability Solutions 8.0 Install Program

Copyright (c) 2020 Veritas Technologies LLC.  All rights reserved.  Veritas and the Veritas Logo are trademarks or
registered trademarks of Veritas Technologies LLC or its affiliates in the U.S. and other countries. Other names may
be trademarks of their respective owners.

The Licensed Software and Documentation are deemed to be "commercial computer software" and "commercial computer
software documentation" as defined in FAR Sections 12.212 and DFARS Section 227.7202.

Logs are being written to /var/tmp/installer-202307152138RgS while installer is in progress
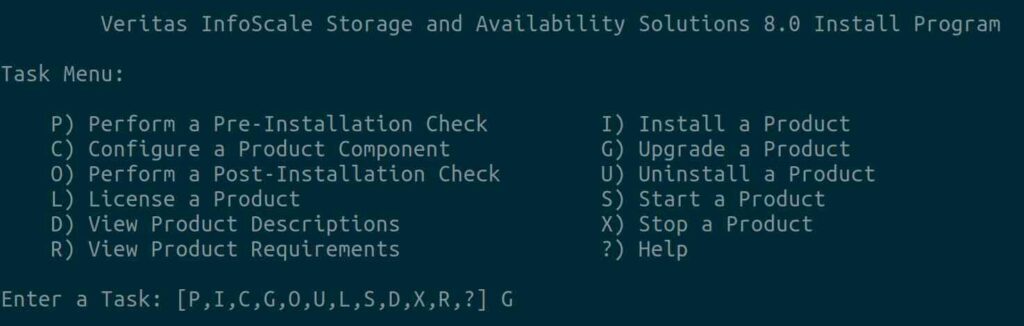
From the Task Menu, Select 'G' and hit 'Enter' to perform the VCS upgrade.
From the submenu, select which method you want to perform the upgrade. In our case, it’s Full Upgrade, so simple hit 'Enter' to go with default option.
Veritas InfoScale Storage and Availability Solutions 8.0 Upgrade Program

	1)  Full Upgrade
	2)  Rolling Upgrade
	3)  Online Upgrade [VCS only]
	b)  Back to previous menu

Select the method by which you want to upgrade the product: [1-3,b,q] (1)
The installer suggests system names for the upgrade. Press Enter to upgrade the suggested systems, or enter the name of any one system in the cluster on which you want to perform a full upgrade and then press Enter.
To minimize the downtime, we will be upgrading one by one node (Phase upgrade), so enter the specific hostname and press 'Enter'.
Enter the system names separated by spaces: [q,?] (2gvcsnode1 2gvcsnode2) 2gvcsnode2
Now, the installer performs various check on the system for the upgrade and ensure communications, release compatibility, and version information. It may present warnings and also report if anything failed during this check.
                              Veritas InfoScale Storage and Availability Solutions 8.0 Upgrade Program
                                                              2gvcsnode1

Logs are being written to /var/tmp/installer-202307152138RgS while installer is in progress

Verifying systems: 100%

Estimated time remaining: (mm:ss) 0:00                                                                     8 of 8

    Checking system communication .......................................................................... Done
    Checking release compatibility ......................................................................... Done
    Checking installed product ............................................................................. Done
    Checking platform version .............................................................................. Done
    Checking prerequisite patches and rpms ................................................................. Done
    Checking file system free space ........................................................................ Done
    Checking configured component .......................................................................... Done
    Performing product prechecks ........................................................................... Done

System verification checks completed

The following notes were discovered on the systems:

CPI NOTE V-9-40-2930 You are performing ENTERPRISE phased upgrade phase 1 on the systems. The first subcluster will be upgraded.

CPI NOTE V-9-30-1114 InfoScale Enterprise version 7.4.2.3100 will be upgraded to InfoScale Enterprise version 8.0.0.0000 on 2gvcsnode1

The following warnings were discovered on the systems:

CPI WARNING V-9-40-1442 Kernel Release 4.18.0-477.13.1.el8_8.x86_64 is detected on 2gvcsnode1, which is not recognizable by the installer. It is strongly recommended to check if on SORT (https://sort.veritas.com) before continue.

CPI WARNING V-9-40-4050 The vxconfigd utility could not be started on 2gvcsnode1. Upgrading VRTSvxvm in this scenario can result in configuration errors, or data loss for Veritas Volume Manager objects. Continue if you are sure that there are no Veritas Volume Manager objects on the host.

CPI WARNING V-9-40-3952 Cannot check for open volumes on 2gvcsnode1 because the vxconfigd process is not in enabled mode. You must affirm that there are no open volumes if you want to continue.

CPI WARNING V-9-40-2947 Not all the members of the cluster, 2gvcsnode, are included in this upgrade. We recommend that you upgrade all the members of the cluster together, unless you plan to perform a phased upgrade for the cluster.

CPI WARNING V-9-40-2916 VCS is not running before upgrade on 2gvcsnode1. Make sure all the configurations are valid before upgrade.
Review and check if all ‘WARNINGS’ can be ignored or if any action is required before moving to the next step.
In our case, all warnings can be ignored, so we can proceed to the next step. For the below questions, input 'y' for all and hit 'Enter'.
Do you want to continue? [y,n,q] (y) y

This product may contain open source and other third party materials that are subject to a separate license. See the
applicable Third-Party Notice at https://www.veritas.com/about/legal/license-agreements

Do you agree with the terms of the End User License Agreement as specified in the EULA/en/EULA.pdf file present on media? [y,n,q,?] y

Do you want to stop InfoScale Enterprise processes now? [y,n,q,?] (y) y
The installer prompts you to stop the applicable VCS processes in order to uninstall old Veritas Cluster Server RPMs.
			        Veritas InfoScale Enterprise 8.0 Upgrade Program
				                    2gvcsnode1

Logs are being written to /var/tmp/installer-202307152138RgS while installer is in progress

    Stopping InfoScale Enterprise: 100%

    Estimated time remaining: (mm:ss) 0:00                                                                 30 of 30

    Performing InfoScale Enterprise prestop tasks ............................................................ Done
    Stopping vcsmm ........................................................................................... Done
    Stopping vxodm ........................................................................................... Done
    Stopping vxgms ........................................................................................... Done
    Stopping vxglm ........................................................................................... Done
    Stopping vxdbd ........................................................................................... Done
    Stopping vxcpserv ........................................................................................ Done
    Stopping had ............................................................................................. Done
    Stopping amf ............................................................................................. Done
    Stopping vxfen ........................................................................................... Done
    Stopping gab ............................................................................................. Done
    Stopping llt ............................................................................................. Done
    Stopping sfmh-discovery .................................................................................. Done
    Stopping vxdclid ......................................................................................... Done
    Stopping vxcafs .......................................................................................... Done
    Stopping fdd ............................................................................................. Done
    Stopping vxportal ........................................................................................ Done
    Stopping vxfs ............................................................................................ Done
    Stopping vxcloud ......................................................................................... Done
    Stopping vvr ............................................................................................. Done
    Stopping vxencryptd ...................................................................................... Done
    Stopping vxsisted ........................................................................................ Done
    Stopping vxnotify ........................................................................................ Done
    Stopping vxvm-recover .................................................................................... Done
    Stopping vxdmp ........................................................................................... Done
    Stopping vxdmp ........................................................................................... Done
    Stopping veki ............................................................................................ Done
    Stopping vxio ............................................................................................ Done
    Stopping vxspac .......................................................................................... Done
    Stopping vxconfigd ....................................................................................... Done
    Stopping xprtld .......................................................................................... Done
    Performing InfoScale Enterprise poststop tasks ........................................................... Done

Veritas InfoScale Enterprise Shutdown completed successfully
Uninstalls old RPMs after the installer stops the associated VCS processes.
Make a Note: If any RPM uninstall fails at this stage, you will be prompted to exit the installer, but continue to the next stage by entering 'n', otherwise you will be faced with a situation where you will have to do a fresh install.
				            Veritas InfoScale Enterprise 8.0 Upgrade Program
				                        2gvcsnode1

Logs are being written to /var/tmp/installer-202307152138RgS while installer is in progress

    Uninstalling InfoScale Enterprise: 100%

    Estimated time remaining: (mm:ss) 0:00                                                                    25 of 25

    Performing InfoScale Enterprise preremove tasks .............................................................. Done
    Uninstalling VRTSdbac ........................................................................................ Done
    Uninstalling VRTSvcswiz ...................................................................................... Done
    Uninstalling VRTSvcsea ....................................................................................... Done
    Uninstalling VRTSodm ......................................................................................... Done
    Uninstalling VRTSgms ......................................................................................... Done
    Uninstalling VRTScavf ........................................................................................ Done
    Uninstalling VRTSglm ......................................................................................... Done
    Uninstalling VRTSdbed ........................................................................................ Done
    Uninstalling VRTSvcsag ....................................................................................... Done
    Uninstalling VRTScps ......................................................................................... Done
    Uninstalling VRTSvcs ......................................................................................... Done
    Uninstalling VRTSamf ......................................................................................... Done
    Uninstalling VRTSvxfen ....................................................................................... Done
    Uninstalling VRTSgab ......................................................................................... Done
    Uninstalling VRTSllt ......................................................................................... Done
    Uninstalling VRTSveki ........................................................................................ Done
    Uninstalling VRTSfsadv ....................................................................................... Done
    Uninstalling VRTSspt ......................................................................................... Done
    Uninstalling VRTSvxfs ........................................................................................ Done
    Uninstalling VRTSvxvm ........................................................................................ Done
    Uninstalling VRTSperl ........................................................................................ Done
    Uninstalling VRTSvlic ........................................................................................ Done
    Uninstalling VRTSpython ...................................................................................... Done
    Performing InfoScale Enterprise postremove tasks ............................................................. Done

Veritas InfoScale Enterprise Uninstall completed successfully
In this screen, it installs Veritas InfoScale Enterprise 8.0 RPMs, including all required patches.
			            Veritas InfoScale Enterprise 8.0 Upgrade Program
				                        2gvcsnode1

Logs are being written to /var/tmp/installer-202307152138RgS while installer is in progress

    Installing InfoScale Enterprise: 100%

    Estimated time remaining: (mm:ss) 0:00                                                                      55 of 55

    Performing InfoScale Enterprise preinstall tasks .............................................................. Done
    Installing VRTSperl rpm ....................................................................................... Done
    Installing VRTSpython rpm ..................................................................................... Done
    Installing VRTSvlic rpm ....................................................................................... Done
    Installing VRTSspt rpm ........................................................................................ Done
    Installing VRTSveki rpm ....................................................................................... Done
    Installing VRTSvxvm rpm ....................................................................................... Done
    Installing VRTSaslapm rpm ..................................................................................... Done
    Installing VRTSvxfs rpm ....................................................................................... Done
    Installing VRTSfsadv rpm ...................................................................................... Done
    Installing VRTSllt rpm ........................................................................................ Done
    Installing VRTSgab rpm ........................................................................................ Done
    Installing VRTSvxfen rpm ...................................................................................... Done
    Installing VRTSamf rpm ........................................................................................ Done
    Installing VRTSvcs rpm ........................................................................................ Done
    Installing VRTScps rpm ........................................................................................ Done
    Installing VRTSvcsag rpm ...................................................................................... Done
    Installing VRTSvcsea rpm ...................................................................................... Done
    Installing VRTSrest rpm ....................................................................................... Done
    Installing VRTSdbed rpm ....................................................................................... Done
    Installing VRTSglm rpm ........................................................................................ Done
    Installing VRTScavf rpm ....................................................................................... Done
    Installing VRTSgms rpm ........................................................................................ Done
    Installing VRTSodm rpm ........................................................................................ Done
    Installing VRTSdbac rpm ....................................................................................... Done
    Installing VRTSperl patch ..................................................................................... Done
    Installing VRTSpython patch ................................................................................... Done
    Installing VRTSspt patch ...................................................................................... Done
    Installing VRTSveki patch ..................................................................................... Done
    Installing VRTSvxvm patch ..................................................................................... Done
    Installing VRTSaslapm patch ................................................................................... Done
    Installing VRTSvxfs patch ..................................................................................... Done
    Installing VRTSfsadv patch .................................................................................... Done
    Installing VRTSllt patch ...................................................................................... Done
    Installing VRTSgab patch ...................................................................................... Done
    Installing VRTSvxfen patch .................................................................................... Done
    Installing VRTSamf patch ...................................................................................... Done
    Installing VRTSvcs patch ...................................................................................... Done
    Installing VRTScps patch ...................................................................................... Done
    Installing VRTSvcsag patch .................................................................................... Done
    Installing VRTSvcsea patch .................................................................................... Done
    Installing VRTSrest patch ..................................................................................... Done
    Installing VRTSdbed patch ..................................................................................... Done
    Installing VRTSglm patch ...................................................................................... Done
    Installing VRTSgms patch ...................................................................................... Done
    Installing VRTSodm patch ...................................................................................... Done
    Performing InfoScale Enterprise postinstall tasks ............................................................. Done

Veritas InfoScale Enterprise Install completed successfully
Finally, it performs SFHA upgrade and configuration then display log file location. Simply exit the installer by hitting 'Enter' button.
			            Veritas InfoScale Enterprise 8.0 Upgrade Program
				                        2gvcsnode1

Logs are being written to /var/tmp/installer-202307152138RgS while installer is in progress

    Configuring SFHA: 100%

    Estimated time remaining: (mm:ss) 0:00                                                                      1 of 1

    Performing SFHA upgrade configuration ....................................................................... Done

Storage Foundation and High Availability Configure completed successfully

You are performing phased upgrade phase 1 on the systems. Follow the steps in Configuration and Upgrade Guide to upgrade
the remaining systems.
Checking online updates for Veritas InfoScale Enterprise 8.0

	A connection attempt to https://sort.veritas.com to check for product updates failed.
	Visit https://sort.veritas.com to check for available product updates and information.

installer log files, summary file, and response file are saved at:

	/opt/VRTS/install/logs/installer-202307152138RgS

Would you like to view the summary  file? [y,n,q] (n)
Veritas Cluster Server upgrade from 7.4.1/7.4.2 to 8.0 has been completed successfully on the Second Node (Node-2). After the Veritas upgrade, perform a sanity restart to verify that all Veritas services start as expected and were able to join the cluster without any issues.
reboot
or
init 6
After restarting, check the status of Node-2 in the cluster. If it joins automatically without any problem, proceed to the next step. But if it doesn’t join then we need to do further troubleshooting based on the logs available in ‘/var/VRTSvcs/log/engine_A.log’.
hastatus -sum

-- SYSTEM STATE
-- System		State		Frozen

A  2gvcsnode1		RUNNING		0
A  2gvcsnode2		RUNNING		0

-- GROUP STATE
-- Group		System		Probed	    AutoDisabled     State

B  ClusterService	2gvcsnode1	Y	    N		     OFFLINE
B  ClusterService	2gvcsnode2	Y	    N		     ONLINE
B  apachesg		2gvcsnode1	Y	    N		     OFFLINE
B  apachesg		2gvcsnode2	Y	    N		     ONLINE
If the upgraded node was joined the cluster and the cluster is healthy, move the service group to the upgraded node. In this scenario, Node-2 is running with VCS 8.0
hagrp -switch apachesg -to 2gvcsnode2
Perform an application sanity check. If it works as expected. Do the upgrade on the other node as well ‘2gvcsnode1’ using the above steps.
Wrapping Up
In this tutorial, we’ve shown you how to upgrade Veritas Cluster Server (VCS) from 7.4.1 or 7.4.2 to 8.0 with necessary patches on RHEL 8.8, along with RHEL 8.8 upgrade from RHEL 7.9.
In the next post, we’ll show you list of frequently used VCS commands and their usage.
If you have any questions or feedback, feel free to comment below.
The post How to Upgrade VCS from 7.4.2 to 8.0 in RHEL first appeared on 2DayGeek.
Source: 2DayGeek