How to Troubleshoot Windows 11 Camera Problems
On Windows, users can operate a system camera and also an external camera. The camera is an essential component in the user’s life and is used in a variety of situations, including meetings, online sessions, and live streaming. But sometimes, Windows 11 users may face difficulty while connecting with a built-in camera or webcam when they start meetings and going live.
This article will demonstrate how to troubleshoot Windows 11 camera problems.
How to Troubleshoot Windows 11 Camera Problems?
Windows Camera may not work properly due to various reasons including, hardware problems (port or wire), outdated camera driver, may camera is off from privacy settings, antivirus programs may blocking the camera, and due to some unknown reason.
To fix the stated issue of Windows 11, follow the listed solutions:
Solution 1: Try and Check the USB port
Check the USB port if the user is utilizing an external camera. When the USB port is damaged, there may be an issue with the camera’s connection to the system. Try to connect the camera to the Windows system using a different USB port.
Solution 2: Update Windows Camera Driver
When the Windows camera driver is outdated, the camera may not work properly. To update the Windows camera driver, follow the listed steps.
Step 1: Open Device Manager App
First, open the Device Manager app from the Windows “Startup” menu:

Step 2: Choose the Camera Driver
Next, open the “Cameras” drop-down menu. Select the camera driver and double-click on it:

Step 3: Update the Driver
Navigate to the “Driver” menu and hit the “Update Driver” button:

Select the below-pointed option to search and install the camera driver automatically:

The output shows that we already have the best camera driver for the system:

Solution 3: Reinstall Driver
Sometimes, updating the camera driver is not enough to resolve the camera’s errors and issues. If the given solutions do not work properly, try to reinstall the camera drivers.
For this purpose, again open the Device Manager app, and double-click on the camera drive. Then, open the “Driver” menu and uninstall the driver by clicking on the “Uninstall Device” button:

Again, hit the “Uninstall” button to remove the camera driver from the system:

After that, restart the device to reinstall the camera driver automatically on system start.
Solution 4: Check Privacy Settings
The camera may occasionally not function properly due to Windows privacy settings, or camera access may be disabled. To check the camera privacy settings in Windows, follow the listed steps.
Step 1: Open Windows Privacy Settings
First, launch the Window settings using the Start menu. Then, navigate to the “Privacy & security” settings:

Step 2: Open Camera Settings
Next, click on the “Camera” settings under the “Privacy & security” settings:

Step 3: Enable Camera Access
Turn on the toggle of the “Camera Access” option to grant access and also grant the camera access to other system applications:

This can resolve the camera problems on Windows 11.
Solution 5: Temporarily Disable Antivirus
Occasionally, Windows antivirus programs find the external camera and other applications as malicious and stop them from accessing the system camera. To fix this issue, temporarily disable the Windows antivirus program.
Solution 6: Reset the Camera
Resetting the camera can resolve camera-related problems. To reset the camera setting, go through the listed steps.
Step 1: Open App & features Settings
First, launch the Windows “App & features” settings from the Start menu:

Step 2: Select Camera Settings
Next, click on the “Three dots” icons of the “Camera” option as shown below:

Step 3: Reset Camera
Click on the “Reset” button to reset the system camera:

Solution 7: Run Camera Troubleshooter
If the camera problem is still there after applying the all above solutions, try to run the camera troubleshooter. The Windows troubleshooter will automatically diagnose and fix the problem. To execute the camera troubleshooter, follow the listed steps.
Step 1: Open Troubleshooter Option
First, press the “Windows + I” key to launch the System settings. Then, open the “Troubleshooter” settings:

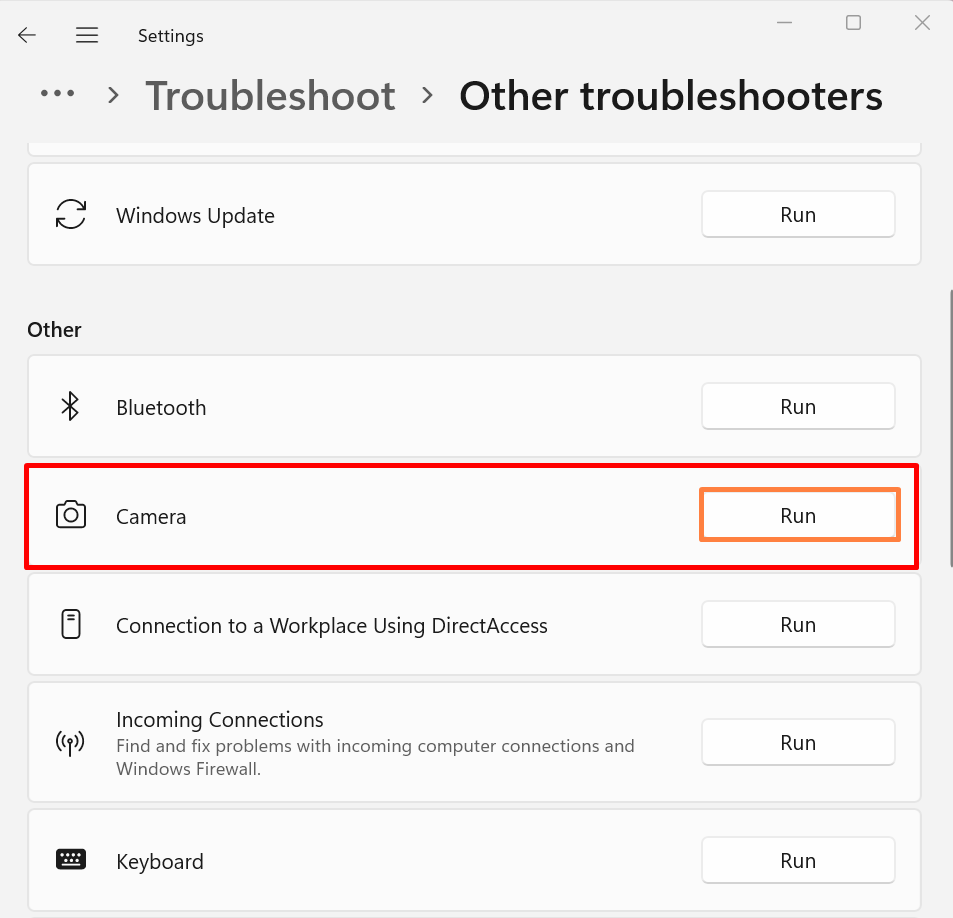
Step 2: Run Windows Camera Troubleshooter
In the next step, check the other troubleshooter options by clicking on highlighted option:

After that, activate the Camera troubleshooter by pressing the “Run” button to solve the issue automatically:
That’s all about troubleshooting the Windows 11 camera problem.
Conclusion
Windows Camera may not work properly due to hardware problems (port or wire), outdated camera driver, may camera is off from privacy settings. To troubleshoot the Windows 11 camera problem, check the USB port, update or reinstall Windows camera driver, check Privacy settings, temporarily disable Antivirus program or reset and troubleshoot the camera. This blog has provided the fixes to troubleshoot the Windows 11 camera problems.
Source: linuxhint.com