How to Store Data in Elasticsearch?
Elasticsearch is one of the best choices to analyze and preserve data. It can store various kinds of data such as geospatial data, numeric data, bulky and raw data, and semi-structured data. It usually stores data in documents that are further sterilized in JSON format. The stored data can be easily searched, updated, and deleted with the help of Rest APIs.
This post will demonstrate how to store data in Elasticsearch.
How to Store Data in Elasticsearch?
In Elasticsearch, data is usually stored in Documents in JSON format. Then, these documents can be managed by indexes just like SQL databases. To store the data in Elasticsearch, go through the following instructions.
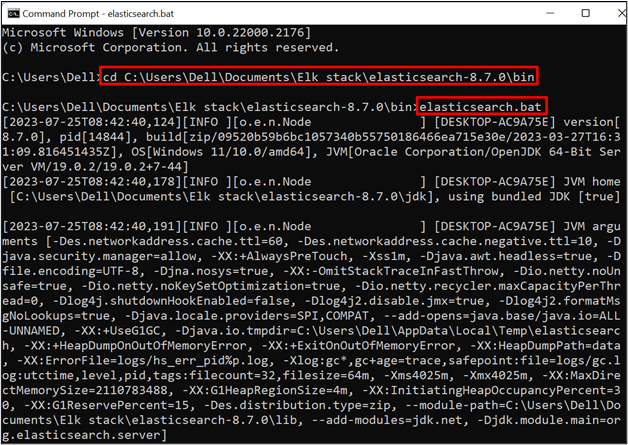
Step 1: Start Elasticsearch Engine
First, run the Elasticsearch database or engine. To do so, navigate to the “bin” folder of Elasticsearch using the “cd” command:
Then, run the batch file of Elasticsearch to start the Elasticsearch engine:
Step 2: Access Elasticsearch From Command Line
When the engine is started, utilize the “curl” command along with the default Elasticsearch URL “localhost:9200” and login credentials to access Elasticsearch from the command line:
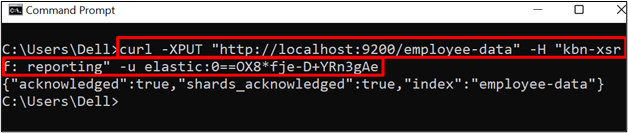
Step 3: Create Index
Next, create a new index using the “PUT” API along with Elasticsearch default URL and index name. For instance, we have created the “employee-data” index:
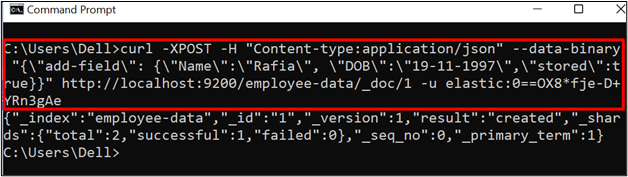
Step 4: Store Data in Elasticsearch Index
Now, store the data using a “POST” API request. It will carry a complete field structure and store the data in the specified location. For demonstration check out the below command:
In the above command:
- “–data-binary” is used to store binary data.
- “add-field” is used to specify the document field. For instance, we are specifying the “Name”, “DOB” and “stored” fields:
- This data will be stored in the “employee-data” index in the “_doc” document format and assigning it an “id” as “1”:
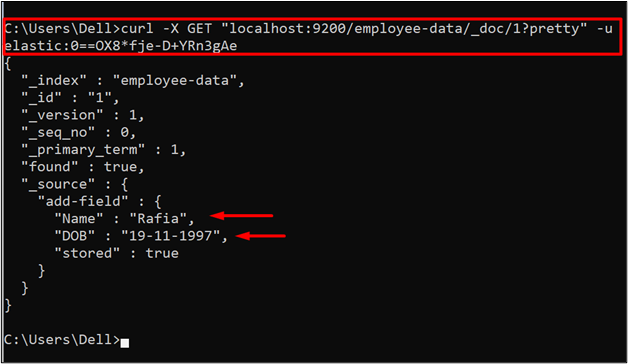
Step 5: Verification
For verification, check whether the data is stored or not. For this purpose, utilize the “GET” API request to access or retrieve the data from Elasticsearch:
How to Store Data in Elasticsearch Using Kibana?
Kibana is a visualization tool for Elasticsearch that represents the data in the form of Pie-chart, histograms, or line graphs. It also makes it easy to execute the APIs and saves the user from using complex command structures as used in the above section.
To use Kibana to store data in Elasticsearch, go through the following steps.
Step 1: Start Kibana
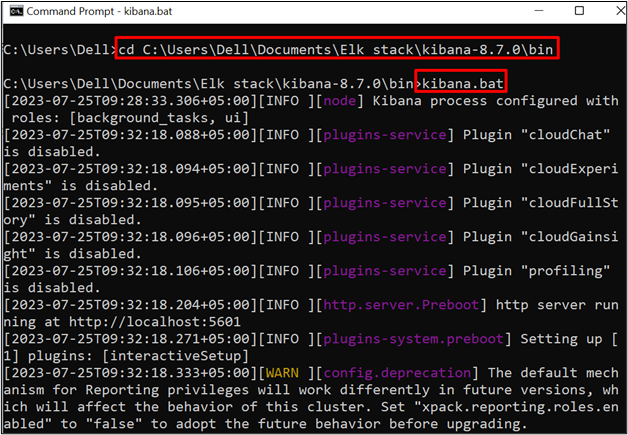
First, run the Kibana on the system by visiting its “bin” directory through the “cd” command:
After that, run the batch file of Kibana using the below command:
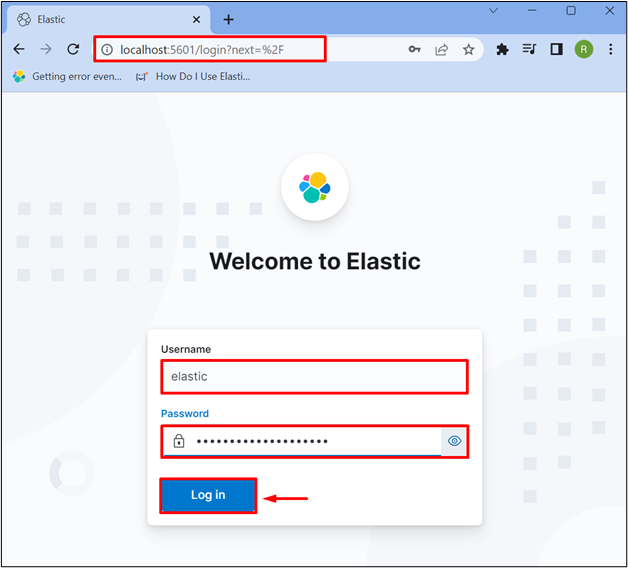
Step 2: Sign in to Kibana
When the Kibana is started properly, navigate to the “localhost:5601” URL to access the Kibana user interface from the browser. After that, provide the Elasticsearch username and password to sign in to Kibana:
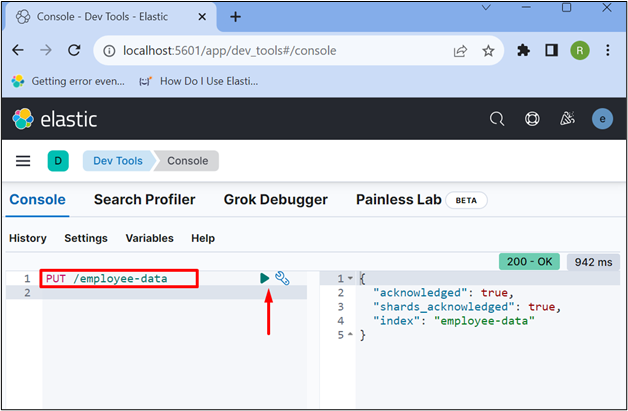
Step 3: Create Index
Create a new index using the “PUT” API request along with the index name:
The output shows that we have successfully created the “employee-data” index:
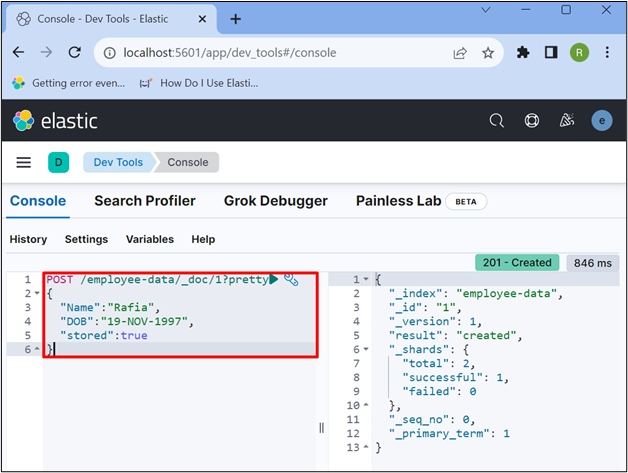
Step 4: Insert Data in Document
Utilize the “POST” API to store the data in the newly created index. Also, specify the data in JSON format as shown below:
{
"Name":"Rafia",
"DOB":"19-NOV-1997",
"stored":true
}
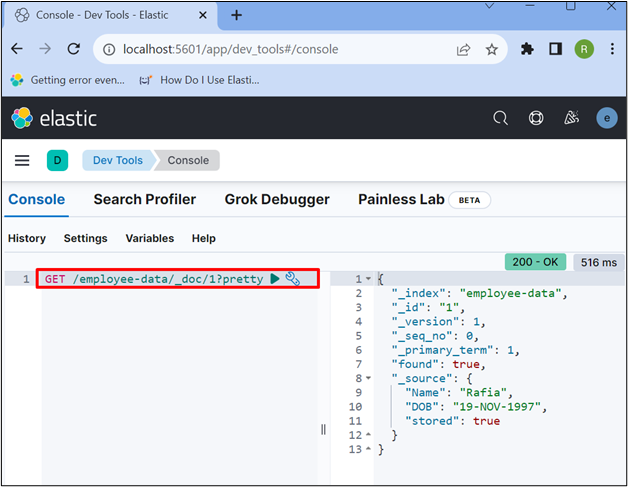
Step 5: Verification
For verification, retrieve the data from the “employee-data” index using the “GET” API:
The below output indicates that we have successfully stored and accessed the data in Elasticsearch:
That is all about storing the data in Elasticsearch.
Conclusion
To store the data in Elasticsearch, first, start the Elasticsearch database. After that, create a new index using the “PUT” API request along with the index name. After that, store the data with the help of the “POST” API. It will carry a complete field structure, data, and the specified location where data is going to store. In this blog, we have demonstrated how to store data in Elasticsearch.
Source: linuxhint.com