How to Set Up a 5V Relay on the Arduino?
How Does Relay Work?
A relay has two configurations that are Normally Open and Normally Closed. The usage of configuration depends upon what type of operation you want to perform
Normally Open (NO) Configuration
Normally open configuration is used when you want to activate the relay, close the switch and complete the circuit at a HIGH signal. In this state, current flows from the COM terminal to the NO terminal. As soon as the relay receives a LOW signal, the relay turns OFF and the circuit is open.
Normally Closed (NO) Configuration
It is opposite to the Normally Open (NO) Configuration. Normally Closed configuration is used when you want to activate the relay, close the switch and complete the circuit at the LOW signal. In this state, current flows from the COM terminal to the NC terminal. As soon as the relay receives a LOW signal, the relay turns OFF and the circuit is open.
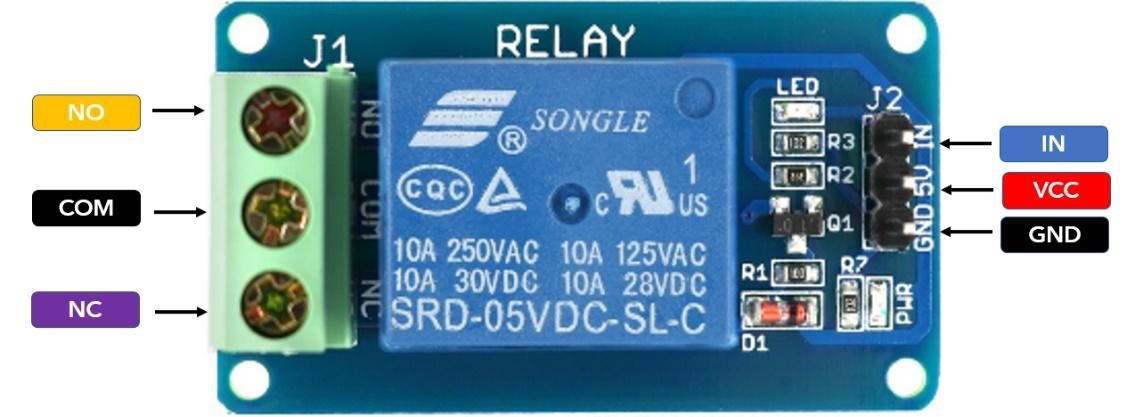
Pin Configuration of Relay
A relay has two sets of pins. One set is of input pins and the other set is of output pins.
Input Pins
- VCC: It is used to give DC supply to relay
- GND: It is a ground terminal
- IN or S: It is used to receive signals from Arduino
Output Pins
- COM: It is the common pin used in normally open as well as normally closed configurations.
- NO: It is used for normally open states.
- NC: It is used for normally closed states.
How to Set up a 5V Relay in Arduino?
To set up a 5V relay in Arduino, you need to fulfill software and hardware requirements.
Software Requirements:
- Arduino IDE
Hardware Requirements:
- Arduino Board
- 5V Relay Module
- Buzzer
- Breadboard
- Connecting Wires
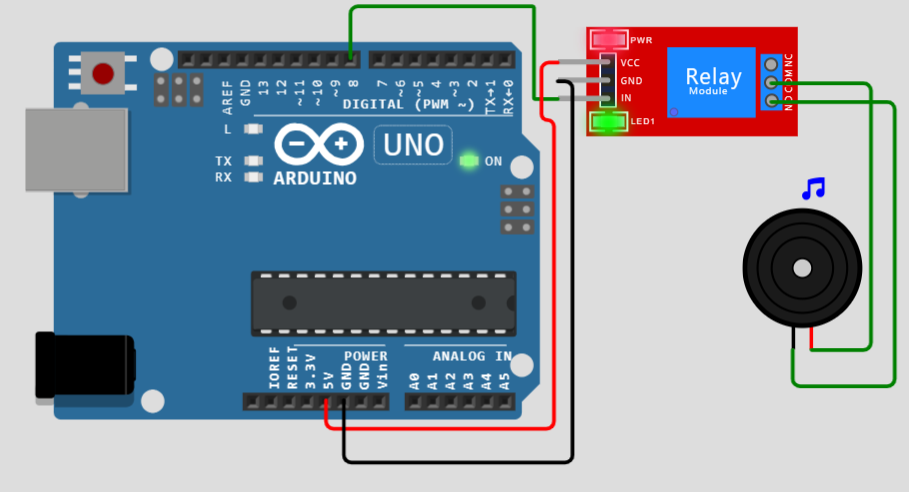
Circuit Diagram
Make connections according to the given circuit diagram:
1. Connect VCC or 5V relay module to the pin of Arduino that is marked as 5V.
2. Connect the GND pin of the relay module to the pin of the Arduino that is marked GND.
3. Connect the Input or Signal pin of the relay module to pin 8 or the Arduino board.
4. Connect a buzzer between the COM and NO terminals of the 5V relay module.
Once you have made the connections as explained above, now you can feed the given code to the Arduino and then run the circuit.
void setup() {
// Set RelayPin as an output pin
pinMode(RelayPin, OUTPUT);
}
void loop() {
// Let’s turn on the relay…
digitalWrite(RelayPin, LOW);
delay(10000);
// Let’s turn off the relay…
digitalWrite(RelayPin, HIGH);
delay(10000);
}
Now, when you run your circuit, the relay will turn the buzzer ON and the buzzer will remain ON for ten seconds and then will remain OFF for ten seconds.
If you want to know other methods of setting up a 5V relay, see the following articles:
- Relay with ESP32 Using Arduino IDE
- What is Arduino Relay
- How to Interface Relay Module with Arduino UNO
Conclusion
A relay can be used to control different appliances. A 5V relay module can easily be set up in Arduino using simple hardware and software. By setting it up with an Arduino, it becomes easy to switch the relay ON or OFF through a simple code. It helps to automate the functioning of the relay.
Source: linuxhint.com