How to Set Static IP Address on Debian 12
Debian 12 Bookworm is the latest stable version of the Debian system that was introduced on 13 July 2023. Like other Linux operating systems, Debian 12 gets an IP address once you connect the system to the Internet. However, by default, the IP address on the Debian system is dynamic and keeps changing every time you go online. This can be annoying, especially for the servers, games, or devices you control remotely. To solve this issue, there is a trick to get a static IP address that will provide you with a reliable IP address, easy access to machines and remote control of the devices from anywhere.
In this guide, you will find:
How to Set Static IP Address on Debian 12
- How to Set Static IP Address on Debian 12 from Terminal
- How to Set Static IP Address on Debian 12 from GUI
How to Set Static IP Address on Debian 12
You can set static IP address on Debian 12 from:
How to Set Static IP Address on Debian 12 from Terminal
You can set static IP address on Debian 12 from terminal through:
How to Set Static IP Address on Debian 12 from Terminal Through an Interfaces File
By default, Debian 12 includes an interfaces file in the network directory that you can use to configure your network. You can open this file and add your network details to change your network settings on your system.
To set static IP address on Debian 12 from terminal through interfaces file, you can use the following steps:
Step 1: Check Current IP Address is Static or Dynamic
Before moving towards setting the static IP address on Debian 12, you should check whether the current IP address of your system is static or dynamic, for that, use:

The presence of dhcp in the above command’s output ensures that the IP address of the system is dynamic.
Step 2: Create a Backup of Interfaces File
It is better to create a backup of your network interfaces file through the below-given command since it will help you revert the changes back to the default one in case of an error:

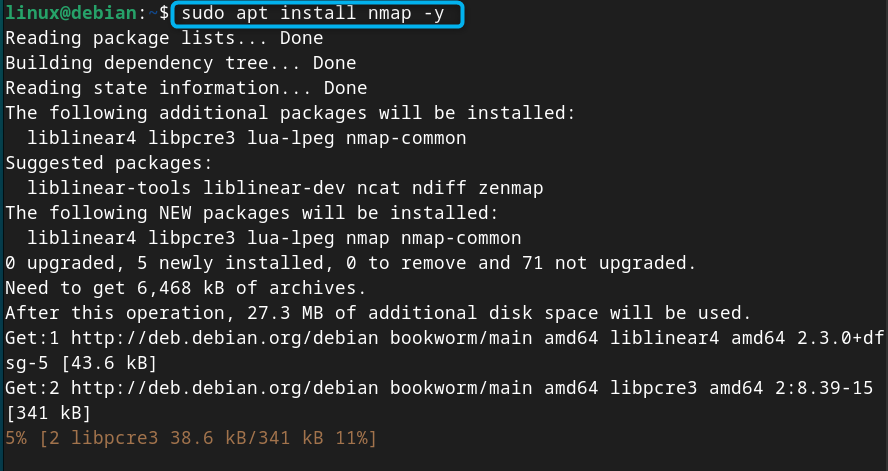
Step 3: Install nmap on Debian 12
You can also install nmap on your Debian system that will help you in retrieving the list of IP addresses that you can use on your system. It is useful for the beginners who are not sure which IP address they have to use.
You can install nmap on Debian 12 from the following command:
Step 4: Check List of IP Address on Debian 12
Now to check the list of IP addresses on Debian 12, you can use the nmap command followed by your network subnet which is 192.168.18.* in my case:
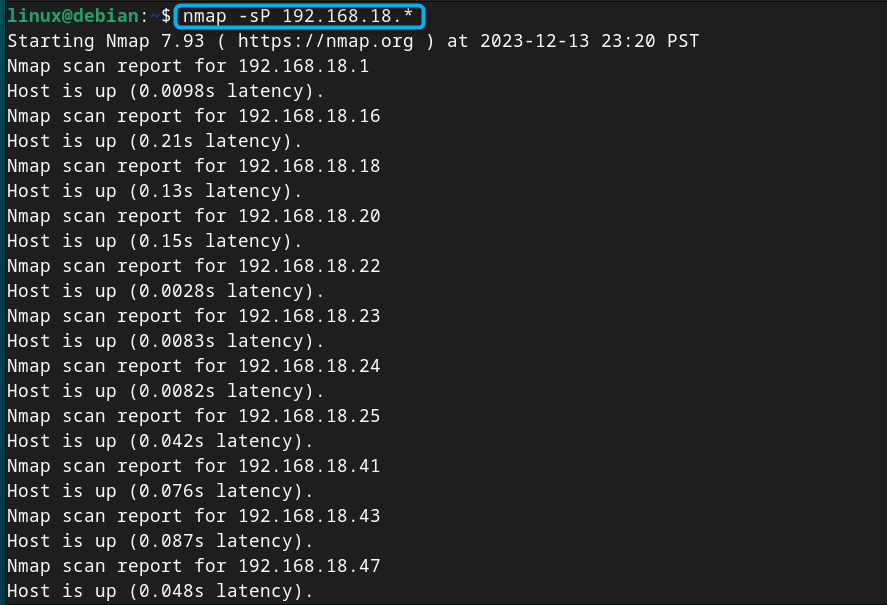
From the above list, you can pick any IP address as your static IP address on Debian.
Step 5: Add Network Interface Details
Now open the network interfaces file on Debian using the following command:
Add the following lines by replacing the IP address and default gateway according to your choice, and keeping the netmask and dns-nameservers same:
iface enp0s3 inet static
address 192.168.18.111 # Enter your desired static IP address
netmask 255.255.255.0 # Subnet mask
gateway 192.168.18.111 # Default gateway
dns-nameservers 8.8.4.4 8.8.8.8 # DNS server(s)
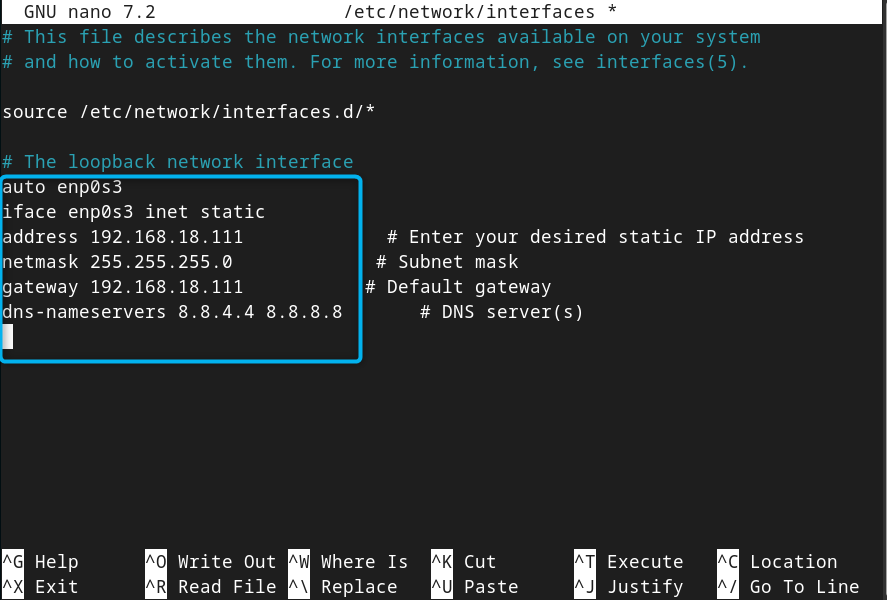
Then save this file using CTRL+X, add Y and press Enter.
Note: We keep the default gateway same as the IP address because our device is directly connected to another network without a router and a NAT device. You can change it to any value, but the first three subnets should remain the same. Further, if you have different IP address, you should set different netmask for each IP address so that they may be able to communicate.
You can also check your device name using:

Step 6: Restart Network Manager Service on Debian 12
After adding the network settings, restart the network manager service on Debian 12 using the following command:
Step 7: Confirm Current IP Address is Static
After reloading the changes, you can confirm whether the current assign IP address is static on Debian, this can be done from the following command:

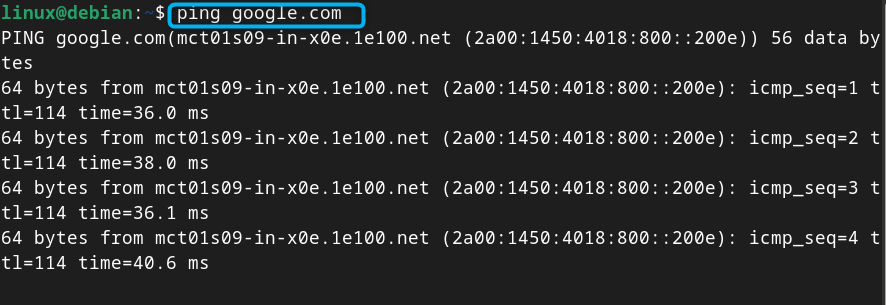
Step 8: Check Internet Connectivity on Debian
To check Internet is accessible on your device after the changes, you can use the ping command:
How to Set Static IP Address on Debian 12 from Terminal Through nmcli Command Line Utility
nmcli is a network manager command line utility preinstalled on Linux systems including Debian 12. You can use this utility and set the static IP address on your Debian system using the following steps:
Step 1: Check the Device
Before using the nmcli command for setting up static IP address on Debian 12, you should use the below-given command to check the device name on your system:

Step 2: Create a Static Connection on Debian 12
Now, you can use the following command with the connection name and device to create a static connection on Debian 12:

Note: Don’t forget to replace the device name enp0s3, IP address and default gateway as they could be different in your case.
Step 3: Add DNS IP to Static IP Connection
You should also add DNS IP to your static IP connection on Debian 12. It allows the device to resolve domain name and connect to the Internet, this can be done from the following command:
Step 4: Activate the Static IP Connection
After creating the static IP connection, use the following command to activate it on Debian:

Step 5: Confirm Current IP Address is Static
You can then use the following command to confirm the IP you set on Debian through nmcli method is static, this can be done using:

Note: Don’t forget to use the ping command to check the Internet connectivity on Debian:
How to Delete Connection on Debian 12 from Terminal Through nmcli Command Line Utility
If you have configured your static IP connection in a wrong way, you can simply delete the connection from the nmcli command with the connection name:

How to Set Static IP Address on Debian 12 from GUI
You can also open the Network settings from the GUI on Debian 12 and set static IP address, this can be done using the following steps:
Step 1: Open Settings on Debian 12
First, open Settings on Debian by selecting the Ethernet icon and clicking the Settings icon:
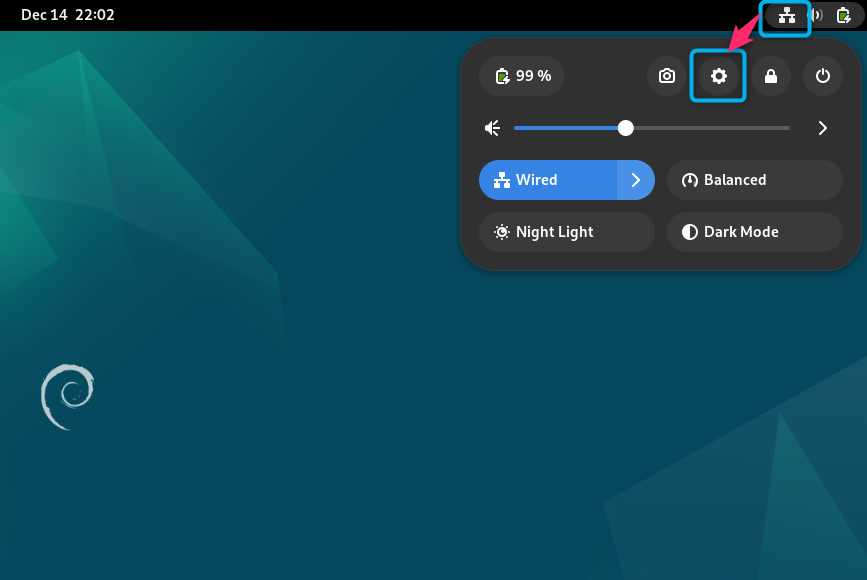
Note: You can also open Settings on Debian 12 from the application search menu.
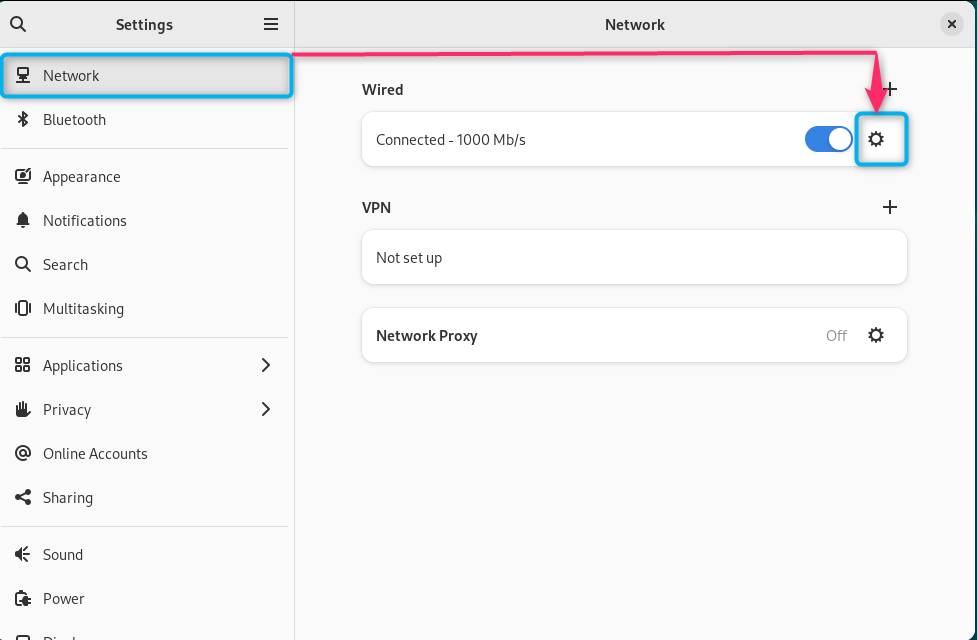
Step 2: Open Network Settings on Debian 12
Click on the Settings icon for Wired network:
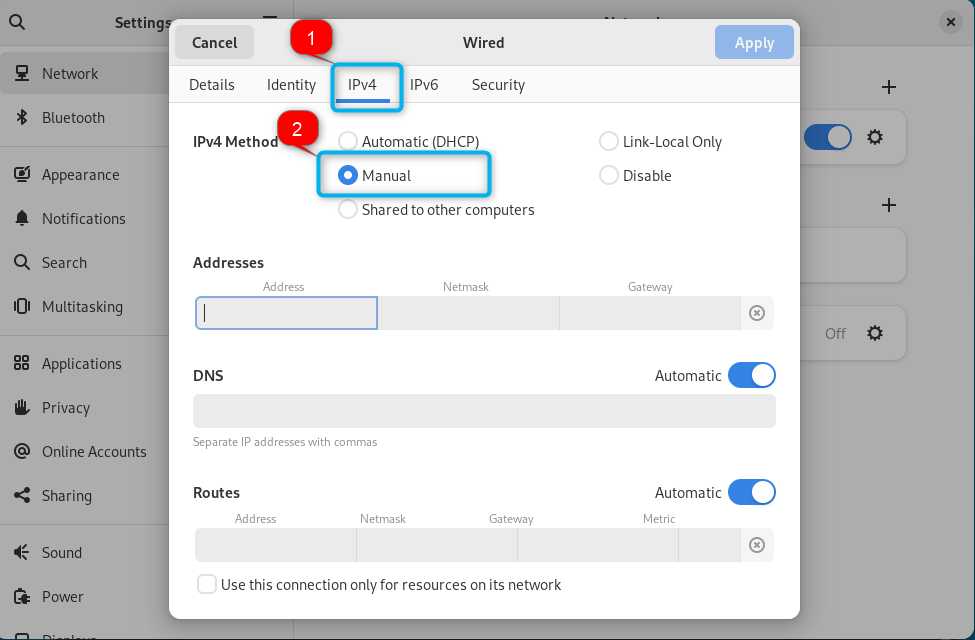
Step 3: Enable Manual Settings
Now, navigate to IPv4 tab and enable the manual settings by check boxing the Manual option:
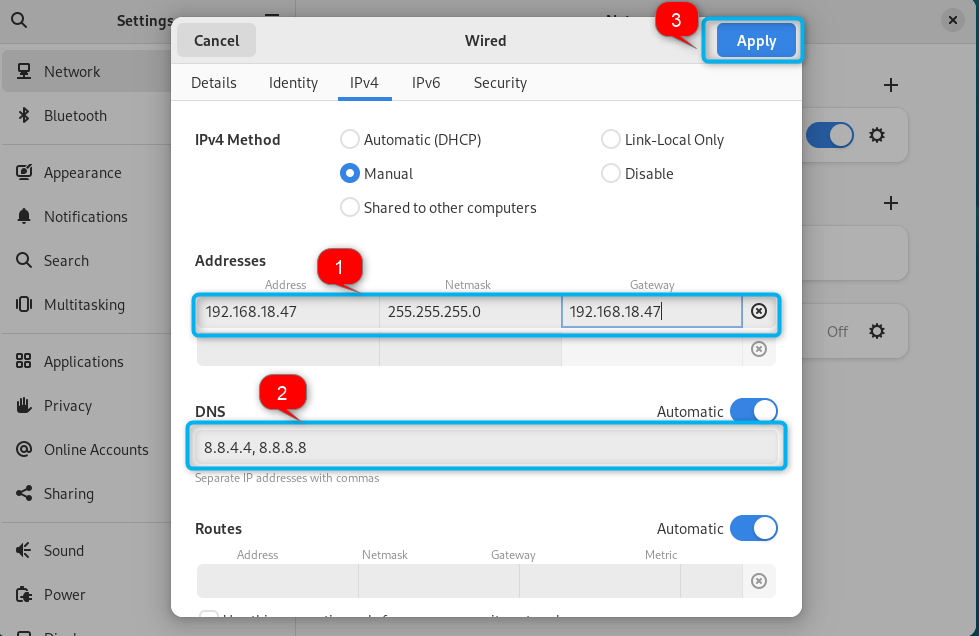
Step 4: Set Static IP Address on Debian
You can now fill in the boxes according to your choice, like adding the static IP address in the Address box, Netmask, gateway and default DNS. Once done, choose the Apply button to make changes to the network configuration:
Step 5: Reload the Network
You should reload the network by using the toggle button. To do this, move towards the left to first disable the connection and then move it in the right direction to enable it again:

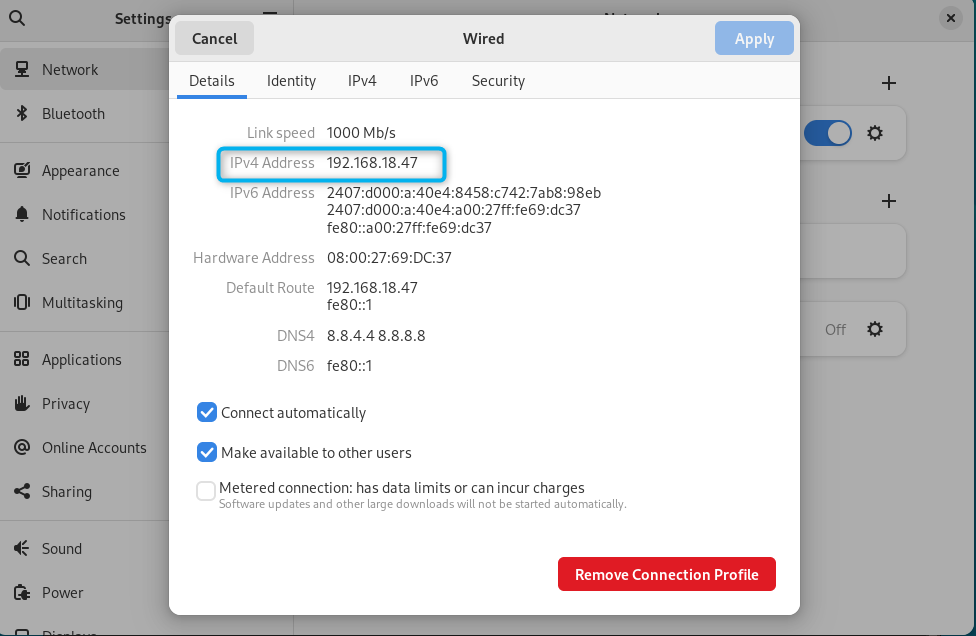
Step 6: Verify the Connection
You can verify whether the IP address is successfully changed on Debian by going into the network settings again:
Note: Again, don’t forget to use the ping command to check the Internet connectivity:

You can also remove the connection any time by using the Remove Connection Profile button.
Conclusion
Setting a static IP address on Debian 12 is a useful task that can be done either from terminal or GUI. If you are using a terminal, you can set a static IP address on Debian from an interfaces file or using the nmcli command line utility. From the GUI, you can set a static IP address by the system Settings in the Network section. The complete step-by-step guide for both methods (terminal and GUI) is discussed in the above sections of this guide. Performing these methods will help you set a permanent IP address for your Debian system.
Source: linuxhint.com