How to Set Priority in Task Manager on Windows (2022)
In our routine computer usage, some apps or games tend to work slowly because they need more resources to work properly. Most computers fail to provide the priority levels to those apps or processes, leading to permanent lag. More specifically, the priority levels are set to boost the performance of the processes or apps with the help of the task manager.
In this manual, we will discover:
So, let’s start!
What is a Process Priority?
Process priority is a term assigned to a process that helps Windows to understand the importance of the processes according to their level. Then, Windows prioritizes the most important process after evaluation.
Process Priority Levels
There exist six types of priority levels that can be assigned to the processes. Here is the description of all of them:
-
- Low: Low priority processes are given resources at the end at the time of resource allocation.
- Normal: At this level, most of the applications normally run. It can be called the average level, where most apps and processes tend to operate properly.
- Below normal: As its name suggests, it is given less priority and fewer resources as compared to processes having normal priority levels.
- Above normal: This level slightly uplifts the performance of the processes as it is privileged to utilize more resources than normal priority processes.
- High: It ensures that all system processes get enough resources to work fluently and flawlessly. This level of priority process is not recommended for the user applications as they slow down the system performance.
- Realtime: This process priority level is dedicated to the hardware processes, ensuring the running of hardware processes at any cost. If you run the user applications with this priority level, then there is a high chance that it can damage your computer hardware.
Now, let’s check out the procedure of setting priority levels with the help of the Task Manager.
Setting Priority in Windows Task Manager
The priority of a certain process can be set to any level using the Task Manager, and the below-provided instructions will help you do that.
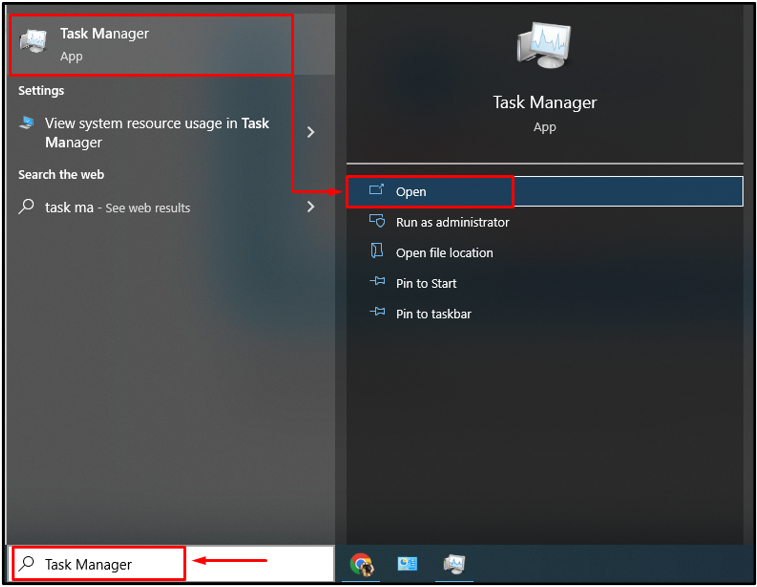
Step 1: Launch Task Manager
First of all, launch “Task Manager” from the “Start menu”:
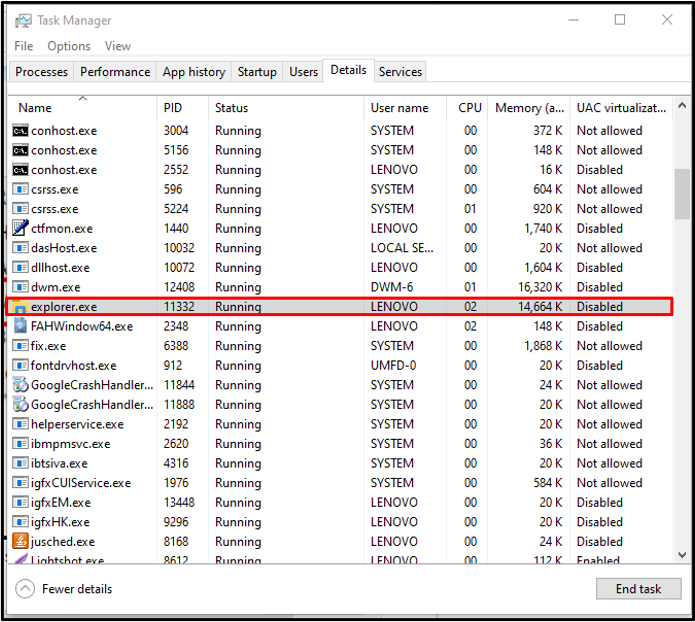
Step 2: Navigate to the Details Tab
Move to the “Details” section:

Step 3: Set Priority
In order to set priority, select any process of your choice. In our case, we have selected “explorer.exe”:
Then, right-click on the selected process, hover the cursor over the “Set priority” option, and select “Normal” from the drop-down menu. Here, you can set the process priority according to your requirements:
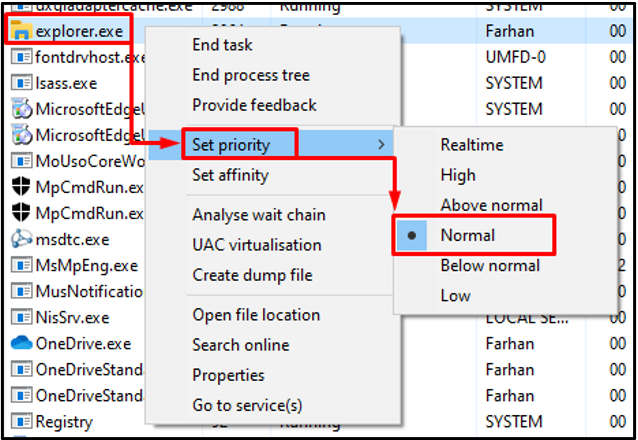
As you can see, we have successfully set the priority of the selected process as “Normal”.
Conclusion
There are six levels of process priority in the task manager. Each level defines the degree of importance of each process according to which the system allocates the resources. The priority level can be set by moving to the Details section in the task manager window. Then, right-click on any of the processes and select the level of priority of the process. This manual has provided various steps to set the priority level on Windows.
Source: linuxhint.com